LeNet网络pytorch实现(基于CIFAR10数据集)
LeNet网络anaconda+pycharm环境pytorch程序(基于CIFAR10数据集)
创建模型
卷积操作图像尺寸变化
卷积过程中出现越界线性的处理:
使用padding对图像的像素矩阵补零,凑够维度
矩阵卷积操作之后的尺寸由输入图像特征矩阵的大小W*H、卷积核的大小F*F、步长S和padding的像素数P 决定
卷积后的特征矩阵的高: (H-F+2P)/S+1 (补零操作如果是左右对称进行的,则是2P,如果只是一边则加P)
卷积后的特征矩阵的宽: (W-F+2P)/S+1
特征矩阵的channel = 卷积核的个数
池化操作图像尺寸变化
池化层:
目的:对特征图进行稀疏处理,减少数据运算量
eg: MaxPooling下采样层 池化核
AveragePooling下采样层
相较于卷积层,池化层只是在原有的数据上进行计算
池化操作 只改变特征矩阵的大小(宽度和高度),不改变深度channel
输出图像宽 = (输入图像宽 - 池化核大小)/步距S +1
输出图像高 = (输入图像高 - 池化核大小)/步距S +1
一般池化核的大小poolsize和步距stride是相同的
各层参数设置说明
卷积层1:
参数:in_channel,out_channel,kernel_size
CIFAR10中图像为大小32*32 的RGB图像,则in channel = 3 ,out channel = 卷积核个数16个,卷积核尺寸为5*5 kernel_size = 5
输出特征矩阵大小: 16,28,28
W,H:(32-5+0)/1+1 = 28 padding默认值:0 stride默认值1池化层1:
参数:kernel_size,stride
2*2的最大下采样池化核,步距为2
输出特征矩阵大小:16,14,14
W,H:(28-2)/2+1 = 14卷积层2:
上一层输出channel = 16,则in channel = 16,32个5*5卷积核,则out channel = 32
输出特征矩阵大小:32,10,10
W,H:(14-5+0)/1+1 = 10池化层2:
参数:kernel_size,stride
2*2的最大下采样池化核,步距为2
输出特征矩阵大小:32,5,5
W,H:(10-2)/2+1 = 5
全连接层:
将数据展平:一个图像的特征矩阵至此是32*5*5,将其展平后作为一条数据 x
图像共10个类别,则最后的输出层有10个节点
from torch import nn
import torch.nn.functional as F

class LeNet(nn.Module):
    def __init__(self):
        #在Python 3中,super(Square,self)调用等同于无参数的super()调用。 第一个参数指的是子类Square,而第二个参数指的是Square对象
        super().__init__()
        #CIFAR10输入图像C,W,H:3*32*32
        self.conv1 = nn.Conv2d(3,16,5) #16个5*5卷积核, 输出结果的channel = 16       W,H:(32-5+0)/1+1 = 28  padding默认值:0 stride默认值1
        self.maxpool1 = nn.MaxPool2d(2,2)#2*2,步距2,池化层不改变channel             W,H:(28-2)/2+1 = 14
        self.conv2 = nn.Conv2d(16, 32, 5)  # 32个5*5卷积核.输出结果的channel = 32   W,H:(14-5+0)/1+1 = 10
        self.maxpool2 = nn.MaxPool2d(2,2)  # 2*2,步距2                           W,H:(10-2)/2+1 = 5
        self.fc1 = nn.Linear(32*5*5,120)  #32*5*5是输入数据的个数,是将特征矩阵从channel开始展平之后的数据个数,120是全连接层节点个数
        self.fc2 = nn.Linear(120,84)      #120 和84 可修改,32*5*5和10是由分类数据决定的
        self.fc3 = nn.Linear(84,10) #输出结果有10个类别

    #nn.ReLU与F.relu的区别:
	#nn.ReLU作为一个层结构,必须添加到nn.Module容器中才能使用,即添加到__init__()中才能在后面的forward()中调用
	#而F.relu则可作为一个函数直接调用
    def forward(self,x):#x输入数据
        x = F.relu(self.conv1(x))
        x = self.maxpool1(x)
        x = F.relu(self.conv2(x))
        x = self.maxpool2(x)
        #数据展平     output:32*5*5将数据展平,变成1维的数据
        x = x.view(-1,32*5*5) #一个图像的特征矩阵至此是32*5*5,将其展平后作为一条数据
        #全连接层
        x = F.relu(self.fc1(x))
        x = F.relu(self.fc2(x))
        x = self.fc3(x)
        return x
训练模型
加载模型数据
torchvision.datasets中包含了以下数据集:
MNIST、COCO(用于图像标注和目标检测)(Captioning and Detection) LSUN Classification、ImageFolder、Imagenet-12、 CIFAR10 and CIFAR100、STL10、SVHN、PhotoTour
所有数据集都是torch.utils.data.Dataset的子类,它们具有getitem和len实现方法
torchvision.datasets.CIFAR10()参数设置:
root (string): Root directory of dataset where directory
``cifar-10-batches-py`` exists or will be saved to if download is set to True.
train (bool, optional): If True, creates dataset from training set, otherwise
creates from test set.
transform (callable, optional): A function/transform that takes in an PIL image
and returns a transformed version. E.g, ``transforms.RandomCrop``
target_transform (callable, optional): A function/transform that takes in the
target and transforms it.
download (bool, optional): If true, downloads the dataset from the internet and
puts it in root directory. If dataset is already downloaded, it is not
downloaded again.
数据处理
torchvision.transforms中包含大量图像处理操作,使用的时候需要关注一下输入和输出,不同的方法对输入参数的类型的要求会不同
Normalize() 归一化:如果输入图像像素是0~1范围,对(输入图像-0.5)/0.5=输入图像*2-1,即设置参数均值为0.5,方差为0.5,可使输出图像像素在-1~1范围
ToTensor() 图像转换为tensor类型
Compose() 将几个变换组合在一起:参数是transforms类型的列表,即要按顺序组合的操作
验证集上计算准确率
模型对每一个类别给出一个可能性,找出可能性最大的类别为预测结果
由于将验证集代入模型output的维度是[batch,10],10所在的维度才是图像类别,所以要在维度dim=1上求最大值
torch.max()会返回最大值和最大值的位置索引,由于只需要最大值的索引,取[1]即可
import torchvision
from torch.utils.data import DataLoader
import torchvision.transforms as transforms
import torch.optim as optim
import torch

#创建模型
model = LeNet()
#加载数据
'''
torchvision.datasets中包含了以下数据集:
    MNIST、COCO(用于图像标注和目标检测)(Captioning and Detection)
    LSUN Classification、ImageFolder、Imagenet-12、
    CIFAR10 and CIFAR100、STL10、SVHN、PhotoTour
所有数据集都是torch.utils.data.Dataset的子类
它们具有getitem和len实现方法
'''
transform = transforms.Compose(
    [
        transforms.ToTensor(),
        transforms.Normalize( (0.5,0.5,0.5),(0.5,0.5,0.5) ) #对图像的3个channel的均值方差都设置为0.5
    ]
)
#参数是transforms类型的列表
#如果输入图像像素是0~1范围,对(输入图像-0.5)/0.5=输入图像*2-1,即设置参数均值为0.5,方差为0.5,可使输出图像像素在-1~1范围
'''
    Args:
        root (string): Root directory of dataset where directory
            ``cifar-10-batches-py`` exists or will be saved to if download is set to True.
        train (bool, optional): If True, creates dataset from training set, otherwise
            creates from test set.
        transform (callable, optional): A function/transform that takes in an PIL image
            and returns a transformed version. E.g, ``transforms.RandomCrop``
        target_transform (callable, optional): A function/transform that takes in the
            target and transforms it.
        download (bool, optional): If true, downloads the dataset from the internet and
            puts it in root directory. If dataset is already downloaded, it is not
            downloaded again.
'''
train_set = torchvision.datasets.CIFAR10(root='./data', train=True,
                                         download=False, transform=transform)
train_loader = torch.utils.data.DataLoader(train_set, batch_size=36,
                                           shuffle=True, num_workers=0)
#验证集
val_set = torchvision.datasets.CIFAR10(root='./data', train=False,download=True, transform=transform)
val_loader = torch.utils.data.DataLoader(val_set, batch_size=5000,shuffle=False, num_workers=0)
#定义迭代器
val_data_iter = iter(val_loader)
val_image, val_label = val_data_iter.next() #.next()返回下一个项目
classes = ('plane', 'car', 'bird', 'cat',
            'deer', 'dog', 'frog', 'horse', 'ship', 'truck')
#训练
loss_fn = nn.CrossEntropyLoss()
opt = optim.Adam(model.parameters(),lr = 0.001)
loss_sum = 0.0
for epoch in range(5):
    # enumerate()用于遍历一个集合对象,在遍历的同时获取当前元素的索引位置
    for step, data in enumerate(train_loader, start=0):
        # 将数据分离成输入和标签
        input,label = data
        #前向传播
        output = model(input)
        #清空梯度
        opt.zero_grad()
        #计算损失
        loss = loss_fn(output,label)
        loss.backward()
        #优化
        opt.step()

        #打印此时模型在训练集上的准确率
        loss_sum += loss.item()
        if step %500 ==499:
            with torch.no_grad():
                outputs = model(val_image)
                # 模型对每一个类别给出一个可能性,找出可能性最大的类别为预测结果
                # 由于outputs的维度是[batch,10],10所在的维度才是图像类别,所以要在维度dim=1上求最大值
                # torch.max()会返回最大值和最大值的位置索引,由于只需要最大值的索引,取[1]即可
                y_pred = torch.max(outputs,dim = 1)[1]
                #torch.eq()判断是否相等函数
                acc =torch.eq(y_pred,val_label).sum().item() / val_label.size(0)
                print('[%d, %5d] train_loss: %.3f  test_accuracy: %.3f' %
                      (epoch + 1, step + 1, loss_sum / 500, acc))
                loss_sum = 0.0

print('Finished Training')
save_path = './Lenet.pth'
torch.save(model.state_dict(), save_path)#model.state_dict():Returns a dictionary containing a whole state of the module.
预测
对指定图像进行预测,输出分类结果
import torch
import torchvision.transforms as transforms
from PIL import Image

from main import LeNet

#预测脚本

#对图像预处理,转换成tensor类型的图像
transform = transforms.Compose(
	[transforms.Resize((32, 32)),
	 transforms.ToTensor(),
	 transforms.Normalize((0.5, 0.5, 0.5), (0.5, 0.5, 0.5))])
#类别标签
classes = ('plane', 'car', 'bird', 'cat',
		   'deer', 'dog', 'frog', 'horse', 'ship', 'truck')
#模型
net = LeNet()
net.load_state_dict(torch.load('Lenet.pth'))
#载入图像
im = Image.open('1.jpeg')
# pytorch tensor中图像的格式是[batch,channel,height,weight]
im = transform(im)  # [C, H, W] 预处理
im = torch.unsqueeze(im, dim=0)  # [N, C, H, W]
#前向传播
with torch.no_grad():
	outputs = net(im)
	predict = torch.max(outputs, dim=1)[1].data.numpy()
	#或predict = torch.softmax(outputs,dim = 1)
print(classes[int(predict)])#输出预测结果
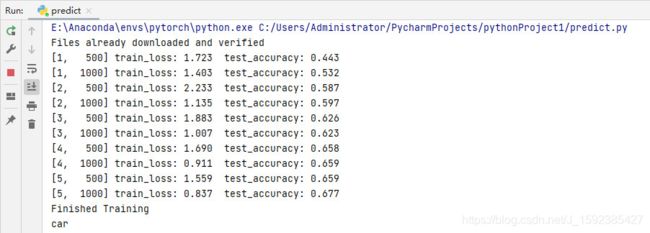
运行结果:
预测图像:
