gazebo: ROS Control的仿真教程
gazebo + ROS control
-
- 1. 预备知识
- 2. 数据流
- 3. 实现动态避障的环境构建
本文主要介绍如何为仿真机器人做控制器的仿真。通过仿真控制器,控制机器人的对应关节
1. 预备知识
关于gazebo中机器人的仿真:link
关于ros_control的了解:link
2. 数据流
如上图所示,ros提供的ros_control接口,通过与硬件接口RobotHW交互,实现对硬件的控制。
在gazebo中使用的时候,主要就是左侧部分的仿真硬件。
与右侧实物硬件对比,可得我们在仿真的时候,也要仿真出来一个transmission传动系统,也要在硬件层面(urdf文件)声明使用gazebo_ros_control来进行控制。
依据上述两点,我们来看如何在gazebo仿真中使用具体的ros_control
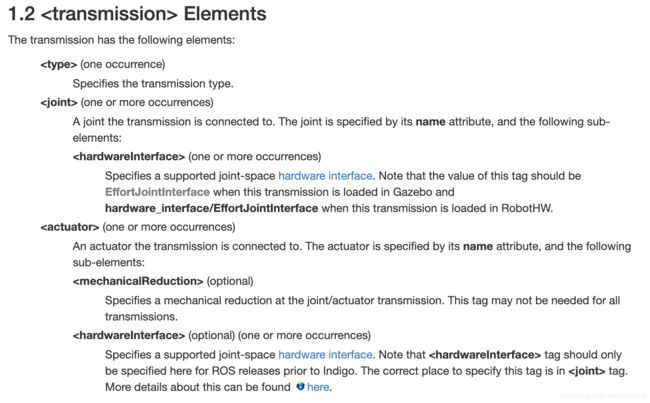
第一部分:添加传动装置
使用标签, 将标签贴在urdf中,并指明传动装置对应的joint
举例:
<transmission name="simple_trans">
  <type>transmission_interface/SimpleTransmissiontype>
  <joint name="foo_joint">
    <hardwareInterface>EffortJointInterfacehardwareInterface>
  joint>
  <actuator name="foo_motor">
    <mechanicalReduction>50mechanicalReduction>
    <hardwareInterface>EffortJointInterfacehardwareInterface>
  actuator>
transmission>
具体标签的含义见link
其中需要指定的hadrwareInterface具体含义如下
第二部分:添加gazebo_ros_control插件
首先需要在urdf中声明:
<gazebo>
  <plugin name="gazebo_ros_control" filename="libgazebo_ros_control.so">
    <robotNamespace>/robotNamespace>
  plugin>
gazebo>
gazebo需要上述这样的声明,来明确需要载入gazebo_ros_control插件,进而能够解析transmission中指定的硬件接口,做好与ros_control对接的准备。
截至目前为止,硬件仿真部分都已经准备好了。等待与上层ros_control进行数据交互。
第三部分:launch文件编写与yaml参数配置文件
先看个例子:
    <rosparam command="load"
              file="$(find learn_model)/config/joints.yaml"
              ns="r2d2_joint_state_controller" />
    <rosparam command="load"
              file="$(find learn_model)/config/head.yaml"
              ns="r2d2_head_controller" />
    <rosparam command="load"
              file="$(find learn_model)/config/gripper.yaml"
              ns="r2d2_gripper_controller"/>
    <rosparam command="load"
              file="$(find learn_model)/config/wheel.yaml"
              ns="r2d2_diff_drive_controller" />


    <node name="r2d2_controller_spawner" pkg="controller_manager" type="spawner"
          args="r2d2_joint_state_controller
          r2d2_head_controller
          r2d2_gripper_controller
          r2d2_diff_drive_controller
          --shutdown-timeout 3"/>
这个例子是ros官方urdf教程link中的r2d2机器人对应的撰写方法。
其中第一部分r2d2_joint_state_controller是用来启动joint_state_controller,需要通过配置参数指定发布类型。
其作用是与控制器形成闭环,同时可以提供给robot_state_publisher需要的joint_state最新信息。

其具体的yaml参数文件如下:
type: "joint_state_controller/JointStateController"
publish_rate: 50
剩下的三个控制器:
- r2d2_head_controller:关节位置控制器
type: "position_controllers/JointPositionController"
joint: head_swivel
- r2d2_gripper_controller:关节位置组控制器
type: "position_controllers/JointGroupPositionController"
joints:
  - gripper_extension
  - left_gripper_joint
  - right_gripper_joint
- r2d2_diff_drive_controller:差分控制器
type: "diff_drive_controller/DiffDriveController"
publish_rate: 50

left_wheel: ['left_front_wheel_joint', 'left_back_wheel_joint']
right_wheel: ['right_front_wheel_joint', 'right_back_wheel_joint']

wheel_separation: 0.44 # wheel distance

# Odometry covariances for the encoder output of the robot. These values should
# be tuned to your robot's sample odometry data, but these values are a good place
# to start
pose_covariance_diagonal: [0.001, 0.001, 0.001, 0.001, 0.001, 0.03]
twist_covariance_diagonal: [0.001, 0.001, 0.001, 0.001, 0.001, 0.03]

# Top level frame (link) of the robot description
base_frame_id: base_link

# Velocity and acceleration limits for the robot
linear:
  x:
    has_velocity_limits    : true
    max_velocity           : 0.2   # m/s
    has_acceleration_limits: true
    max_acceleration       : 0.6   # m/s^2
angular:
  z:
    has_velocity_limits    : true
    max_velocity           : 2.0   # rad/s
    has_acceleration_limits: true
    max_acceleration       : 6.0   # rad/s^2
最后我们启动之后,查看所有topic可以发现,差分控制器是一种速度控制器,订阅cmd_vel
其他的属于位置控制,需要指定command位置。
如果位置控制器速度太快,我们可以在joint标签下添加
3. 实现动态避障的环境构建
笔者想要在gazebo中构建一个动态环境,来验证动态避障算法的时候,需要实现如下几点。
- 批量建立一些简单的urdf模型
- 给所有的urdf模型设置gazebo_ros_control插件
- 设立一个node节点,按照时间间隔给上述这些模型定时发布位置命令。
- 最好能找个好看的人模型的mesh给urdf模型贴上,这样就看起来就好很多了。
发现gazebo都给实现好了:之间调用就可以,不用折腾了。
https://blog.csdn.net/allenhsu6/article/details/112966600


