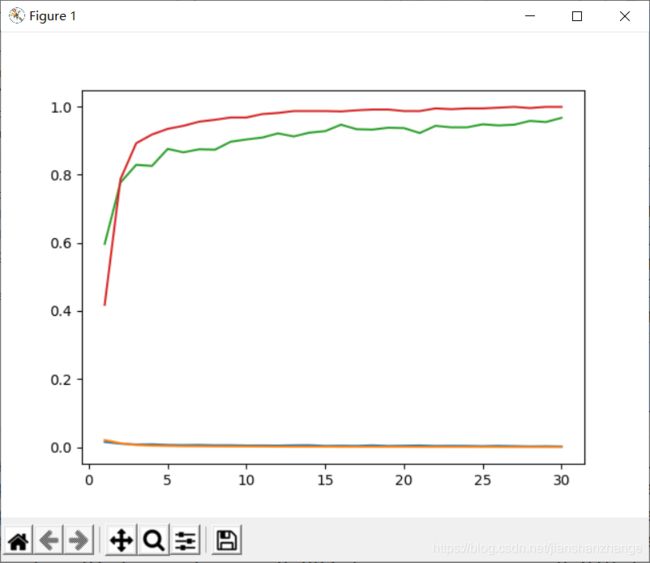
基于pytorch的四种天气分类含Dropout层和BN层
import torch
import torch.nn as nn
import pandas as pd
import numpy as np
import matplotlib.pyplot as plt
import torch.nn.functional as F
import torchvision
import time
import os
import shutil
from torchvision import datasets,transforms
from torch.utils.data import TensorDataset
from torch.utils.data import DataLoader
from sklearn.model_selection import train_test_split

start=time.time()

base_dir = r'D:/pycharmworkspace/ISLR-master/fourweather'
#如果base_dir不是文件目录
if not os.path.isdir(base_dir):
    #就创建base_dir这个目录
    os.mkdir(base_dir)
    #在base_dir目录基础上再建train目录,下同
    train_dir = os.path.join(base_dir,'train')
    test_dir = os.path.join(base_dir, 'test')
    os.mkdir(train_dir)
    os.mkdir(test_dir)

specises=['cloudy','rain','shine','sunrise']
#继续循环创建目录
for train_or_test in ['train','test']:
        for spc in specises:
            exist = os.path.join(base_dir,train_or_test,spc)
            if not os.path.isdir(exist):
                os.mkdir(os.path.join(base_dir,train_or_test,spc))

#图片原始存放目录
image_dir = r'D:/pycharmworkspace/ISLR-master/4w'
#os.listdir(image_dir)会把图片列举出来
#利用enumerate则i为0 img为第一张图片,i为1 img为第二张图片
for i,img in enumerate(os.listdir(image_dir)):
    for spec in specises:
        #字符串判断
        if spec in img:
            s = os.path.join(image_dir,img)
            #4/5数据分到train目录
            if i%5 == 0:
                d = os.path.join(base_dir,'test',spec,img)
            #1/5数据分到test目录
            else:
                d = os.path.join(base_dir, 'train',spec,img)
            #将数据从s路径拷贝到d路径
            shutil.copy(s,d)
#分割线----------------------以上是数据移动的内容---------------------------

#将所有变换都以列表形式放在Compose里面
transformation = transforms.Compose([
    #将图片切割为96*96的大小
    transforms.Resize((96,96)),
    #将读取的图片或者其他类型的数据转换成Tensor
    #将Tensor转换到0到1之间
    #会将channel放在第一维度上
    transforms.ToTensor(),
    #将Tensor转换到-1到1之间
    transforms.Normalize(mean=[0.5,0.5,0.5],std=[0.5,0.5,0.5])
])
#分割线----------------------以上是数据设置的内容---------------------------

#ImageFolder可以从分类的文件夹中创建dataset数据
#比如下雨的图片在一个文件夹 多云的图片在一个文件夹等
train_ds = torchvision.datasets.ImageFolder(
    #即train_dir
    os.path.join(base_dir,'train'),
    transform=transformation
)
test_ds = torchvision.datasets.ImageFolder(
    #即test_dir
    os.path.join(base_dir, 'test'),
    transform=transformation
)
#常量大写
BATCHSIZE=64
train_dl = torch.utils.data.DataLoader(
    train_ds,
    batch_size=BATCHSIZE,
    shuffle=True,
)
test_dl = torch.utils.data.DataLoader(
    train_ds,
    batch_size=BATCHSIZE,
)

#通过iter()函数获取这些可迭代对象的迭代器
#对获取的迭代器不断使用next()函数来获取下一条数据
imgs,labels=next(iter(train_dl))
#print(imgs.shape)
##输出的是torch.Size([64, 3, 96, 96]) 64是图片张数 3是通道(图层)即彩色 [···96个数据···] 共96个[]
#在pytorch里面图片的表示形式:[batch,channel,hight,width]

#分割线----------------------以上是数据预处理的内容---------------------------

# print(train_ds.classes)
# #输出的是['cloudy', 'rain', 'shine', 'sunrise']
# print(train_ds.class_to_idx)
# #输出的是{'cloudy': 0, 'rain': 1, 'shine': 2, 'sunrise': 3}
# id_to_class = dict((v,k) for k,v in train_ds.class_to_idx.items())
# print(id_to_class)
# #输出的是{0: 'cloudy', 1: 'rain', 2: 'shine', 3: 'sunrise'}
# plt.figure(figsize=(12,8))
# for i,(img,label) in enumerate(zip(imgs[:6],labels[:6])):
#     img = img=img.permute(1,2,0).numpy()+1
#     plt.subplot(2,3,i+1)
#     plt.title(id_to_class.get(label.item()))
#     plt.imshow(img)
# plt.show()
#分割线----------------------以上是额外学习的内容---------------------------

device = torch.device("cuda:0" if torch.cuda.is_available() else "cpu")

class Net(nn.Module):
    # 定义初始化方法
    def __init__(self):
        # 继承父类所有属性
        super().__init__()
        #彩色图片故输入channel为3 16为卷积核个数则会形成16通道(图层) 3为3*3的卷积核.
        #nn.Conv2d()适合图片
        self.conv1 = nn.Conv2d(3,16,3,)
        #nn.BatchNorm2d()适合图片 16是上一层的输出
        self.bn1 = nn.BatchNorm2d(16)
        self.conv2 = nn.Conv2d(16,32,3,)
        self.bn2 = nn.BatchNorm2d(32)
        self.conv3 = nn.Conv2d(32,64,3,)
        self.bn3 = nn.BatchNorm2d(64)
        #droput是随机丢弃掉一部分神经元(的输出)来抑制过拟合
        #添加Dropout层
        #nn.Dropout()适合Linear
        self.drop = nn.Dropout(0.5)
        #nn.Dropout2d()适合图片
        self.drop2d = nn.Dropout2d(0.5)
        #nn.Dropout2d()适合三维数据
        self.pool = nn.MaxPool2d((2, 2))
        self.fc1 = nn.Linear(64*10*10,1024)
        self.bn_f1 = nn.BatchNorm1d(1024)
        self.fc2 = nn.Linear(1024,256)
        self.bn_f2 = nn.BatchNorm1d(256)
        self.fc3 = nn.Linear(256, 4)

    def forward(self, input):
        x = F.relu(self.conv1(input))
        x = self.bn1(x)
        x = self.pool(x)
        x = F.relu(self.conv2(x))
        x = self.bn2(x)
        x = self.pool(x)
        x = F.relu(self.conv3(x))
        x = self.bn3(x)
        x = self.pool(x)
        x = self.drop2d(x)
        #print(x.shape)
        #会输出torch.Size([64, 64, 10, 10])
        x = x.view(-1,64*10*10)
        x = F.relu(self.fc1(x))
        x = self.bn_f1(x)
        #Dropout一般在BN层之后
        x = self.drop(x)
        x = F.relu(self.fc2(x))
        x = self.bn_f2(x)
        x = self.drop(x)
        x = self.fc3(x)
        return x
#分割线----------------------以上是定义神经网络的内容---------------------------
model = Net()
model = model.to(device)

loss_fn = torch.nn.CrossEntropyLoss()
optim = torch.optim.Adam(model.parameters(),lr=0.0001)
epochs = 30

def fit(epoch,model,trainloader,testloder):
    #下面三个是个数不是概率
    correct = 0
    total = 0
    running_loss = 0
    #Dropput在训练的时候回随机丢弃神经元(的输出),但预测的时候不会
    #model.train()是训练模式,想让Dropout发挥作用,对BN层也有用
    model.train()
    for x,y in trainloader:
        #将训练数据也放到GPU上
        x = x.to(device)
        y = y.to(device)
        y_pred = model(x)
        loss = loss_fn(y_pred, y)
        # 梯度置为0
        optim.zero_grad()
        # 反向传播求解梯度
        loss.backward()
        # 优化
        optim.step()
        # 不需要进行梯度计算
        with torch.no_grad():
            #torch.argmax将数字转换成真正的预测结果
            y_pred = torch.argmax(y_pred, dim=1)
            #计算个数
            correct += (y_pred == y).sum().item()
            total += y.size(0)
            running_loss += loss.item()

    #除以的是总样本数 trainloader.dataset是形参,实参是train_dl即train_dl.dataset
    #train_dl.dataset指向的是train_ds
    epoch_loss = running_loss/len(trainloader.dataset)
    epoch_acc = correct/total

    test_correct = 0
    test_total = 0
    test_running_loss = 0

    #model.eval()是预测模式,不让Dropout发挥作用,对BN层也有用
    model.eval()
    with torch.no_grad():
        for x,y in testloder:
            #将测试数据也要放到GPU上
            x = x.to(device)
            y = y.to(device)
            y_pred = model(x)
            loss = loss_fn(y_pred,y)
            y_pred = torch.argmax(y_pred, dim=1)
            test_correct += (y_pred == y).sum().item()
            test_total += y.size(0)
            test_running_loss += loss.item()

    epoch_test_loss = test_running_loss / len(test_dl.dataset)
    epoch_test_acc = test_correct / test_total

    print('epoch: ',epoch,
          'train_loss: ',round(epoch_loss,3),
          'train_accuracy: ',round(epoch_acc,3),
          'test_loss: ',round(epoch_test_loss,3),
          'test_accuracy: ',round(epoch_test_acc,3)
              )

    return epoch_loss,epoch_acc,epoch_test_loss,epoch_test_acc
#分割线----------------------以上是定义学习函数的内容---------------------------

#便于随着训练的进行观察数值的变化
train_loss=[]
train_acc=[]
test_loss=[]
test_acc=[]

for epoch in range(epochs):
    epoch_loss,epoch_acc,epoch_test_loss,epoch_test_acc = fit(epoch,model,train_dl,test_dl)
    train_loss.append(epoch_loss)
    train_acc.append(epoch_acc)
    test_loss.append(epoch_test_loss)
    test_acc.append(epoch_test_acc)

end = time.time()
print(end-start)

plt.plot(range(1,epochs+1),train_loss,label='train_loss')
plt.plot(range(1,epochs+1),test_loss,label='test_loss')
plt.plot(range(1,epochs+1),train_acc,label='train_acc')
plt.plot(range(1,epochs+1),test_acc,label='test_acc')
plt.show()

#分割线----------------------以上是最终运行的内容---------------------------
添加Dropout层未添加BN层结果如图所示

添加Dropout层且添加BN层结果如图所示
Dropput层应该在BN层之后!!!

