Huggingface入门篇 II (QA)
1 任务介绍和前期准备
任务的背景如下
- 本次任务使用了MRQA-shared-task中的train和dev数据,其中包含了常见的QA数据库,例如SQuAD,NewsQA,SearchQA,HotpotQA等。
- 预训练模型是huawei-noah/TinyBERT_General_6L_768D
- 训练数据集是
HotpotQA。 - 运行环境 Google Colab (Pro)详细性能配置可以见本文章
- Model的运行代码
1.1 下载第三方库
安装Transformer和Huggingface
!pip install transformers
!pip install datasets
!pip install huggingface_hub
所使用的第三方类
import torch
from torch.utils.data import DataLoader
from transformers import AutoTokenizer, AutoModelForQuestionAnswering, AdamW, get_scheduler
from datasets import load_dataset, Dataset, DatasetDict, load_metric
from tqdm import tqdm
from sklearn.metrics import accuracy_score, f1_score
from matplotlib import pyplot as plt
import pandas as pd
import gzip
import json
import numpy as np
import os
加载与预训练的模型和tokenizer,此处使用的args是一个包含训练参数的字典,这里的配置也是得到本次任务最佳模型的训练参数:
args={
    "DATASET_PATHS":[{
      "TRAIN":"datasets/train/HotpotQA.jsonl.gz",
      "IN_DOMAIN_DEV":"datasets/in_domain_dev/HotpotQA.jsonl.gz",
      "OUT_DOMAIN_DEV":"datasets/out_domain_dev/HotpotQA.jsonl.gz",
    }],
    'MODEL':'huawei-noah/TinyBERT_General_6L_768D',
    'EPOCHS': 5,
    'VAL_BATCH_SIZE':16,
    'TRAINING_BATCH_SIZE':16,
    'LEARNING_RATE':2e-5,
    'MAX_SIZE':256,
}
args['DEVICE'] = torch.device('cuda')

model = AutoModelForQuestionAnswering.from_pretrained(args.get('MODEL')).to(args.get('device'))
tokenizer=AutoTokenizer.from_pretrained(args.get('MODEL'))
1.2 从sharetask中下载数据
在这次的sharetask1中,作者准备好了自动下载所有训练数据据的脚本, 我们只需要将该仓库克隆到Colab中,然后再 运行该脚本 即可:
!git clone https://github.com/mrqa/MRQA-Shared-Task-2019.git
!bash MRQA-Shared-Task-2019/download_train.sh 'datasets/train'
!bash MRQA-Shared-Task-2019/download_in_domain_dev.sh 'datasets/in_domain_dev'
!bash MRQA-Shared-Task-2019/download_in_domain_dev.sh 'datasets/out_domain_dev'
1.3 加载原始数据
下载完成后,文件树如下,可以观察到各个数据集是jsonl格式的文档的gz格式压缩。

先将gz文件用gzip打开,然后用json.load读取每个文件:
  def read(self,file_path):
    rawdata = []
    with gzip.open(file_path, 'rb') as myzip:
        for example in myzip:
            context = json.loads(example)
            if 'header' in context:
                continue
            rawdata.append(context)
    return rawdata
读取后的结果是一个字典的list,每个字典的结构包括 dict_keys(['id', 'context', 'qas', 'context_tokens'])。 读取完原始数据之后,由于本次是QA任务,所以只需要以下三个key的内容2:
context相关文本question根据context提出的的问题,其属于qas的子结构answers其属于qas的子结构。包括text:答案的文本,answer_start: 答案在context中的位置
我写了一个Reader类,其功能包含了以上描述的读取原始数据,提取所需的key,以及将其封装成datasets类,最后dataset的数据格式如下:
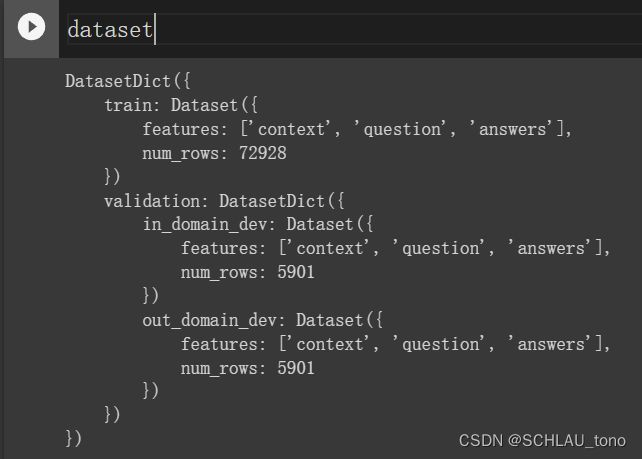
Reader以及本文完整的代码我会放入Notebook中,上传到Github。
小规模训练中,我从trainset中随机选择5000条数据作为训练数据集,从devset中随机500条作为validation
SEED=123
train_text_dataset=dataset['train'].select(range(5000)).shuffle(SEED)
dev_text_dataset=dataset['validation']['in_domain_dev'].select(range(500)).shuffle(SEED)
2 预处理数据
Recap: 该阶段的工作主要有:
- 使用
tokenizer对文本进行编码 - 找到答案的在文本中的开始位置和结束位置
使用tokenizer编码 本次任务使用预训练的tokenizer编码,为了进行第二步工作:标注答案在context中的起始位置和结束位置,需要设置return_offsets_mapping=True
标注答案位置 Tokenizer 编码返回了offset_mapping字段。格式为[(token1_start, token1_end),(token2_start,token2_end),…], 即为每个token的位置信息(坐标)。例如:
- 原文中有 “
The lovely boy.” - 其对应的mapping信息是 [(0, 0), (0, 1), (1, 3), (3, 4), (4, 5), (6, 9), (10, 16), (17, 20), (20, 21)], mapping信息是基于字符的,因此空格也会被编码。
我们的任务是找出answer中的文本在context中对应的mapping信息(坐标)。
根据pre-processing的任务描述,我们写出大概的流程如下,get_labels的功能是标注答案位置。限于篇幅,在这里不在展开描述。
def preprocess_function(examples):
    # First, let's remove duplicated spaces from the question. This occurrs in some datasets and may create problems.
    questions = [q.strip() for q in examples["question"]]
    # Get the features
    features = tokenizer(examples[COULUMN_CONTEXT_NAME], questions, max_length=512, padding='max_length', truncation=True,return_offsets_mapping=True)

    # Get the labels
    (start_positions, end_positions) = get_labels(examples, features)

    # Return the features
    features['start_positions']=start_positions
    features['end_positions']=end_positions

    return features
将该函数用map应用到dataset中的每一行数据,为了减小计算,丢弃除了answers,question,context的其他字段。需要注意的是,由于get_label()中预期的输入是一组行数据,所以使用map时要将batch=True
train_encoding_dataset=train_text_dataset.map(lambda x : preprocess_function(x), batched=True,remove_columns=train_text_dataset.column_names)
dev__encoding_dataset=dev_text_dataset.map(lambda x: preprocess_function(x), batched= True, remove_columns=dev_text_dataset.column_names)
3 训练模型
Recap: 该阶段的主要工作有:
- 配置
optimizer和dataloader - 实现训练过程
3.1 配置optimizer和dataloader
为了加快训练速度,我们将数据集用set_format设置运行格式为torch上。需要注意的是,由于set_format只支持2维向量中每一行设置为torch,如果输入的是4维向量,则会展开到至2维为每一个元素设置为torch,(大致是这个意思,可能具体原因不是很精准,输入4维向量的预期结果时为其中的每个3维向量设置torch,实际上是为每个2维的向量添加了torch)因此offset_mapping字段在set_format 之后,无法建立Dataloader,而该字段在之后的evaluate阶段还需要使用,所以也不能抛弃不用。
Given
[ [(0,0), (0,0), (0,0)], [(1,1), (1,2), (3,5)]]
Expected:[tensor([(0,0), (0,0), (0,0)]), tensor([(1,1), (1,2), (3,5)])]
Got:[[tensor((0,0),tensor((0,0),tensor((0,0)],[tensor((1,1),tensor((1,2),tensor((3,5)] ]
希望有大神指点一下有没有什么比较优雅的方式处理这个问题
我的解决方法是,建立两个dataset, 例如对于训练数据集,train_endoding_dataset包含文本编码后的信息,即tokenzier的输出结果和步骤2中的答案的位置信息; train_text_dataset是文本的原始数据,包含offset_mapping
注意, 建立Dataloader时,需要丢弃最后不满一个batch的数据,因为在之后的函数处理中没有针对非batchsize整数倍的数据大小的鲁棒性检查。(懒了,而且该损失对较小的batch时模型性能表现的影响可忽略不计)
columns_names=['input_ids', 'token_type_ids', 'attention_mask','start_positions','end_positions']
train_encoding_dataset.set_format(type='torch',columns=columns_names)
dev__encoding_dataset.set_format(type='torch',columns=columns_names)
train_dataloader = torch.utils.data.DataLoader(train_encoding_dataset, batch_size=args.get('TRAINING_BATCH_SIZE'),drop_last=True)
dev_dataloader =torch.utils.data.DataLoader(dev__encoding_dataset, batch_size=args.get('VAL_BATCH_SIZE'), drop_last=True)
使用get_scheduler来封装optimization需要的信息
optimizer = AdamW(model.parameters(), lr=args.get('LEARNING_RATE'))
num_epochs = args.get('EPOCHS')
num_training_steps = num_epochs * len(train_dataloader)
lr_scheduler = get_scheduler(
    "linear",
    optimizer=optimizer,
    num_warmup_steps=0,
    num_training_steps=num_training_steps,
)
print(num_training_steps)
3.2 训练模型
4 评估模型
Recap:该阶段的主要工作有:
- 实现将模型输出结果与Gold文本进行比较和评估
- 保存模型
4.1 将预测结果与label比较
该模型的prediction实质是计算每个token是答案开始或者结束的概率。 start_logits和end_logits分别是每个在context中的token是答案开始, 结束的概率。
Recall:
offset_mapping中存储的是每个token在context中开始和结束的位置
将model的预测值转化为文本的思路:
分别从start_logits和end_logits中各取top 50的值所对应的索引
valid_answers=[]
for start_idx in start_logits:
	for end_idx in end_logits:
		如果(start,end)有效且offset_mapping不为空:
			start_char = 从offset_mapping 中找到第start_idx个单词的开始位置
           	end_char =从offset_mapping 中找到第end_idx个单词的结束位置
			valid_answers.append(
				'score': start_idx 和 end_idx 相应的值之和
				'text:': context[start_char:end_char]
			)
将可能的有效答案valid_answers取score最大的一个答案,即为预测的答案
具体代码:
def postprocess_qa_predictions(dataset, features, raw_predictions, topk=1, max_answer_length=30):
  predictions = dict()
  for idx, item in enumerate(dataset) :
    if idx==len(raw_predictions['start_logits']):
      break

    start_logits = raw_predictions['start_logits'][idx] # get the start_logits
    end_logits = raw_predictions['end_logits'][idx] # get the end_logits
    offset_mapping = features['offset_mapping'][idx] # get the offset_mapping from the dataset features

    # get the context of this QA pair
    context = item['context']

    # Gather the indices of the best 50 start/end logits:
    start_indexes = torch.topk(start_logits,50).indices
    end_indexes = torch.topk(end_logits,50).indices

    valid_answers = []

    for start_idx in start_indexes: # for each start_index
        for end_idx in end_indexes: # for each end_index

            # Make sure that indexes are not out of bounds and the offset_mapping are not None
            if offset_mapping is None or start_idx>=len(offset_mapping) or end_idx>=len(offset_mapping):
              continue

            # Don't consider answers with a length that is either < 0 or > max_answer_length.
            # make sure that 1) the end_index is not smaller than the start index and 2) the answer length is smaller than the max_answer_length
            if start_idx>=end_idx or (end_idx-start_idx)>max_answer_length:
              continue
            # if start_index is smaller than end_index
            if start_idx<end_idx:
                # get the char starting and ending index (hint: use the offset_mapping)
                start_char = offset_mapping[start_idx][0]
                end_char = offset_mapping[end_idx][1]
                valid_answers.append(
                    {
                        "score": torch.sum(start_logits[start_idx]+end_logits[end_idx]), # the sum of the starting and ending logits
                        "text": context[start_char:end_char] # answer string. What we were looking for!!!
                    }
                )
    if len(valid_answers) == 0: # if there are no candidate answer
      valid_answers.append(
        {
            "score": torch.Tensor([-999]).to(device),
            "text": ' '
        }
      )
    # sort the answers by descending score and pick only the best topk
    valid_answers = sorted(valid_answers, key=lambda x:x['score'],reverse=True)[0]
    # add the list of valid answers to the predictions dictionary
    if predictions.get(str(id(predictions))) is None:
      print(predictions.get(str(id(predictions))) is None)
      predictions[str(id(predictions))]=[valid_answers]
      print(predictions.get(str(id(predictions))) is None)
    else:
      predictions[str(id(predictions))]=predictions[str(id(predictions))].append(valid_answers)

  return predictions
evaluation的框架:
def evaluation(model, dev_dataloader, dev_dataset):
    list_outputs = []
    model.eval()
    # get raw predictions
    for batch in dev_dataloader:
      batch_tmp={}
      for k, v in batch.items():
        if k == 'offset_mapping':
          offset_list=[]
          for element in v:
            offset_list.append(element.to(device))
          batch_tmp[k]=offset_list
        else:
          batch_tmp[k]=v.to(device)

      offset_list=batch_tmp.pop('offset_mapping')   # offset_mapping column is not used in training

      with torch.no_grad():
        outputs=model(**batch_tmp)

      batch_tmp.update({'offset_mapping':offset_list}) # insert offset into features

      # post-process the predictions to get strings
      predictions = postprocess_qa_predictions(dev_dataset, batch_tmp, outputs)
    # compute EM and F1
    return predictions
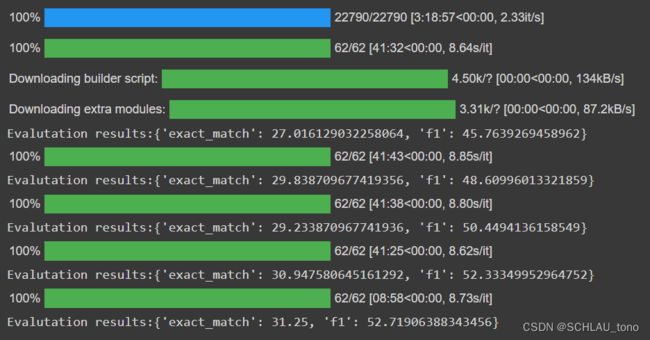
训练和评估阶段的结果
5 训练的模型开源至Huggingface
Recap:该阶段的主要工作有:
- 几种从上传Huggingface的方法
- 添加
model card
5.1 创建model仓库
在https://huggingface.co/new上填写model的名字并创建一个新的model仓库
5.2 上传model
可以手动从local本地上传,因为该过程和github push过程相似,网上有许多教程,因此不再赘述。以下主要介绍模型自动训练完后,比较结果,如果是最佳结果就自动上传。
5.2.1 使用push_to_hub上传
首先, 使用以下命令从huggingface下载model仓库到本地. clone_from所用的地址就是model在huggingface的URL,例如 https://huggingface.co/owners/model_name
from huggingface_hub import Repository

repo = Repository("Path to store repository", clone_from="URL of model repos in huggingface")
repo.git_pull()
在huggingface个人账户中添加新的access token, 然后将token粘贴复制到以下代码中,

将model和tokenizer都上传到huggingface
token='Your token'
best_f1=53.53507261461125
if results.get('f1')>best_f1:
  model.push_to_hub("Path to store repository ",
                  repo_url='RL of model repos in huggingface',
                  organization="huggingface", use_auth_token=token)
  tokenizer.push_to_hub("Path to store repository",
                  repo_url='RL of model repos in huggingface',
                  organization="huggingface", use_auth_token=token)
MRQA-shared-task ↩︎
Huggingface官方文档:从SQuAD中构建dataset ↩︎