【深度学习】 Pytorch笔记
标量、向量、矩阵、张量
标量,向量,矩阵与张量
1、标量
一个标量就是一个单独的数,一般用小写的的变量名称表示。
2、向量
一个向量就是一列数,这些数是有序排列的。通常会赋予向量粗体的小写名称。
我们可以把向量看作空间中的点,每个元素是不同的坐标轴上的坐标。
计算机中一般把向量视为行向量,shape为(1,n),列向量为矩阵,shape为(n,1)
【参考:python 、(n,1)、(1,n)数组的区别_J符离的博客-CSDN博客】
test = np.array([1,2,3])
print(test.shape) # (3,) 行向量
print(test)
print('=='*10)

test1 = test.reshape(1,-1)
print(test1.shape) # (1,3)
print(test1)
print('=='*10)

test2 = test.reshape(-1,1)
print(test2.shape) # (3,1) 矩阵 (其实就是一个列向量)
print(test2)
参考:2.16 关于 Python Numpy 的说明-深度学习-Stanford吴恩达教授_赵继超的笔记-CSDN博客
注意:下面的(5,)表明a是一个一维数组,不是向量

下面有两对中括号包裹起来的才是向量 [[ … ]]
a是列向量

快速断言,以免出错,大胆使用
assert(a.shape == (5,1) )
3、矩阵
矩阵是二维数组,其中的每一个元素被两个索引而非一个所确定。
我们通常会赋予矩阵粗体的大写变量名称,比如A。
4、张量
几何代数中定义的张量是基于向量和矩阵的推广,通俗一点理解的话,我们可以将标量视为零阶张量,矢量视为一阶张量,那么矩阵就是二阶张量。 例如,可以将任意一张彩色图片表示成一个三阶张量,三个维度分别是图片的高度、宽度和色彩数据。
list / np.shape
【参考:如何一眼看出Python中数组是几维的?_gailj的博客-CSDN博客】
import numpy as np
a=[
    [1,2,3],
    [1,2,3],
    [1,2,3],
    [1,2,3]
   ]
b = np.random.randint(10,size=(4,3))
# print(a.shape) # list 没有shape
# print(a.size) # list size
print(np.shape(a)) # (4, 3)
print(np.size(a)) # 12  np里面的size是所有维度的乘积之和

print(b.shape) # (4, 3)
print(b.shape[0]) # 4
print(b.size) # 12 np里面的size是所有维度的乘积之和
张量测试 ***
tensor([ 数据 ]) 最外面的[ ]是固定写法 因为至少为一阶张量
import torch

a1 = torch.IntTensor(3)
print(a1) # tensor([1073741825, 1072585629, -529678328], dtype=torch.int32)
print(a1.shape) # torch.Size([3])
print('=============')

a2 = torch.IntTensor([3]) # 一阶张量
print(a2) # tensor([3], dtype=torch.int32)
print(a2.shape) # torch.Size([1]) # 元素个数为1
print('=============')

b1 = torch.IntTensor(1, 3) # 二阶张量
print(b1) # tensor([[-530005120,      32760,          0]], dtype=torch.int32)
print(b1.shape) # torch.Size([1, 3])
print('=============')

b2 = torch.IntTensor([2, 3]) # 一阶张量
print(b2) # tensor([1, 3], dtype=torch.int32)
print(b2.shape) # torch.Size([2]) # 元素个数为2
print('=============')

---------------------------------------

d1 = torch.IntTensor(3, 1) # 二阶张量
print(d1)
"""
tensor([[         0],
        [1074266112],
        [-529678328]], dtype=torch.int32)
"""
print(d1.shape) # torch.Size([3, 1])
print('=============')

d2 = torch.IntTensor([3, 1]) # 一阶张量
print(d2) # tensor([3, 1], dtype=torch.int32)
print(d2.shape) # torch.Size([2]) # 元素个数为2

------------------------------------------------

c1 = torch.IntTensor(2, 3) # 二阶张量
print(c1)
"""
tensor([[0, 0, 0],
        [0, 0, 0]], dtype=torch.int32)
"""
print(c1.shape) # torch.Size([2, 3])
print('=============')

c2 = torch.IntTensor([2, 3]) # 一阶张量
print(c2) # tensor([2, 3], dtype=torch.int32)
print(c2.shape) # torch.Size([2]) # 元素个数为2
print('=============')
基础
PyTorch简明笔记[1]-Tensor的初始化和基本操作
视频笔记
Tensor与tensor深入分析与异同
常用torch.Tensor()
Tensor 是多维矩阵,矩阵的元素都是同一种数据类型。
tensor 需要确切的数据对它进行赋值。
torch.Tensor是torch.FloatTensor的别名。
Tensor()如果值传递一个整数,则会生成一个随机的张量:
import torch
torch.Tensor(1)
输出:tensor([一个随机值])
如果传递一个可迭代的对象,则输出就是这个可迭代的对象
torch.Tensor([1,2])
输出:tensor([1.,2.])

tensor.detach()
返回一个新的tensor,从当前计算图中分离下来。
mport torch
a=torch.tensor([1.,2.,3.])
b=torch.tensor([4.,5.,6.],requires_grad=True)

a
a.data
b
b.data

tensor([1., 2., 3.])
tensor([1., 2., 3.])
tensor([4., 5., 6.], requires_grad=True)
tensor([4., 5., 6.])

b.detach().numpy()

array([4., 5., 6.], dtype=float32)
optimizer
理解optimizer.zero_grad(), loss.backward(), optimizer.step()的作用及原理
model = MyModel()
criterion = nn.CrossEntropyLoss()
optimizer = torch.optim.SGD(model.parameters(), lr=0.001, momentum=0.9, weight_decay=1e-4)

for epoch in range(1, epochs):
    for i, (inputs, labels) in enumerate(train_loader):
        output= model(inputs)
        loss = criterion(output, labels)

        # compute gradient and do SGD step
        optimizer.zero_grad()
        loss.backward()
        optimizer.step()
torch.nn.init
官网:https://pytorch.org/docs/stable/nn.init.html
【细聊】torch.nn.init 初始化
自动求导
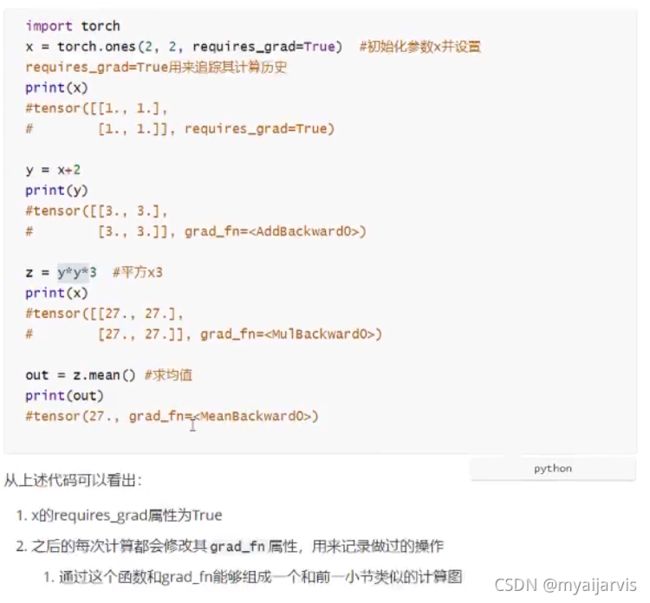
PyTorch学习笔记(三):自动求导Autograd
如果用 非标量y 进行求导,函数需要额外指定grad_tensors
且grad_tensors的shape必须和y的相同
torch.tensor加参数requires_grad=True时数据必须为浮点数 如1.0 简写1.
>>> x = torch.ones(2, 2) # x.is_leaf= True 叶子节点
>>> w = torch.rand(2, 2, requires_grad=True)
>>> b = torch.rand(2, 2, requires_grad=True)
>>> y = w * x + b # 标量

>>> weights = torch.ones(2, 2)
>>> y.backward(weights) # 这里要加上相同shape的tensors
>>> w.grad
tensor([[1., 1.],
        [1., 1.]])
此外,PyTorch中梯度是累加的,每次反向传播之后,当前的梯度值会累加到旧的梯度值上。
PyTorch简明笔记[2]-Tensor的自动求导(AoutoGrad)
PyTorch里面,求导是调用.backward()方法。直接调用backward()方法,会计算对计算图叶节点的导数。
获取求得的导数,用.grad方法。
自动求导,只能是【标量】对标量,或者【标量】对向量/矩阵求导!
x = torch.tensor([[1.,2.,3.],[4.,5.,6.]],requires_grad=True)
y = x+1
z = 2*y*y
J = torch.mean(z)
x # 矩阵
y # 矩阵
z # 矩阵
J # 标量
>>>
tensor([[1., 2., 3.],
        [4., 5., 6.]], requires_grad=True)
tensor([[2., 3., 4.],
        [5., 6., 7.]], grad_fn=<AddBackward0>)
tensor([[ 8., 18., 32.],
        [50., 72., 98.]], grad_fn=<MulBackward0>)
tensor(46.3333, grad_fn=<MeanBackward0>)
求导
z.backward() # z是标量
RuntimeError: grad can be implicitly created only for scalar outputs

z.backward(torch.ones(2,3))
x.grad
>>>
tensor([[ 8., 12., 16.],
        [20., 24., 28.]])


J.backward() # J对x求导  x是叶子节点
x.grad
>>>
tensor([[1.3333, 2.0000, 2.6667],
        [3.3333, 4.0000, 4.6667]])
一个计算图只能backward一次
一个计算图在进行反向求导之后,为了节省内存,这个计算图就销毁了。
如果你想再次求导,就会报错。
forward
【参考:pytorch 中的 forward 的使用与解释_JY丫丫的博客-CSDN博客】
self.forward(x)
等价于

model=Module() # 实例化一个对象
model(x) # 输入参数
损失函数
交叉熵 ***
写得非常详细【参考:PyTorch损失函数之交叉熵损失函数nn.CrossEntropyLoss_zyoung17的博客-CSDN博客】
参考文档 https://pytorch-cn.readthedocs.io/zh/stable/package_references/torch-nn/#loss-functions
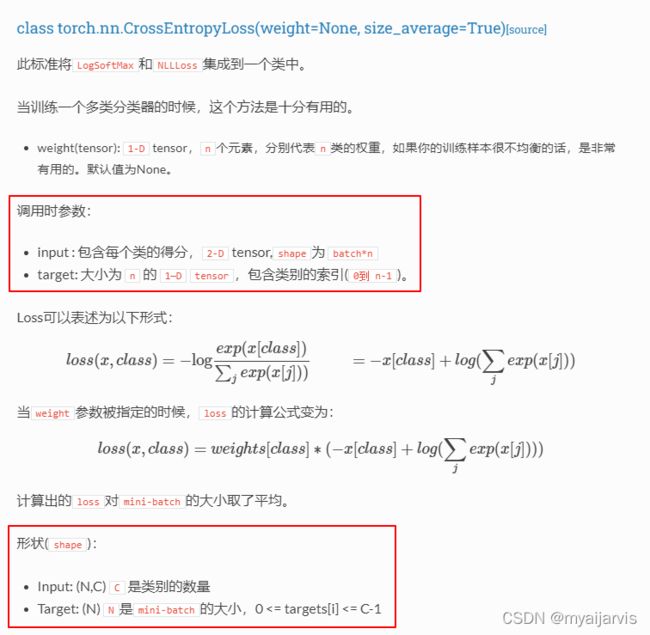
CrossEntropyLoss = LogSoftmax + NLLLoss
也就是说使用CrossEntropyLoss,其输入可以直接是线性层的输出,不用做额外的操作
- 传入input以及target即可,但是需要注意两者的格式
- 调用的时候需要创建变量,不能直接调用
batch_size=1的时候可以忽略
input (N,C)
target (N)
import torch
import torch.nn as nn
loss_fn = nn.CrossEntropyLoss() # 定义变量
# 方便理解,此处假设batch_size = 1
x_input = torch.randn(2, 3)   # 预测2个对象,每个对象分别属于三个类别分别的概率 (N,C)
print(x_input)
"""
tensor([[ 0.1548,  1.4148, -1.0462],
        [ 0.5148, -0.7261,  0.8426]])
"""
# 需要的格式为个数为2的一维tensor,其中的值范围必须在0-2 (0< value < C-1)之间。
x_target = torch.tensor([0, 2])  # 这里给出两个对象所属的类别标签即可,此处的意思为第一个对象属于第0类,第二个对象属于第2类 (N)
print(x_target) # tensor([0, 2])
loss = loss_fn(x_input, x_target) # 参数(预测值,真实值)
"""
批次为1时
预测值 N行C列 每行是一个对象,每列是分别属于三个类别的概率
真实值 一行N列 每列是对象所属的类别

函数会自己计算
"""
print('loss:\n', loss)
"""
loss:
 tensor(1.1155)
"""
batch_size>1的时候
看官网输入输出要求

官方的参数是 N:batch_size 没看懂官方的文档
记住下面的就可以了
- (B,N,C) batch_size、 预测的N个对象、C个类别
总结一下,首先把Input的shape调整为(B, C, N)后,确保Target的输入为(B, N)即可。
import torch
import torch.nn as nn
loss_fn = nn.CrossEntropyLoss()
# 假设batch_size = 2, 预测5个对象,类别C=6
x_input = torch.randn(2, 5, 6)
x_input = x_input.permute(0, 2, 1) # 此处的意思是第1维换成第2维,第2维换成第0维。即(B,N,C)--->(B,C,N)
print('x_input_permute:\n', x_input)  # 不理解的话可以打印出permute前后的shape进行观察
"""
tensor([[[ 0.7662,  0.0853, -0.5515, -1.7547, -1.1409],
         [-0.8601, -1.6239, -0.1457, -1.1998,  0.3238],
         [ 0.7538, -1.5381,  0.8663,  1.7035, -1.3303],
         [ 2.4804, -0.3206,  0.1201,  0.3770,  0.9153],
         [ 0.0696,  0.6718,  0.2825, -0.5917, -0.4444],
         [-1.2014, -0.6291, -0.0986,  1.6863, -0.1270]],

        [[-0.3112,  1.0664,  1.7267,  0.0671,  1.6475],
         [-0.5655, -0.7472, -0.9992, -0.2128,  0.4959],
         [-0.2752,  0.0928,  1.4486,  0.4801,  0.5191],
         [ 0.3457, -1.0388,  0.2390, -1.5472, -0.8020],
         [ 0.3820,  0.5579, -0.7946,  0.0083,  0.0337],
         [ 0.2323, -1.1603,  0.0221, -0.2788, -0.3571]]])
"""
# 根据前面对target的分析,需要的shape为(2, 5),其中的值范围必须在0-17之间。
x_target = torch.tensor([[1, 2, 3, 5, 0],
                         [3, 5, 1, 4, 2]])

loss = loss_fn(x_input, x_target)
# 或者如下
# loss = loss_fn(x_input.permute(0, 2, 1), x_target)
print('loss:\n', loss)
"""
loss:
 tensor(2.4204)
"""
语法知识点
x == y
import torch

x=torch.Tensor([0,0,1,0,1,0])
y=torch.Tensor([0,1,0,0,1,0])

print(x == y)
print((x == y).sum()) # print(torch.sum(x == y)) 计算True的个数
print((x == y).sum().item())

'''
tensor([ True, False, False,  True,  True,  True])
tensor(4)
4
'''
数据预处理
求和
总结:axis=0 跨行(默认)上下压扁 对每列进行求和 把多行变成一行,即消去多行
axis=1 跨列 左右压扁 对每行进行求和 把多列变成一列,即消去多列
例子:
A.shape():(2,3,4)
A.sum(axis=2) 就是把 第二个轴消掉 即变为 (2,4)
A.sum(axis=2, keepdims=True) shape为(2,1,4)
A = torch.randint(10,size=(2,4))
A
>>>
tensor([[4, 1, 8, 5],
        [2, 9, 1, 7]])

A.sum()
>>>
tensor(37)

A.sum(axis=0) # 输入矩阵沿0轴(行)降维以生成输出向量,因此输入的轴0的维数在输出形状中丢失。行数降为1
>>>
tensor([ 6, 10,  9, 12])

A.sum(axis=1) # 汇总所有列的元素降维(轴1)。因此,输入的轴1的维数在输出形状中消失。
>>>
tensor([18, 19])
'''
[[18],
 [19]]
然后转化为一维行向量
'''
线性模型
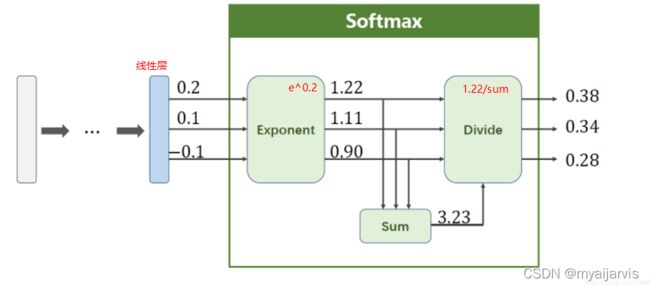
softmax
PyTorch 深度学习实践 第9讲
交叉熵
PyTorch 深度学习实践 第9讲
CrossEntropyLoss <==> LogSoftmax + NLLLoss 具体看图
也就是说使用CrossEntropyLoss,其输入可以直接是线性层的输出,不用做额外的操作
使用NLLLoss之前,需要其输入数据先进行SoftMax处理,再进行log操作。
import torch

y0 = torch.LongTensor([0])  # 认为 z 的预测为分类0
y1 = torch.LongTensor([1])
y2 = torch.LongTensor([2])
z = torch.Tensor([[0.9, 0.1, -0.2]])  # 对于分类 0 1 2 的数据经过线性层处理输出的数据
criterion = torch.nn.CrossEntropyLoss()

# tensor(0.5778) tensor(1.3778) tensor(1.3778) y0的交叉熵最小
print(criterion(z, y0), criterion(z, y1), criterion(z, y1))
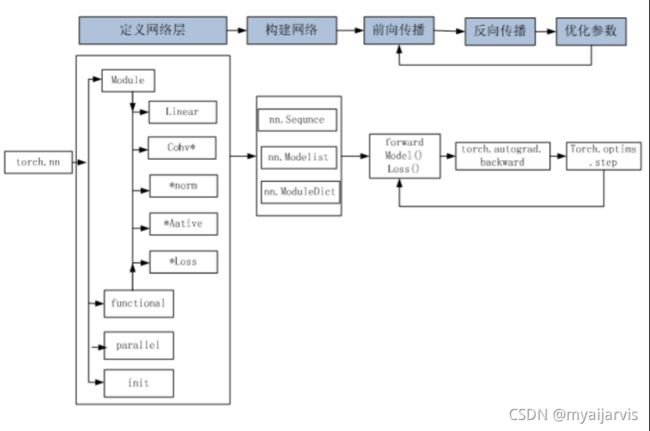
神经网络
视频笔记
https://www.bilibili.com/video/BV1R44y1v7tJ?p=28
文档笔记
非常推荐:NLP学习笔记-Pytorch框架(一)
非常推荐:Tensor入门使用
全连接层:当前一层和前一层每个神经元相互链接,我们称当前这一层为全连接层。
词嵌入 ***
word embedding 词嵌入:又叫词向量
- num_embeddings : 词嵌入字典大小,即一个字典里要有多少个词。
- embedding_dim:词向量的维度,即用多少长度的向量来表示一个词
nn.embedding (num_embeddings,embedding_dim)
seq_len就是输入的sequence_length(序列长度)
举例:每条评论取前20个词 seq_len=20
既然LSTM是处理序列数据的,那么序列就需要一个长度。虽然LSTM处理的序列长度通常是不固定的,但是Pytorch和TensorFlow的集成实现还是固定了input的序列长度,在处理不固定长度的数据(如机器翻译),通常加入开始和结束符号并采用序列的最大长度MAX_LEN作为seq_len
import torch
from torch import nn
from torch.autograd import Variable

# 初始化权重
embedding = nn.Embedding(10, 5)  #  一句话10个词,每个词为 5维
print("embedding权重: ", embedding.weight.size())   # torch.Size([10, 5])

inputs = torch.arange(0, 6).view(3, 2).long()  # 输入三行两列,即三个句子,每个句子有两个词
inputs = Variable(inputs)
print("embedding输入大小: ", inputs.shape)

outputs = embedding(inputs) # torch.Size([3, 2])
print("embedding输出大小: ", outputs.shape)   # torch.Size([3, 2, 5])

'''
3是batch_size(批次)
2是num_embeddings
5是embedding_dim
'''
RNN模型与NLP应用(2/9):文本处理与词嵌入

词典p^T:每一列对应一个词
d:词向量的维度(用户决定)
v:字典的长度
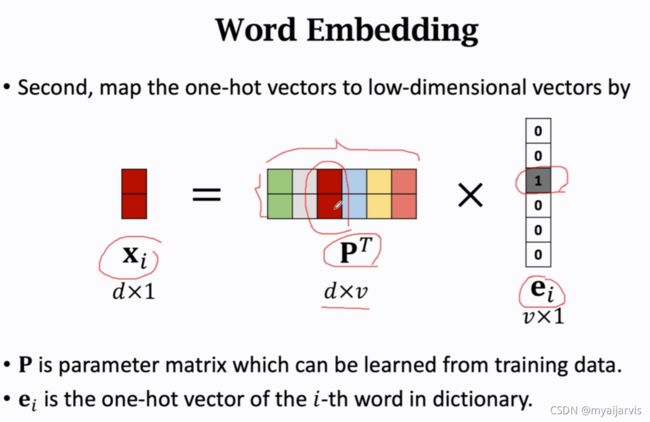
d=2 就是二维的
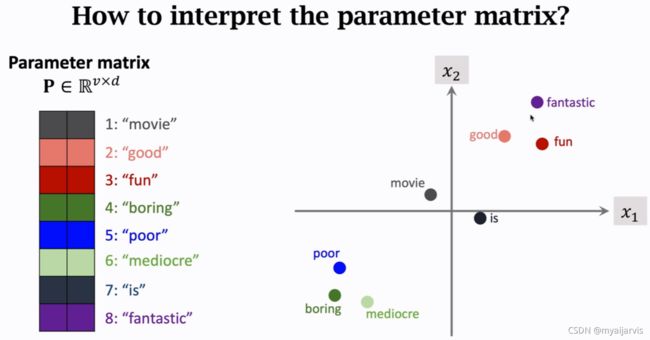
词典 vocabulary 有一万条数据
word_num=20:每个序列只取20个词(即每条电影评论取20个单词)即seq_len
embedding_dim=8:每个单词用一个8维的词向量来表示

simple RNN
https://www.bilibili.com/video/BV1dq4y1f7ep
A是模型参数
A中紫色的是h_t-1的参数矩阵 蓝色的是x_t的参数矩阵

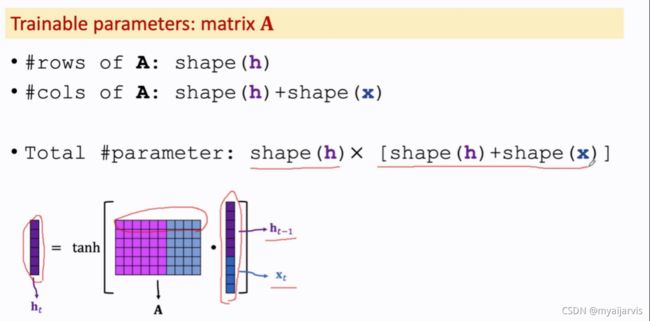
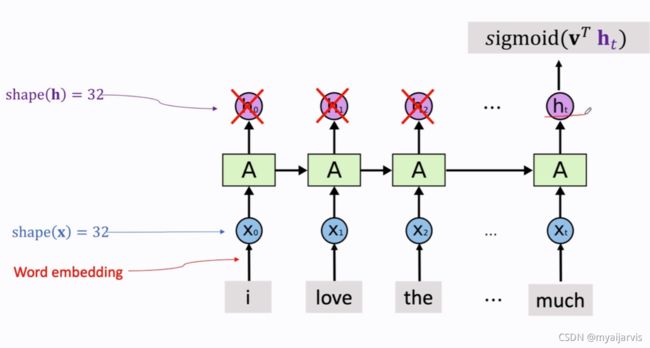
训练参数A

LSTM模型
图解:https://blog.csdn.net/baidu_38963740/article/details/117197619

RNN输入输出参数理解
pytorch中实现循环神经网络的基本单元RNN、LSTM、GRU的输入、输出、参数详细理解
pytorch中RNN参数的详细解释
看了两天还是没有理解,先强记吧


