Python 实现钉钉三方登录
登录流程图
注册钉钉
1.1钉钉作为阿里旗下的一款免费移动通讯软件,受众群体越来越多,这里我们使用DJANGO来集成一下钉钉的三方账号登录,首先注册钉钉开发平台:HTTPS://OPEN-DEV.DINGTALK.COM/
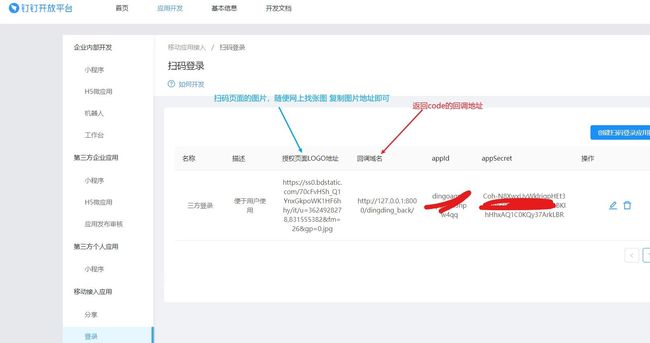
1.2 创建应用
代码
# 构建一个钉钉类
class DingDing:
    # 拼接url
    # 构造钉钉登录url
    def ding_url(request):
        appid = 'dingoagmvzpdwxx5npw4qqx'   # 应用中的appid
        redirect_uri = 'http://127.0.0.1:8000/dingding_back/'  #钉钉返回信息的回调地址

        return redirect('https://oapi.dingtalk.com/connect/qrconnect?appid=' + appid + '&response_type=code&scope=snsapi_login&state=STATE&redirect_uri=' + redirect_uri)

    # 构造钉钉回调方法
    def ding_back(request):
        # 获取code
        code = request.GET.get("code")
        t = time.time()
        # 时间戳
        timestamp = str((int(round(t * 1000))))
        appSecret = 'Coh-N8XwxUvWklrjgpHEt35zePr3l9vmTquUMPFKRBKIhHhxAQ1C0KQy37ArmLBRx'
        # 构造签名
        signature = base64.b64encode(
            hmac.new(appSecret.encode('utf-8'), timestamp.encode('utf-8'), digestmod=sha256).digest())
        # 请求接口,换取钉钉用户名
        payload = {'tmp_auth_code': code}
        headers = {'Content-Type': 'application/json'}
        appid='dingoagmvzpdwxx5npw4qqx'
        res = requests.post('https://oapi.dingtalk.com/sns/getuserinfo_bycode?signature=' + urllib.parse.quote(
            signature.decode("utf-8")) + "×tamp=" + timestamp + "&accessKey="+appid,
                            data=json.dumps(payload), headers=headers)  # accessKey=appid
        # 返回的用户信息
        res_dict = json.loads(res.text)
        print(res_dict)
        # name = res_dict['user_info']['nick']
        # print(name)

        # 判断对象是否存在
        obj = User.objects.filter(oauth_id=res_dict['user_info']['dingId']).first()
        print('obj>>>>>>', obj)
        print('obj>>>>>>', obj.username)
        # 如果不存在 创建新用户
        if not obj:
            user = User(username=res_dict['user_info']['nick'], oauth_id=res_dict['user_info']['dingId'])
            user.save()  # 创建新用户
            obj = User.objects.filter(oauth_id=res_dict['user_info']['dingId']).first()
            encode_jwt = jwt.encode({'uid': obj.id, 'username': obj.username}, settings.SECRET_KEY,
                                    algorithm='HS256')  # 加密内容,**,算法
            return redirect(
                'http://localhost:8080/staition?uid=' + str(obj.id) + "&username=" + obj.username + "&jwt=" + str(
                    encode_jwt, encoding='utf-8'))

        # 否则直接返回用户名和id
        encode_jwt = jwt.encode({'uid': obj.id, 'username': obj.username}, settings.SECRET_KEY,
                                algorithm='HS256')  # 加密内容,**,算法
        # 回调到前端
        return redirect(
            'http://localhost:8080/staition?uid=' + str(obj.id) + "&username=" + obj.username + "&jwt=" + str(
                encode_jwt, encoding='utf-8'))
