前端使用nginx部署项目到服务器
目录
一、下载nginx
二、启动
三、验证
四、windows的操作指南
五、目录介绍
六、部署
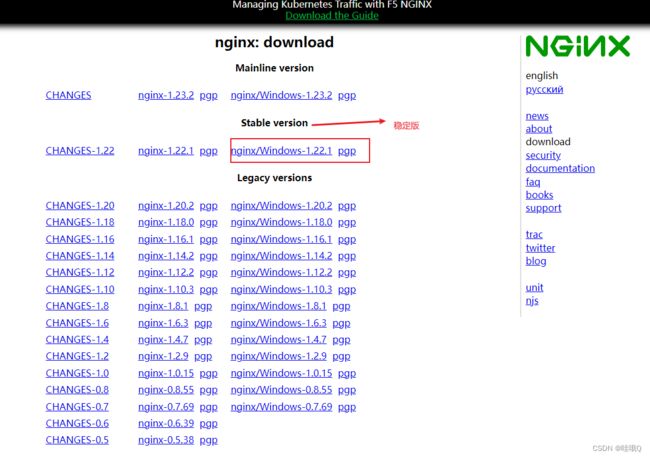
一、下载nginx
下载地址:https://nginx.org/en/download.html
二、启动
两种方法:
1) 直接双击该目录下的"nginx.exe",即可启动nginx服务器;
2) 命令行(cmd)进入该文件夹,执行start nginx命令,也会直接启动nginx服务器。
注意:记得关闭防火墙
三、验证
打开浏览器,输入地址:http://localhost,访问页面,出现如下页面表示访问成功。
四、windows的操作指南
启动服务:start nginx
退出服务:nginx -s quit
强制关闭服务:nginx -s stop
重载服务:nginx -s reload (重载服务配置文件,类似于重启,服务不会中止)
验证配置文件:nginx -t
使用配置文件:nginx -c "配置文件路径"
使用帮助:nginx -h
五、目录介绍
conf: 配置文件 配置虚拟主机文件就在此
html: nginx默认web根路径位置
logs: 日志文件
sbin: 二进制程序 启动/停止/重载服务命令就在此
六、部署
进入nginx文件夹下的conf文件,打开nginx.conf文件,修改端口以及配置子目录
Windows下的nginx可以通过文本或者vscode这种代码编辑器打开都可以
1、使用命令npm run build:prod进行项目打包。
2、打包后的文件名称是dist,将dist整个文件夹复制到nginx的文件夹下(与html文件夹同级)。
3、到 conf文件夹下配置配置nginx.conf文件里面修改相关配置
该文件里面的location / {} 里面的root就是解压nginx的目录,意思是说,默认打开的是root(也就是根目录)下的HTML里面的index.html/index.htm的网页。
location / {                  # 表示 以'/'开头的请求怎样处理
            root   html;      #指定root文件夹为 上面提到的html文件夹
            index  index.html index.htm;   #返回index.html
        }
把这个修改为dist下的html
location / {
            root   dist;
            index  index.html index.htm;
        }
修改完成后一定要重启nginx,重启后才会生效
七、部署中的问题
1、跨域
在点击登录的时候,发现发送请求成功,但是没有返回值,而且还报错network Error ,经查看,发现控制台报跨域,原来是前端使用了反向代理vue.config.js
devServer: {
    port: port,
    open: true,
    overlay: {
      warnings: false,
      errors: true,
    },
    // 反向代理
    proxy: {
       "/api": {
         target: "http://192.168.4.95:8092/", //本地地址
         changeOrigin: true,
         pathRewrite: {
           "^/api": "/api",
         },
       },
    },
  },
所以nginx中要修改配置,还是在nginx.conf中修改
server {
        listen       80; #监听端口
        server_name  localhost; #可以改成自己的域名或者ip

        #charset koi8-r;

        #access_log  logs/host.access.log  main;

        location / {
            root   dist;
            index  index.html index.htm;
        }

        location / {       #想要访问的baseurl
            proxy_pass http://192.168.4.95:8092;       #反向代理的服务器真正的ip
            add_header 'Access-Control-Allow-Origin' '*';      #允许来自所有的访问地址
            add_header 'Access-Control-Allow-Credentials' 'true';   #允许携带Cookie
            add_header 'Access-Control-Allow-Methods' *;  #允许所有的请求
            add_header 'Access-Control-Allow-Headers' 'Content-Type,*';#允许所有的header
        }
}
这里来说一下,貌似nginx跨域和后端不能一起设置跨域,所以你们要注意哦

