项目实战 之 vue3 + vite + pinia
目录
一、创建项目
1. 安装vite
2. 创建项目
3. 安装过程
二、项目基本配置
1. 项目icon
2. 项目标题
3. 配置 jsconfig.json
4. 设置 .prettierrc 文件
5. 生成代码片段
01 - 网址
02 - 生成
03 - 配置
04 - 使用
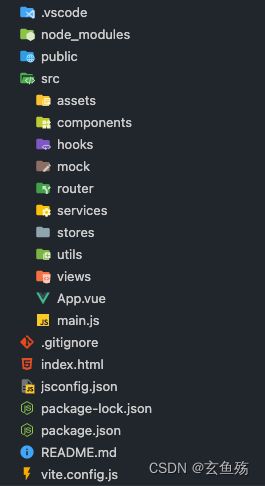
三、项目目录 结构划分
1. assets
2. components
3. hooks
4. mock
5. router
6. service
7. stores
8. utils
9. views
四、css 样式重置
1. normalize.css
01 - 安装
02 - 引入
2. reset.css
01 - 代码
02 - 引入
3. common.css
01 - 代码
02 - 引入
五、vue-router 路由配置
1. 安装
2. 配置
3. 引入
4. 使用
六、pinia 状态管理
1. 安装
2. 创建
3. 引入
4. 模块
七、把代码推送到远程仓库
1. 初始化git仓库
2. 配置 name 和 email
3. 提交代码到本地
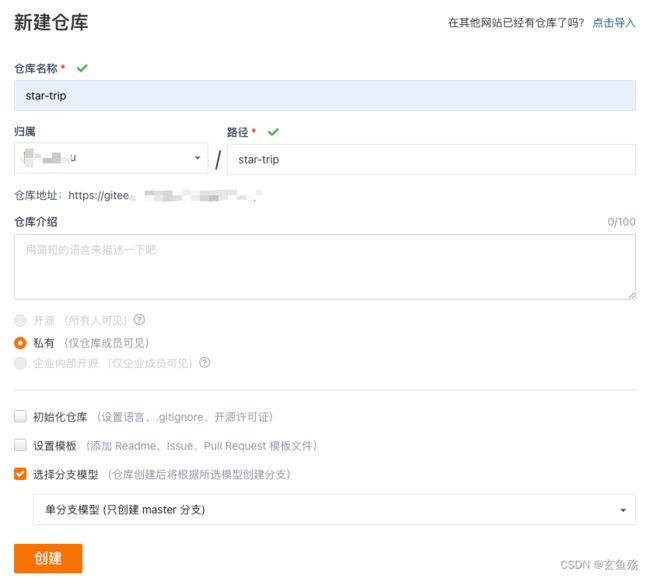
4. 生成远程仓库
5. 本地和远程连接
八、项目正在开发中
1. 使用百度地图插件
01 - 注册并登录百度账号 百度地图开放平台 | 百度地图API SDK | 地图开发
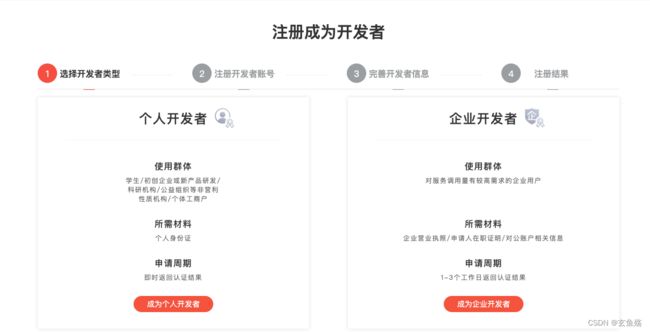
02 - 成为开发者
点击控制台
填写资料进行注册
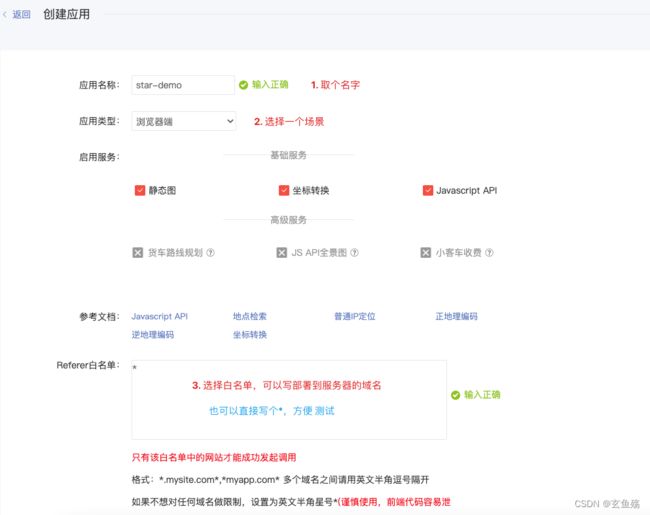
03 - 创建应用
创建应用
获取AK
04 - 使用JavaScript API文档
复制js代码,在index.html中引入
展示地图
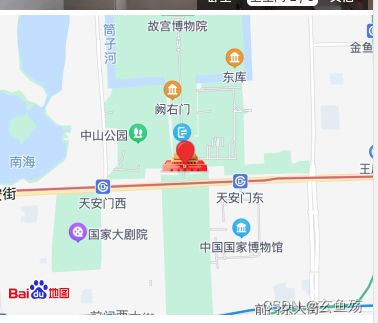
效果
一、创建项目
1. 安装vite
npm i vite -g2. 创建项目
npm init vue@latest3. 安装过程
二、项目基本配置
1. 项目icon
在 public目录 下,添加一个 favicon.icon 图片
2. 项目标题
在 index.html 文件的 title标签 中配置
3. 配置 jsconfig.json
能让 代码提示 变得更加友好
{
  "compilerOptions": {
    // "target": "es5",
    "module": "esnext",
    "baseUrl": "./",
    "moduleResolution": "node",
    "paths": {
      "@/*": [
        "src/*"
      ]
    },
    "lib": [
      "esnext",
      "dom",
      "dom.iterable",
      "scripthost"
    ]
  },
  "vueCompilerOptions": {
    "experimentalDisableTemplateSupport": true
  }
}
4. 设置 .prettierrc 文件
{
  "printWidth": 120,
  "singleQuote": true,
  "bracketSpacing": true,
  "jsxBracketSameLine": false,
  "htmlWhitespaceSensitivity": "ignore",
  "useTabs": false,
  "tabWidth": 2,
  "endOfLine": "lf",
  "trailingComma": "none",
  "semi": true,
  "eslintIntegration": true
}
5. 生成代码片段
01 - 网址
代码片段生成网址 : snippet generator
02 - 生成
"vue3": {
"prefix": "vue3",
"body": [
"",
"",
" ",
" ${1}
",
" ",
"",
"",
"",
"",
"",
""
],
"description": "vue3"
}03 - 配置
设置 => 配置用户代码片段 => vue.json => copy
04 - 使用
使用设置的title即可 => tab键 切换占位符1. 2. 3. 4 ...
三、项目目录 结构划分
1. assets
存放 => 静态资源
- css => 样式重置
- img => 图片文件
- font => 字体文件
2. components
存放 => 公共组件
3. hooks
存放 => 公共常用的hook
4. mock
存放 => 模拟接口数据
5. router
存放 => 路由管理
6. service
存放 => 接口请求
7. stores
存放 => 状态管理
8. utils
存放 => 插件、第三方插件
9. views
存放 => 视图、页面
四、css 样式重置
自定义的css公共文件放置在assets中的css文件中即可
1. normalize.css
01 - 安装
npm i normalize.css02 - 引入
// 在 main.js 中引入
import 'normalize.css';
2. reset.css
01 - 代码
 html,
 body,
 div,
 span,
 applet,
 object,
 iframe,
 h1,
 h2,
 h3,
 h4,
 h5,
 h6,
 p,
 blockquote,
 pre,
 a,
 abbr,
 acronym,
 address,
 big,
 cite,
 code,
 del,
 dfn,
 em,
 font,
 img,
 ins,
 kbd,
 q,
 s,
 samp,
 small,
 strike,
 strong,
 sub,
 sup,
 tt,
 var,
 b,
 u,
 i,
 center,
 dl,
 dt,
 dd,
 ol,
 ul,
 li,
 fieldset,
 form,
 label,
 legend,
 caption {
     margin: 0;
     padding: 0;
     border: 0;
     outline: 0;
     font-size: 100%;
     vertical-align: baseline;
     background: transparent;
 }

 table,
 tbody,
 tfoot,
 thead,
 tr,
 th,
 td {
     margin: 0;
     padding: 0;
     outline: 0;
     font-size: 100%;
     vertical-align: baseline;
     background: transparent;
 }

 button,
 input,
 textarea {
     margin: 0;
     padding: 0;
 }


 /* form elements 表单元素 */

 body,
 button,
 input,
 select,
 textarea {
     font: normal 12px/1.5 '\5FAE\8F6F\96C5\9ED1', tahoma, arial;
 }


 /*设置的字体,行高*/

 h1,
 h2,
 h3,
 h4,
 h5,
 h6,
 th {
     font-size: 100%;
     font-weight: normal;
 }


 /*重置标题*/

 address,
 cite,
 dfn,
 var {
     font-style: normal;
 }


 /* 将斜体扶正 */

 code,
 kbd,
 pre,
 samp {
     font-family: 'courier new', courier, monospace;
 }


 /* 统一等宽字体 */

 small {
     font-size: 12px;
 }


 /* 小于 12px 的中文很难阅读,让 small 正常化 */

 ul,
 ol {
     list-style: none;
 }


 /* 重置列表元素 */

 button,
 input[type="submit"],
 input[type="button"] {
     cursor: pointer;
 }

 input[type="radio"],
 input[type="checkbox"],
 input[type="submit"],
 input[type="reset"] {
     vertical-align: middle;
     cursor: pointer;
     border: none;
 }


 /** 重置文本格式元素 **/

 a {
     text-decoration: none;
 }

 a:hover {
     text-decoration: underline;
 }

 a:focus {
     outline: 0;
 }

 sup {
     vertical-align: text-top;
 }


 /* 重置,减少对行高的影响 */

 sub {
     vertical-align: text-bottom;
 }


 /** 重置表单元素 **/

 legend {
     color: #000;
 }


 /* for ie6 */

 fieldset,
 img {
     border: 0;
 }


 /* img 搭车:让链接里的 img 无边框 */

 button,
 input,
 select,
 textarea {
     background: transparent;
     font-size: 100%;
     outline: 0;
 }


 /* 使得表单元素在 ie 下能继承字体大小 */


 /* 注:optgroup 无法扶正 */

 table {
     border-collapse: collapse;
     border-spacing: 0;
 }

 td,
 th {
     vertical-align: middle;
 }


 /** 重置表格元素 **/


 /* 重置 HTML5 元素 */

 article,
 aside,
 details,
 figcaption,
 figure,
 footer,
 header,
 hgroup,
 menu,
 nav,
 section,
 summary,
 time,
 mark,
 audio,
 video {
     display: block;
     margin: 0;
     padding: 0;
 }


 /*回复标签重置*/

 blockquote,
 q {
     quotes: none;
 }

 blockquote:before,
 blockquote:after,
 q:before,
 q:after {
     content: '';
     display: none;
 }
02 - 引入
// 在 main.js 中引入
import './assets/css/reset.css';
3. common.css
01 - 代码
// 清除浮动
.clearfix {
  *zoom: 1;
}

......
02 - 引入
// 在 main.js 中引入
import './assets/css/common.css';
五、vue-router 路由配置
Vue3 之 Vue - Router_玄鱼殇的博客-CSDN博客
1. 安装
npm i vue-router2. 配置
在 router文件夹 中的 index.js 中进行配置
// 1. 导入
import { createRouter, createWebHashHistory } from 'vue-router';

// 2. 创建路由对象
const router = createRouter({
  history: createWebHashHistory(),
  routes: [
    {
      path: '/',
      redirect: '/home'
    },
    {
      path: '/home',
      component: () => import('xxx/home.vue')
    }
  ]
});

// 3. 导出
export default router;
3. 引入
// main.js

import { createApp } from 'vue';
import App from './App.vue';
// 1. 导入
import router from './router';

import 'normalize.css';
import './assets/css/reset.css';
import './assets/css/common.css';

// 2. 使用
createApp(App).use(router).mount('#app');
4. 使用
在该用的地方加上
六、pinia 状态管理
Vue3 之 Pinia - 状态管理_玄鱼殇的博客-CSDN博客
1. 安装
npm i pinia2. 创建
在 stores文件夹 中创建 index.js
// 1. 导入
import { createPinia } from 'pinia'
// 2. 创建
const pinia = createPinia()
// 3. 导出
export default pinia
3. 引入
// main.js

import { createApp } from 'vue';
import App from './App.vue';
// 1. 导入
import router from './router';

import 'normalize.css';
import './assets/css/reset.css';
import './assets/css/common.css';

// 2. 使用
createApp(App).use(router).mount('#app');
4. 模块
在 stores文件夹 中创建 modules , 在其中创建模块
// 1. 导入
import { defineStore } from 'pinia';

// 2. 使用
const useDemoStore = defineStore('demoStore', {
  state: () => ({
    arrList: []
  }),
  actions: {},
  getters: {}
});

// 3. 导出
export default useDemoStore;
七、把代码推送到远程仓库
版本控制工具 之 Git_玄鱼殇的博客-CSDN博客
1. 初始化git仓库
git init
2. 配置 name 和 email
这里设定的是针对该仓库的配置
git config --local user.name 'xxxx'
git config --local user.email '[email protected]'
3. 提交代码到本地
git add .
git commit -m 'feat: 项目初始化'
4. 生成远程仓库
5. 本地和远程连接
git remote add origin https://xxxxxx.git
git push -u origin master
八、项目正在开发中
1. 使用百度地图插件
01 - 注册并登录百度账号 百度地图开放平台 | 百度地图API SDK | 地图开发
02 - 成为开发者
点击控制台
填写资料进行注册
03 - 创建应用
应用管理 > 我的应用
创建应用
获取AK
04 - 使用JavaScript API文档
jspopularGL | 百度地图API SDK
ps : 可查看hello world
复制js代码,在index.html中引入
展示地图


