Tensorflow实战(二)——MNIST(CNN实现)
入门篇
《Tensorflow入门(六)——初识卷积神经网络(CNN)》
《Tensorflow入门(七)——CNN经典模型:LeNet》
原文链接:https://my.oschina.net/u/876354/blog/1926060
本文在原文基础上进行细微的修改和完善。
文章目录
-
- 1. 准备数据
- 2. 数据预处理
- 3. 划分数据集
- 4. 配置模型
- 5. 训练模型
- 6. 评估优化
- 7. 模型应用
- 8. 完整代码
关于MNIST的介绍可以参考《Tensorflow实战(一)——MNIST》
在构建AI模型时,一般有以下主要步骤:准备数据、数据预处理、划分数据集、配置模型、训练模型、评估优化、模型应用,如下图所示:
下面将按照主要步骤进行介绍。
注意: 由于MNIST数据集太经典了,很多深度学习书籍在介绍该入门模型案例时,基本上就是直接下载获取数据,然后就进行模型训练,最后得出一个准确率出来。但这样的入门案例学习后,当要拿自己的数据来训练模型,却往往不知该如何处理数据、如何训练、如何应用。在本文,将分两种情况进行介绍:
(1)使用MNIST数据(本案例)
(2)使用自己的数据。
下面将针对模型训练的各个主要环节进行介绍,便于读者快速迁移去训练自己的数据模型。
1. 准备数据
准备数据是训练模型的第一步,基础数据可以是网上公开的数据集,也可以是自己的数据集。视觉、语音、语言等各种类型的数据在网上都能找到相应的数据集。
(1)使用MNIST数据(本案例)
MNIST数据集由于非常经典,已集成在tensorflow里面,可以直接加载使用,也可以从MNIST的官网上(http://yann.lecun.com/exdb/mnist/) 直接下载数据集,代码如下:
# 从tensorflow.examples.tutorials.mnist引入模块。这是TensorFlow为了教学MNIST而提前编制的程序
from tensorflow.examples.tutorials.mnist import input_data

# 从MNIST_data/中读取MNIST数据。这条语句在数据不存在时,会自动执行下载
mnist = input_data.read_data_sets('MNIST_data/', one_hot=True)
集成或下载的MNIST数据集已经是打好标签了,直接使用就行。
(2)使用自己的数据
如果是使用自己的数据集,在准备数据时的重要工作是“标注数据”,也就是对数据进行打标签,主要的标注方式有:
① 整个文件打标签。例如MNIST数据集,每个图像只有1个数字,可以从0至9建10个文件夹,里面放相应数字的图像;也可以定义一个规则对图像进行命名,如按标签+序号命名;还可以在数据库里面创建一张对应表,存储文件名与标签之间的关联关系。如下图:
② 圈定区域打标签。例如ImageNet的物体识别数据集,由于每张图片上有各种物体,这些物体位于不同位置,因此需要圈定某个区域进行标注,目前比较流行的是VOC2007、VOC2012数据格式,这是使用xml文件保存图片中某个物体的名称(name)和位置信息(xmin,ymin,xmax,ymax)。
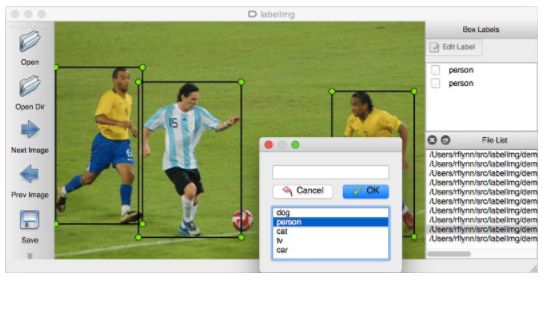
如果图片很多,一张一张去计算位置信息,然后编写xml文件,实在是太耗时耗力了。所幸,有一位大神开源了一个数据标注工具labelImg(https://github.com/tzutalin/labelImg),只要在界面上画框标注,就能自动生成VOC格式的xml文件了,非常方便,如下图所示:
③ 数据截段打标签。针对语音识别、文字识别等,有些是将数据截成一段一段的语音或句子,然后在另外的文件中记录对应的标签信息。
2. 数据预处理
在准备好基础数据之后,需要根据模型需要对基础数据进行相应的预处理。
(1)使用MNIST数据(本案例)
由于MNIST数据集的尺寸统一,只有黑白两种像素,无须再进行额外的预处理,直接拿来建模型就行。
(2)使用自己的数据
而如果是要训练自己的数据,根据模型需要一般要进行以下预处理:
a. 统一格式: 即统一基础数据的格式,例如图像数据集,则全部统一为jpg格式;语音数据集,则全部统一为wav格式;文字数据集,则全部统一为UTF-8的纯文本格式等,方便模型的处理;
b. 调整尺寸: 根据模型的输入要求,将样本数据全部调整为统一尺寸。例如LeNet模型是32x32,AlexNet是224x224,VGG是224x224等;
c. 灰度化: 根据模型需要,有些要求输入灰度图像,有些要求输入RGB彩色图像;
d. 去噪平滑: 为提升输入图像的质量,对图像进行去噪平滑处理,可使用中值滤波器、高斯滤波器等进行图像的去噪处理。如果训练数据集的图像质量很好了,则无须作去噪处理;
e. 其它处理: 根据模型需要进行直方图均衡化、二值化、腐蚀、膨胀等相关的处理;
f. 样本增强: 有一种观点认为神经网络是靠数据喂出来的,如果能够增加训练数据的样本量,提供海量数据进行训练,则能够有效提升算法的质量。常见的样本增强方式有:水平翻转图像、随机裁剪、平移变换,颜色、光照变换等,如下图所示:
3. 划分数据集
在训练模型之前,需要将样本数据划分为训练集、测试集,有些情况下还会划分为训练集、测试集、验证集。
(1)使用MNIST数据(本案例)
本案例要训练模型的MNIST数据集,已经提供了训练集、测试集,代码如下:
# 提取训练集、测试集
train_xdata = mnist.train.images
test_xdata = mnist.test.images

# 提取标签数据
train_labels = mnist.train.labels
test_labels = mnist.test.labels
(2)使用自己的数据
如果是要划分自己的数据集,可使用scikit-learn工具进行划分,代码如下:
from sklearn.model_selection import train_test_split

# 随机选取75%的数据作为训练样本,其余25%的数据作为测试样本
# X_data:数据集
# y_labels:数据集对应的标签
X_train, X_test, y_train, y_test = train_test_split(X_data, y_labels, test_size=0.25, random_state=33)
4. 配置模型
接下来是选择模型、配置模型参数,建议先阅读深度学习经典模型的文章,可以参考《Tensorflow入门(六)——初识卷积神经网络(CNN)》,便于快速掌握深度学习模型的相关知识。
(1)选择模型
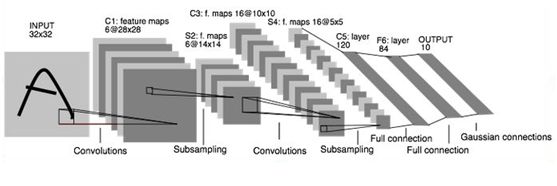
本案例将采用LeNet模型来训练MNIST手写数字模型,LeNet是一个经典卷积神经网络模型,结构简单,针对MNIST这种简单的数据集可达到比较好的效果,LeNet模型的原理介绍请见文章《Tensorflow入门(七)——CNN经典模型:LeNet》,网络结构图如下:
(2)设置参数
在训练模型时,一般要设置的参数有:
step_cnt = 5000         # 训练模型的迭代步数
batch_size = 100        # 每次迭代批量取样本数据的量
learning_rate = 0.001   # 学习率
除此之外还有卷积层权重和偏置、池化层权重、全联接层权重和偏置、优化函数等等,根据模型需要进行设置。
5. 训练模型
接下来便是根据选择好的模型,构建网络,然后开始训练。
(1)构建模型
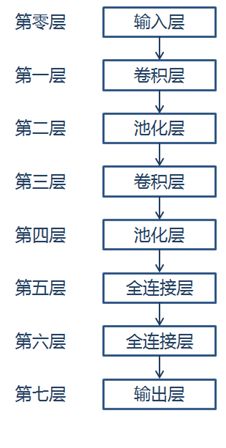
本案例按照LeNet的网络模型结构,构建网络模型,网络结构如下:
代码如下:
# 训练数据,占位符
x = tf.placeholder("float", shape=[None, 784])
# 训练的标签数据,占位符
y_ = tf.placeholder("float", shape=[None, 10])
# 将样本数据转为28x28
x_image = tf.reshape(x, [-1, 28, 28, 1])

# 保留概率,用于 dropout 层
keep_prob = tf.placeholder(tf.float32)

# 第一层:卷积层
# 卷积核尺寸为5x5,通道数为1,深度为32,移动步长为1,采用ReLU激励函数
conv1_weights = tf.get_variable("conv1_weights", [5, 5, 1, 32], initializer=tf.truncated_normal_initializer(stddev=0.1))
conv1_biases = tf.get_variable("conv1_biases", [32], initializer=tf.constant_initializer(0.0))
conv1 = tf.nn.conv2d(x_image, conv1_weights, strides=[1, 1, 1, 1], padding='SAME')
relu1 = tf.nn.relu(tf.nn.bias_add(conv1, conv1_biases))

# 第二层:最大池化层
# 池化核的尺寸为2x2,移动步长为2,使用全0填充
pool1 = tf.nn.max_pool(relu1, ksize=[1, 2, 2, 1], strides=[1, 2, 2, 1], padding='SAME')

# 第三层:卷积层
# 卷积核尺寸为5x5,通道数为32,深度为64,移动步长为1,采用ReLU激励函数
conv2_weights = tf.get_variable("conv2_weights", [5, 5, 32, 64], initializer=tf.truncated_normal_initializer(stddev=0.1))
conv2_biases = tf.get_variable("conv2_biases", [64], initializer=tf.constant_initializer(0.0))
conv2 = tf.nn.conv2d(pool1, conv2_weights, strides=[1, 1, 1, 1], padding='SAME')
relu2 = tf.nn.relu(tf.nn.bias_add(conv2, conv2_biases))

# 第四层:最大池化层
# 池化核尺寸为2x2, 移动步长为2,使用全0填充
pool2 = tf.nn.max_pool(relu2, ksize=[1, 2, 2, 1], strides=[1, 2, 2, 1], padding='SAME')

# 第五层:全连接层
fc1_weights = tf.get_variable("fc1_weights", [7 * 7 * 64, 1024], initializer=tf.truncated_normal_initializer(stddev=0.1))
fc1_baises = tf.get_variable("fc1_baises", [1024], initializer=tf.constant_initializer(0.1))
pool2_vector = tf.reshape(pool2, [-1, 7 * 7 * 64])
fc1 = tf.nn.relu(tf.matmul(pool2_vector, fc1_weights) + fc1_baises)

# Dropout层(即按keep_prob的概率保留数据,其它丢弃),以防止过拟合
fc1_dropout = tf.nn.dropout(fc1, keep_prob)

# 第六层:全连接层
# 神经元节点数1024, 分类节点10
fc2_weights = tf.get_variable("fc2_weights", [1024, 10], initializer=tf.truncated_normal_initializer(stddev=0.1))
fc2_biases = tf.get_variable("fc2_biases", [10], initializer=tf.constant_initializer(0.1))
fc2 = tf.matmul(fc1_dropout, fc2_weights) + fc2_biases

# 第七层:输出层
y_conv = tf.nn.softmax(fc2)
(2)训练模型
在训练模型时,需要选择优化器,也就是说要告诉模型以什么策略来提升模型的准确率,一般是选择交叉熵损失函数,然后使用优化器在反向传播时最小化损失函数,从而使模型的质量在不断迭代中逐步提升。
代码如下:
# 定义交叉熵损失函数
# y_ 为真实标签
cross_entropy = tf.reduce_mean(-tf.reduce_sum(y_ * tf.log(y_conv), reduction_indices=[1]))

# 选择优化器,使优化器最小化损失函数
train_step = tf.train.AdamOptimizer(learning_rate).minimize(cross_entropy)

# 返回模型预测的最大概率的结果,并与真实值作比较
correct_prediction = tf.equal(tf.argmax(y_conv, 1), tf.argmax(y_, 1))

# 用平均值来统计测试准确率
accuracy = tf.reduce_mean(tf.cast(correct_prediction, tf.float32))

# 训练模型
saver = tf.train.Saver()
model_dir = ''
with tf.Session() as sess:
    tf.global_variables_initializer().run()

    for step in range(step_cnt):
        batch = mnist.train.next_batch(batch_size)
        if step % 100 == 0:
            # 每迭代100步进行一次评估,输出结果,保存模型,便于及时了解模型训练进展
            train_accuracy = accuracy.eval(feed_dict={x: batch[0], y_: batch[1], keep_prob: 1.0})
            print("step %d, training accuracy %g" % (step, train_accuracy))
            saver.save(sess, model_dir + '/my_mnist_model.ctpk', global_step=step)
        train_step.run(feed_dict={x: batch[0], y_: batch[1], keep_prob: 0.8})

    # 使用测试数据测试准确率
    print("test accuracy %g" % accuracy.eval(feed_dict={x: mnist.test.images, y_: mnist.test.labels, keep_prob: 1.0}))
训练的结果如下,由于MNIST数据集比较简单,模型训练很快就达到99%的准确率,如下图所示:
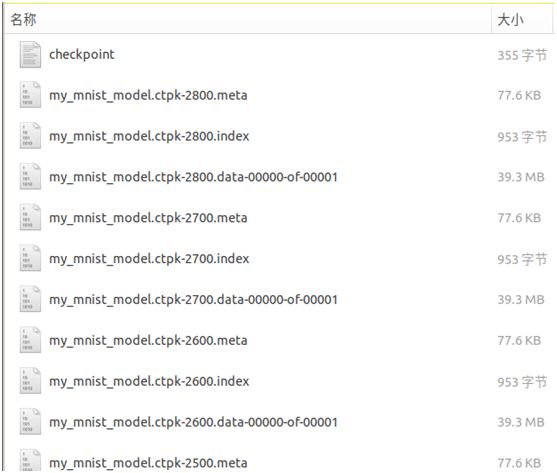
模型训练后保存的结果如下图所示:
6. 评估优化
在使用训练数据完成模型的训练之后,再使用测试数据进行测试,了解模型的泛化能力,代码如下:
# 使用测试数据测试准确率
test_acc = accuracy.eval(feed_dict={x: test_xdata, y_: test_labels, keep_prob: 1.0})
print("test accuracy %g" % test_acc)
模型测试结果如下:
7. 模型应用
模型训练完成后,将模型保存起来,当要实际应用时,则通过加载模型,输入图像进行应用。代码如下:
# 加载 MNIST 模型
saver = tf.train.Saver()
with tf.Session() as sess:
    saver.restore(sess, tf.train.latest_checkpoint(model_dir))

    # 随机提取 MNIST 测试集的一个样本数据和标签
    test_len = len(mnist.test.images)
    test_idx = random.randint(0, test_len-1)
    x_image = mnist.test.images[test_idx]
    y = np.argmax(mnist.test.labels[test_idx])

    # 跑模型进行识别
    y_conv = tf.argmax(y_conv, 1)
    pred=sess.run(y_conv, feed_dict={x: [x_image], keep_prob: 1.0})

    print('正确:', y, ',预测:', pred[0])
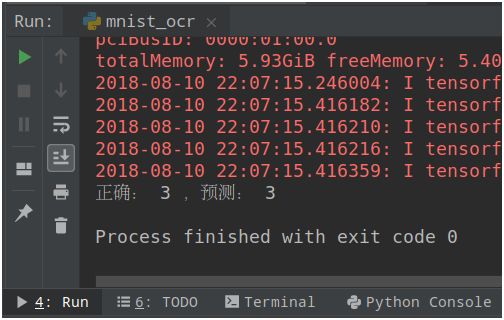
使用模型进行测试的结果如下图:
至此,一个完整的模型训练和应用的过程就介绍完了。
8. 完整代码
# coding: utf-8

# 基于 LeNet5 的 MNIST 手写数字识别模型

import numpy as np
import random
import tensorflow as tf
from tensorflow.examples.tutorials.mnist import input_data

# 数据集路径
data_dir = 'MNIST_data/'

# 自动下载 MNIST 数据集
mnist = input_data.read_data_sets(data_dir, one_hot=True)

# 如果自动下载失败,则手工从官网上下载 MNIST 数据集,然后进行加载
# 下载地址  http://yann.lecun.com/exdb/mnist/
# mnist=input_data.read_data_sets(data_dir,one_hot=True)

# 提取训练集、测试集
train_xdata = mnist.train.images
test_xdata = mnist.test.images

# 提取标签数据
train_labels = mnist.train.labels
test_labels = mnist.test.labels

# 训练数据,占位符
x = tf.placeholder("float", shape=[None, 784])
# 训练的标签数据,占位符
y_ = tf.placeholder("float", shape=[None, 10])
# 将样本数据转为28x28
x_image = tf.reshape(x, [-1, 28, 28, 1])

# 保留概率,用于 dropout 层
keep_prob = tf.placeholder(tf.float32)

# 模型的相关参数
step_cnt = 5000  # 训练模型的迭代次数
batch_size = 100  # 每次迭代时,批量获取样本的数据量
learning_rate = 0.001  # 学习率

# 模型保存路径
model_dir = 'model'


# LeNet5 网络模型
def lenet_network():
    # 第一层:卷积层
    # 卷积核尺寸为5x5,通道数为1,深度为32,移动步长为1,采用ReLU激励函数
    conv1_weights = tf.get_variable("conv1_weights", [5, 5, 1, 32],
                                    initializer=tf.truncated_normal_initializer(stddev=0.1))
    conv1_biases = tf.get_variable("conv1_biases", [32], initializer=tf.constant_initializer(0.0))
    conv1 = tf.nn.conv2d(x_image, conv1_weights, strides=[1, 1, 1, 1], padding='SAME')
    relu1 = tf.nn.relu(tf.nn.bias_add(conv1, conv1_biases))

    # 第二层:最大池化层
    # 池化核的尺寸为2x2,移动步长为2,使用全0填充
    pool1 = tf.nn.max_pool(relu1, ksize=[1, 2, 2, 1], strides=[1, 2, 2, 1], padding='SAME')

    # 第三层:卷积层
    # 卷积核尺寸为5x5,通道数为32,深度为64,移动步长为1,采用ReLU激励函数
    conv2_weights = tf.get_variable("conv2_weights", [5, 5, 32, 64],
                                    initializer=tf.truncated_normal_initializer(stddev=0.1))
    conv2_biases = tf.get_variable("conv2_biases", [64], initializer=tf.constant_initializer(0.0))
    conv2 = tf.nn.conv2d(pool1, conv2_weights, strides=[1, 1, 1, 1], padding='SAME')
    relu2 = tf.nn.relu(tf.nn.bias_add(conv2, conv2_biases))

    # 第四层:最大池化层
    # 池化核尺寸为2x2, 移动步长为2,使用全0填充
    pool2 = tf.nn.max_pool(relu2, ksize=[1, 2, 2, 1], strides=[1, 2, 2, 1], padding='SAME')

    # 第五层:全连接层
    fc1_weights = tf.get_variable("fc1_weights", [7 * 7 * 64, 1024],
                                  initializer=tf.truncated_normal_initializer(stddev=0.1))
    fc1_baises = tf.get_variable("fc1_baises", [1024], initializer=tf.constant_initializer(0.1))
    pool2_vector = tf.reshape(pool2, [-1, 7 * 7 * 64])
    fc1 = tf.nn.relu(tf.matmul(pool2_vector, fc1_weights) + fc1_baises)

    # Dropout层(即按keep_prob的概率保留数据,其它丢弃),以防止过拟合
    fc1_dropout = tf.nn.dropout(fc1, keep_prob)

    # 第六层:全连接层
    fc2_weights = tf.get_variable("fc2_weights", [1024, 10],
                                  initializer=tf.truncated_normal_initializer(stddev=0.1))  # 神经元节点数1024, 分类节点10
    fc2_biases = tf.get_variable("fc2_biases", [10], initializer=tf.constant_initializer(0.1))
    fc2 = tf.matmul(fc1_dropout, fc2_weights) + fc2_biases

    # 第七层:输出层
    y_conv = tf.nn.softmax(fc2)

    return y_conv


# 训练模型
def train_model():
    # 加载 LeNet5 网络结构
    y_conv = lenet_network()

    # 定义交叉熵损失函数
    # y_ 为真实标签
    cross_entropy = tf.reduce_mean(-tf.reduce_sum(y_ * tf.log(y_conv), reduction_indices=[1]))

    # 选择优化器,使优化器最小化损失函数
    train_step = tf.train.AdamOptimizer(learning_rate).minimize(cross_entropy)

    # 返回模型预测的最大概率的结果,并与真实值作比较
    correct_prediction = tf.equal(tf.argmax(y_conv, 1), tf.argmax(y_, 1))

    # 用平均值来统计测试准确率
    accuracy = tf.reduce_mean(tf.cast(correct_prediction, tf.float32))

    # 训练模型
    saver = tf.train.Saver()
    with tf.Session() as sess:
        tf.global_variables_initializer().run()

        for step in range(step_cnt):
            batch = mnist.train.next_batch(batch_size)
            if step % 100 == 0:
                # 每迭代100步进行一次评估,输出结果,保存模型,便于及时了解模型训练进展
                train_accuracy = accuracy.eval(feed_dict={x: batch[0], y_: batch[1], keep_prob: 1.0})
                print("step %d, training accuracy %g" % (step, train_accuracy))
                saver.save(sess, model_dir + '/my_mnist_model.ctpk', global_step=step)
            train_step.run(feed_dict={x: batch[0], y_: batch[1], keep_prob: 0.8})

        # 使用测试数据测试准确率
        test_acc = accuracy.eval(feed_dict={x: test_xdata, y_: test_labels, keep_prob: 1.0})
        print("test accuracy %g" % test_acc)


# 模型测试应用
def test_model():
    # 加载 LeNet5 网络结构
    y_conv = lenet_network()

    # 加载 MNIST 模型
    saver = tf.train.Saver()
    with tf.Session() as sess:
        saver.restore(sess, tf.train.latest_checkpoint(model_dir))

        # 随机提取 MNIST 测试集的一个样本数据和标签
        test_len = len(mnist.test.images)
        test_idx = random.randint(0, test_len - 1)
        x_image = mnist.test.images[test_idx]
        y = np.argmax(mnist.test.labels[test_idx])

        # 跑模型进行识别
        y_conv = tf.argmax(y_conv, 1)
        pred = sess.run(y_conv, feed_dict={x: [x_image], keep_prob: 1.0})

        print('正确:', y, ',预测:', pred[0])


if __name__ == "__main__":
    # 训练模型
    train_model()

    # 测试应用模型
    # test_model()
该代码运行后默认为训练模型,若要测试模型,则仅需将最后一段改为:
if __name__ == "__main__":
    # 训练模型
    # train_model()

    # 测试应用模型
    test_model()


