图漾深度相机开发-PCL点云实时显示
目录
- 1. 从示例程序 SimpleView_FetchFrame 开始
-
- 程序功能
- 程序解读
- 2. 创建自己的点云处理程序
-
- 文件结构
- 创建点云
- 点云图实时显示完整代码
- 3. 新建工程
- 相机型号:图漾科技 FS820 深度相机
【参数信息】【深度相机开发说明文档】【SDK下载】 - 编译环境:Ubuntu 18.04 / C++ / VS code
- 安装库:OpenCV + PCL
- 图漾深度相机初步使用流程见博客,在能简单应用相机示例程序的基础上,对相机进行开发,以实现三维点云处理,本文实现的功能是显示实时点云图。
1. 从示例程序 SimpleView_FetchFrame 开始
程序功能
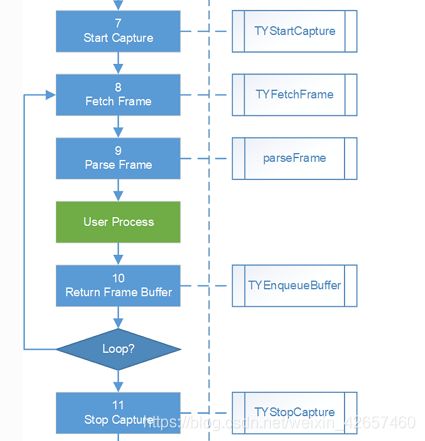
SimpleView_FetchFrame 是深度相机获取图像数据并在数据获取线程中进行 OpenCV 渲染的示例程序,以此为例说明图像获取流程【图像获取的完整流程】
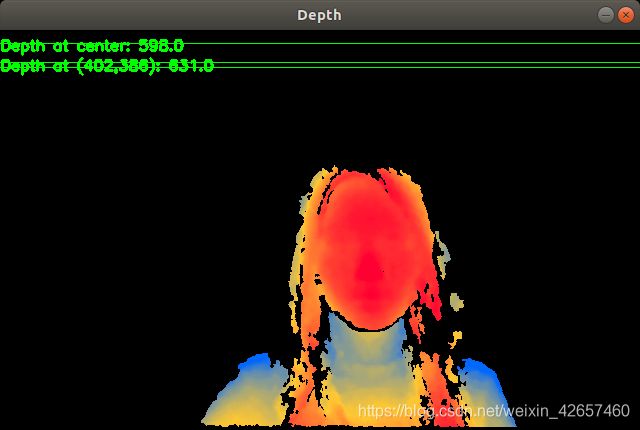
运行程序,生成 color彩色图像、depth深度图像、leftIR、rightIR 窗口
程序解读
打开 sample/SimpleView_FetchFrame/main.cpp,解读代码:
从主函数开始阅读,可以看到多个 LOGD() 函数,这些函数实现的是打印功能,相当于程序中的注释(如 LOGD("Init lib"),说明下一段代码的功能是初始化 API,初始化设备对象等数据结构)
对于开发者而言,我们需要关注的是如何获取相机的数据,以进行后续的处理,也就是下图中的 Loop 循环部分,这一循环的作用是不断获取相机的帧数据,并对数据进行处理(本例中的处理效果即为生成 color彩色图像、depth深度图像、leftIR、rightIR 窗口)

因此我们继续往下阅读代码,读到 LOGD("While loop to fetch frame") 语句,下面一段程序的功能就是获取相机帧循环,贴出代码进行解读:
LOGD("While loop to fetch frame");
    bool exit_main = false;
    TY_FRAME_DATA frame;
    int index = 0;
    while(!exit_main) {
        int err = TYFetchFrame(hDevice, &frame, -1);
        if( err == TY_STATUS_OK ) {
            LOGD("Get frame %d", ++index);

            int fps = get_fps();
            if (fps > 0){
                LOGI("fps: %d", fps);
            }

            cv::Mat depth, irl, irr, color;
            parseFrame(frame, &depth, &irl, &irr, &color, hColorIspHandle);
            if(!depth.empty()){
                depthViewer.show(depth);
            }
            if(!irl.empty()){ cv::imshow("LeftIR", irl); }
            if(!irr.empty()){ cv::imshow("RightIR", irr); }
            if(!color.empty()){ cv::imshow("Color", color); }

            int key = cv::waitKey(1);
            switch(key & 0xff) {
            case 0xff:
                break;
            case 'q':
                exit_main = true;
                break;
            default:
                LOGD("Unmapped key %d", key);
            }

            TYISPUpdateDevice(hColorIspHandle);
            LOGD("Re-enqueue buffer(%p, %d)"
                , frame.userBuffer, frame.bufferSize);
            ASSERT_OK( TYEnqueueBuffer(hDevice, frame.userBuffer, frame.bufferSize) );
        }
    }
首先定义了 bool 型变量exit_main:作为循环的标志位,while(!exit_main) 表示当 exit_main = 1 时循环结束
- Fetch Frame
这一段代码的功能是获取相机的帧信息,即 frame:
int err = TYFetchFrame(hDevice, &frame, -1);
        if( err == TY_STATUS_OK ) {
            LOGD("Get frame %d", ++index);

            int fps = get_fps();
            if (fps > 0){
                LOGI("fps: %d", fps);
            }
这段代码的核心部分为:TYFetchFrame(hDevice, &frame, -1),函数功能为 Fetch one frame,即通过输入 hDevice 这一参数,获取一帧相机的信息到 frame 中,如果成功获取帧信息,则返回值为 TY_STATUS_OK
当 err == TY_STATUS_OK (成功获取帧信息)时,会打印信息:Get frame + (index 的值),表示当前获取的是第几帧,index 在每次循环中加1,如下图所示:
- Parse Frame
这一段代码的功能是解析获取的帧信息:
cv::Mat depth, irl, irr, color;
parseFrame(frame, &depth, &irl, &irr, &color, hColorIspHandle);
首先定义 cv::Mat 类型的深度图 depth,彩色图 color,左红外图像 irl,右红外图像 irr
接着通过 parseFrame() 函数解析 frame,分别生成深度图、左右红外图和彩色图
- User Process
在解析帧后,我们成功得到了相机的深度图 depth 和彩色图 color 等,用户就可以利用获取的数据进行处理和开发了,示例程序中实现的是简单的图像显示功能,即分别可视化深度图、左右红外图和彩色图:
if(!depth.empty()){
                depthViewer.show(depth);
            }
            if(!irl.empty()){ cv::imshow("LeftIR", irl); }
            if(!irr.empty()){ cv::imshow("RightIR", irr); }
            if(!color.empty()){ cv::imshow("Color", color); }

            int key = cv::waitKey(1);
            switch(key & 0xff) {
            case 0xff:
                break;
            case 'q':
                exit_main = true;
                break;
            default:
                LOGD("Unmapped key %d", key);
            }
如果在 openCV 的图窗中,键盘按下 q 键,则exit_main = true,整个帧循环会结束
- Return Frame Buffer
TYISPUpdateDevice(hColorIspHandle);
LOGD("Re-enqueue buffer(%p, %d)" , frame.userBuffer, frame.bufferSize);
ASSERT_OK( TYEnqueueBuffer(hDevice, frame.userBuffer, frame.bufferSize) );
更新设备状态,将 frame buffer 推入帧缓冲队列
2. 创建自己的点云处理程序
文件结构
最简单的方式是直接在 sample 文件夹创建一个新的文件夹例如 point3D,并在该文件夹中创建 main.cpp ,接着在 CMakeLists.txt 中修改以下部分即可:
set(ALL_SAMPLES
    point3D  # 加上自己命名的文件夹
    DumpAllFeatures
    ListDevices
    ...
在 sample/build 目录下打开终端,重新编译运行即可:
cmake ..
make
cd bin
sudo ./point3D
创建点云
根据对示例程序的分析可知,通过 parseFrame(frame, &depth, &irl, &irr, &color, hColorIspHandle) 语句可以获取相机的深度图和彩色图,处理深度图得到位置信息 ( x , y , z ) (x, y, z) (x,y,z) ,处理彩色图得到颜色信息 ( r , g , b ) (r, g, b) (r,g,b) ,最终生成包含颜色信息的点云图
使用 Point CLoud Library 处理点云,首先需要安装 PCL 库:
- 安装 PCL 库
sudo apt install libpcl-dev
- 修改 CMakeLists.txt 添加 PCL 库
添加如下语句:
# ========================================
# === PCL
# ========================================
find_package(PCL 1.8 REQUIRED)
    include_directories(${PCL_INCLUDE_DIRS})
    link_directories(${PCL_LIBRARY_DIRS})
    add_definitions(${PCL_DEFINITIONS})
修改倒数第五行:
target_link_libraries(${sample} sample_common ${ABSOLUTE_TARGET_LIB} ${OpenCV_LIBS} ${CLOUD_VIEWER} ${PCL_LIBRARIES})
- Map depth image to 3D points
根据深度相机的标定参数,将深度图映射为三维点云:
(1) 首先需要获取深度相机的标定参数,根据官方文档可知,利用 TYGetStruct() 函数即可:
 TY_CAMERA_CALIB_INFO depth_calib;
 TYGetStruct(hDevice, TY_COMPONENT_DEPTH_CAM
 , TY_STRUCT_CAM_CALIB_DATA, &depth_calib,sizeof(depth_calib));  //  提取深度相机的标定数据
(2) 接着将深度图转换为三维数据:
std::vector<TY_VECT_3F> p3d;  // p3d 用于存储三维数据
TYMapDepthImageToPoint3d(&depth_calib, depth.cols, depth.rows
, (uint16_t*)depth.data, &p3d[0]);  // 输入深度数据和标定数据,输出三维数据
p3d[i].x 表示第 i 个点的 x值;p3d[i].y 表示第 i 个点的 y值;p3d[i].z 表示第 i 个点的 z值
- Map original RGB image to depth coordinate RGB image
根据彩色相机的标定参数,将彩色图与深度图对齐:
(1) 首先需要获取彩色相机的标定参数,根据官方文档可知,利用 TYGetStruct() 函数即可:
 TY_CAMERA_CALIB_INFO color_calib;
 TYGetStruct(hDevice, TY_COMPONENT_RGB_CAM, TY_STRUCT_CAM_CALIB_DATA
, &color_calib, sizeof(color_calib));  // 提取彩色相机的标定数据
(2) 彩色图与深度图对齐:
首先定义函数doRgbRegister(),实现对齐功能:
// 定义一个函数 doRgbRegister(),实现对齐功能
static void doRgbRegister(const TY_CAMERA_CALIB_INFO& depth_calib
                       , const TY_CAMERA_CALIB_INFO& color_calib
                       , const cv::Mat& depth
                       , const cv::Mat& color
                       , cv::Mat& out
                       )
{
    // do rgb undistortion
    TY_IMAGE_DATA src;
    src.width = color.cols;
    src.height = color.rows;
    src.size = color.size().area() * 3;
    src.pixelFormat = TY_PIXEL_FORMAT_RGB;
    src.buffer = color.data;

    cv::Mat  undistort_color = cv::Mat(color.size(), CV_8UC3);
    TY_IMAGE_DATA dst;
    dst.width = color.cols;
    dst.height = color.rows;
    dst.size = undistort_color.size().area() * 3;
    dst.buffer = undistort_color.data;
    dst.pixelFormat = TY_PIXEL_FORMAT_RGB;
    TYUndistortImage(&color_calib, &src, NULL, &dst);

    // do register
    out.create(depth.size(), CV_8UC3);
        TYMapRGBImageToDepthCoordinate(
        &depth_calib,
        depth.cols, depth.rows, depth.ptr<uint16_t>(),
        &color_calib,
        undistort_color.cols, undistort_color.rows, undistort_color.ptr<uint8_t>(),
        out.ptr<uint8_t>());
}
在主函数中调用函数doRgbRegister():
cv::Mat color_data_mat;  // color_data_mat 为对齐后的彩色图
if (!color.empty())
{
bool hasColorCalib;
TYHasFeature(hDevice, TY_COMPONENT_RGB_CAM, TY_STRUCT_CAM_CALIB_DATA, &hasColorCalib);  // 查询有无彩色相机标定参数这一属性
    if (hasColorCalib)
    {
    doRgbRegister(depth_calib, color_calib, depth, color, color_data_mat); // 输入深度相机标定数据、彩色相机标定数据、深度图和彩色图,输出对齐后的彩色图
    cv::cvtColor(color_data_mat, color_data_mat, cv::COLOR_BGR2RGB);  // BGR 格式转换为 RGB 格式
    }
}
- 生成 PointXYZRGB 类型点云(核心代码)
pcl::PointCloud<pcl::PointXYZRGB> cloud; // 生成的点云 cloud
pcl::PointXYZRGB point;

for (int m = 0; m < depth.rows; m++)
    {
        for (int n=0; n < depth.cols; n++)
        {
            point.x = p3d[(m*(depth.cols)+n)].x;
            point.y = p3d[(m*(depth.cols)+n)].y;
            point.z = p3d[(m*(depth.cols)+n)].z;

            point.r = color_data_mat.at<cv::Vec3b>(m, n)[0];
            point.g = color_data_mat.at<cv::Vec3b>(m, n)[1];
            point.b =color_data_mat.at<cv::Vec3b>(m, n)[2];

            cloud.points.push_back(point); // 构造xyzrgb类型点云
        }
    }
    cloud.width = (uint32_t)cloud.points.size();
    cloud.height = 1;
- 点云可视化
boost::shared_ptr<pcl::visualization::PCLVisualizer> viewer1(new pcl::visualization::PCLVisualizer("3D Viewer"));

pcl::PointCloud<pcl::PointXYZRGB>::Ptr basic_cloud_ptr(new pcl::PointCloud<pcl::PointXYZRGB>);
basic_cloud_ptr = cloud.makeShared(); // 转换为指针格式 basic_cloud_ptr
basic_cloud_ptr->is_dense = false;  //  自己创建的点云,默认为dense,需要修改属性,否则removenanfrompointcloud函数无效
pcl::PointCloud<pcl::PointXYZRGB>::Ptr cloud_ptr(new pcl::PointCloud<pcl::PointXYZRGB>);
std::vector<int> mapping;
pcl::removeNaNFromPointCloud(*basic_cloud_ptr, *cloud_ptr, mapping); // 移除无效点

viewer1->removeAllPointClouds();  // 移除当前所有点云
viewer1->addPointCloud<pcl::PointXYZRGB> (cloud_ptr, "initial");
viewer1->updatePointCloud(cloud_ptr, "initial");
viewer1->spinOnce(100);
点云图实时显示完整代码
#include ] [-ip ]" );
return 0;
}
}
LOGD("Init lib");
ASSERT_OK( TYInitLib() );
TY_VERSION_INFO ver;
ASSERT_OK( TYLibVersion(&ver) );
LOGD(" - lib version: %d.%d.%d", ver.major, ver.minor, ver.patch);
std::vector<TY_DEVICE_BASE_INFO> selected;
ASSERT_OK( selectDevice(TY_INTERFACE_ALL, ID, IP, 1, selected) );
ASSERT(selected.size() > 0);
TY_DEVICE_BASE_INFO& selectedDev = selected[0];
ASSERT_OK( TYOpenInterface(selectedDev.iface.id, &hIface) );
ASSERT_OK( TYOpenDevice(hIface, selectedDev.id, &hDevice) );
int32_t allComps;
ASSERT_OK( TYGetComponentIDs(hDevice, &allComps) );
///try to enable color camera
if(allComps & TY_COMPONENT_RGB_CAM && color) {
LOGD("Has RGB camera, open RGB cam");
ASSERT_OK( TYEnableComponents(hDevice, TY_COMPONENT_RGB_CAM) );
//create a isp handle to convert raw image(color bayer format) to rgb image
ASSERT_OK(TYISPCreate(&hColorIspHandle));
//Init code can be modified in common.hpp
//NOTE: Should set RGB image format & size before init ISP
ASSERT_OK(ColorIspInitSetting(hColorIspHandle, hDevice));
//You can call follow function to show color isp supported features
#if 0
ColorIspShowSupportedFeatures(hColorIspHandle);
#endif
//You can turn on auto exposure function as follow ,but frame rate may reduce .
//Device may be casually stucked 1~2 seconds while software is trying to adjust device exposure time value
#if 0
ASSERT_OK(ColorIspInitAutoExposure(hColorIspHandle, hDevice));
#endif
}
if (allComps & TY_COMPONENT_IR_CAM_LEFT && ir) {
LOGD("Has IR left camera, open IR left cam");
ASSERT_OK(TYEnableComponents(hDevice, TY_COMPONENT_IR_CAM_LEFT));
}
if (allComps & TY_COMPONENT_IR_CAM_RIGHT && ir) {
LOGD("Has IR right camera, open IR right cam");
ASSERT_OK(TYEnableComponents(hDevice, TY_COMPONENT_IR_CAM_RIGHT));
}
//try to enable depth map
LOGD("Configure components, open depth cam");
if (allComps & TY_COMPONENT_DEPTH_CAM && depth) {
int32_t image_mode;
ASSERT_OK(get_default_image_mode(hDevice, TY_COMPONENT_DEPTH_CAM, image_mode));
LOGD("Select Depth Image Mode: %dx%d", TYImageWidth(image_mode), TYImageHeight(image_mode));
ASSERT_OK(TYSetEnum(hDevice, TY_COMPONENT_DEPTH_CAM, TY_ENUM_IMAGE_MODE, image_mode));
ASSERT_OK(TYEnableComponents(hDevice, TY_COMPONENT_DEPTH_CAM));
//depth map pixel format is uint16_t ,which default unit is 1 mm
//the acutal depth (mm)= PixelValue * ScaleUnit
}
LOGD("Prepare image buffer");
uint32_t frameSize;
ASSERT_OK( TYGetFrameBufferSize(hDevice, &frameSize) );
LOGD(" - Get size of framebuffer, %d", frameSize);
LOGD(" - Allocate & enqueue buffers");
char* frameBuffer[2];
frameBuffer[0] = new char[frameSize];
frameBuffer[1] = new char[frameSize];
LOGD(" - Enqueue buffer (%p, %d)", frameBuffer[0], frameSize);
ASSERT_OK( TYEnqueueBuffer(hDevice, frameBuffer[0], frameSize) );
LOGD(" - Enqueue buffer (%p, %d)", frameBuffer[1], frameSize);
ASSERT_OK( TYEnqueueBuffer(hDevice, frameBuffer[1], frameSize) );
LOGD("Register event callback");
ASSERT_OK(TYRegisterEventCallback(hDevice, eventCallback, NULL));
bool hasTrigger;
ASSERT_OK(TYHasFeature(hDevice, TY_COMPONENT_DEVICE, TY_STRUCT_TRIGGER_PARAM, &hasTrigger));
if (hasTrigger) {
LOGD("Disable trigger mode");
TY_TRIGGER_PARAM trigger;
trigger.mode = TY_TRIGGER_MODE_OFF;
ASSERT_OK(TYSetStruct(hDevice, TY_COMPONENT_DEVICE, TY_STRUCT_TRIGGER_PARAM, &trigger, sizeof(trigger)));
}
LOGD("Start capture");
ASSERT_OK( TYStartCapture(hDevice) );
LOGD("While loop to fetch frame");
TY_FRAME_DATA frame;
boost::shared_ptr<pcl::visualization::PCLVisualizer> viewer1(new pcl::visualization::PCLVisualizer("3D Viewer"));
while(!viewer1->wasStopped()){
int err = TYFetchFrame(hDevice, &frame, -1);
cv::Mat depth, irl, irr, color;
parseFrame(frame, &depth, &irl, &irr, &color, hColorIspHandle);
std::vector<TY_VECT_3F> p3d;
TY_CAMERA_CALIB_INFO depth_calib;
TY_CAMERA_CALIB_INFO color_calib;
pcl::PointCloud<pcl::PointXYZRGB> cloud;
pcl::PointXYZRGB point;
p3d.resize(depth.size().area());
TYGetStruct(hDevice, TY_COMPONENT_DEPTH_CAM, TY_STRUCT_CAM_CALIB_DATA, &depth_calib, sizeof(depth_calib)); // 提取深度相机的标定数据
TYGetStruct(hDevice, TY_COMPONENT_RGB_CAM, TY_STRUCT_CAM_CALIB_DATA, &color_calib, sizeof(color_calib)); // 提取RGB相机的标定数据
TYMapDepthImageToPoint3d(&depth_calib, depth.cols, depth.rows, (uint16_t*)depth.data, &p3d[0]); // 深度图像->xyz点云
cv::Mat color_data_mat;
if (!color.empty())
{
bool hasColorCalib;
TYHasFeature(hDevice, TY_COMPONENT_RGB_CAM, TY_STRUCT_CAM_CALIB_DATA, &hasColorCalib);
if (hasColorCalib)
{
doRgbRegister(depth_calib, color_calib, depth, color, color_data_mat);
cv::cvtColor(color_data_mat, color_data_mat, cv::COLOR_BGR2RGB);
}
}
for (int m = 0; m < depth.rows; m++)
{
for (int n=0; n < depth.cols; n++)
{
point.x = p3d[(m*(depth.cols)+n)].x;
point.y = p3d[(m*(depth.cols)+n)].y;
point.z = p3d[(m*(depth.cols)+n)].z;
point.r = color_data_mat.at<cv::Vec3b>(m, n)[0];
point.g = color_data_mat.at<cv::Vec3b>(m, n)[1];
point.b =color_data_mat.at<cv::Vec3b>(m, n)[2];
cloud.points.push_back(point); // 构造xyzrgb类型点云
}
}
cloud.width = (uint32_t)cloud.points.size();
cloud.height = 1;
pcl::PointCloud<pcl::PointXYZRGB>::Ptr basic_cloud_ptr(new pcl::PointCloud<pcl::PointXYZRGB>);
basic_cloud_ptr = cloud.makeShared(); // 转换为指针格式 basic_cloud_ptr
basic_cloud_ptr->is_dense = false; // 自己创建的点云,默认为dense,需要修改属性,否则removenanfrompointcloud函数无效
pcl::PointCloud<pcl::PointXYZRGB>::Ptr cloud_ptr(new pcl::PointCloud<pcl::PointXYZRGB>);
std::vector<int> mapping;
pcl::removeNaNFromPointCloud(*basic_cloud_ptr, *cloud_ptr, mapping); // 移除无效点
viewer1->removeAllPointClouds(); // 移除当前所有点云
viewer1->addPointCloud<pcl::PointXYZRGB> (cloud_ptr, "initial");
viewer1->updatePointCloud(cloud_ptr, "initial");
viewer1->spinOnce(100);
TYISPUpdateDevice(hColorIspHandle);
LOGD("Re-enqueue buffer(%p, %d)", frame.userBuffer, frame.bufferSize);
ASSERT_OK( TYEnqueueBuffer(hDevice, frame.userBuffer, frame.bufferSize));
}
ASSERT_OK( TYStopCapture(hDevice) );
ASSERT_OK( TYCloseDevice(hDevice) );
ASSERT_OK( TYCloseInterface(hIface) );
ASSERT_OK(TYISPRelease(&hColorIspHandle));
ASSERT_OK( TYDeinitLib() );
LOGD("Main done!");
return 0;
}
3. 新建工程
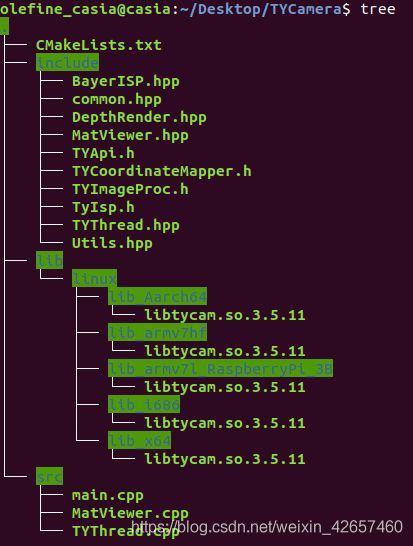
如果不想使用官方 SDK 的文件结构,自己新建一个项目,可以新建工程文件夹 TYCamera,文件结构如图:

除了 CMakeLists.txt 和 main.cpp,其他的文件都可以直接从官方 SDK 中拷贝,main.cpp 即为上一节中的点云图实时显示完整代码
CMakeLists.txt 修改为:
(可以正常运行,但我对 cmake 不是很熟悉,写法上可能有不规范之处)
cmake_minimum_required(VERSION 2.8)
project(rgbd_camera)

if (NOT TARGET tycam)
    #only build samples
    option (OpenCV_STATIC OFF)
    set(INCLUDE_PATH include)
    include_directories(${INCLUDE_PATH})
    set(ABSOLUTE_TARGET_LIB tycam)
    add_library(${ABSOLUTE_TARGET_LIB} SHARED IMPORTED)
    if(ARCH)
        set_property(TARGET ${ABSOLUTE_TARGET_LIB} PROPERTY IMPORTED_LOCATION ${CMAKE_CURRENT_SOURCE_DIR}/../lib/linux/lib_${ARCH}/libtycam.so)
    else()
        set(ABSOLUTE_TARGET_LIB -ltycam)
    endif()
endif()

# ========================================
# === common, build static lib to speed up
# ========================================
set(COMMON_SOURCES src/MatViewer.cpp src/TYThread.cpp)

add_library(sample_common STATIC ${COMMON_SOURCES})

if(UNIX)
  target_link_libraries(sample_common pthread)
endif()

# ========================================
# === OpenCV
# ========================================
set(OpenCV_DIR "/home/olefine_casia/opencv-4.5.1/build/")
find_package(OpenCV REQUIRED)
if (NOT OpenCV_FOUND)
    message(FATAL_ERROR "OpenCV library not found")
else()
    include_directories(${OpenCV_INCLUDE_DIRS})
    include_directories(${OpenCV2_INCLUDE_DIRS})
    # if(CMAKE_BUILD_TYPE STREQUAL Debug)
    # link_directories(${OpenCV_LIB_DIR_DBG})
    # else()
    # link_directories(${OpenCV_LIB_DIR_OPT})
    # endif()
   link_directories(${OpenCV_LIB_DIR})

endif()

# ========================================
# === PCL
# ========================================
find_package(PCL 1.8 REQUIRED)
    include_directories(${PCL_INCLUDE_DIRS})
    link_directories(${PCL_LIBRARY_DIRS})
    add_definitions(${PCL_DEFINITIONS})


aux_source_directory(./src/ DIR_SRCS)

add_executable(rgbd_camera  ${DIR_SRCS})

include_directories (
    ${CMAKE_CURRENT_SOURCE_DIR}/include
    )

target_link_libraries(rgbd_camera
${ABSOLUTE_TARGET_LIB} ${OpenCV_LIBS} ${PCL_LIBRARIES}
)

