rosbag录制数据与解包
文章目录
- 一、rosbag录制数据
- 二、bag数据播放
- 三、bag解包出图像数据(三种方式)
-
- 1.ROS Wiki提供的roslaunch文件解包
- 2.python解包
- 3.用kalibr的一个工具解包
- 总结
一、rosbag录制数据
使用rosbag record命令
rosbag record -O [bag_name] [topic1] [topic2] [...] #不加中括号
-O大写,后面对录制的bag命名,再之后跟要录制的topic名字(用rostopic list查询当前所有的topic)。
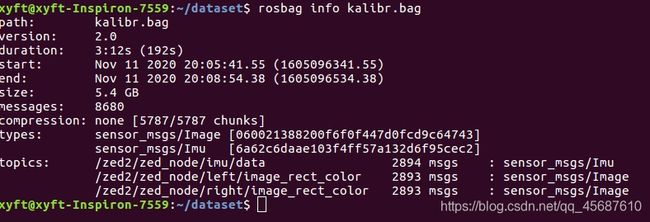
录制结束后,在当前shell所在路径会生成后缀为.bag的数据包,使用rosbag info来查看该数据包的信息
rosbag info [bag_file] #不加中括号
应该会输出该bag存储的topic名字和帧数,如果报错,说明该包有损坏(常见于U盘拷贝的情况)。正常输出类似于下面这样:
tips:这里顺便记录一下rostopic的用法
查看当前所有的topic:rostopic list
查看某个topic的输出:rostopic echo [topic_name]
查看某个topic的发布频率:rostopic hz [topic_name]
查看某个topic的数据格式:rostopic echo [topic_name]/encoding
二、bag数据播放
用rosbag play命令
rosbag play [bag_file] #不加中括号
播放的意思是指将bag所记录的所有内容重新进行了一遍,按空格暂停和继续。播放时可在rviz里add相应的topic进行查看。
三、bag解包出图像数据(三种方式)
参考链接https://www.codeleading.com/article/11362024892/的内容,这里介绍两种解包的方法。
1.ROS Wiki提供的roslaunch文件解包
新建launch文件(文件在哪无所谓) : bag2img.launch
args="/home/user/test1.bag"是bag的存放路径,"/zed2/zed_node/depth/depth_registered"是要解析的topic名称。
**< param name=“sec_per_frame” value=“0.03”/>**这句话是说,以每一帧花费0.03s的时间,这个条件对你的bag文件进行图像提取,如果没有这句话,就是默认0.1s,也就是没秒10帧的速率对图像提取。经过我的测试发现,无论怎么调整这个值,都无法跟bag文件中的信息数目匹配,因此来说,这种方法存在一定的图像缺失的情况,只能无限接近袁原始图像的数目,比如我的原始数据有640帧,但经过调整sec_per_frame的值,最高的时候还是只能到639,多数情况下到637,默认值0.1的时候,只有200多张图像。原因是实际录制时相机的帧率不是绝对稳定的,而解析时设置了固定的时间间隔,这个误差会累积下去,帧数越多,最后漏掉的就越多。
运行roslaunch:
roslaunch bag2img.launch
提取成功的图像存储在home文件夹下的.ros文件夹下,一般是隐藏的文件夹,使用crtl+h可显示出来。
优点:操作简单,使用ros即可;缺点:提取信息与原始录制的信息并不完全一致,主要体现在提取的图片数量和ros录制的时候的信息数量不一致,会少。此外,不含有时间戳;
2.python解包
通过编写Python程序按照我们想要的信息及方式来提取,在与bag文件同级目录下建立.py文件(方便操作,若不是同级目录,下面代码中要写绝对路径)
代码如下(示例):
# coding:utf-8
#!/usr/bin/python

# Extract images from a bag file.

#PKG = 'beginner_tutorials'
import roslib;   #roslib.load_manifest(PKG)
import rosbag
import rospy
import cv2
from sensor_msgs.msg import Image
from cv_bridge import CvBridge
from cv_bridge import CvBridgeError

# Reading bag filename from command line or roslaunch parameter.
#import os
#import sys

rgb_path = '/home/david/workspace/bags/rgb/'   #已经建立好的存储rgb彩色图文件的目录
depth_path= '/home/david/workspace/bags/depth/' # 已经建立好的存储深度图文件的目录

class ImageCreator():
    def __init__(self):
        self.bridge = CvBridge()
        with rosbag.Bag('/home/andy/bag_folder/file_name.bag', 'r') as bag:  #要读取的bag文件;
            for topic,msg,t in bag.read_messages():
                if topic == "camera/rgb/image_raw": #图像的topic;
                        try:
                            cv_image = self.bridge.imgmsg_to_cv2(msg,"bgr8")
                        except CvBridgeError as e:
                            print e
                        timestr = "%.6f" %  msg.header.stamp.to_sec()
                        #%.6f表示小数点后带有6位,可根据精确度需要修改;
                        image_name = timestr+ ".png" #图像命名:时间戳.png
                        cv2.imwrite(rgb_path + image_name, cv_image)  #保存;
                elif topic == "camera/depth_registered/image_raw": #图像的topic;
                        try:
                            cv_image = self.bridge.imgmsg_to_cv2(msg,"16UC1")
                        except CvBridgeError as e:
                            print e
                        timestr = "%.6f" %  msg.header.stamp.to_sec()
                        #%.6f表示小数点后带有6位,可根据精确度需要修改;
                        image_name = timestr+ ".png" #图像命名:时间戳.png
                        cv2.imwrite(depth_path + image_name, cv_image)  #保存;

if __name__ == '__main__':
    #rospy.init_node(PKG)
    try:
        image_creator = ImageCreator()
    except rospy.ROSInterruptException:
        pass
上边这段代码是原博客给的,我又根据自己需求改了一份,同时解析双目rgb和深度图,其中深度图的存储格式由默认的uint8改为float(而且我的深度图是32FC1格式的,不是16UC1)
代码如下:
# coding:utf-8
#!/usr/bin/python

# Extract images from a bag file.

#PKG = 'beginner_tutorials'
import roslib;   #roslib.load_manifest(PKG)
import rosbag
import rospy
import cv2
import sys
import numpy as np
from sensor_msgs.msg import Image
from cv_bridge import CvBridge
from cv_bridge import CvBridgeError

# Reading bag filename from command line or roslaunch parameter.
#import os
#import sys

rgb_path_left = '/home/user/dynamic_data/left/'
rgb_path_right = '/home/user/dynamic_data/right/'   #已经建立好的存储rgb彩色图文件的目录
depth_path= '/home/user/dynamic_data/depth_pfm/' # 已经建立好的存储深度图文件的目录

class ImageCreator():
    def __init__(self):
        self.bridge = CvBridge()
        with rosbag.Bag('/home/user/test1.bag', 'r') as bag:  #要读取的bag文件;
            for topic,msg,t in bag.read_messages():
                if topic == "/zed2/zed_node/left_raw/image_raw_color": #图像的topic;
                        try:
                            cv_image = self.bridge.imgmsg_to_cv2(msg,"bgr8")
                        except CvBridgeError as e:
                            print (e)
                        timestr = "%.6f" %  msg.header.stamp.to_sec()
                        #%.6f表示小数点后带有6位,可根据精确度需要修改;
                        image_name = timestr+ ".png" #图像命名:时间戳.png
                        cv2.imwrite(rgb_path_left + image_name, cv_image)  #保存;
                elif topic == "/zed2/zed_node/right_raw/image_raw_color": #图像的topic;
                        try:
                            cv_image = self.bridge.imgmsg_to_cv2(msg,"bgr8")
                        except CvBridgeError as e:
                            print (e)
                        timestr = "%.6f" %  msg.header.stamp.to_sec()
                        #%.6f表示小数点后带有6位,可根据精确度需要修改;
                        image_name = timestr+ ".png" #图像命名:时间戳.png
                        cv2.imwrite(rgb_path_right + image_name, cv_image)  #保存;
                elif topic == "/zed2/zed_node/depth/depth_registered": #图像的topic;
                        try:
                            cv_image = self.bridge.imgmsg_to_cv2(msg,"32FC1")
                        except CvBridgeError as e:
                            print (e)
                        timestr = "%.6f" %  msg.header.stamp.to_sec()
                        #%.6f表示小数点后带有6位,可根据精确度需要修改;
                        image_name = timestr+ ".pfm" #图像命名:时间戳.png
                        # print('image max:',np.max(cv_image))
                        # cv2.imwrite(depth_path + image_name, cv_image)  #保存;
                        write_pfm(depth_path + image_name, cv_image)

def write_pfm(path, image, scale=1):
    """Write pfm file.
    Args:
        path (str): pathto file
        image (array): data
        scale (int, optional): Scale. Defaults to 1.
    """

    with open(path, "wb") as file:
        color = None

        if image.dtype.name != "float32":
            raise Exception("Image dtype must be float32.")

        image = np.flipud(image)

        if len(image.shape) == 3 and image.shape[2] == 3:  # color image
            color = True
        elif (
            len(image.shape) == 2 or len(image.shape) == 3 and image.shape[2] == 1
        ):  # greyscale
            color = False
        else:
            raise Exception("Image must have H x W x 3, H x W x 1 or H x W dimensions.")

        file.write("PF\n" if color else "Pf\n".encode())
        file.write("%d %d\n".encode() % (image.shape[1], image.shape[0]))

        endian = image.dtype.byteorder

        if endian == "<" or endian == "=" and sys.byteorder == "little":
            scale = -scale

        file.write("%f\n".encode() % scale)

        image.tofile(file)

if __name__ == '__main__':
    #rospy.init_node(PKG)
    try:
        image_creator = ImageCreator()
    except rospy.ROSInterruptException:
        pass
优点:没有信息损失,完全按照你录制的数据完整提取,且具有时间戳。缺点:使用python2,要装一些库,如OpenCV
3.用kalibr的一个工具解包
https://github.com/ethz-asl/kalibr/wiki/bag-format.
kalibr里的这个东西不仅可以从bag里解出image、IMU信息,还能把image、IMU信息打包成bag格式。但是kalibr解包出的image是灰度图(kalibr本身是一个标定工具,标定用的是灰度图)。
关于解包这块,问了高手,他们都是自己写的代码订阅某个topic,每收到一个message就做一次输出,避免了官方给的launch文件定时提取造成的漏帧BUG。自己写个也挺好,这玩意复用性还挺强的。
总结
算是记录一下rosbag的一些常见用法,包括录制,播放,解包。
这里还有个链接,里面介绍了rosbag一些更丰富的功能:
http://zhaoxuhui.top/blog/2021/02/24/ros-bag-processing-scripts.html.