NLP学习—11.实现基于PyTorch与LSTM的情感分类
文章目录
-
-
- 一、文本情感分析简介
- 二、文本情感分类任务
-
- 1.基于情感词典的方法
- 2.基于机器学习的方法
- 三、PyTorch中LSTM介绍
- 四、基于PyTorch与LSTM的情感分类流程
-
- 这节理论部分传送门:NLP学习—10.循环神经网络RNN及其变体LSTM、GRU、双向LSTM
- 数据集代码链接
一、文本情感分析简介
利用算法来分析提取文本中表达的情感。 分析一个句子表达的好、中、坏等判断,高兴、悲伤、愤怒等情绪。如果能将这种文字转为情感的操作让计算机自动完成,就节省了大量的时间。对于目前的海量文本数据来说,这是很有必要 的。我们可以通过情感分析,在电商领域挖掘出口碑好的商品,订餐订住宿领域挖掘优质场所等。
文本情感分析主要有三大任务 即文本情感特征提取,文本情感特征分类,文本情感特征检索与归纳。
二、文本情感分类任务
1.基于情感词典的方法
第一种方法:基于情感词典的方法

举个例子:这个/电影/不是/太好看,一共分为四个词,这个,电 影,不是,太好看。 “太好看”在情感词典中的pos词典中出现,所以pos_score得分为1,然后往前遍历是否出现程度词,无程度词,再搜索否定词,出现了“不是”为-1,相乘最终得分为-1。
词典的构建有如下方法:
- 人工构建情感字典(人工总结标注)
- 自动构建情感词典(基于知识库)
基于关键词(高兴、悲伤、愤怒等)挖掘出包含同样情感的词
- 利用gensim找出最相近的词向量
- 利用爬虫或者查词典的方式做同义词的替换
2.基于机器学习的方法
- 朴素贝叶斯
- SVM分类器
- 集成学习
- 深度学习方法
这里介绍LSTM与LSTM+Attention,起到融合信息的作用。
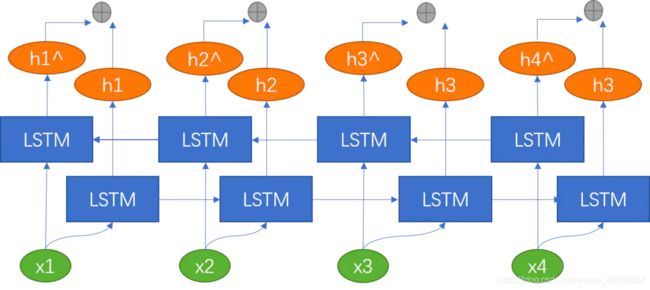
诸如在词性标注下游任务中,我们不仅考虑上文信息,而且还要考虑下文信息,此时,就需要双向LSTM。双向LSTM可以理解为同时训练两个LSTM,两个LSTM的方向、参数都不同。当前时刻的 h t h_t ht就是将两个方向不同的LSTM得到的两个 h t h_t ht向量拼接到一起。我们使用双向LSTM捕捉到当前时刻 t t t的过去和未来的特征。通过反向传播来训练双向LSTM网络。

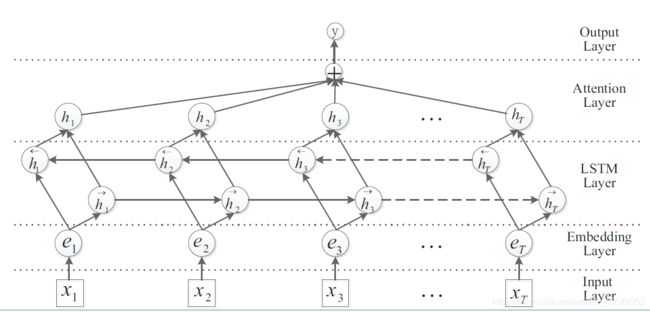
如果是双向LSTM+Attention,这里是静态的Attention,则网络结构如下:
 h t h_t ht是每一个词的hidden state,而 h s ‾ \overline{h_s} hs是向量,开始是随机生成的,后面经过反向传播可以得到 ∂ L o s s ∂ h s ‾ \frac{\partial{Loss}}{\partial{\overline{h_s}}} ∂hs∂Loss,通过梯度不断迭代更新,得到标准。

score是标量。每句话进行拼接,然后做softmax得到概率,然后对hidden state进行加权平均,得到总向量,然后经过一个分类层,经softmax得到每一个类别的得分。
三、PyTorch中LSTM介绍
LSTM
torch.nn.LSTM(*args, **kwargs)
参数:
- input_size –输入特征数
- hidden_size – 隐藏层的大小
- num_layers – LSTM的层数,例如,设置num_layers=2意味着将两个LSTM堆叠在一起,形成一个堆叠的LSTM,第二个LSTM接收第一个LSTM的输出并计算最终的结果。默认值:1
- bias – 如果为False,则该层不适用偏置权重。Default: True
- batch_first – 如果为True,则输入和输出张量被提供为(batch, seq, feature)而不是(seq, batch, feature)。注意,这并不适用于隐藏或单元格状态。 Default: False
- dropout – 如果非0,则在除最后一层外的每个LSTM层的输出上引入Dropout层,Dropout概率等于Dropout。默认值:0。 Default: 0
- bidirectional – 如果为True,则为双向LSTM。 Default: False
- proj_size – if> 0,则使用LSTM,并进行相应大小的投影。 Default: 0
输出:Outputs: output, (h_n, c_n)

四、基于PyTorch与LSTM的情感分类流程
- 拿到文本,分词,清洗数据(去掉停用词)
- 建立word2index index2word 表
- 准备好预训练好的 word embedding ( or start from one hot)
- 做好 Dataset / Dataloader
- 建立模型(soft attention/ hard attention/ self-attention/ scaled dot /product self attention)
- 配置好参数
- 开始训练
- 测评
- 保存模型
数据预处理部分代码:Sentiment_Analysis_DataProcess.py
from __future__ import unicode_literals, print_function, division
from io import open
import torch
import re
import numpy as np
import gensim
from torch.utils.data import Dataset
from Sentiment_Analysis_Config import Config


class Data_set(Dataset):
    """
    自定义数据类,只需要定义__len__和__getitem__这两个方法就可以。
    我们可以通过迭代的方式来取得每一个数据,但是这样很难实现取batch,shuffle或者多线程读取数据,此时,需要torch.utils.data.DataLoader来进行加载
    """
    def __init__(self, Data, Label):
        self.Data = Data
        # 考虑对测试集的使用
        if Label is not None:
            self.Label = Label

    def __len__(self):
        # 返回长度
        return len(self.Data)

    def __getitem__(self, index):
        # 如果是训练集
        if self.Label is not None:
            data = torch.from_numpy(self.Data[index])
            label = torch.from_numpy(self.Label[index])
            return data, label
        # 如果是测试集
        else:
            data = torch.from_numpy(self.Data[index])
            return data


def stopwordslist():
    """
    创建停用词表
    :return:
    """
    stopwords = [line.strip() for line in open('word2vec_data/stopword.txt', encoding='UTF-8').readlines()]
    return stopwords


def build_word2id(file):
    """
    将word2id词典写入文件中,key为word,value为索引
    :param file: word2id保存地址
    :return: None
    """
    # 加载停用词表
    stopwords = stopwordslist()
    word2id = {'_PAD_': 0}
    # 文件路径
    path = [Config.train_path, Config.val_path]
    # print(path)
    # 遍历训练集与验证集
    for _path in path:
        # 打开文件
        with open(_path, encoding='utf-8') as f:
            # 遍历文件每一行
            for line in f.readlines():
                out_list = []
                # 去掉首尾空格并按照空格分割
                sp = line.strip().split()
                # 遍历文本部分每一个词
                for word in sp[1:]:
                    # 如果词不是停用词
                    if word not in stopwords:
                        # 在字符串中找到正则表达式所匹配的所有子串,并返回一个列表,如果没有找到匹配的,则返回空列表。
                        rt = re.findall('[a-zA-Z]+', word)
                        # 如果word不等于制表符
                        if word != '\t':
                            # 如果词匹配的字符串为1,则继续遍历下一个词
                            if len(rt) == 1:
                                continue
                            # 如果词匹配的字符串为0,则将这个词添加到out_list中
                            else:
                                out_list.append(word)

                # 遍历out_list中的词
                for word in out_list:
                    # 如果这些词不在word2id字典的key中,则添加到word2id字典中
                    if word not in word2id.keys():
                        word2id[word] = len(word2id)

    # 打开输出文件并进行文件写入
    with open(file, 'w', encoding='utf-8') as f:
        # 遍历词典中的每一个词
        for w in word2id:
            f.write(w + '\t')
            f.write(str(word2id[w]))
            f.write('\n')


def build_word2vec(fname, word2id, save_to_path=None):
    """
    使用word2vec对单词进行编码
    :param fname: 预训练的word2vec.
    :param word2id: 语料文本中包含的词汇集.
    :param save_to_path: 保存训练语料库中的词组对应的word2vec到本地
    :return: 语料文本中词汇集对应的word2vec向量{id: word2vec}.
    """
    # 词的总数量
    n_words = max(word2id.values()) + 1
    # 加载预训练的词向量
    model = gensim.models.KeyedVectors.load_word2vec_format(fname, binary=True)
    # 初始化词向量
    word_vecs = np.array(np.random.uniform(-1., 1., [n_words, model.vector_size]))
    # 遍历每个单词
    for word in word2id.keys():
        try:
            # 构建词向量
            word_vecs[word2id[word]] = model[word]
        except KeyError:
            pass
    # 将word_vecs保存到文件中
    if save_to_path:
        with open(save_to_path, 'w', encoding='utf-8') as f:
            for vec in word_vecs:
                vec = [str(w) for w in vec]
                f.write(' '.join(vec))
                f.write('\n')
    # 返回word_vecs数组
    return word_vecs


def text_to_array(word2id, seq_lenth, path):
    """
    有标签文本转为索引数字模式
    :param word2id: word2id
    :param seq_lenth: 句子最大长度
    :param path: 文件路径
    :return:
    """
    # 存储标签
    lable_array = []
    # 句子索引初始化
    i = 0
    sa = []

    # 获取句子个数
    with open(path, encoding='utf-8') as f1:
        # 打开文件并遍历文件每一行
        for l1 in f1.readlines():
            # 返回分割后的字符串列表
            s = l1.strip().split()
            # 去掉标签
            s1 = s[1:]
            # 单词转索引数字
            new_s = [word2id.get(word, 0) for word in s1]
            # 存储由索引数字表示的文本列表
            sa.append(new_s)
        # print(len(sa))

    with open(path, encoding='utf-8') as f:
        # 初始化句子array;行:句子个数 列:句子长度
        sentences_array = np.zeros(shape=(len(sa), seq_lenth))
        # 遍历每一句话
        for line in f.readlines():
            # 返回分割后的字符串列表
            sl1 = line.strip().split()
            # 去掉标签
            sen = sl1[1:]
            # 单词转索引数字,不存在则为0
            new_sen = [word2id.get(word, 0) for word in sen]
            # 转换为(1,sen_len)
            new_sen_np = np.array(new_sen).reshape(1, -1)

            # 补齐每个句子长度,少了就直接赋值,0填在前面。
            # np.size,返回沿给定轴的元素数
            if np.size(new_sen_np, 1) < seq_lenth:
                sentences_array[i, seq_lenth - np.size(new_sen_np, 1):] = new_sen_np[0, :]
            # 长了进行截断
            else:
                sentences_array[i, 0:seq_lenth] = new_sen_np[0, 0:seq_lenth]

            i = i + 1
            # 标签
            lable = int(sl1[0])
            lable_array.append(lable)
    # 返回索引模式的文本以及标签
    return np.array(sentences_array), lable_array


def text_to_array_nolable(word2id, seq_lenth, path):
    """
    无标签文本转为索引数字模式,与上面相比,只是少了标签的处理
    :param word2id:
    :param seq_lenth: 序列长度
    :param path:文件路径
    :return:
    """

    i = 0
    sa = []
    # 获取句子个数
    with open(path, encoding='utf-8') as f1:
        # 打开文件并遍历文件每一行
        for l1 in f1.readlines():
            # 返回分割后的字符串列表
            s = l1.strip().split()
            # 去掉标签
            s1 = s[1:]
            # 单词转索引数字
            new_s = [word2id.get(word, 0) for word in s1]
            # 存储由索引数字表示的文本列表
            sa.append(new_s)


    with open(path, encoding='utf-8') as f:
        # 初始化句子array;行:句子个数 列:句子长度
        sentences_array = np.zeros(shape=(len(sa), seq_lenth))
        # 遍历每一句话
        for line in f.readlines():
            # 返回分割后的字符串列表
            sl1 = line.strip().split()
            # 去掉标签
            sen = sl1[1:]
            # 单词转索引数字,不存在则为0
            new_sen = [word2id.get(word, 0) for word in sen]
            # 转换为(1,sen_len)
            new_sen_np = np.array(new_sen).reshape(1, -1)

            # 补齐每个句子长度,少了就直接赋值,0填在前面。
            # np.size,返回沿给定轴的元素数
            if np.size(new_sen_np, 1) < seq_lenth:
                sentences_array[i, seq_lenth - np.size(new_sen_np, 1):] = new_sen_np[0, :]
            # 长了进行截断
            else:
                sentences_array[i, 0:seq_lenth] = new_sen_np[0, 0:seq_lenth]
            i = i + 1
    # 返回索引模式的文本
    return np.array(sentences_array)


def to_categorical(y, num_classes=None):
    """
    将类别转化为one-hot编码
    :param y: 标签
    :param num_classes: 类别数
    :return:
    """
    y = np.array(y, dtype='int')
    input_shape = y.shape
    if input_shape and input_shape[-1] == 1 and len(input_shape) > 1:
        input_shape = tuple(input_shape[:-1])
    # 压平
    y = y.ravel()
    # 计算类别数
    if not num_classes:
        num_classes = np.max(y) + 1

    n = y.shape[0]
    # 初始化
    categorical = np.zeros((n, num_classes))
    # 赋值
    categorical[np.arange(n), y] = 1
    output_shape = input_shape + (num_classes,)
    categorical = np.reshape(categorical, output_shape)
    return categorical


def prepare_data(w2id, train_path, val_path, test_path, seq_lenth):
    """
    得到数字索引表示的句子和标签
    :param w2id: word2id
    :param train_path: 训练文件路径
    :param val_path: 验证文件路径
    :param test_path: 测试文件路径
    :param seq_lenth: 句子最大长度
    :return:
    """
    # 对训练集、验证集、测试集处理,将文本转化为由单词索引构成的array
    train_array, train_lable = text_to_array(w2id, seq_lenth=seq_lenth, path=train_path)
    val_array, val_lable = text_to_array(w2id, seq_lenth=seq_lenth, path=val_path)
    test_array, test_lable = text_to_array(w2id, seq_lenth=seq_lenth, path=test_path)

    # 标签为[1, 1, 1, 1, 1, 1, 1, 1, 0, 0...]将标签转为onehot
    # train_lable=to_categorical(train_lable,num_classes=2)
    # val_lable=to_categorical(val_lable,num_classes=2)

    """for i in train_lable:
        np.array([i])"""
    # 转换标签数据格式
    train_lable = np.array([train_lable]).T
    val_lable = np.array([val_lable]).T
    test_lable = np.array([test_lable]).T
    """转换后标签
            [[0. 1.]
            [0. 1.]
            [0. 1.]
            ...
            [1. 0.]
            [1. 0.]
            [1. 0.]]"""
    # print(train_lab,"\nval\n",val_lab)
    # 返回训练集、验证集、测试集的array与label
    return train_array, train_lable, val_array, val_lable, test_array, test_lable

if __name__ == '__main__':
    # 建立word2id,并将word2id写入文件中
    build_word2id('./word2vec_data/word2id.txt')
    splist = []
    # 基于文件重新构建word2id,这里也可以将build_word2id中的word2id返回
    word2id = {}
    with open('./word2vec_data/word2id.txt', encoding='utf-8') as f:
        for line in f.readlines():
            sp = line.strip().split()  # 去掉\n \t 等
            splist.append(sp)
        word2id = dict(splist)  # 转成字典

    # 将word2id中的value转化为int
    for key in word2id:
        word2id[key] = int(word2id[key])

    # 构建id2word
    id2word = {}
    for key, val in word2id.items():
        id2word[val] = key

    # 构建word2vec词向量
    w2vec = build_word2vec(Config.pre_word2vec_path, word2id, Config.corpus_word2vec_path)

    # 得到句子id表示和标签
    train_array, train_lable, val_array, val_lable, test_array, test_label = prepare_data(word2id,
                                                                                          train_path=Config.train_path,
                                                                                          val_path=Config.val_path,
                                                                                          test_path=Config.test_path,
                                                                                          seq_lenth=Config.max_sen_len)
    # 将训练集、验证集、测试集处理后的句子id表示保存至文件中
    np.savetxt('./word2vec_data/train_data.txt', train_array, fmt='%d')
    np.savetxt('./word2vec_data/val_data.txt', val_array, fmt='%d')
    np.savetxt('./word2vec_data/test_data.txt', test_array, fmt='%d')
模型部分代码为:Sentiment_model.py
"""
模型部分
"""
from __future__ import unicode_literals, print_function, division
import torch
import torch.nn as nn
import torch.nn.functional as F


class LSTMModel(nn.Module):
    def __init__(self, vocab_size, embedding_dim, pretrained_weight, update_w2v, hidden_dim,
                 num_layers, drop_keep_prob, n_class, bidirectional, **kwargs):
        super(LSTMModel, self).__init__()
        self.hidden_dim = hidden_dim  # 隐藏层节点数
        self.num_layers = num_layers  # 神经元层数
        self.n_class = n_class  # 类别数

        self.bidirectional = bidirectional  # 控制是否为双向LSTM
        self.embedding = nn.Embedding.from_pretrained(pretrained_weight)  # 读取预训练好的参数
        self.embedding.weight.requires_grad = update_w2v  # 控制加载的预训练模型在训练中参数是否更新
        # LSTM
        self.encoder = nn.LSTM(input_size=embedding_dim, hidden_size=self.hidden_dim,
                               num_layers=num_layers, bidirectional=self.bidirectional,
                               dropout=drop_keep_prob)
        # 解码部分
        if self.bidirectional:
            self.decoder1 = nn.Linear(hidden_dim * 4, hidden_dim)
            self.decoder2 = nn.Linear(hidden_dim, n_class)
        else:
            self.decoder1 = nn.Linear(hidden_dim * 2, hidden_dim)
            self.decoder2 = nn.Linear(hidden_dim, n_class)

    def forward(self, inputs):
        """
        前向传播
        :param inputs: [batch, seq_len]
        :return:
        """
        # [batch, seq_len] => [batch, seq_len, embed_dim][64,75,50]
        embeddings = self.embedding(inputs)
        # [batch, seq_len, embed_dim] = >[seq_len, batch, embed_dim]
        states, hidden = self.encoder(embeddings.permute([1, 0, 2]))
        # states.shape= torch.Size([65, 64, 200])
        encoding = torch.cat([states[0], states[-1]], dim=1)
        # encoding.shape= torch.Size([64, 400])
        # 解码
        outputs = self.decoder1(encoding)
        # outputs = F.softmax(outputs, dim=1)
        outputs = self.decoder2(outputs)
        return outputs


class LSTM_attention(nn.Module):
    def __init__(self, vocab_size, embedding_dim, pretrained_weight, update_w2v, hidden_dim,
                 num_layers, drop_keep_prob, n_class, bidirectional, **kwargs):
        super(LSTM_attention, self).__init__()
        self.hidden_dim = hidden_dim  # 隐藏层节点数
        self.num_layers = num_layers  # 神经元层数
        self.n_class = n_class  # 类别数

        self.bidirectional = bidirectional  # 控制是否双向LSTM
        self.embedding = nn.Embedding.from_pretrained(pretrained_weight)  # 读取预训练好的参数
        self.embedding.weight.requires_grad = update_w2v  # 控制加载的预训练模型在训练中参数是否更新
        # LSTM
        self.encoder = nn.LSTM(input_size=embedding_dim, hidden_size=self.hidden_dim,
                               num_layers=num_layers, bidirectional=self.bidirectional,
                               dropout=drop_keep_prob, batch_first=True)

        # weiht_w即为公式中的h_s(参考系)
        # nn. Parameter的作用是参数是需要梯度的
        self.weight_W = nn.Parameter(torch.Tensor(2 * hidden_dim, 2 * hidden_dim))
        self.weight_proj = nn.Parameter(torch.Tensor(2 * hidden_dim, 1))

        # 对weight_W、weight_proj进行初始化
        nn.init.uniform_(self.weight_W, -0.1, 0.1)
        nn.init.uniform_(self.weight_proj, -0.1, 0.1)

        if self.bidirectional:
            self.decoder1 = nn.Linear(hidden_dim * 2, hidden_dim)
            self.decoder2 = nn.Linear(hidden_dim, n_class)
        else:
            self.decoder1 = nn.Linear(hidden_dim * 2, hidden_dim)
            self.decoder2 = nn.Linear(hidden_dim, n_class)

    def forward(self, inputs):
        """
        前向传播
        :param inputs: [batch, seq_len]
        :return:
        """
        # 编码
        embeddings = self.embedding(inputs)  # [batch, seq_len] => [batch, seq_len, embed_dim][64,65,50]
        # 经过LSTM得到输出,state是一个输出序列
        # 结合batch_first设置
        states, hidden = self.encoder(embeddings.permute([0, 1, 2]))  # [batch, seq_len, embed_dim]
        # print("states.shape=", states.shape)  (64,50,200)

        # attention
        # states与self.weight_W矩阵相乘,然后做tanh
        u = torch.tanh(torch.matmul(states, self.weight_W))
        # u与self.weight_proj矩阵相乘,得到score
        att = torch.matmul(u, self.weight_proj)
        # softmax
        att_score = F.softmax(att, dim=1)
        # 加权求和
        scored_x = states * att_score
        encoding = torch.sum(scored_x, dim=1)
        # 线性层
        outputs = self.decoder1(encoding)
        outputs = self.decoder2(outputs)
        return outputs
验证部分代码为:Sentiment_Analysis_eval.py
from __future__ import unicode_literals, print_function, division
from io import open
import torch
import torch.nn.functional as F
from torch.utils.data import DataLoader
from sklearn.metrics import confusion_matrix, f1_score, recall_score, precision_score
import os
from Sentiment_model import LSTMModel, LSTM_attention
from Sentiment_Analysis_Config import Config
from Sentiment_Analysis_DataProcess import prepare_data, build_word2vec, text_to_array_nolable, Data_set


def val_accuary(model, val_dataloader, device, criterion):
    # # 验证模式,验证时将模型固定
    model.eval()
    # 将模型转换到gpu
    model = model.to(device)
    with torch.no_grad():
        correct1 = 0
        total1 = 0
        val_loss = 0.0
        for j, data_1 in (enumerate(val_dataloader, 0)):
            input1, target1 = data_1[0], data_1[1]
            input1 = input1.type(torch.LongTensor)
            target1 = target1.type(torch.LongTensor)
            target1 = target1.squeeze(1)  # 从[64,1]到[64]
            input1 = input1.to(device)
            target1 = target1.to(device)
            output1 = model(input1)
            loss1 = criterion(output1, target1)
            val_loss += loss1.item()
            _, predicted1 = torch.max(output1, 1)
            total1 += target1.size(0)  # 此处的size()类似numpy的shape: np.shape(train_images)[0]
            correct1 += (predicted1 == target1).sum().item()
            F1 = f1_score(target1.cpu(), predicted1.cpu(), average='weighted')
            Recall = recall_score(target1.cpu(), predicted1.cpu(), average='micro')
            # CM = confusion_matrix(target1.cpu(), predicted1.cpu())
        print(
            '\nVal accuracy : {:.3f}%,val_loss:{:.3f}, F1_score:{:.3f}%, Recall:{:.3f}%'.format(100 * correct1 / total1,
                                                                                                val_loss, 100 * F1,
                                                                                                100 * Recall))
        return 100 * correct1 / total1


def test_accuary(model, test_dataloader, device):
    model = model.to(device)
    # 被它包括起来的部分,梯度不在更新
    with torch.no_grad():
        correct = 0
        total = 0
        # 迭代test_dataloader中的batch大小数据
        for k, data_test in (enumerate(test_dataloader, 0)):
            input_test, target_ = data_test[0], data_test[1]
            # 转换成整数
            input_test = input_test.type(torch.LongTensor)
            target_ = target_.type(torch.LongTensor)
            # 从[64,1]到[64]
            target_ = target_.squeeze(1)
            # 转换到gpu上
            input_test = input_test.to(device)
            target_ = target_.to(device)
            # 前向传播
            output2 = model(input_test)
            _, predicted_test = torch.max(output2, 1)
            # 记录总数
            total += target_.size(0)  # 此处的size()类似numpy的shape: np.shape(train_images)[0]
            # 记录正确数
            correct += (predicted_test == target_).sum().item()
            # 评价指标
            F1 = f1_score(target_.cpu(), predicted_test.cpu(), average='weighted')
            Recall = recall_score(target_.cpu(), predicted_test.cpu(), average='micro')
            CM = confusion_matrix(target_.cpu(), predicted_test.cpu())
        print('test accuracy : {:.3f}%, F1_score:{:.3f}%, Recall:{:.3f}%,Confusion_matrix:{}'.format(
            100 * correct / total, 100 * F1, 100 * Recall, CM))


def pre(word2id, model, seq_lenth, path):
    model.to("cpu")
    with torch.no_grad():
        # 加载无标签数据
        input_array = text_to_array_nolable(word2id, seq_lenth, path)
        # sen_p = sen_p.type(torch.LongTensor)
        # 转换数据类型
        sen_p = torch.from_numpy(input_array)
        sen_p = sen_p.type(torch.LongTensor)
        # 前向传播
        output_p = model(sen_p)
        _, pred = torch.max(output_p, 1)
        for i in pred:
            print('预测类别为', i.item())


if __name__ == '__main__':
    splist = []
    # 构建word2id
    word2id = {}
    with open(Config.word2id_path, encoding='utf-8') as f:
        for line in f.readlines():
            sp = line.strip().split()  # 去掉\n \t 等
            splist.append(sp)
        word2id = dict(splist)  # 转成字典

    # 将索引转为整数
    for key in word2id:  # 将字典的值,从str转成int
        word2id[key] = int(word2id[key])

    # 转换设备到gpu
    device = torch.device("cuda" if torch.cuda.is_available() else "cpu")
    # 得到句子id表示和标签
    train_array, train_lable, val_array, val_lable, test_array, test_lable = prepare_data(word2id,
                                                                                          train_path=Config.train_path,
                                                                                          val_path=Config.val_path,
                                                                                          test_path=Config.test_path,
                                                                                          seq_lenth=Config.max_sen_len)
    # 构建测试Data_set与DataLoader
    test_loader = Data_set(test_array, test_lable)
    test_dataloader = DataLoader(test_loader,
                                 batch_size=Config.batch_size,
                                 shuffle=True,
                                 num_workers=0)
    # 构建word2vec词向量
    w2vec = build_word2vec(Config.pre_word2vec_path,
                           word2id,
                           None)
    # 将词向量转化为Tensor
    w2vec = torch.from_numpy(w2vec)
    # CUDA接受float32,不接受float64
    w2vec = w2vec.float()
    # LSTM_attention
    model = LSTM_attention(Config.vocab_size, Config.embedding_dim, w2vec, Config.update_w2v,
                           Config.hidden_dim, Config.num_layers, Config.drop_keep_prob, Config.n_class,
                           Config.bidirectional)
    # 读取训练好的模型
    # model1 = torch.load(Config.model_state_dict_path)
    model = torch.load('./word2vec_data/sen_model_best.pkl')

    # model.load_state_dict(torch.load(Config.model_state_dict_path)) #仅保存参数
    # 验证
    # val_accuary(model1, val_dataloader, device)
    # 测试
    test_accuary(model, test_dataloader, device)
    # 预测
    pre(word2id, model, Config.max_sen_len, Config.pre_path)
如果对您有帮助,麻烦点赞关注,这真的对我很重要!!!如果需要互关,请评论或者私信!
![]()


