【超简易版】基于Pytorch Fasterrcnn_resnet50_fpn的多车牌定位/车牌检测-基于CCPD2019数据集
说明:
本项目为本人初学torch框架练习项目,在此仅作个人经验分享。由于本人现大三,码code经验有限,难免存在瑕疵,望各位前辈批评指正!
本项目在linux上训练模型并下载权重.pth文件在windows上进行测试
数据集来源参考:
CCPD2019数据集介绍及下载地址 <------戳这里
说明:由于个人计算资源有限,我个人租了一个AutoDL的云Linux服务器进行训练,因为这个模型跑起来起码需要6G显存,并且在这里的训练由于仅作定位,仅仅选了ccpd_base中的10000张图片进行训练。具体过程在本文后方详述
主要环境及包
系统:windows/linux
cv2 : 无版本版本要求【测试中显示图片用】,也可以将模型预测图片另存并查看,具体可自行在test修改。
PIL:与torch dataset类结合,用PIL.Image读取图片
pycocotools:【windows上建议使用在conda环境下使用conda安装】,linux上可以直接使用pip安装。
pytorch :1.9以上吧,越新越好,是在训练的时候遇见的问题后来去搜索说是pytorch版本较低,更换成1.11后能够成功训练,我在云端配置的pytorch是1.11版本。
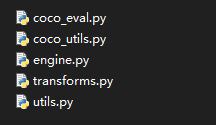
官方工具代码下载【后续需要用到】:
工具源程序下载地址 <------戳这里
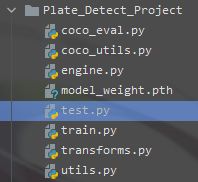
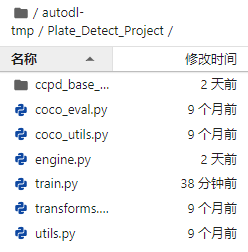
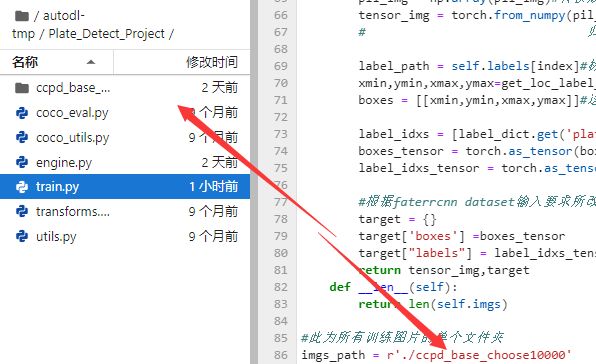
工程源代码放置目录相对位置:
训练主程序train:
注!在这里我个人是在linux云服务器上训练的,具体情况可自行调整
import torch
from torch.utils import data
import torchvision
from PIL import Image
import numpy as np
import os
import utils
print('Before success')
print('Engine import success')
from engine import train_one_epoch
print('train_one_epoch_import success')

#使用预训练模型进行训练
from torchvision.models.detection.faster_rcnn import FastRCNNPredictor
#加载预训练模型
model = torchvision.models.detection.fasterrcnn_resnet50_fpn(pretrained= True)
# get number of input features for the classifier
in_features = model.roi_heads.box_predictor.cls_score.in_features#1024
num_classes = 2 #category + background
# replace the pre-trained head with a new one
model.roi_heads.box_predictor = FastRCNNPredictor(in_features, num_classes)

#数据预处理,设定类别,由于只有1类即车牌,因此对于fasterrcnn的输入作规范
label_dict = {'plate':1}


def get_box_label(labelname):#从图片label中分割出标记车牌框的四个坐标
    # print('lbm',labelname)
    locs=labelname.split('-')[2]
    # print(locs)
    # print(locs.split('_')[0])
    # print(locs.split('_')[0].split('&'))

    #分别代表图片比label的车牌框矩形的两个对角坐标
    #(xmin,ymin),(xmax.ymax)
    xmin,ymin = [int(loc) for loc in locs.split('_')[0].split('&')]
    xmax,ymax = [int(loc) for loc in locs.split('_')[1].split('&')]
    return (xmin,ymin,xmax,ymax)

def get_labelname_from_path(path):#从路径字符中分割出图片label
    #由于在linux和windows上系统不同的原因分隔符不同,为了通用性作了以下技巧
    #但实际上需要根据个人实际情况
    a_split = path.split('\\')
    b_split = path.split(r'\\')
    c_split = path.split('/')
    d_split = path.split('//')
    split_lis = [a_split,b_split,c_split,d_split]
    mx_item = max([len(i) for i in split_lis])
    mx_idx = [len(i) for i in split_lis].index(mx_item)
    result = split_lis[mx_idx][-1]
    return result

def get_loc_label_from_path(path):#从路径中获取loc位置即location
    label_name=get_labelname_from_path(path)
    xmin,ymin,xmax,ymax = get_box_label(label_name)
    return (xmin,ymin,xmax,ymax)
#自定义dataset类
class My_dataset(data.Dataset):
    def __init__(self,img_paths_list):
        self.imgs = img_paths_list
        self.labels = img_paths_list
    def __getitem__(self, index):
        img_path = self.imgs[index]
        pil_img = Image.open(img_path).convert('RGB')#使用PIL打开图片并强制转换成3通道,确保无单通道图片
        pil_img = np.array(pil_img)#转换成array
        tensor_img = torch.from_numpy(pil_img/255).permute(2,0,1).type(torch.float32)
        #                               归一化          通道转换            模型数据类型要求

        label_path = self.labels[index]#标签路径
        xmin,ymin,xmax,ymax=get_loc_label_from_path(label_path)#获取坐标
        boxes = [[xmin,ymin,xmax,ymax]]#这个必须是二维的

        label_idxs = [label_dict.get('plate')]
        boxes_tensor = torch.as_tensor(boxes,dtype=torch.float32)#转化成tensor
        label_idxs_tensor = torch.as_tensor(label_idxs,dtype=torch.int64)#转化成tensor

        #根据faterrcnn dataset输入要求所改
        target = {}
        target['boxes'] =boxes_tensor
        target["labels"] = label_idxs_tensor
        return tensor_img,target
    def __len__(self):
        return len(self.imgs)

#此为所有训练图片的单个文件夹
imgs_path = r'./ccpd_base_choose10000'
print('imgs_path=',imgs_path)
print('Listing...')
os_lisdir_imgs_path = os.listdir(imgs_path)
print('Single_Label=',os_lisdir_imgs_path[0])

print('Single_Spilt_list=',os_lisdir_imgs_path[0].split('&'))

#下面的功能将所有图片路径添加
imgs_paths = []
for idx,img in enumerate(os_lisdir_imgs_path):
    imgs_paths.append(os.path.join(imgs_path,img))
    if (idx+1) % 100 == 0 or idx+1==len(os_lisdir_imgs_path):
        print(f'\r{idx+1}/{len(os_lisdir_imgs_path)}',end='')#动态显示进度
        if idx+1 == len(os_lisdir_imgs_path):
            print()
#print作测试用,读者可自行调整
print('Single_img_path=',imgs_paths[0])

#创建数据集
images = imgs_paths
dataset = My_dataset(images)#创建数据集
BATCH_SIZE = 16 #批大小
dl = data.DataLoader(dataset,
                     batch_size=BATCH_SIZE,
                     shuffle=True,
                     collate_fn=utils.collate_fn #utils中图片处理工具,主要为打包批次
)#Dataloader

#去除一个批次的图片进行简易查看
imgs_batch,labels_batch = next(iter(dl))
print('Batchsize =',len(imgs_batch))
print('Single_img_shape=',imgs_batch[0].shape,imgs_batch[1].shape)
print('labels_batch=')
for i in range(len(labels_batch)):
    print(labels_batch[i])

#pytorch常用设置训练设备的写法
device = 'cuda' if torch.cuda.is_available() else 'cpu'
print('Device :',device)

print('Model transition...')
model = model.to(device)

#获取模型所有可训练参数
params = [p for p in model.parameters() if p.requires_grad]
#采用SGD优化器
optimizer = torch.optim.SGD(params,lr = 0.005, momentum=0.9,weight_decay= 0.0005)
#学习速率衰减,这些具体的浮点数参数参照官网进行设定的,个人未进行深究测试
lr_scheduler = torch.optim.lr_scheduler.StepLR(optimizer,step_size=3,gamma=0.2)
#训练迭代次数epoch
num_epochs = 20

#存放日志
list_logger = []
print('Begin_training...')
for epoch in range(num_epochs):
    #训练一次后返回一次日志兵记录
    #print_freq为打印训练loss的频数,50个batch显示一次,具体可自行调整
    metric_logger=train_one_epoch(model,optimizer,dl,device,epoch,print_freq=50)
    list_logger.append(metric_logger)
    print('Metric_logger=',metric_logger,'epoch=',epoch)
    #将日志写入txt
    with open('Logger.txt','a') as f:
        f.write(str(metric_logger)+'\n')
    #学习速率衰步数记录
    lr_scheduler.step()

    #模型保存路径
    PATH = f'{epoch}_model.pth'
    #保存模型
    torch.save({'epoch':epoch,
                'model_state_dict':model.state_dict(),
                'optimizer_state_dict':optimizer.state_dict(),
                      },
               PATH
    )
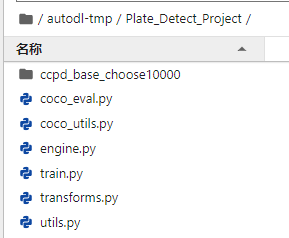
至此已经准备好的源代码及数据集如下【其中ccpda_base_choose10000文件夹里面为个人从ccpd_base中挑选的10000张数据集图片(带标签)】:
由于个人计算资源有限,个人选用云计算资源参考<--------------戳这里
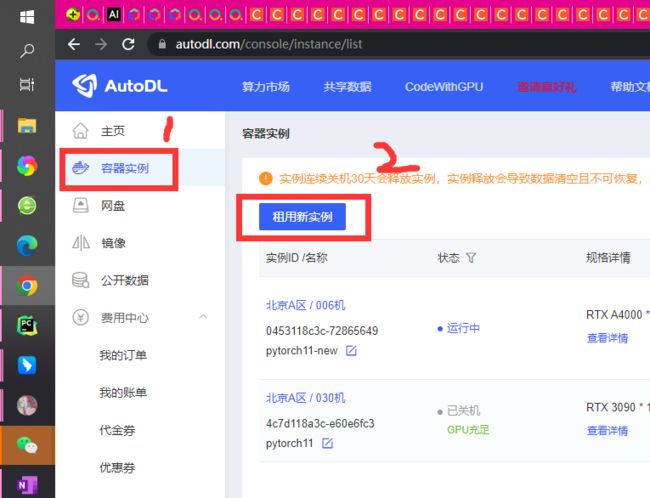
AutoDL参考文档
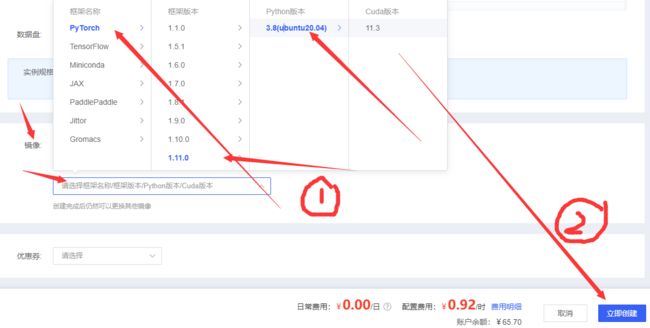
step1
step2 【任选一台即可】
step3【租用云服务如有学生资质可以绑定教育邮箱,具体参考官方说明文档】
step4
step5
step 5.5 上传之前linux推荐一个解压缩小工具: 7za
在linux上安装
wget https://jaist.dl.sourceforge.net/project/p7zip/p7zip/16.02/p7zip_16.02_src_all.tar.bz2
tar -jxvf p7zip_16.02_src_all.tar.bz2
cd p7zip_16.02
make && make install
解压使用方法:
1、使用cd到对应压缩包目录
·2、 只需要修改test.zip改成自己的压缩包,其余参数默认,即解压到当前文件夹
7za x test.zip -r -o./
图下为上传压缩包后的,解压示例
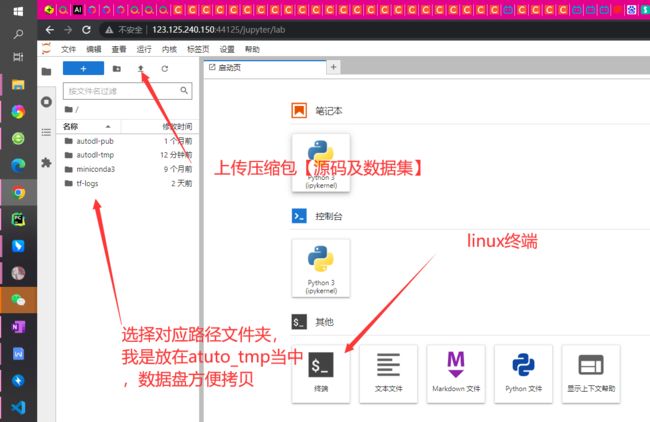
step6 【将数据集及源码上传】
step7云端训练【路径对应修改好】
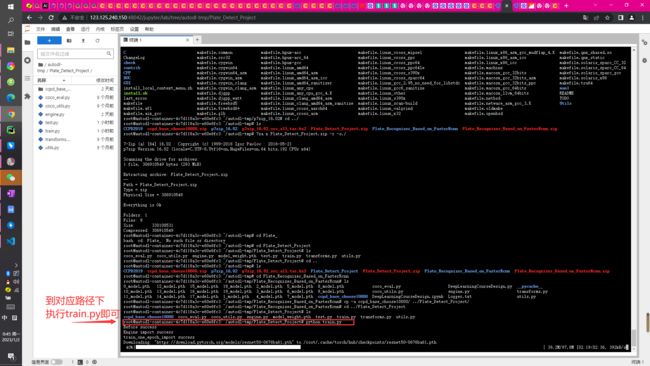
step8云端训练
【个人设置的20个epoch,这个过程大约持续6个小时,具体详见源代码可修改】
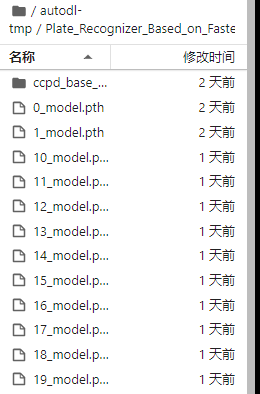
step9下载模型,在windows上进行测试
个人设置的是训练一次epoch就保存模型,我在这里选用的是最后一次训练迭代的模型。也可以根据具体情况自行保存性能最优的模型。
以上是从租用服务器到训练保存模型的全过程
现在来看测试test.py源代码:
import torch
import torchvision

#使用预训练模型进行训练
from torchvision.models.detection.faster_rcnn import FastRCNNPredictor
#加载预训练模型,模型重构
model = torchvision.models.detection.fasterrcnn_resnet50_fpn(petrained= False)
# get number of input features for the classifier
in_features = model.roi_heads.box_predictor.cls_score.in_features#1024
num_classes = 2 #category + background
# replace the pre-trained head with a new one
model.roi_heads.box_predictor = FastRCNNPredictor(in_features, num_classes)

#加载检查点,加载模型训练好的权重
model_PATH = './model_wieght.pth'
checkpoint = torch.load(model_PATH,map_location=torch.device('cpu'))

model.load_state_dict(checkpoint['model_state_dict'])
model.eval()

# test_img_path = r'E:/CCPD2019/CCPD2019/ccpd_challenge/03-0_2-214&506_502&593-497&593_214&589_219&506_502&510-0_0_10_33_30_26_4-96-13.jpg'
#直接改这里就行
test_img_path = './0044-1_1-291&497_392&534-392&532_291&534_291&499_392&497-0_0_6_17_31_33_31-11-5.jpg'
import PIL
from PIL import Image
import numpy as np
test_img = Image.open(test_img_path).convert('RGB')

test_img_array = np.array(test_img)

from torchvision import transforms
transform = transforms.Compose([
    transforms.ToTensor()
])

test_tensor = transform(test_img_array)

'''以上程序无问题'''
pred = model([test_tensor])
# print(len(pred))
print(pred)

boxes = pred[0]['boxes']
labels = pred[0]['labels']
scores = pred[0]['scores']

# print(boxes)
# print(labels)
# print(scores)


boxes_ = []
labels_ = []
scores_ = []
for xmin,ymin,xmax,ymax in boxes:
    xmin_,ymin_,xmax_,ymax_ = xmin.item(),ymin.item(),xmax.item(),ymax.item()
    xmin_, ymin_, xmax_, ymax_ = int(xmin_),int(ymin_),int(xmax_),int(ymax_)
    boxes_.append([xmin_,ymin_,xmax_,ymax_])

print(boxes_)

import cv2
# pred_rec=cv2.imread(r'E:/CCPD2019/CCPD2019/ccpd_challenge/03-0_2-214&506_502&593-497&593_214&589_219&506_502&510-0_0_10_33_30_26_4-96-13.jpg')

pred_rec=cv2.imread(test_img_path)
print(pred_rec.shape)
cv2.imshow('Init',pred_rec)

#绘制一张图片上的所有预测框
for xmin_,ymin_,xmax_,ymax_ in boxes_:
    pred_rec = cv2.rectangle(pred_rec,(xmin_,ymin_),(xmax_,ymax_),color=(255,0,0),thickness=4)
cv2.imshow('Predict Result!',pred_rec)
cv2.waitKey()
测试结果如下
这里是测试图片路径
在有非密集有限个车牌的情况下,可以看到右下角模型预测后通过cv2库绘制矩形框【个人设定为蓝色框】能够得到较好的预测定位结果。【也可以用PIL绘制矩形框】,具体请读者自行参考PIL库以及cv2库的相关使用方法。
注:
Fasterrcnn 为典型two-stage模型,对于现在而言年代已较为久远。mAP评价虽较高,但是相较于yolo而言,在某一方面准确性略高,但是速度却远远不及yolo,只有5FPS。目前yolo已经经过多个版本的迭代,有较高的应用性,可以应用在实际生活中的方方面面,而Fasterrcnn由于速度的而局限性远不及yolo。因此本项目的主要价值十分局限,但仍旧可以为初学同胞以及初学fasterrcnn应用的学u们提供经验分享。仅供参考,仅供参考。
个人测试过本项目中模型预测【整个过程其中包括了预测数据处理图像绘制显示等过程】时间长达8~9s,这么长的预测时间在性能上就已经限制了它对于实际生活的应用。
但不可否认的是Fasterrcnn作为重要的多目标检测的鼻祖之一,仍有它重要的学习、参考、研究和应用价值。

