TensorRT debug及FP16浮点数溢出问题分析
前言
TensorRT是NVIDIA推出的一款高效深度学习模型推理框架,其包括了深度学习推理优化器和运行时,能够让深度学习推理应用拥有低时延和高吞吐的优点。
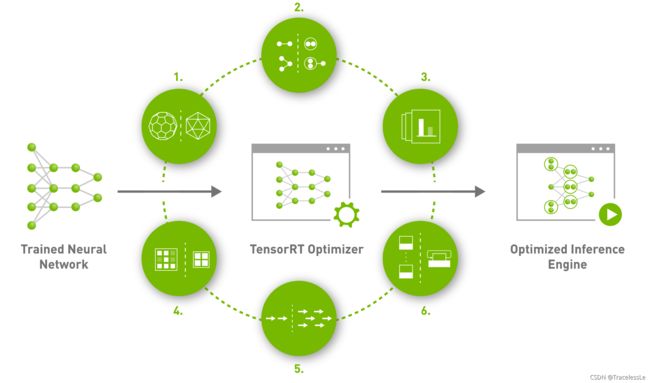
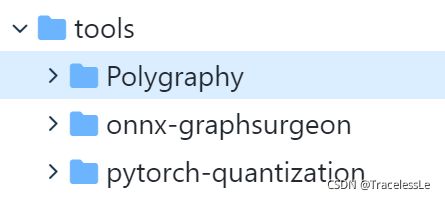
除了常规的加速功能外,TensorRT还提供了一套可用于engine生成过程中debug的工具,包括Polygraphy、ONNX GraphSurgeon和PyTorch-Quantization。这些小工具用处很大,值得花时间进一步研究。
Debug方法示例
polygraphy
Polygraphy是TensorRT官方提供的一系列小工具合集,是一个非常强大的Debug工具。
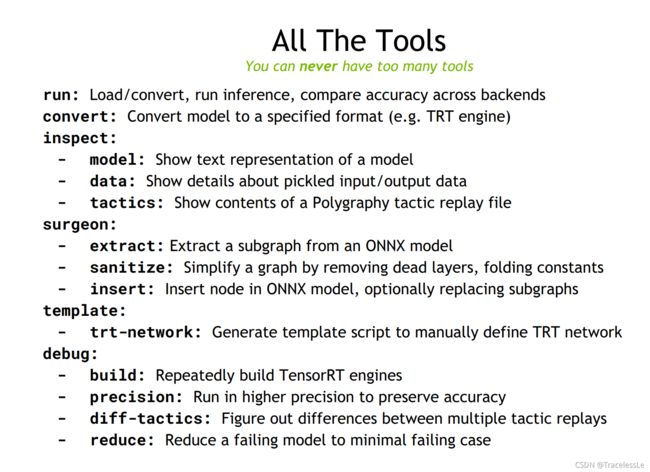
可以使用Polygraphy检查ONNX或TRT的网络结构,可以debug engine,还可以利用Polygraphy查看ONNX与TRT模型的输出差异等。
例如利用Polygraphy查看ONNX与TRT模型的输出差异:
# 使用默认参数
polygraphy run polygraphy_debug.engine --trt

# 加载onnx推理得到的结果,并设置绝对误差
polygraphy run polygraphy_debug.engine --trt --load-outputs onnx_res.json --abs 1e-4

# 使用fp16和cublas策略库生成engine,并与onnx推理得到的结果作比较
polygraphy run net_bs8.onnx --trt --onnxrt --tactic-sources CUBLAS --fp16 --rtol 1e-03 --atol 1e-03

# 保存 data_loader生成的输入和运行得到的结果
polygraphy run net_bs8.onnx --onnxrt  --val-range [0,1] --save-inputs  net_input.json --save-outputs onnx_res.json
# 对onnx推理得到的结果进行保存,同时运行trt engine,并与onnx推理得到的结果作比较
polygraphy run net_bs8.onnx --onnxrt --load-inputs  gpen_input.json --save-outputs onnx_res.json
polygraphy run net_bs8_fp32.engine --model-type engine --trt --load-outputs onnx_res.json --abs 1e-4
--load-inputs  net_input.json

# 采用二分策略,使用fp16和cublas策略库按层数迭代生成engine,并加载onnx推理得到的结果作比较,以判断设置fp16时误差出现的层的范围
polygraphy debug precision net_bs8.onnx --fp16 --tactic-sources cublas --check polygraphy run polygraphy_debug.engine --trt --load-outputs onnx_res.json --abs 1e-1
# 使用polygraphy debug precision工具搜索Layer精度设置,判断FP16的engine运行结果与onnx结果的误差是否在误差范围内,不移除运行中生成的engine文件
polygraphy debug precision net_bs8.onnx --fp16 --tactic-sources cublas --check polygraphy run polygraphy_debug.engine --trt --load-inputs  net_input.json --load-outputs onnx_res.json --abs 1e-1 --no-remove-intermediate

# POLYGRAPHY_ARRAY_SWAP_THRESHOLD_MB=0表示结果交换到硬盘上,不放在内存中,mark all 表示对比所有节点结果
POLYGRAPHY_ARRAY_SWAP_THRESHOLD_MB=0 polygraphy run net_bs8.onnx --trt --onnxrt --tactic-sources CUBLAS --fp16 --rtol 1e-03 --atol 1e-03  --trt-outputs mark all --onnx-outputs mark all


# 比较单个或者多个Tensor的结果
polygraphy run net_bs8.onnx --onnxrt --trt --tactic-sources CUBLAS --fp16 --rtol 1e-03 --atol 1e-03 --trt-outputs 151 --onnx-outputs 151

polygraphy debug run net_bs8.onnx --onnxrt  --check polygraphy run net_bs8.engine --trt --tactic-sources CUBLAS --fp16 --rtol 1e-03 --atol 1e-03 --trt-outputs 153 197 --onnx-outputs 153 197


# 检查模型
polygraphy inspect model net_bs8.engine --mode=basic --display-as=trt
polygraphy inspect model net_bs8.onnx --mode=full --display-as=trt
更多polygraphy的使用可以查阅参考资料[2]和[6]。
Python API
TensorRT提供了Python API,可以基于该API进行生成engine的过程。同时,可以按层名或节点名设置一些debug参数,例如该层是否使用FP16。以实现针对层的调试。
__author__ = 'TracelessLe'

import os
import tensorrt as trt

ONNX_SIM_MODEL_PATH = 'net_bs8_v1_simple.onnx'
TENSORRT_ENGINE_PATH_PY = 'net_bs8_v1_fp16_py.engine'

def build_engine(onnx_file_path, engine_file_path, flop=16):
    trt_logger = trt.Logger(trt.Logger.VERBOSE)  # trt.Logger.ERROR
    builder = trt.Builder(trt_logger)
    network = builder.create_network(
        1 << (int)(trt.NetworkDefinitionCreationFlag.EXPLICIT_BATCH)
    )

    parser = trt.OnnxParser(network, trt_logger)
    # parse ONNX
    with open(onnx_file_path, 'rb') as model:
        if not parser.parse(model.read()):
            print('ERROR: Failed to parse the ONNX file.')
            for error in range(parser.num_errors):
                print(parser.get_error(error))
            return None
    print("Completed parsing ONNX file")
    builder.max_workspace_size = 2 << 30
    # default = 1 for fixed batch size
    builder.max_batch_size = 1
    # set mixed flop computation for the best performance
    if builder.platform_has_fast_fp16 and flop == 16:
        builder.fp16_mode = True

    if os.path.isfile(engine_file_path):
        try:
            os.remove(engine_file_path)
        except Exception:
            print("Cannot remove existing file: ",
                engine_file_path)

    print("Creating Tensorrt Engine")

    include_list = ['ConvTranspose']
    check_list = ['Pow_293', 'Sqrt_297']
    for i, n_i in enumerate(network):
        if n_i.name in check_list or n_i.name.split('_')[0] in include_list:
            layer = network[i]
            layer.precision = trt.float32
        print(f'Network Layer {i}:  {n_i.name}, {n_i.type}, {n_i.precision}, is_set: {n_i.precision_is_set }')

    config = builder.create_builder_config()
    config.set_tactic_sources(1 << int(trt.TacticSource.CUBLAS))
    config.max_workspace_size = 2 << 30
    config.set_flag(trt.BuilderFlag.FP16)
    config.set_flag(trt.BuilderFlag.STRICT_TYPES)
    # config.flags = (1 << int(trt.BuilderFlag.FP16) | 1 << int(trt.BuilderFlag.STRICT_TYPES))
    print('config.flags: ', config.flags)

    engine = builder.build_engine(network, config)
    with open(engine_file_path, "wb") as f:
        f.write(engine.serialize())
    print("Serialized Engine Saved at: ", engine_file_path)
    return engine

if __name__ == "__main__":
    build_engine(ONNX_SIM_MODEL_PATH, TENSORRT_ENGINE_PATH_PY)
从上述代码中,通过config.set_flag(trt.BuilderFlag.STRICT_TYPES)打开了trt的严格类型限制(Enables strict type constraints)。这样通过使用layer.precision = trt.float32可以使该层类型严格为FP32。利于对全FP16模式下某些层溢出问题的定位。
FP16溢出问题分析
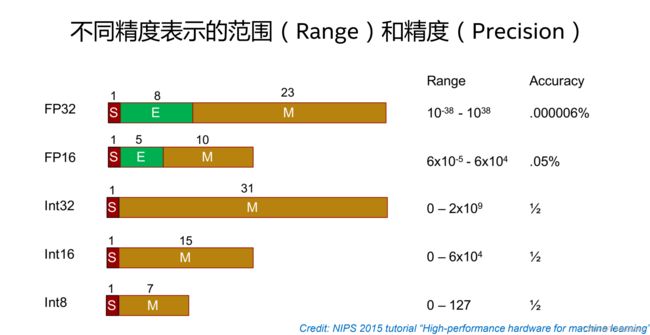
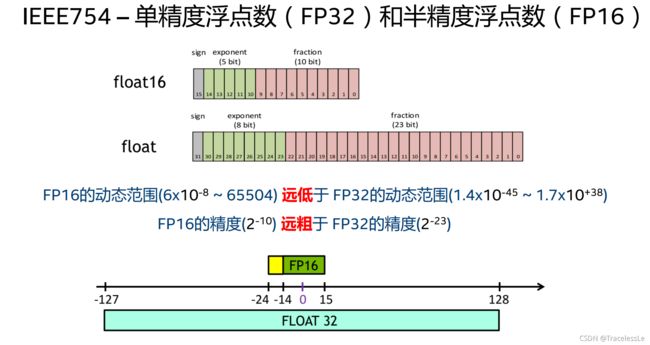
半精度浮点数是一种较新的浮点类型。NVIDIA在2002年初发布的Cg语言中将它称为half类型,并首次在2002年末发布的GeForce FX中实现。半精度浮点数使用2个字节(16位)来存储,这种数据类型只适合存储对精度要求不高的数字,不适合用来计算。其与8位或16位整数相比具有动态范围高的优点,可以使高对比度图片中更多细节得以保留。与单精度浮点数相比,它的优点是只需要一半的存储空间和带宽,但是会牺牲精度和数值范围。
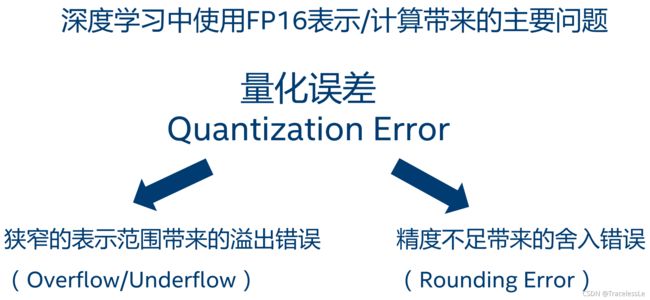
可以看到,如果使用FP16数据类型,由于最大值也仅为65504 ,在计算中很容易出现溢出问题。因此在对网络使用TensorRT的FP16模式加速时,需要特别注意部分计算的数值溢出问题,例如Pow, Sqrt等。
在PyTorch框架下,对于FP16的Tensor操作如果发生了溢出,则得到的结果为tensor(inf, dtype=torch.float16)。
import torch

a = torch.tensor(1e3, dtype=torch.float16)
b = torch.tensor(1e-2, dtype=torch.float16)
c = a/b
print(c)
然而在TensorRT框架下,则会出现最终值为溢出值(错误结果)的问题。例如需要对1e3先平方再开方,如果使用默认的FP16计算则会得到一个错误的计算结果(平方后得到1e6>65504,发生溢出)。
out = input * torch.rsqrt(torch.mean(input ** 2, dim=1, keepdim=True) + 1e-8)
在发生这种问题时,可以通过除以一个scale(如1e3),将原始值缩小一定比例(=1),再做平方操作(=1),然后再进行开方操作(=1),最后将结果乘以scale(=1e3),所有的中间结果和最终结果均在FP16表示范围内,不会出现溢出风险。
fp16_div = 1e4
fp16_div_neg = 1e-4
input_div = input/fp16_div
out = input * torch.rsqrt(torch.mean(input_div ** 2, dim=1, keepdim=True) + 1e-8)*fp16_div_neg
因此,在使用TensorRT的FP16模式时,如果出现部分计算溢出问题,可以通过一些巧妙的操作使得整个计算过程不再溢出。
版权说明
本文为原创文章,独家发布在blog.csdn.net/TracelessLe。未经个人允许不得转载。如需帮助请email至[email protected]。
![]()
参考资料
[1] Prototyping and Debugging Deep Learning Inference Models Using TensorRT’s ONNX-Graphsurgeon and Polygraphy Tools | NVIDIA On-Demand
[2] TensorRT/tools/Polygraphy at master · NVIDIA/TensorRT
[3] Polygraphy — Polygraphy 0.33.0 documentation
[4] 低精度表示用于深度学习训练与推断.pdf-深度学习文档类资源-CSDN文库
[5] TensorRT详细入门指北,如果你还不了解TensorRT,过来看看吧! - SegmentFault 思否
[6] 分享一些值的深入学习的关于AI部署的NVIDIA新技术 - 知乎
[7] ONNX转TensorRT加速模型推理_TracelessLe的专栏-CSDN博客
[8] IBuilderConfig — NVIDIA TensorRT Standard Python API Documentation 8.2.0 documentation
[9] 半精度浮点数 - 维基百科,自由的百科全书
[10] 基于Apex的混合精度加速:半精度浮点数FP16 - stardsd - 博客园
[11] DataType — NVIDIA TensorRT Standard Python API Documentation 8.2.0 documentation
[12] 深度学习算法优化系列二十 | TensorRT 如何进行细粒度的Profiling - GiantPandaCV专栏
[13] ONNX model produces different results in tensorRT 7 compared to pytorch and tensorRT 6 · Issue #1087 · NVIDIA/TensorRT
[14] A complete guide to AI accelerators for deep learning inference — GPUs, AWS Inferentia and Amazon Elastic Inference | by Shashank Prasanna | Towards Data Science
[15] Low Precision Inference with TensorRT | by Vignesh Ungrapalli | Towards Data Science
[16] 自动混合精度训练-使用文档-PaddlePaddle深度学习平台
[17] Achieving FP32 Accuracy for INT8 Inference Using Quantization Aware Training with NVIDIA TensorRT | NVIDIA Developer Blog
[18] FP16 weights out of range error · Issue #420 · NVIDIA/TensorRT
[19] (抛砖引玉)TensorRT的FP16不得劲?怎么办?在线支招! - 知乎
[20] Developer Guide :: NVIDIA Deep Learning TensorRT Documentation - set_layer_mp_python
[21] Layer Base Classes — NVIDIA TensorRT Standard Python API Documentation 8.0.1 documentation
[22] Developer Guide :: NVIDIA Deep Learning TensorRT Documentation - mixed_precision
[23] TensorRT/LayerDumpAndAnalyze - eLinux.org
[24] TensorRT/LayerDumpAndAnalyzeForINT8 - eLinux.org
[25] TensorRT/How2Debug - eLinux.org
[26] Warning: Encountered known unsupported method torch.rsqrt · Issue #485 · NVIDIA-AI-IOT/torch2trt
