Latex的基本使用
本文目录
-
- 一、Latex文档的基本结构
-
- 1.1 latex文档的两个部分
- 1.2 导言区
- 1.3 正文区
- 1.4 数学模式和文本模式
- 二、Latex中中文的处理办法
-
- 2.1 第一种方式 引入ctex宏包
- 2.2 第2种方式,使用ctexart类文档
- 三、带编号的公式、图表等
-
- 3.1 带编号的公式(引入equation)
- 四、Latex中字体的设置
-
- 4.1 字体属性
- 4.2 字体族
- 4.3 字体系列和字体形状设置
-
- 4.4 字体大小
- 4.5 格式与内容分离
- 五、Latex的文章大纲
-
- 5.1 生成文章大纲
- 5.2 生成章节的大纲
- 六、Latex中的特殊字符
-
- 6.1 空格
- 6.2 特殊字符
- 6.3 排版符号
- 6.4 Latex标识符号
- 6.5 引号
- 6.6 连字符
- 七、插图
-
- 7.1 基本使用
- 7.2 可选参数的使用
- 八、表格
- 九、浮动体环境
-
- 9.1 使用figure环境 设置图像浮动体环境
- 9.2 使用table环境 设置表格浮动体环境
- 9.3 使用\centering命令 设置浮动体居中排版
- 9.4 使用[htbp]设置浮动位置
- 9.5 使用\caption命令 设置插图\表标题
- 9.6 使用\lable命令设置标签
- 9.7 使用\ref命令 实现交叉引用
- 十、数学公式
-
- 10.1 行内公式的3中写法
- 10.2 上标
- 10.3 小标
- 10.4 根式、分式
- 10.5 行间公式的5种写法
- 10.6 多行公式的排版
一、Latex文档的基本结构
1.1 latex文档的两个部分
latex分为两部分:导言区和正文区(文稿区)。
1.2 导言区
% 例1
% 导言区
\documentclass{article}  % 除此之外还有book, report, letter类型
% 例2
\documentclass{article}

\title{My First Document}
\author{Mingliang Zhang}
\date{\today}

\begin{document}
	\maketitle
	Hello!
\end{document}
注意:
- 导言区的作用是:
设置全局环境,例如title设置标题,author设置作者,在正文区使用\maketitle生成和显示标题、作者等信息,如例2。
1.3 正文区
% 例3
% 正文区(文稿区)
\begin{document}
\end{document}
注意:
- 一个latex文件有且仅有一个document环境
1.4 数学模式和文本模式
一般用$符号包围起来的成为数学模式,$之外的称为文本模式。
% 例4
\documentclass{article}

\title{My First Document}
\author{Mingliang Zhang}
\date{\today}

\begin{document}
	\maketitle

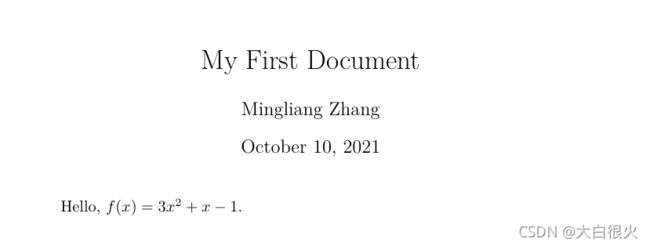
	Hello, $f(x)=3x^2+x-1$.
\end{document}
注意:
- 在Latex中一个
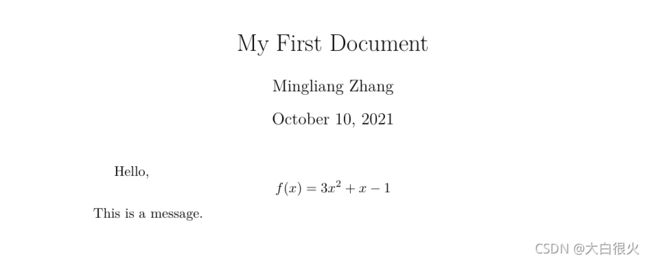
$表示行内公式(如上图,代码如例4),双$表示行间公式(如下图,代码如例5)。
% 例5
\documentclass{article}

\title{My First Document}
\author{Mingliang Zhang}
\date{\today}

\begin{document}
	\maketitle

	Hello,$$f(x)=3x^2+x-1$$This is a message.
\end{document}
二、Latex中中文的处理办法
2.1 第一种方式 引入ctex宏包
注意,Latex编辑中文的3个前提条件:
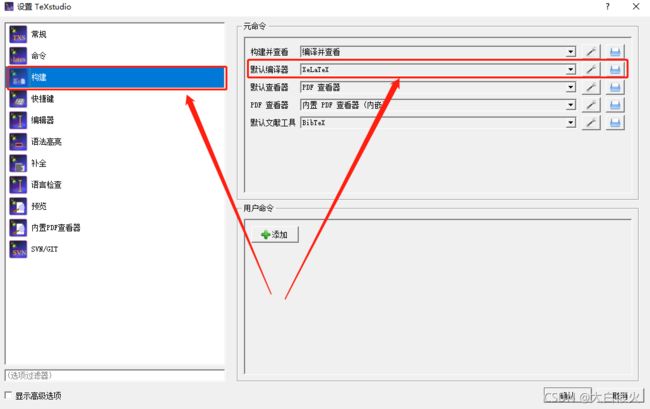
- 默认编译器为:XeLatex
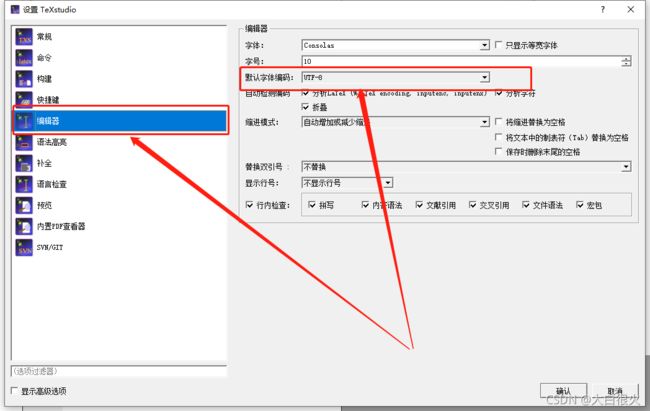
- 默认字体编码为:UTF-8
- 引入一个
\usepackage{ctex}的包
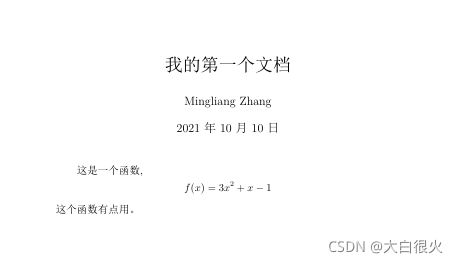
\documentclass{article}

\usepackage{ctex}
\title{我的第一个文档}
\author{Mingliang Zhang}
\date{\today}

\begin{document}
	\maketitle

	这是一个函数,$$f(x)=3x^2+x-1$$这个函数有点用。
\end{document}
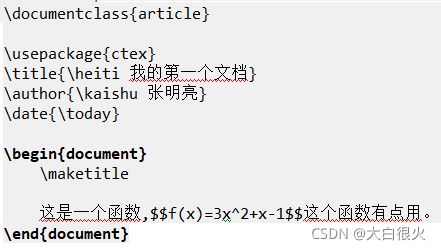
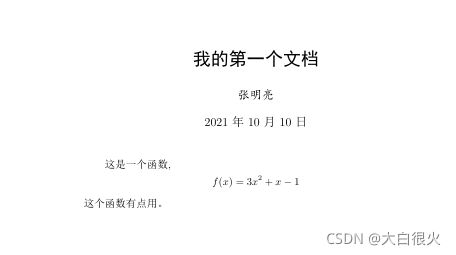
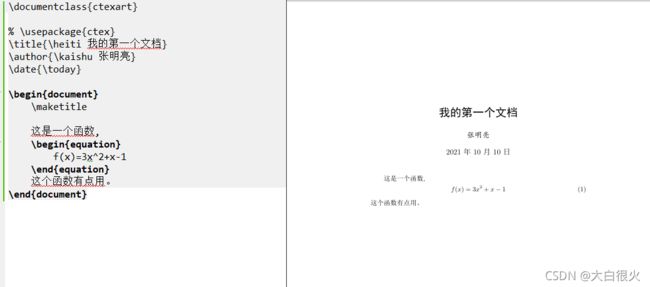
2.2 第2种方式,使用ctexart类文档
\documentclass{ctexart} % 还有ctexbook, ctexreport, 但没有ctexletter

% \usepackage{ctex}
\title{\heiti 我的第一个文档}
\author{\kaishu 张明亮}
\date{\today}

\begin{document}
	\maketitle

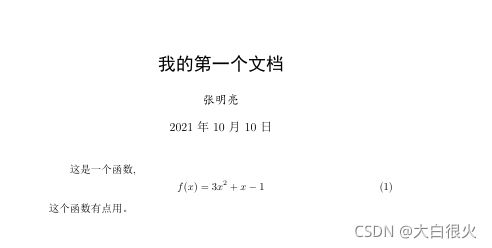
	这是一个函数,
	\begin{equation}
		f(x)=3x^2+x-1
	\end{equation}
	这个函数有点用。
\end{document}
三、带编号的公式、图表等
3.1 带编号的公式(引入equation)
% 例6
\documentclass{article}

\usepackage{ctex}
\title{\heiti 我的第一个文档}
\author{\kaishu 张明亮}
\date{\today}

\begin{document}
	\maketitle

	这是一个函数,
	\begin{equation}
		f(x)=3x^2+x-1
	\end{equation}
	这个函数有点用。
\end{document}
四、Latex中字体的设置
4.1 字体属性
Latex字体共有5种属性:
- 字体编码
- 正文字体编码:OT1、T1、EU1等
- 数学字体编码:OML、OMS、OMX等
- 字体族
- 罗马字体:笔画起始处有装饰
- 无衬线字体:笔画起始处无装饰
- 打字机字体:每个字符宽度相同,又称等宽字体
- 字体系列
- 粗细
- 宽度
- 字体形状
- 直立
- 斜体
- 伪斜体
- 小型大写
- 字体大小
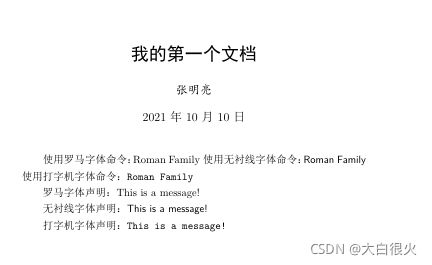
4.2 字体族
\documentclass{ctexart}

% \usepackage{ctex}
\title{\heiti 我的第一个文档}
\author{\kaishu 张明亮}
\date{\today}

\begin{document}
	\maketitle

	使用罗马字体命令:\textrm{Roman Family}
	使用无衬线字体命令:\textsf{Roman Family}
	使用打字机字体命令:\texttt{Roman Family}

	% 使用字体族声明后续的字体
	罗马字体声明:
	\rmfamily This is a message!

	无衬线字体声明:
	{\sffamily This is a message!}

	打字机字体声明:
	{\ttfamily This is a message!}
\end{document}
注意:字体声明可以将后续的字体都为当前字体族的字体,可以使用
{}限定字体声明的作用域,当遇到新的字体声明时,将结束当前字体声明,使用新的字体声明。
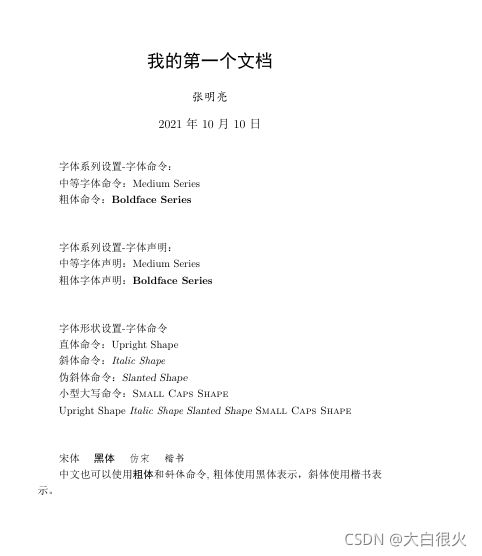
4.3 字体系列和字体形状设置
\documentclass{ctexart}

% \usepackage{ctex}
\title{\heiti 我的第一个文档}
\author{\kaishu 张明亮}
\date{\today}

\begin{document}
	\maketitle

	% 字体系列设置(粗细、宽度)
	字体系列设置-字体命令:

	中等字体命令:\textmd{Medium Series}

	粗体命令:\textbf{Boldface Series}

	\vspace{3em}  % 设置垂直空白
	字体系列设置-字体声明:

	中等字体声明:{\mdseries Medium Series}

	粗体字体声明: {\bfseries Boldface Series}

	\vspace{3em}  % 设置垂直空白
	% 字体形状(直立、斜体、伪斜体、小型大写
	字体形状设置-字体命令

	直体命令:\textup{Upright Shape}

	斜体命令:\textit{Italic Shape}

	伪斜体命令:\textsl{Slanted Shape}

	小型大写命令:\textsc{Small Caps Shape}

	{\upshape Upright Shape}
	{\itshape Italic Shape}
	{\slshape Slanted Shape}
	{\scshape Small Caps Shape}

	\vspace{3em}  % 设置垂直空白
	% 中文字体设置
	{\songti 宋体} \quad {\heiti 黑体} \quad {\fangsong 仿宋} \quad {\kaishu 楷书}

	中文也可以使用\textbf{粗体}和\textit{斜体}命令,粗体使用黑体表示,斜体使用楷书表示。


\end{document}
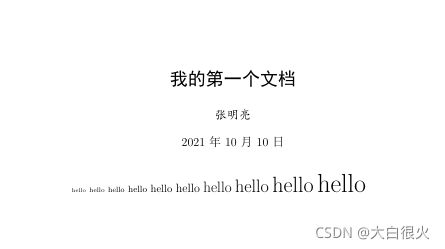
4.4 字体大小
\documentclass{ctexart}

% \usepackage{ctex}
\title{\heiti 我的第一个文档}
\author{\kaishu 张明亮}
\date{\today}

\begin{document}
	\maketitle

	% 字体大小
	{\tiny hello}
	{\scriptsize hello}
	{\footnotesize hello}
	{\small hello}
	{\normalsize hello}
	{\large hello}
	{\Large hello}
	{\LARGE hello}
	{\huge hello}
	{\Huge hello}


\end{document}
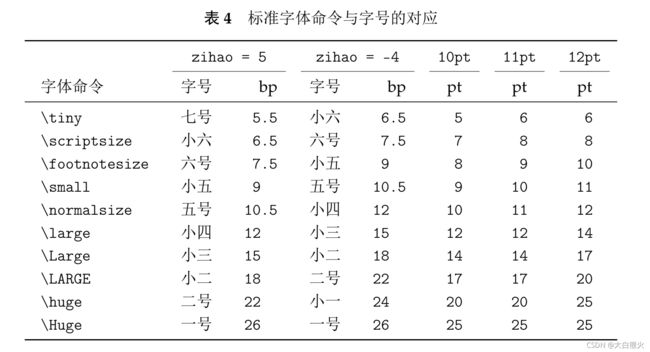
注意:normalsize的大小是文档类的可选参数控制的
\documentclass[12pt]{ctexart}

\usepackage{ctex}
\title{\heiti 我的第一个文档}
\author{\kaishu 张明亮}
\date{\today}

\begin{document}
	\maketitle

    一般只有10pt,11pt,12pt
    中文字体可以为
	\zihao{5}你好
	\zihao{-0}你好,具体参阅ctex文档
\end{document}
4.5 格式与内容分离
Latex的排版原则是格式与内容分离,Latex不建议在内容中设置过多的格式命令,而是自己自定义命令。
\documentclass[12pt]{ctexart}

\usepackage{ctex}
\title{\heiti 我的第一个文档}
\author{\kaishu 张明亮}
\date{\today}

\newcommand{\myfont}{\textbf{\large{\textrm{Fancy Text}}}}

\begin{document}
	\maketitle

    \myfont

\end{document}
五、Latex的文章大纲
5.1 生成文章大纲
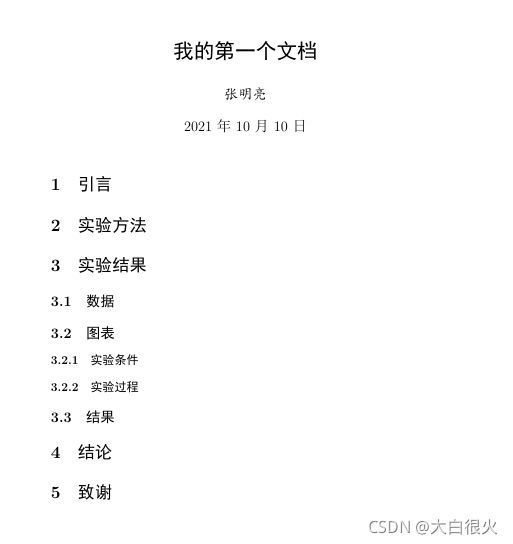
使用sectioin,subsection, subsubsection…来设置文章结构。使用\ctexset可以更改格式。
\documentclass[12pt]{article}

\usepackage{ctex}
\title{\heiti 我的第一个文档}
\author{\kaishu 张明亮}
\date{\today}


\begin{document}
	\maketitle

    \section{引言}
    \section{实验方法}
    \section{实验结果}
    	\subsection{数据}
    	\subsection{图表}
    	\subsubsection{实验条件}
    	\subsubsection{实验过程}
    	\subsection{结果}
    \section{结论}
    \section{致谢}


\end{document}
5.2 生成章节的大纲
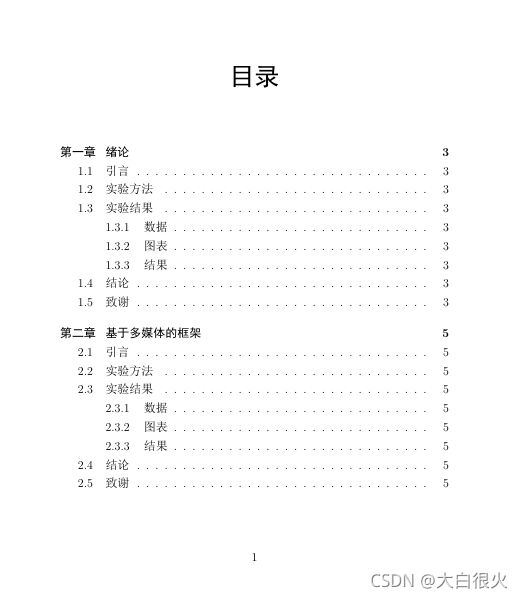
\documentclass[12pt]{ctexbook}

%\usepackage{ctex}
\title{\heiti 我的第一个文档}
\author{\kaishu 张明亮}
\date{\today}


\begin{document}

	\tableofcontents

	\chapter{绪论}
    \section{引言}
    \section{实验方法}
    \section{实验结果}
    	\subsection{数据}
    	\subsection{图表}
    	\subsection{结果}
    \section{结论}
    \section{致谢}

    \chapter{基于多媒体的框架}
    \section{引言}
    \section{实验方法}
    \section{实验结果}
    \subsection{数据}
    \subsection{图表}
    \subsection{结果}
    \section{结论}
    \section{致谢}


\end{document}
注意:
- 引入\chapter命令
- subsubsection不起作用
六、Latex中的特殊字符
6.1 空格
\documentclass[12pt]{article}

\usepackage{ctex}
\title{\heiti 我的第一个文档}
\author{\kaishu 张明亮}
\date{\today}


\begin{document}

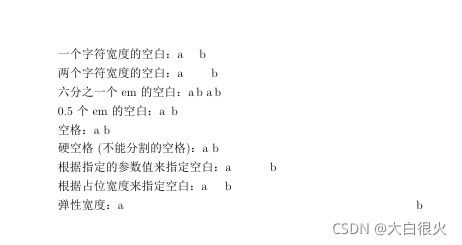
    一个字符宽度的空白:a \quad b

    两个字符宽度的空白:a \qquad b

    六分之一个em的空白:a\,b  a\thinspace b

    0.5个em的空白:a\enspace b

    空格:a\ b

    硬空格(不能分割的空格):a~b

    根据指定的参数值来指定空白:a\hspace{35pt} b

    根据占位宽度来指定空白:a\hphantom{xyz}b

    弹性宽度:a\hfill b

\end{document}
6.2 特殊字符
\documentclass[12pt]{article}

\usepackage{ctex}
\title{\heiti 我的第一个文档}
\author{\kaishu 张明亮}
\date{\today}


\begin{document}

    \# \$ \% \{ \} \~{}  \_{} \^{} \textbackslash \&

\end{document}
6.3 排版符号
\documentclass[12pt]{article}

\usepackage{ctex}
\title{\heiti 我的第一个文档}
\author{\kaishu 张明亮}
\date{\today}


\begin{document}

    \S \P \dag \ddag \copyright \pounds

\end{document}
6.4 Latex标识符号
\documentclass[12pt]{article}

\usepackage{ctex}
\title{\heiti 我的第一个文档}
\author{\kaishu 张明亮}
\date{\today}


\begin{document}

    \TeX{} \LaTeX{} \LaTeXe{}

\end{document}
XeLaTeX的标识符需要引如宏包\usepackage{xltxtra} 并使用\XeLaTeX才可以引入.
6.5 引号
\documentclass[12pt]{article}

\usepackage{ctex}
\title{\heiti 我的第一个文档}
\author{\kaishu 张明亮}
\date{\today}


\begin{document}

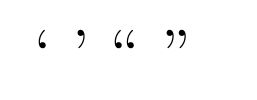
    ` ' `` ''

\end{document}
6.6 连字符
\documentclass[12pt]{article}

\usepackage{ctex}
\title{\heiti 我的第一个文档}
\author{\kaishu 张明亮}
\date{\today}


\begin{document}

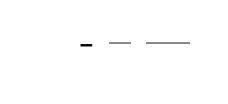
    - -- ---

\end{document}
七、插图
基础:
- 引入宏包:
\usepackage{graphicx}- 使用命令:
\includegraphics{./figures/001.pdf}- 语法格式:
\includegraphics[<选项>]{<文件名>}- 格式:EPS,PDF,PNG,JPEG,BMP
-更多细节查看:texdoc graphicx
7.1 基本使用
\documentclass[12pt]{article}

\usepackage{ctex}
\usepackage{graphicx}
\graphicspath{{figures/}, {pics/}}  % 指定图像的搜索路径,必须是当前路径下的文件夹

\title{\heiti 我的第一个文档}
\author{\kaishu 张明亮}
\date{\today}


\begin{document}

\includegraphics{001.pdf}


\end{document}
7.2 可选参数的使用
% 缩放银子
\includegraphics[scale=0.3]{001}

% 固定值的图像宽度
\includegraphics[width=2cm]{001}

% 固定值的图像高度
\includegraphics[height=2cm]{001}

% 版型高度的0.5
\includegraphics[height=0.5\textheight]{001}

% 版型宽度的0.5
\includegraphics[width=0.5\textwidth]{001}

% 可以同时指定多个参数,不同参数之间用逗号分隔
\includegraphics[height=0.5\textheight, angle=45]{001}
八、表格
\begin{tabular}{列格式}
 ...内容
\end{tabular}
- 列格式, 分别用l,c,r表示居左,居中,居右
- 有几个列格式,说明有几列
- 在列格式之间用竖线表示表格竖线
- \表示结束本行并换行
- \hline命令产生表格横线,两个\hline表示双横线
- 在列格式中可以使用p{1.5cm}产生固定宽度的列,内容超过宽度会自动换行
- 可以使用
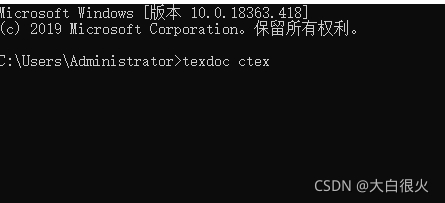
texdoc booktab查看详细说明- 跨页长表格 textdoc longtab
- 综合表格宏包 textdoc tabu
\documentclass[12pt]{article}

\usepackage{ctex}
\usepackage{graphicx}
\graphicspath{{figures/}}

\title{\heiti 我的第一个文档}
\author{\kaishu 张明亮}
\date{\today}


\begin{document}

\begin{tabular}{|l|c|c|c|r|}
	\hline
	姓名 & 语文 & 外语 & 备注 \\
	\hline
	张三 & 99 & 127 & 58 \\
	\hline
\end{tabular}


\end{document}
\documentclass[12pt]{article}

\usepackage{ctex}
\usepackage{graphicx}
\graphicspath{{figures/}}

\title{\heiti 我的第一个文档}
\author{\kaishu 张明亮}
\date{\today}


\begin{document}

\begin{tabular}{|l|c|c|p{5cm}|}
	\hline
	姓名 & 语文 & 外语 & 备注 \\
	\hline
	张三 & 99 & 127 & 58 \\
	\hline
\end{tabular}


\end{document}
九、浮动体环境
9.1 使用figure环境 设置图像浮动体环境
 \begin{figure}
 	内容...
 \end{figure}
9.2 使用table环境 设置表格浮动体环境
 \begin{table}
 	内容...
 \end{table}
9.3 使用\centering命令 设置浮动体居中排版
 \begin{figure}
 	\centering
 \end{figure}
9.4 使用[htbp]设置浮动位置
 \begin{figure}[htbp]
 \end{figure}
9.5 使用\caption命令 设置插图\表标题
 \begin{figure}
    \caption{标题}
 \end{figure}
9.6 使用\lable命令设置标签
 \begin{figure}
    \caption{标题}\lable{fig-lion}
 \end{figure}
9.7 使用\ref命令 实现交叉引用
\documentclass[12pt]{article}

\usepackage{ctex}
\usepackage{graphicx}
\graphicspath{{figures/}}

\title{\heiti 我的第一个文档}
\author{\kaishu 张明亮}
\date{\today}


\begin{document}
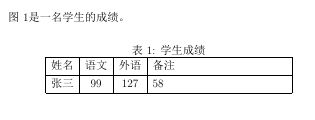
	表\ref{my}是一名学生的成绩。
\begin{table}[htbp]
	\centering
	\caption{学生成绩}\label{my}
	\begin{tabular}{|l|c|c|p{5cm}|}
		\hline
		姓名 & 语文 & 外语 & 备注 \\
		\hline
		张三 & 99 & 127 & 58 \\
		\hline
	\end{tabular}
\end{table}


\end{document}
十、数学公式
10.1 行内公式的3中写法
\documentclass[12pt]{article}

\usepackage{ctex}
\usepackage{graphicx}
\graphicspath{{figures/}}

\title{\heiti 我的第一个文档}
\author{\kaishu 张明亮}
\date{\today}


\begin{document}

美元符号:交换律是$a+b=b+a$, 如$1+2=2+1$。

小括号:交换律是\(a+b=b+a\), 如\(1+2=2+1\)。

math环境:交换律是
\begin{math}
	a+b=b+a
\end{math}如
\begin{math}
1+2=2+1
\end{math}。

\end{document}
10.2 上标
\begin{document}

$3x^{20} - x + 2 = 0$

\end{document}
10.3 小标
\begin{document}

$a_{12}$

\end{document}
![]()
10.4 根式、分式
\begin{document}

$$\frac{3}{4}$$
\[frac{6}{6}\]

\end{document}
10.5 行间公式的5种写法
\documentclass[12pt]{article}

\usepackage{ctex}
\usepackage{graphicx}
\graphicspath{{figures/}}

\title{\heiti 我的第一个文档}
\author{\kaishu 张明亮}
\date{\today}


\begin{document}
% 1.双$
$$\frac{3}{4}$$

% 2.中括号
\[\frac{6}{6} \]

% 3.display环境
\begin{displaymath}
	\frac{6}{6}
\end{displaymath}

% 4.自动编号的equation环境
\begin{equation}
	\frac{6}{6} \label{eq:e1}
\end{equation}

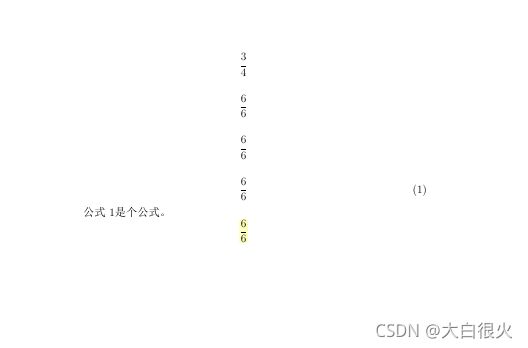
公式\ref{eq:e1}是个公式。
% 5.不自动编号的equation*环境
\begin{equation*}
	\frac{6}{6} \label{eq:e2}
\end{equation*}

\end{document}

%\ref{eq:e2}
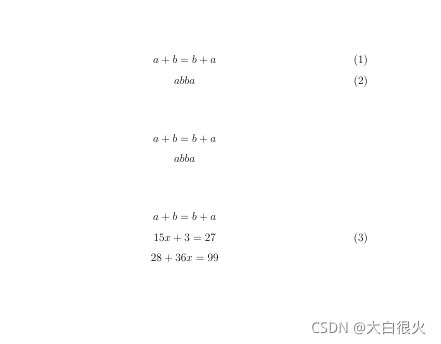
10.6 多行公式的排版
导包:
\usepackage{amsmath}
\usepackage{amssymb}
\documentclass[12pt]{article}

\usepackage{ctex}
\usepackage{graphicx}
\graphicspath{{figures/}}

\usepackage{amsmath}
\usepackage{amssymb}

\title{\heiti 我的第一个文档}
\author{\kaishu 张明亮}
\date{\today}


\begin{document}

% 多行公式编号
\begin{gather}
	a + b = b + a \\
	ab ba
\end{gather}

% 多行公式不编号
\begin{gather*}
	a + b = b + a \\
	ab ba
\end{gather*}

% 在gather环境中可以在\\前使用\notag阻止编号
\begin{gather}
	a + b = b + a \notag \\
	15x + 3 = 27 \\
	28 + 36x = 99 \notag
\end{gather}

% 使用align环境在&指定位置对齐,此处略


\end{document}

%\ref{eq:e2}
