【ROS】—— ROS通信机制——实践与练习(六)
文章目录
- 前言
- 1. 话题发布
-
- 1.1 C++方式实现
- 1.2 python实现
- 2. 话题订阅
-
- 2.1 C++实现
- 2.2 python实现
- 3. 服务调用
-
- 3.1 C++
- 3.2 python
- 4. 参数设置
-
- 4.1 C++
- 4.2 python
- 4.3 运行
- 4.4 其他方式
-
- 4.4.1 修改小乌龟节点的背景色(命令行实现)
- 4.4.2 启动节点时,直接设置参数
- 4.4.3 通过launch文件传参
前言
本系列将依托赵虚左老师的ROS课程,写下自己的一些心得与笔记。
课程链接:https://www.bilibili.com/video/BV1Ci4y1L7ZZ
讲义链接:http://www.autolabor.com.cn/book/ROSTutorials/index.html
文章可能存在疏漏的地方,恳请大家指出。
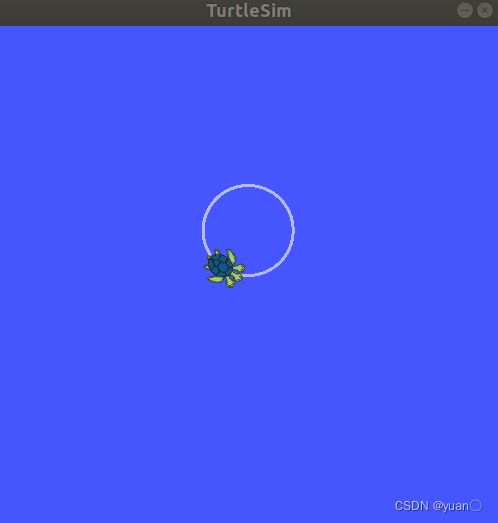
1. 话题发布
实现流程:
- 通过计算图结合ros命令获取话题与消息信息。
- 编码实现运动控制节点。
- 启动 roscore、turtlesim_node 以及自定义的控制节点,查看运行结果。
一些关于运动学的基本概念可以参考
自动驾驶路径跟踪控制——车辆动力学建模基本概念
创建功能包需要依赖的功能包: roscpp rospy std_msgs geometry_msgs注意多了一个geometry_msgs
1.1 C++方式实现
#include "ros/ros.h"
#include "geometry_msgs/Twist.h"
/*
    编写 ROS 节点,控制小乌龟画圆

    准备工作:
        1.获取topic(已知: /turtle1/cmd_vel)
        2.获取消息类型(已知: geometry_msgs/Twist)
        3.运行前,注意先启动 turtlesim_node 节点

    实现流程:
        1.包含头文件
        2.初始化 ROS 节点
        3.创建发布者对象
        4.循环发布运动控制消息
*/
int main(int argc, char  *argv[])
{
    //初始化 ROS 节点
    ros::init(argc,argv,"talker_turtle");
    ros::NodeHandle nh;
    // 创建发布者对象
    ros::Publisher pub = nh.advertise<geometry_msgs::Twist>("/turtle1/cmd_vel",30);
    //设置发布频率
    ros::Rate rate(10);
    //循环发布运动控制消息
    geometry_msgs::Twist twist;
    //线速度
    twist.linear.x = 1.0;
    twist.linear.y = 0.0;
    twist.linear.z = 0.0;
    //角速度
    twist.angular.x = 0.0;
    twist.angular.y = 0.0;
    twist.angular.z = 1.0;
    while(ros::ok())
    {
        pub.publish(twist);
        rate.sleep();
        ros::spinOnce();
    }
    return 0;
}
CmakeLists配置
add_executable(test_publisher_turtle src/test_publisher_turtle.cpp)

add_dependencies(test_publisher_turtle ${${PROJECT_NAME}_EXPORTED_TARGETS} ${catkin_EXPORTED_TARGETS})

target_link_libraries(test_publisher_turtle
  ${catkin_LIBRARIES}
)
1.2 python实现
#! /usr/bin/env python
#-- coding:UTF-8 --
import rospy
from geometry_msgs.msg import Twist

"""
    编写 ROS 节点,控制小乌龟画圆

    准备工作:
        1.获取topic(已知: /turtle1/cmd_vel)
        2.获取消息类型(已知: geometry_msgs/Twist)
        3.运行前,注意先启动 turtlesim_node 节点

    实现流程:
        1.导包
        2.初始化 ROS 节点
        3.创建发布者对象
        4.循环发布运动控制消息

"""

if __name__ ==  "__main__":
    # 初始化 ROS 节点
    rospy.init_node("test_pub")
    # 创建发布者对象
    pub = rospy.Publisher("/turtle1/cmd_vel",Twist,queue_size =30)
    # 循环发布运动控制消息
    rate =  rospy.Rate(10)
    # 创建速度消息
    twist = Twist()
    twist.linear.x = 1.0
    twist.linear.y = 0.0
    twist.linear.z = 0.0
    twist.angular.x = 0.0
    twist.angular.y = 0.0
    twist.angular.z = 1.0
    # 循环发布
    while not rospy.is_shutdown():
        pub.publish(twist)
        rate.sleep()
2. 话题订阅
实现流程:
- 通过ros命令获取话题与消息信息。
- 编码实现位姿获取节点。
- 启动 roscore、turtlesim_node 、控制节点以及位姿订阅节点,控制乌龟运动并输出乌龟的位姿。
2.1 C++实现
创建功能包需要依赖的功能包: roscpp rospy std_msgs turtlesim
因为先前已经创建过功能包了,所以只需在配置文件中补上相关内容。
CmakeLists
find_package(catkin REQUIRED COMPONENTS
  geometry_msgs
  roscpp
  rospy
  std_msgs
  turtlesim
)
package.xml
    turtlesim
      turtlesim
/*
    订阅小乌龟的位姿: 时时获取小乌龟在窗体中的坐标并打印
    准备工作:
        1.获取话题名称 /turtle1/pose
        2.获取消息类型 turtlesim/Pose
        3.运行前启动 turtlesim_node 与 turtle_teleop_key 节点

    实现流程:
        1.包含头文件
        2.初始化 ROS 节点
        3.创建 ROS 句柄
        4.创建订阅者对象
        5.回调函数处理订阅的数据
        6.spin
*/

#include "ros/ros.h"
#include "turtlesim/Pose.h"

void doPose(const turtlesim::Pose::ConstPtr& p){
    ROS_INFO("乌龟位姿信息:x=%.2f,y=%.2f,theta=%.2f,lv=%.2f,av=%.2f",
        p->x,p->y,p->theta,p->linear_velocity,p->angular_velocity
    );
}

int main(int argc, char *argv[])
{
    setlocale(LC_ALL,"");
    // 2.初始化 ROS 节点
    ros::init(argc,argv,"sub_pose");
    // 3.创建 ROS 句柄
    ros::NodeHandle nh;
    // 4.创建订阅者对象
    ros::Subscriber sub = nh.subscribe<turtlesim::Pose>("/turtle1/pose",1000,doPose);
    // 5.回调函数处理订阅的数据
    // 6.spin
    ros::spin();
    return 0;
}
launch文件
<launch>


    <node pkg = 'turtlesim' type = "turtlesim_node" name = "turtle1" output = "screen"/>

    <node pkg =  "turtlesim" type = "turtle_teleop_key" name ="key" output = "screen"/>

    <node pkg =  "test_turtle" type = "test_subscribe_turtle" name ="sub" output = "screen"/>
launch>
2.2 python实现
#! /usr/bin/env python
#-- coding:UTF-8 --
"""
    订阅小乌龟的位姿: 时时获取小乌龟在窗体中的坐标并打印
    准备工作:
        1.获取话题名称 /turtle1/pose
        2.获取消息类型 turtlesim/Pose
        3.运行前启动 turtlesim_node 与 turtle_teleop_key 节点

    实现流程:
        1.导包
        2.初始化 ROS 节点
        3.创建订阅者对象
        4.回调函数处理订阅的数据
        5.spin

"""

import rospy
from turtlesim.msg import Pose

def doPose(data):
    rospy.loginfo("乌龟坐标:x=%.2f, y=%.2f,theta=%.2f,linear_velocity=%lf",data.x,data.y,data.theta,data.linear_velocity)

if __name__ == "__main__":

    # 2.初始化 ROS 节点
    rospy.init_node("sub_pose_p")

    # 3.创建订阅者对象
    sub = rospy.Subscriber("/turtle1/pose",Pose,doPose,queue_size=1000)
    #     4.回调函数处理订阅的数据
    #     5.spin
    rospy.spin()
3. 服务调用
实现流程:
- 通过ros命令获取服务与服务消息信息。
- 编码实现服务请求节点。
- 启动 roscore、turtlesim_node 、乌龟生成节点,生成新的乌龟
创建功能包需要依赖的功能包: roscpp rospy std_msgs turtlesim
3.1 C++
/*
    生成一只小乌龟
    准备工作:
        1.服务话题 /spawn
        2.服务消息类型 turtlesim/Spawn
        3.运行前先启动 turtlesim_node 节点

    实现流程:
        1.包含头文件
          需要包含 turtlesim 包下资源,注意在 package.xml 配置
        2.初始化 ros 节点
        3.创建 ros 句柄
        4.创建 service 客户端
        5.等待服务启动
        6.发送请求
        7.处理响应

*/

#include "ros/ros.h"
#include "turtlesim/Spawn.h"

int main(int argc, char *argv[])
{
    setlocale(LC_ALL,"");
    // 2.初始化 ros 节点
    ros::init(argc,argv,"set_turtle");
    // 3.创建 ros 句柄
    ros::NodeHandle nh;
    // 4.创建 service 客户端
    ros::ServiceClient client = nh.serviceClient<turtlesim::Spawn>("/spawn");
    // 5.等待服务启动
    // client.waitForExistence();
    ros::service::waitForService("/spawn");
    // 6.发送请求
    turtlesim::Spawn spawn;
    spawn.request.x = 1.0;
    spawn.request.y = 1.0;
    spawn.request.theta = 1.57;
    spawn.request.name = "turtle2";
    bool flag = client.call(spawn);
    // 7.处理响应结果
    if (flag)
    {
        ROS_INFO("新的乌龟生成,名字:%s",spawn.response.name.c_str());
    } else {
        ROS_INFO("乌龟生成失败!!!");
    }


    return 0;
}
3.2 python
#! /usr/bin/env python
#-- coding:UTF-8 --
"""
    生成一只小乌龟
    准备工作:
        1.服务话题 /spawn
        2.服务消息类型 turtlesim/Spawn
        3.运行前先启动 turtlesim_node 节点

    实现流程:
        1.导包
          需要包含 turtlesim 包下资源,注意在 package.xml 配置
        2.初始化 ros 节点
        3.创建 service 客户端
        4.等待服务启动
        5.发送请求
        6.处理响应

"""

import rospy
from turtlesim.srv import Spawn,SpawnRequest,SpawnResponse

if __name__ == "__main__":
    # 2.初始化 ros 节点
    rospy.init_node("set_turtle_p")
    # 3.创建 service 客户端
    client = rospy.ServiceProxy("/spawn",Spawn)
    # 4.等待服务启动
    client.wait_for_service()
    # 5.发送请求
    req = SpawnRequest()
    req.x = 2.0
    req.y = 2.0
    req.theta = -1.57
    req.name = "my_turtle_p"
    try:
        response = client.call(req)
        # 6.处理响应
        rospy.loginfo("乌龟创建成功!,叫:%s",response.name)
    except expression as identifier:
        rospy.loginfo("服务调用失败")
4. 参数设置
实现流程:
- 通过ros命令获取参数。
- 编码实现服参数设置节点。
- 启动 roscore、turtlesim_node 与参数设置节点,查看运行结果。
4.1 C++
/*
    注意命名空间的使用。

*/
#include "ros/ros.h"


int main(int argc, char *argv[])
{
    ros::init(argc,argv,"haha");

    ros::NodeHandle nh("turtlesim");
    //ros::NodeHandle nh;

    // ros::param::set("/turtlesim/background_r",0);
    // ros::param::set("/turtlesim/background_g",0);
    // ros::param::set("/turtlesim/background_b",0);

    nh.setParam("background_r",0);
    nh.setParam("background_g",0);
    nh.setParam("background_b",0);


    return 0;
}
4.2 python
#! /usr/bin/env python
#-- coding:UTF-8 --
import rospy

if __name__ == "__main__":
    rospy.init_node("hehe")
    # rospy.set_param("/turtlesim/background_r",255)
    # rospy.set_param("/turtlesim/background_g",255)
    # rospy.set_param("/turtlesim/background_b",255)
    rospy.set_param("background_r",255)
    rospy.set_param("background_g",255)
    rospy.set_param("background_b",255)  # 调用时,需要传入 __ns:=xxx
4.3 运行
首先,启动 roscore;
然后启动背景色设置节点;
最后启动乌龟显示节点;
最终执行结果与演示结果类似。
PS: 注意节点启动顺序,如果先启动乌龟显示节点,后启动背景色设置节点,那么颜色设置不会生效。
4.4 其他方式
4.4.1 修改小乌龟节点的背景色(命令行实现)
rosparam set /turtlesim/background_b 自定义数值
rosparam set /turtlesim/background_r 自定义数值
rosparam set /turtlesim/background_g 自定义数值
4.4.2 启动节点时,直接设置参数
rosrun turtlesim turtlesim_node _background_r:=100 _background_g:=0 _background_b:=0
4.4.3 通过launch文件传参
<launch>
    <node pkg="turtlesim" type="turtlesim_node" name="set_bg" output="screen">


        <rosparam command="load" file="$(find demo03_test_parameter)/cfg/color.yaml" />
    node>


