Attention及其pytorch代码实现
基于RNN的Seq2Seq的基本假设:原始序列的最后一个隐含状态(一个向量)包含了该序列的全部信息。
(这显然是不合理的)
解决:当要生成一个目标语言单词的时候,不光考虑前一个时刻的状态和已经生成的单词,还要考虑
当前要生成的单词和源句子中的哪些单词更加相关,即更关注源句子中的哪些词,这种做法就叫做注意力机制(Attention)
Attention
Luong等人在2015年发布的Effective Approaches to Attention-based Neural Machine Translation论文中,提出了attention技术,通过attention技术,seg2seg模型极大地提高了机器翻译的质量。
归其原因是:attention机制使得seg2seg模型可以有区分度、有重点地关注输入序列。
- 假设模型已经生成单词“我”之后,要生成下一个单词;
- 显然和源语言中“love”关系最大,因此将源语言句子中的“love”对应的状态乘以一个比较大的权重,如0.6,而其余词的权重则较小;
- 最终将源语言句子中每个单词对应的状态加权求和,并用作新状态更新一个额外输出。
结合Attention机制的Seg2Seg模型
-
结合attention, seg2seg模型decoder每次更新状态的时候都会再看一遍encoder的所有状态(decoder会知道去关注哪里)
-
在Encoder结束工作之后,Attention和Decoder同时开始工作 -
attention可以简单的理解为:一种有效的加权求和技术,关键点在于如何获得权重。
- 计算权重: α i = a l i g h ( h i , s 0 ) \alpha_i=aligh(h_i,s_0) αi=aligh(hi,s0)
(相当于计算 h i h_i hi和 s 0 的 相 关 性 s_0的相关性 s0的相关性)
( h i 为 E n c o d e r 的 隐 藏 层 状 态 , s 0 为 E n c o d e r 的 最 后 一 个 隐 藏 层 状 态 h_i为Encoder的隐藏层状态,s_0为Encoder的最后一个隐藏层状态 hi为Encoder的隐藏层状态,s0为Encoder的最后一个隐藏层状态)
(权重为0-1之间的数,加起来等于1)- 计算方法:
- Linear maps(线性变换):
k i = W K ⋅ h i , f o r i = 1 t o m k_i=W_K·h_i,for i = 1 to m ki=WK⋅hi,fori=1tom q 0 = W Q ⋅ s 0 q_0=W_Q·s_0 q0=WQ⋅s0- Inner product(计算内积):
α i ~ = k i T q 0 \tilde{\alpha_i} = \mathbf{k}^\mathrm{T}_iq_0 αi~=kiTq0- Normalization:
[ α 1 , ⋅ ⋅ ⋅ , α m ] = s o f t m a x ( [ α 1 ~ , ⋅ ⋅ ⋅ , α m ~ ] ) [\alpha_1,···,\alpha_m] = softmax([\tilde{\alpha_1},···,\tilde{\alpha_m}]) [α1,⋅⋅⋅,αm]=softmax([α1~,⋅⋅⋅,αm~])
- 获得权重之后就是求取Context Vector:
c 0 = α 1 h 1 + ⋅ ⋅ ⋅ + α m h m c_0=\alpha_1h_1+···+\alpha_mh_m c0=α1h1+⋅⋅⋅+αmhm
- 更新Decoder状态向量( s 0 = h m s_0=h_m s0=hm)
- SimpleRNN
s 1 = t a n h ( A ′ ⋅ [ X 1 ′ s 0 ] + b ) s_1=tanh(A'·\begin{bmatrix}X_1'\\s_0\\ \end{bmatrix}+b) s1=tanh(A′⋅[X1′s0]+b)- SimpleRNN+Attention
s 1 = t a n h ( A ′ ⋅ [ X 1 ′ s 0 c 0 ] + b ) s_1=tanh(A'·\begin{bmatrix}X_1'\\s_0\\c_0\\ \end{bmatrix}+b) s1=tanh(A′⋅⎣⎡X1′s0c0⎦⎤+b)
- 缺点:计算量非常大
- attention时间复杂度很高 m t mt mt(encoder和decoder序列长度的乘积)
GRU
由于后面的代码用到了GRU,这里简单介绍一下。
GRU(Gate Recurrent Unit)是RNN的一种。和LSTM一样,也是为了解决长期记忆和反向传播中的梯度等问题而提出的。
GRU输入输出的结构和普通的RNN相似,其中内部思想与LSTM相似。
与LSTM相比,GRU内部少了一个Gate,参数相对更少,训练速度更快,但是也能达到和LSTM相当的功能。
GRU的输入输出
- 和RNN一样,没什么好说的
GRU的内部结构
-
通过前一时刻状态 h t − 1 h_{t-1} ht−1和当前输入 x t x_t xt来获取两个门控状态
重 置 门 控 : r = σ ( W r ⋅ [ x t h t − 1 ] ) 重置门控:r = \sigma(W^r·\begin{bmatrix}x_t\\h_{t-1}\\ \end{bmatrix}) 重置门控:r=σ(Wr⋅[xtht−1]) 更 新 门 控 : z = σ ( W z ⋅ [ x t h t − 1 ] ) 更新门控:z = \sigma(W^z·\begin{bmatrix}x_t\\h_{t-1}\\ \end{bmatrix}) 更新门控:z=σ(Wz⋅[xtht−1]) -
得到门控信息后,首先使用重置门控来得到重置之后的数据 h t − 1 ′ = h t − 1 ⋅ r h_{t-1}^{'} = h_{t-1} \cdot r ht−1′=ht−1⋅r再将 h t − 1 ′ h_{t-1}^{'} ht−1′与输入 x t x_t xt进行拼接,再通过一个tanh函数来将数据缩放到-1~1之间 h ′ = t a n h ( W [ x t h t − 1 ′ ] ) h'=tanh(W\begin{bmatrix}x_t\\h_{t-1}^{'}\\ \end{bmatrix}) h′=tanh(W[xtht−1′])这里的 h ′ h' h′主要是包含了当前输入 x t x_t xt,有针对性的添加了上一时刻的隐藏层状态,类似与LSTM的forget gate。
-
更新记忆阶段
在这个阶段,我们同时进行了遗忘和记忆两个步骤。
先使用了之前得到的更新门控 h t = ( 1 − z ) ⋅ h t − 1 + z ⋅ h ′ h_t = (1-z) \cdot h_{t-1} + z \cdot h' ht=(1−z)⋅ht−1+z⋅h′
GRU的关键点就在于此:使用更新门控 z z z就可以同时进行遗忘和选择记忆
代码实现
任务:机器翻译
源语言:德语
目标语言:英语
- 导入包
import torch
import torch.nn as nn
import torch.optim as optim
import torch.nn.functional as F

from torchtext.legacy import data,datasets

import spacy
import numpy as np

import random
import math

import de_core_news_sm
数据预处理
- 设置种子
SEED = 1234

random.seed(SEED)
np.random.seed(SEED)
torch.manual_seed(SEED)
torch.cuda.manual_seed(SEED)
torch.backends.cudnn.deterministic = True
- 接下来,我们将加载spaCy模块,并为源语言和目标语言定义标记器。(这里比较麻烦,建议从spacy的github直接下载,然后安装)
spacy_de = spacy.load('de_core_news_sm')
spacy_en = spacy.load('en_core_web_sm')
- 构建分词器
def tokenize_de(text):
    # Tokenizes German text from a string into a list of strings
    return [tok.text for tok in spacy_de.tokenizer(text)]

def tokenize_en(text):
    # Tokenizes English text from a string into a list of strings
    return [tok.text for tok in spacy_en.tokenizer(text)]
- 接下来,我们将设置决定如何处理数据的字段。我们附加了序列标记的开始和结束,并对所有文本进行小写。
SRC = data.Field(tokenize = tokenize_de,
init_token = '' ,
eos_token = '' ,
lower = True)
TRG = data.Field(tokenize = tokenize_en,
init_token = '' ,
eos_token = '' ,
lower = True)
- 我们加载训练集、验证集和测试集,生成dataset类。使用torchtext自带的Multi30k数据集,这是一个包含约30000个平行的英语、德语和法语句子的数据集,每个句子包含约12个单词。
train_data, valid_data, test_data = datasets.Multi30k.splits(exts = ('.de', '.en'),
															fields = (SRC, TRG))
- 可以查看以下加载完的数据集
print(f"Number of training examples: {len(train_data.examples)}")
print(f"Number of validation examples: {len(valid_data.examples)}")
print(f"Number of testing examples: {len(test_data.examples)}")

Number of training examples: 29000
Number of validation examples: 1014
Number of testing examples: 1000
- 查看数据实例
vars(train_data.examples[0])

{'src': ['zwei',
  'junge',
  'weiße',
  'männer',
  'sind',
  'im',
  'freien',
  'in',
  'der',
  'nähe',
  'vieler',
  'büsche',
  '.'],
 'trg': ['two',
  'young',
  ',',
  'white',
  'males',
  'are',
  'outside',
  'near',
  'many',
  'bushes',
  '.']}
- 构建词汇表,将出现次数少于2次的任何标记转换为标记。
SRC.build_vocab(train_data, min_freq = 2)
TRG.build_vocab(train_data, min_freq = 2)
- 查看一下生成的词表大小
print(f"Unique tokens in source (de) vocabulary: {len(SRC.vocab)}")
print(f"Unique tokens in target (en) vocabulary: {len(TRG.vocab)}")

Unique tokens in source (de) vocabulary: 7855
Unique tokens in target (en) vocabulary: 5893
- 查看词汇表中最常见的单词及其他们在数据集中出现的次数。
SRC.vocab.freqs.most_common(20)

[('.', 28809),
 ('ein', 18851),
 ('einem', 13711),
 ('in', 11895),
 ('eine', 9909),
 (',', 8938),
 ('und', 8925),
 ('mit', 8843),
 ('auf', 8745),
 ('mann', 7805),
 ('einer', 6765),
 ('der', 4990),
 ('frau', 4186),
 ('die', 3949),
 ('zwei', 3873),
 ('einen', 3479),
 ('im', 3107),
 ('an', 3062),
 ('von', 2363),
 ('sich', 2273)]
- 也可以使用
stoi(string to int) oritos(int to string) 方法,以下输出TRG-vocab的前10个词汇。
print(TRG.vocab.itos[:10])

# ['', '', '', '', 'a', '.', 'in', 'the', 'on', 'man']
- 设置GPU,构建迭代器
device = torch.device('cuda' if torch.cuda.is_available() else 'cpu')

BATCH_SIZE = 64

train_iterator, valid_iterator, test_iterator = data.BucketIterator.splits(
    (train_data, valid_data, test_data),
    batch_size = BATCH_SIZE,
    device = device)
- 查看一下生成的batch
batch = next(iter(train_iterator))
print(batch)

[torchtext.legacy.data.batch.Batch of size 64 from MULTI30K]
	[.src]:[torch.cuda.LongTensor of size 25x64 (GPU 0)]
	[.trg]:[torch.cuda.LongTensor of size 28x64 (GPU 0)]
搭建模型
Encoder
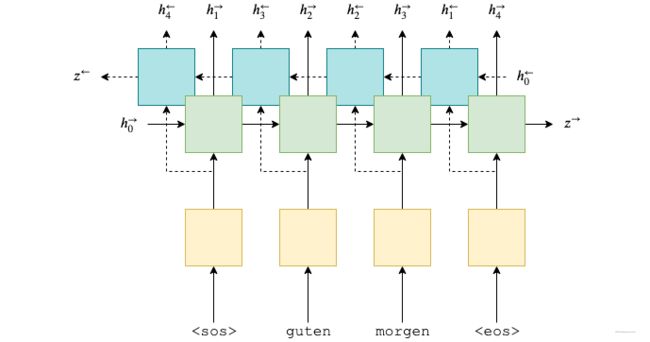
-
双向GRU的隐藏层状态输出由两个向量拼接而成
例如: h 1 = [ h 1 → ; h T ← ] ; h 2 = [ h 2 → ; h T − 1 ← ] ; . . . . . . . . . . h_1=[\overrightarrow{h_1};\overleftarrow{h_T}];h_2=[\overrightarrow{h_2};\overleftarrow{h_{T-1}}];.......... h1=[h1;hT];h2=[h2;hT−1];..........
o u t p u t = { h 1 , h 2 , . . . . . . h T } output=\{h_1,h_2,......h_T\} output={h1,h2,......hT} -
假设这是个m层的GRU h i d d e n = { [ h T 1 → ; h 1 1 ← ] , [ h T 2 → ; h 1 2 ← ] , . . . . . . , [ h T m → ; h 1 m ← ] } hidden=\{[\overrightarrow{h_T^1};\overleftarrow{h_1^1}],[\overrightarrow{h_T^2};\overleftarrow{h_1^2}],......,[\overrightarrow{h_T^m};\overleftarrow{h_1^m}]\} hidden={[hT1;h11],[hT2;h12],......,[hTm;h1m]}
-
我们需要的是hidden的最后一层输出(包括正向和反向),因此我们可以通过
hidden[-2,:,:]和hidden[-1,:,:]取出最后一层的hidden state,将他们拼接起来记作 s 0 s_0 s0。 -
s 0 s_0 s0的维度变换(我们需要将 s 0 s_0 s0维度变换到匹配decoder的初始隐藏状态)
- enc_hidden:[n_layersnum_directions, batch_size, hid_dim2]
- 由于是双向的,做concat:[batch_size, enc_hid_dim*x]
- 经过一个全连接层:[batch_size,dec_hid_dim]
- 剩下还需要进行unsqueeze 和 repeat,这将在下一步完成。
class Encoder(nn.Module):
    def __init__(self, input_dim, emb_dim, enc_hid_dim, dec_hid_dim, dropout):
        super().__init__()
        self.embedding = nn.Embedding(input_dim, emb_dim)
        self.rnn = nn.GRU(emb_dim, enc_hid_dim, bidirectional = True)
        self.fc = nn.Linear(enc_hid_dim * 2, dec_hid_dim)
        self.dropout = nn.Dropout(dropout)

    def forward(self, src):
        '''
        src = [src_len, batch_size]
        '''
        src = src.transpose(0, 1) # src = [batch_size, src_len]
        embedded = self.dropout(self.embedding(src)).transpose(0, 1) # embedded = [src_len, batch_size, emb_dim]

        # enc_output = [src_len, batch_size, hid_dim * num_directions]
        # enc_hidden = [n_layers * num_directions, batch_size, hid_dim]
        enc_output, enc_hidden = self.rnn(embedded) # if h_0 is not give, it will be set 0 acquiescently

        # enc_hidden is stacked [forward_1, backward_1, forward_2, backward_2, ...]
        # enc_output are always from the last layer

        # enc_hidden [-2, :, : ] is the last of the forwards RNN
        # enc_hidden [-1, :, : ] is the last of the backwards RNN

        # initial decoder hidden is final hidden state of the forwards and backwards
        # encoder RNNs fed through a linear layer
        # s = [batch_size, dec_hid_dim]
        s = torch.tanh(self.fc(torch.cat((enc_hidden[-2,:,:], enc_hidden[-1,:,:]), dim = 1)))
        # s就是隐藏层输出,之后作为decoder的初始隐藏状态
        # 由于维度不匹配,经历了一个全连接网络改变维度,以适应decoder的初始隐藏层维度。
        # 之后还需要unsqueeze(0)

        return enc_output, s
Attention
E t = t a n h [ a t t n ( s t − 1 , H ) ] E_t=tanh[attn(s_{t-1},H)] Et=tanh[attn(st−1,H)] α ~ t = v ⋅ E t \tilde\alpha_t = v·E_t α~t=v⋅Et α t = s o f t m a x ( α ~ t ) \alpha_t=softmax(\tilde\alpha_t) αt=softmax(α~t)
- s t − 1 是 指 e n c o d e r 的 隐 藏 层 输 出 s_{t-1}是指encoder的隐藏层输出 st−1是指encoder的隐藏层输出
- H 指 的 是 E n c o d e r 中 的 变 量 e n c _ o u p u t H指的是Encoder中的变量enc\_ouput H指的是Encoder中的变量enc_ouput
- attn()其实就是一个简单的全连接神经网络。
维度变换:
- 首先将encoder传过来的s变换成[batch_size, src_len, dec_hid_dim]
- enc_output进行transpose–>[batch_sizr, src_len, enc_hid_dim*2]好让他们可以concat
- 运算第一个公式得到energy [batch_size,src_len, dec_hid_dim]
- 第二个公式,线性变换 [batch_size,src_len,1] 然后squeeze(2)去掉最后一个维度
- 最后就是softmax,不改变维度。
返回的就是权重值
class Attention(nn.Module):
    def __init__(self, enc_hid_dim, dec_hid_dim):
        super().__init__()
        self.attn = nn.Linear((enc_hid_dim * 2) + dec_hid_dim, dec_hid_dim, bias=False)
        self.v = nn.Linear(dec_hid_dim, 1, bias = False)

    def forward(self, s, enc_output):

        # s = [batch_size, dec_hid_dim]
        # enc_output = [src_len, batch_size, enc_hid_dim * 2]

        batch_size = enc_output.shape[1]
        src_len = enc_output.shape[0]

        # repeat decoder hidden state src_len times
        # s = [batch_size, src_len, dec_hid_dim]
        # enc_output = [batch_size, src_len, enc_hid_dim * 2]
        s = s.unsqueeze(1).repeat(1, src_len, 1)
        enc_output = enc_output.transpose(0, 1)

        # energy = [batch_size, src_len, dec_hid_dim]
        energy = torch.tanh(self.attn(torch.cat((s, enc_output), dim = 2)))

        # attention = [batch_size, src_len]
        attention = self.v(energy).squeeze(2)

        return F.softmax(attention, dim=1)
Decoder
实际也就三个公式:
- 利用attention部分求得的权重计算context vector c = α t H c=\alpha_tH c=αtH
- 更新decoder状态向量 s t = G R U ( e m b ( y t ) , c , s t − 1 ) s_t=GRU(emb(y_t),c,s_{t-1}) st=GRU(emb(yt),c,st−1)
- y t ^ = f ( e m b ( y t ) , c , s t ) \hat{y_t}=f(emb(y_t),c,s_t) yt^=f(emb(yt),c,st)
- H 指 的 是 E n c o d e r 中 的 变 量 e n c _ o u p u t H指的是Encoder中的变量enc\_ouput H指的是Encoder中的变量enc_ouput
- e m b ( y t ) 指 的 是 将 d e c _ i n p u t 经 过 W o r d E m b e d d i n g 之 后 得 到 的 结 果 emb(y_t)指的是将dec\_input经过WordEmbedding之后得到的结果 emb(yt)指的是将dec_input经过WordEmbedding之后得到的结果
- f ( ) 函 数 实 际 上 就 是 为 了 转 换 维 度 f()函数实际上就是为了转换维度 f()函数实际上就是为了转换维度
维度变换
- decoder中最开始先调用一次attention,得到权重 α t \alpha_t αt,它的维度是[batch_size, src_len]
class Decoder(nn.Module):
    def __init__(self, output_dim, emb_dim, enc_hid_dim, dec_hid_dim, dropout, attention):
        super().__init__()
        self.output_dim = output_dim
        self.attention = attention
        self.embedding = nn.Embedding(output_dim, emb_dim)
        self.rnn = nn.GRU((enc_hid_dim * 2) + emb_dim, dec_hid_dim)
        self.fc_out = nn.Linear((enc_hid_dim * 2) + dec_hid_dim + emb_dim, output_dim)
        self.dropout = nn.Dropout(dropout)

    def forward(self, dec_input, s, enc_output):

        # dec_input = [batch_size]
        # s = [batch_size, dec_hid_dim]
        # enc_output = [src_len, batch_size, enc_hid_dim * 2]

        dec_input = dec_input.unsqueeze(1) # dec_input = [batch_size, 1]

        embedded = self.dropout(self.embedding(dec_input)).transpose(0, 1) # embedded = [1, batch_size, emb_dim]

        # a = [batch_size, 1, src_len]
        a = self.attention(s, enc_output).unsqueeze(1)

        # enc_output = [batch_size, src_len, enc_hid_dim * 2]
        enc_output = enc_output.transpose(0, 1)

        # c = [1, batch_size, enc_hid_dim * 2]
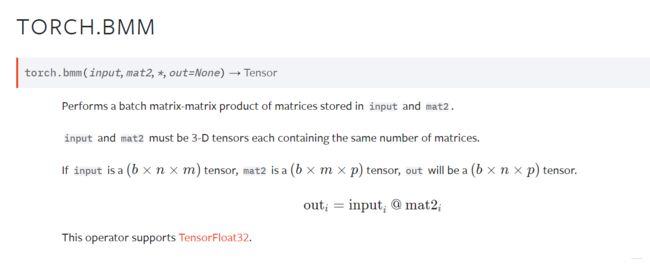
        c = torch.bmm(a, enc_output).transpose(0, 1)

        # rnn_input = [1, batch_size, (enc_hid_dim * 2) + emb_dim]
        rnn_input = torch.cat((embedded, c), dim = 2)

        # dec_output = [src_len(=1), batch_size, dec_hid_dim]
        # dec_hidden = [n_layers * num_directions, batch_size, dec_hid_dim]
        dec_output, dec_hidden = self.rnn(rnn_input, s.unsqueeze(0))

        # embedded = [batch_size, emb_dim]
        # dec_output = [batch_size, dec_hid_dim]
        # c = [batch_size, enc_hid_dim * 2]
        embedded = embedded.squeeze(0)
        dec_output = dec_output.squeeze(0)
        c = c.squeeze(0)

        # pred = [batch_size, output_dim]
        pred = self.fc_out(torch.cat((dec_output, c, embedded), dim = 1))

        return pred, dec_hidden.squeeze(0)
Seg2Seg(with attention)
class Seq2Seq(nn.Module):
    def __init__(self, encoder, decoder, device):
        super().__init__()
        self.encoder = encoder
        self.decoder = decoder
        self.device = device

    def forward(self, src, trg, teacher_forcing_ratio = 0.5):

        # src = [src_len, batch_size]
        # trg = [trg_len, batch_size]
        # teacher_forcing_ratio is probability to use teacher forcing

        batch_size = src.shape[1]
        trg_len = trg.shape[0]
        trg_vocab_size = self.decoder.output_dim

        # tensor to store decoder outputs
        outputs = torch.zeros(trg_len, batch_size, trg_vocab_size).to(self.device)

        # enc_output is all hidden states of the input sequence, back and forwards
        # s is the final forward and backward hidden states, passed through a linear layer
        enc_output, s = self.encoder(src)

        # first input to the decoder is the  tokens
        dec_input = trg[0,:]

        for t in range(1, trg_len):

            # insert dec_input token embedding, previous hidden state and all encoder hidden states
            # receive output tensor (predictions) and new hidden state
            dec_output, s = self.decoder(dec_input, s, enc_output)

            # place predictions in a tensor holding predictions for each token
            outputs[t] = dec_output

            # decide if we are going to use teacher forcing or not
            teacher_force = random.random() < teacher_forcing_ratio

            # get the highest predicted token from our predictions
            top1 = dec_output.argmax(1)

            # if teacher forcing, use actual next token as next input
            # if not, use predicted token
            dec_input = trg[t] if teacher_force else top1

        return outputs
参考
- RNN模型与NLP应用(8/9):Attention (注意力机制)
- Seq2Seq (Attention) 的 PyTorch 实现
- Datawhale(learning-nlp-with-transformers)
- 人人都能看懂的GRU
- Pytorch实现Seq2Seq模型:以机器翻译为例
- 卷积序列到序列模型的学习(Convolutional Sequence to Sequence Learning)


