NLP预训练模型2 -- BERT详解和源码分析
1 模型结构
论文信息:2018年10月,谷歌,NAACL
论文地址 https://arxiv.org/pdf/1810.04805.pdf
模型和代码地址 https://github.com/google-research/bert
BERT自18年10月问世以来,就引起了NLP业界的广泛关注。毫不夸张的说,BERT基本上是近几年来NLP业界意义最大的一个创新,其意义主要包括
大幅提高了GLUE任务SOTA performance(+7.7%),使得NLP真正可以应用到各生产环境中,大大推进了NLP在工业界的落地
预训练模型从大量人类优质语料中学习知识,并经过了充分的训练,从而使得下游具体任务可以很轻松的完成fine-tune。大大降低了下游任务所需的样本数据和计算算力,使得NLP更加平民化,推动了在工业界的落地。
pretrain fine-tune两阶段已基本成为NLP业界新的范式,引领了一大波pretrain预训练模型的落地。
Transformer架构更加深入人心,attention机制基本取代了RNN。有了Transformer后,模型层面创新对NLP任务推动作用比较有限,可以将精力更多的放在数据和任务层面上了。
BERT全称为“Bidirectional Encoder Representations from Transformers”。它是一个基于Transformer结构的双向编码器。其结构可以简单理解为Transformer的encoder部分。如下图所示
最左边即为BERT,它是真正意义上的双向语言模型。双向对于语义表征的作用不言而喻,能够更加完整的利用上下文学习到语句信息。GPT是基于auto regression的单向语言模型,无法利用下文学习当前语义。ELMO虽然看起来像双向,但其实是一个从左到右的lstm和一个从右到左的lstm单独训练然后拼接而成,本质上并不是双向。
BERT主要分为三层,embedding层、encoder层、prediction层。
1.1 embedding层
embedding层如下所示
包括三部分
1、token embeddings。和Transformer的token embedding基本相同,也是通过自训练embedding_lookup查找表方式。token做了word piece。
2、position embedding。对字的位置进行编码,和Transformer不同,bert采用了自训练embedding_lookup方式,而不是三角函数encoding
3、segment embedding。bert采用了两句话拼接的方式构建训练语料,利用自训练embedding_lookup方式得到。
1.2 encoder层
encoder层则和Transformer encoder基本相同,详见之前一篇文章 NLP预训练模型1 – transformer详解和源码分析。
1.3 prediction层
prediction层则采用线性全连接并softmax归一化,下游任务基本上对prediction做改造即可。在不同的下游任务使用中,可以把bert理解为一个特征抽取encoder,根据下游任务灵活使用。下面分别是BERT应用的四个场景
1、语句对分类,如语句相似度任务,语句蕴含判断等
2、单语句分类,如情感分类/3、QA任务,如阅读理解,将question和document构建为语句对,输出start和end的位置即可
4、序列标注,如NER,从每个位置得到类别即可。
![]()
2 源码分析
我们大致了解了BERT模型结构,下面我们从源码角度进行分析,从而加深理解。分析的源码为基于PyTorch的HuggingFace Transformer。git地址 https://github.com/huggingface/transformers。bert源码放在src/transformers/modeling_bert.py中,入口类为BertModel。
2.1 入口和总体架构
使用bert进行下游任务fine-tune时,我们通常先构造一个BertModel,然后由它从输入语句中提取特征,得到输出。我们先来看看构造方法
class BertModel(BertPreTrainedModel):
    """
    模型入口,可以作为一个encoder
    """

    def __init__(self, config):
        super().__init__(config)

        self.config = config

        # 1 embedding向量输入层
        self.embeddings = BertEmbeddings(config)

        # 2 encoder编码层
        self.encoder = BertEncoder(config)

        # 3 pooler输出层,CLS位置输出
        self.pooler = BertPooler(config)

        # 从pretrain model加载初始化参数,多头剪枝等
        self.init_weights()

    def get_input_embeddings(self):
        # 获取embedding层的word_embedding,
        # 不要直接用它作为固定的词向量,需要在下游任务中fine-tune
        # 如果想直接使用固定的词向量,比如在LSTM网络中,则不如直接使用预训练词向量
        return self.embeddings.word_embeddings

    def set_input_embeddings(self, value):
        # 利用别的数据来初始化word_embeddings,正常情况下,我们使用bert预训练模型中的即可,不需要重设
        self.embeddings.word_embeddings = value
构造方法主要做三件事
1、读取配置config,它可以是一个BertConfig对象,包括vocab_size, num_attention_heads, num_hidden_layers 等重要参数,我们一般把它们放在配置文件 bert_config.json中构造
2、embedding、encoder、pooler三个对象,对应到我们上面说的embedding层、encoder层、prediction三层。这三个对象也是我们要分析的主要对象
3、利用pretrain model初始化weights,进行多头剪枝prune_heads等。
从输入语句提取特征,并得到输出,代码如下
	def forward(
        self,
        input_ids=None,
        attention_mask=None,
        token_type_ids=None,
        position_ids=None,
        head_mask=None,
        inputs_embeds=None,
        encoder_hidden_states=None,
        encoder_attention_mask=None,
    ):
    	# 省略一段输入预处理代码,主要为
        # 1. input_ids和inputs_embeds处理,支持这两种输入token,但不能同时二者都指定
        # 2. 如果attention_mask为空,则默认构建为全1矩阵
        # 3. 如果token_type没指定,默认0。它表示语句A或语句B,只能取0或者1。这是由预训练模型决定的。
        # 4. 如果被用作decoder,则处理encoder_attention_mask
        # 5. 处理head_mask,可以利用它进行多头剪枝
        ......

		# 1 embedding层,包括word_embedding, position_embedding, token_type_embedding三个
        embedding_output = self.embeddings(
            input_ids=input_ids, position_ids=position_ids, token_type_ids=token_type_ids, inputs_embeds=inputs_embeds
        )

        # 2 encoder层,得到每个位置的编码、所有中间隐层、所有中间attention分布
        encoder_outputs = self.encoder(
            embedding_output,
            attention_mask=extended_attention_mask,
            head_mask=head_mask,
            encoder_hidden_states=encoder_hidden_states,
            encoder_attention_mask=encoder_extended_attention_mask,
        )
        sequence_output = encoder_outputs[0]

        # 3 CLS位置编码向量
        pooled_output = self.pooler(sequence_output)

        # 返回每个位置编码、CLS位置编码、所有中间隐层、所有中间attention分布等。
        # sequence_output, pooled_output, (hidden_states), (attentions)。
        # (hidden_states), (attentions)需要config中设置相关配置,否则默认不保存
        outputs = (sequence_output, pooled_output,) + encoder_outputs[
            1:
        ]  # add hidden_states and attentions if they are here
        return outputs
由上可见,从输入语句中抽取特征,得到输出主要包括三步
1、embedding层,对input_ids、position_ids、token_type_ids进行embedding,它们都是采用embedding_lookup查表得到
2、encoder层,embedding后的结果,经过多层Transformer encoder,得到输出。每一层encoder结构基本相同,均包括multi-head self-attention和feed-forward,并经过layer-norm和残差连接
3、pooler层,对CLS位置进行线性全连接,将它作为整个sequence的输出。
最终返回4个结果
1、sequence_output:每个位置的编码输出,每个位置对应一个向量
2、pooled_output: CLS位置编码输出,经过了一层Linear和activation。一般用CLS来代表整个语句
3、hidden_states:所有中间层的隐层,这个需要在config中打开,才会保存下来
4、attentions: 所有中间层的attention分布,这个也需要在config中打开,才会保存。
2.2 embedding层
下面我们分别对embedding层,encoder层和pooler层进行分析。先来看embedding层。
class BertEmbeddings(nn.Module):
    """Construct the embeddings from word, position and token_type embeddings.
    """
    def __init__(self, config):
        super().__init__()

        # word_embedding, position_embedding, token_type_embedding均采用自训练方式
        # max_position_embeddings决定了最大语句长度,如512。超过则截断,不足则padding
        # token_type_embedding决定了最大语句种类,一般为2,只能A句或者B句两种。
        self.word_embeddings = nn.Embedding(config.vocab_size, config.hidden_size, padding_idx=config.pad_token_id)
        self.position_embeddings = nn.Embedding(config.max_position_embeddings, config.hidden_size)
        self.token_type_embeddings = nn.Embedding(config.type_vocab_size, config.hidden_size)

        # layerNorm归一化,和dropout。layerNorm对归一化做一个线性连接,故有训练参数
        self.LayerNorm = BertLayerNorm(config.hidden_size, eps=config.layer_norm_eps)
        self.dropout = nn.Dropout(config.hidden_dropout_prob)

    def forward(self, input_ids=None, token_type_ids=None, position_ids=None, inputs_embeds=None):
        # 获取input_shape, [batch, seq_length]
        if input_ids is not None:
            input_shape = input_ids.size()
        else:
            input_shape = inputs_embeds.size()[:-1]

        seq_length = input_shape[1]
        device = input_ids.device if input_ids is not None else inputs_embeds.device
        if position_ids is None:
            # position_ids默认按照字的顺利进行编码,不足补0
            position_ids = torch.arange(seq_length, dtype=torch.long, device=device)
            position_ids = position_ids.unsqueeze(0).expand(input_shape)
        if token_type_ids is None:
            # token_type_ids默认全0,也就是都为语句A
            token_type_ids = torch.zeros(input_shape, dtype=torch.long, device=device)

        # 通过embedding_lookup查表,将ids向量化
        if inputs_embeds is None:
            inputs_embeds = self.word_embeddings(input_ids)
        position_embeddings = self.position_embeddings(position_ids)
        token_type_embeddings = self.token_type_embeddings(token_type_ids)

        # 最终embedding为三者直接相加,不做加权。因为权值完全可以包含在embedding本身训练参数中
        embeddings = inputs_embeds + position_embeddings + token_type_embeddings

        # 归一化和dropout后,得到最终输入向量
        embeddings = self.LayerNorm(embeddings)
        embeddings = self.dropout(embeddings)
        return embeddings
主要步骤:
1、从三个embedding表中,通过id查找到对应向量。三个embedding表为word_embeddings,position_embeddings,token_type_embeddings。均是在train阶段训练得到。
2、三个embedding向量直接相加,得到总embedding。注意此处没有加权,因为权值可以被包含在各自embedding中
3、对总embedding进行归一化和dropout
2.3 encoder层
class BertEncoder(nn.Module):
    def __init__(self, config):
        super().__init__()
        self.output_attentions = config.output_attentions
        self.output_hidden_states = config.output_hidden_states

        # 每层结构相同,都是 BertLayer
        self.layer = nn.ModuleList([BertLayer(config) for _ in range(config.num_hidden_layers)])

    def forward(
        self,
        hidden_states,
        attention_mask=None,
        head_mask=None,
        encoder_hidden_states=None,
        encoder_attention_mask=None,
    ):
        all_hidden_states = ()
        all_attentions = ()

        # 遍历所有layer。bert中每个layer结构相同
        for i, layer_module in enumerate(self.layer):
            # 保存每层hidden_state, 默认不保存
            if self.output_hidden_states:
                all_hidden_states = all_hidden_states + (hidden_states,)

            # 执行每层self-attention和feed-forward计算。得到隐层输出
            layer_outputs = layer_module(
                hidden_states, attention_mask, head_mask[i], encoder_hidden_states, encoder_attention_mask
            )
            hidden_states = layer_outputs[0]

            # 保存每层attention分布,默认不保存
            if self.output_attentions:
                all_attentions = all_attentions + (layer_outputs[1],)

        # 保存最后一层
        if self.output_hidden_states:
            all_hidden_states = all_hidden_states + (hidden_states,)

        outputs = (hidden_states,)
        if self.output_hidden_states:
            outputs = outputs + (all_hidden_states,)
        if self.output_attentions:
            outputs = outputs + (all_attentions,)
        return outputs  # last-layer hidden state, (all hidden states), (all attentions)
encoder由多个结构相同的子层BertLayer组成,遍历所有的子层,执行每层的self-attention和feed-forward计算,并保存每层的hidden_state和attention分布。下面先看子层BertLayer结构。
2.3.1 BertLayer子层
class BertLayer(nn.Module):
    def __init__(self, config):
        super().__init__()

        # 1 multi-head self attention层
        self.attention = BertAttention(config)
        self.is_decoder = config.is_decoder
        if self.is_decoder:
            # 2 对于decoder,cross-attention和self-attention共用一个函数。他们仅仅q k v的来源不同而已
            self.crossattention = BertAttention(config)

        # 3 两层feed-forward全连接,然后残差并layerNorm输出
        self.intermediate = BertIntermediate(config)
        self.output = BertOutput(config)

    def forward(
        self,
        hidden_states,
        attention_mask=None,
        head_mask=None,
        encoder_hidden_states=None,
        encoder_attention_mask=None,
    ):
        # 1 self-attention, 支持attention_mask 和 head_mask
        self_attention_outputs = self.attention(hidden_states, attention_mask, head_mask)

        # hidden state隐层输出
        attention_output = self_attention_outputs[0]

        # attention分布
        outputs = self_attention_outputs[1:]  # add self attentions if we output attention weights

        # 2 decoder的话,self-attention结束后,还需要做一层soft-attention。将encoder信息和decoder信息产生交互
        if self.is_decoder and encoder_hidden_states is not None:
            cross_attention_outputs = self.crossattention(
                attention_output, attention_mask, head_mask, encoder_hidden_states, encoder_attention_mask
            )
            attention_output = cross_attention_outputs[0]
            outputs = outputs + cross_attention_outputs[1:]

        # 3 feed-forward 和 layerNorm归一化
        intermediate_output = self.intermediate(attention_output)
        layer_output = self.output(intermediate_output, attention_output)

        # 输出hidden_state隐层和attention分布
        outputs = (layer_output,) + outputs
        return outputs
主要包括三步
1、multi-head self-attention, 支持attention_mask 和 head_mask
2、如果将bert用作decoder的话,self-attention结束后,还需要做一层cross-attention。将encoder信息和decoder信息产生交互
3、feed-forward全连接 和 layerNorm归一化。
主要操作有BertAttention,BertIntermediate和BertOutput,分别来看看它们的实现
2.3.2 BertAttention注意力计算
class BertAttention(nn.Module):
    def __init__(self, config):
        super().__init__()

        # self-attention
        self.self = BertSelfAttention(config)

        # add + layerNorm
        self.output = BertSelfOutput(config)

        # 多头剪枝
        self.pruned_heads = set()

    def prune_heads(self, heads):
        # 对每层多头进行裁剪,是一种直接对权重矩阵剪枝的方式,效果还是比较明显的。
        # 总体方法为:利用attention mask,需要prune的head,其mask为1。保留的head则mask为0
        # 可以参见论文 "Are Sixteen Heads Really Better than One"
        if len(heads) == 0:
            return

        # mask为全1矩阵,[num_heads, head_size]
        mask = torch.ones(self.self.num_attention_heads, self.self.attention_head_size)
        heads = set(heads) - self.pruned_heads  # 去掉要剪枝的head
        for head in heads:
            # 需要保留head对应的mask设置为0,需要prune的则维持1
            head = head - sum(1 if h < head else 0 for h in self.pruned_heads)
            mask[head] = 0
        mask = mask.view(-1).contiguous().eq(1)
        index = torch.arange(len(mask))[mask].long()

        # q,k,v和全连接上,加入mask
        self.self.query = prune_linear_layer(self.self.query, index)
        self.self.key = prune_linear_layer(self.self.key, index)
        self.self.value = prune_linear_layer(self.self.value, index)
        self.output.dense = prune_linear_layer(self.output.dense, index, dim=1)

        # Update hyper params and store pruned heads
        self.self.num_attention_heads = self.self.num_attention_heads - len(heads)
        self.self.all_head_size = self.self.attention_head_size * self.self.num_attention_heads
        self.pruned_heads = self.pruned_heads.union(heads)

    def forward(
        self,
        hidden_states,
        attention_mask=None,
        head_mask=None,
        encoder_hidden_states=None,
        encoder_attention_mask=None,
    ):
        # self-attention计算
        self_outputs = self.self(
            hidden_states, attention_mask, head_mask, encoder_hidden_states, encoder_attention_mask
        )

        # 残差连接和归一化
        attention_output = self.output(self_outputs[0], hidden_states)

        # 输出归一化后隐层,和attention概率分布
        outputs = (attention_output,) + self_outputs[1:]  # add attentions if we output them
        return outputs
BertAttention主要包括两步,self-attention计算和归一化残差连接。这两步和Transformer基本相同,我们就不分析了,可以详细看 NLP预训练模型1 – transformer详解和源码分析。简略代码分析如下
class BertSelfAttention(nn.Module):
    def __init__(self, config):
        super().__init__()
        if config.hidden_size % config.num_attention_heads != 0 and not hasattr(config, "embedding_size"):
            raise ValueError(
                "The hidden size (%d) is not a multiple of the number of attention "
                "heads (%d)" % (config.hidden_size, config.num_attention_heads)
            )
        self.output_attentions = config.output_attentions

        # 每个头的隐层大小,等于总隐层大小除以多头数目。故增加多头,每个头的size下降,总隐层size不变
        self.num_attention_heads = config.num_attention_heads
        self.attention_head_size = int(config.hidden_size / config.num_attention_heads)
        self.all_head_size = self.num_attention_heads * self.attention_head_size

        # q,k,v矩阵 [hidden_size, all_head_size], 比如[768, 768]
        self.query = nn.Linear(config.hidden_size, self.all_head_size)
        self.key = nn.Linear(config.hidden_size, self.all_head_size)
        self.value = nn.Linear(config.hidden_size, self.all_head_size)

        self.dropout = nn.Dropout(config.attention_probs_dropout_prob)

    def transpose_for_scores(self, x):
        new_x_shape = x.size()[:-1] + (self.num_attention_heads, self.attention_head_size)
        x = x.view(*new_x_shape)
        return x.permute(0, 2, 1, 3)

    def forward(
        self,
        hidden_states,
        attention_mask=None,
        head_mask=None,
        encoder_hidden_states=None,
        encoder_attention_mask=None,
    ):
        # 多头query向量 [hidden_size, seq_len]
        mixed_query_layer = self.query(hidden_states)

        # 多头key和value向量,注意soft-attention和self-attention的区别
        if encoder_hidden_states is not None:
            # soft-attention,k和v来自encoder,而q来自decoder
            mixed_key_layer = self.key(encoder_hidden_states)
            mixed_value_layer = self.value(encoder_hidden_states)
            attention_mask = encoder_attention_mask     # attention_mask, 比如遮挡预测字后面的字,防止未来数据穿越
        else:
            # self-attention,q k v 都来自encoder自己
            mixed_key_layer = self.key(hidden_states)
            mixed_value_layer = self.value(hidden_states)

        # q k v转置
        query_layer = self.transpose_for_scores(mixed_query_layer)
        key_layer = self.transpose_for_scores(mixed_key_layer)
        value_layer = self.transpose_for_scores(mixed_value_layer)

        # attention计算。softmax(mask(q * k / sqrt(dk))) * v
        # 1 q * k计算两向量相关性。除根号dk,对向量长度做归一化,防止方差过大
        attention_scores = torch.matmul(query_layer, key_layer.transpose(-1, -2))
        attention_scores = attention_scores / math.sqrt(self.attention_head_size)

        # 2 attention_mask,[seq_len, seq_len], 代表两不同位置间是否做attention。
        # decoder的attention_mask为一个上三角矩阵,防止未来信息穿越
        # encoder也要使用attention_mask, padding位置与其他所有位置为0
        # 计算层面,mask中0实际为一个绝对值很大负数,使得softmax时趋近0. 1则实际为0
        if attention_mask is not None:
            attention_scores = attention_scores + attention_mask

        # 3 softmax 归一化,dropout
        attention_probs = nn.Softmax(dim=-1)(attention_scores)
        attention_probs = self.dropout(attention_probs)

        # 4 head mask,直接将一个head剪枝掉
        if head_mask is not None:
            attention_probs = attention_probs * head_mask

        # 5 value矩阵加权求和,attention_probs可看做一个权重矩阵,得到每个位置的attention后向量
        context_layer = torch.matmul(attention_probs, value_layer)

        context_layer = context_layer.permute(0, 2, 1, 3).contiguous()
        new_context_layer_shape = context_layer.size()[:-2] + (self.all_head_size,)
        context_layer = context_layer.view(*new_context_layer_shape)

        # 最终输出attention后隐层和attention分布矩阵。attention矩阵表示了不同位置间两两相关关系,甚至比隐层更重要
        outputs = (context_layer, attention_probs) if self.output_attentions else (context_layer,)
        return outputs
class BertSelfOutput(nn.Module):
    def __init__(self, config):
        super().__init__()

        # 线性连接 -> layerNorm -> dropout
        self.dense = nn.Linear(config.hidden_size, config.hidden_size)
        self.LayerNorm = BertLayerNorm(config.hidden_size, eps=config.layer_norm_eps)
        self.dropout = nn.Dropout(config.hidden_dropout_prob)

    def forward(self, hidden_states, input_tensor):
        # 线性连接
        hidden_states = self.dense(hidden_states)

        # dropout
        hidden_states = self.dropout(hidden_states)

        # 残差连接,并做layerNorm。从而保证self-attention和feed-forward模块的输入均是经过归一化的
        # layerNorm中包含训练参数w和b
        hidden_states = self.LayerNorm(hidden_states + input_tensor)
        return hidden_states
2.3.3 BertIntermediate全连接
class BertIntermediate(nn.Module):
    def __init__(self, config):
        super().__init__()
        self.dense = nn.Linear(config.hidden_size, config.intermediate_size)
        if isinstance(config.hidden_act, str):
            self.intermediate_act_fn = ACT2FN[config.hidden_act]
        else:
            self.intermediate_act_fn = config.hidden_act

    def forward(self, hidden_states):
        # 全连接,[hidden_size, intermediate_size]
        hidden_states = self.dense(hidden_states)

        # 非线性激活,如glue,relu。bert默认使用glue
        hidden_states = self.intermediate_act_fn(hidden_states)
        return hidden_states
feed-forward这一步比较简单,主要就是全连接和非线性激活。
2.3.4 BertOutput输出
class BertOutput(nn.Module):
    def __init__(self, config):
        super().__init__()
        self.dense = nn.Linear(config.intermediate_size, config.hidden_size)
        self.LayerNorm = BertLayerNorm(config.hidden_size, eps=config.layer_norm_eps)
        self.dropout = nn.Dropout(config.hidden_dropout_prob)

    def forward(self, hidden_states, input_tensor):
        # 全连接, [intermediate_size, hidden_size]
        hidden_states = self.dense(hidden_states)

        # dropout
        hidden_states = self.dropout(hidden_states)

        # add + layerNorm
        hidden_states = self.LayerNorm(hidden_states + input_tensor)
        return hidden_states
输出层也比较简单,经过一层全连接、dropout、layerNorm归一化和残差连接,即可得到输出隐层。
2.4 pooler层输出
pooler层对CLS位置向量,进行全连接和tanh激活,从而得到输出向量。CLS位置向量一般用来代表整个sequence。
class BertPooler(nn.Module):
    def __init__(self, config):
        super().__init__()
        self.dense = nn.Linear(config.hidden_size, config.hidden_size)
        self.activation = nn.Tanh()

    def forward(self, hidden_states):
        # CLS位置输出
        first_token_tensor = hidden_states[:, 0]

        # 全连接 + tanh激活  [768, 768]
        pooled_output = self.dense(first_token_tensor)
        pooled_output = self.activation(pooled_output)
        return pooled_output
3 实验和分析
3.1 预训练任务
BERT预训练任务包括两部分,
MLM,masked language model,学习token间信息。类似于完形填空,对15%的经过word piece后的token,进行处理。其中80%设置为[MASK],10%随机替换为其他token,10%不变。利用双向上下文信息,来预测这些位置的词语。
NSP,next sequence prediction,学习语句间信息。一个二分类问题,给定两句话,判断seqB是否为seqA的下一句。构造的正负样本为 1:1。
3.1.1 消融分析
两部分的loss直接相加(没有加权),构成了multi-task learning。两部分均有比较重要的作用,消融分析如下
1、去掉NSP,而只使用MLM后,不利于sequence级别信息的学习,故performance下降了一些,但不算很多
2、不使用双向MLM,而改成和GPT类似的LTR(left to right LM)后,performance下降很多,故可见双向语言模型的重要性。因为从两个方向学习到的信息才是完整的,语义表达更准确。
3.1.2 双向MLM和单向LTR对比
如图所示,双向MLM模型基本是吊打单向LTR的。
3.1.3 不同的mask策略
bert随机选择15%的token进行predict,为了缓解mask导致的pretrain和fine-tune两阶段不一致问题,这些token又被分为三类
1、80% token被mask
2、10% token保持不变
3、10% token随机替换为其他token
这个比例文章也做了充分实验,结果如下
3.2 输入预处理 tokenize
对输入语句的处理,主要包括
- 经过word piece,中文的话不需要处理
- 每句话末尾添加一个[SEP]标志,并在整个语句最前面添加[CLS]。例子如下
[CLS] my dog is cute [SEP] he likes play ##ing [SEP]3、语句超过max_seq_len则截断,否则补齐[PAD]
4、利用vocab词典,将token转变为id。此处值得4、注意的是,如果我们在具体下游任务中fine-tune时,有词语没有包括在vocab中,则可以直接添加到[unused]位置处。vocab中添加了大量的[unused]占位符
3.3 语料数据
采用了两部分,包含800M词语的BooksCorpus,和包含2,500M词语的英语Wikipedia。openAI GPT仅采用了BooksCorpus语料。后续的Roberta等优化模型,大幅扩充了训练语料,从而提升了模型performance。
3.4 耗时分析
预训练十分耗时,batch-size=256, 1M个step,33亿原始语料情况下,bert-base在4块TPU训练了4天,bert-large则需要16块TPU训练4天。
一定要训练100万个step吗?文中指出,对于MNLI任务,100万个step比50万,提高了1%的ACC。另外文中也指出基于双向语言模型的MLM比仅单向的LTR要更耗时,但performance更高。
fine-tune则相对轻松很多,文章中做的所有任务,如glue SQuAD SWAG,在一块TPU上一个小时就可以全部fine-tune完成。即使在GPU上,也仅需要几个小时而已。
提升bert预训练、fine-tune和inference的速度一直以来都是一个比较大的话题。英伟达使用1472个V100 GPU,实现了53分钟训练完bert-large,一次推理仅需2.2ms。
3.5 实验结果
glue任务上,相比当时的SOTA,也就是openAI GPT,平均score大幅提高了7个点。各项子任务也都得到了提升。CoLA任务甚至提高了15个点。这也是当时引起巨大反响的一个主要原因。具体如下
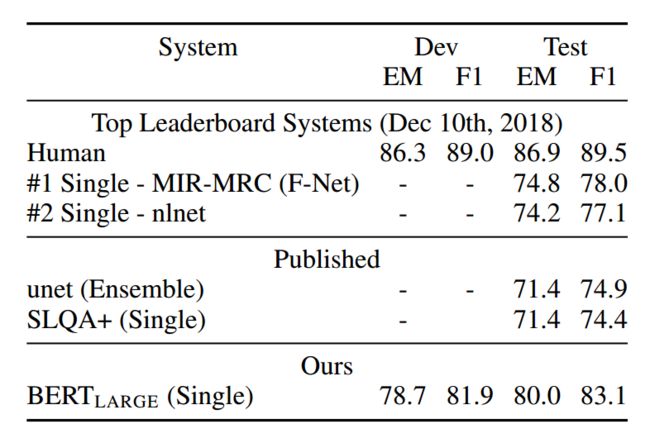
SQuAD1.1和SQuAD2.0任务上,也是有大幅度的提升。如下为SQuAD2.0上结果
3.6 超参分析
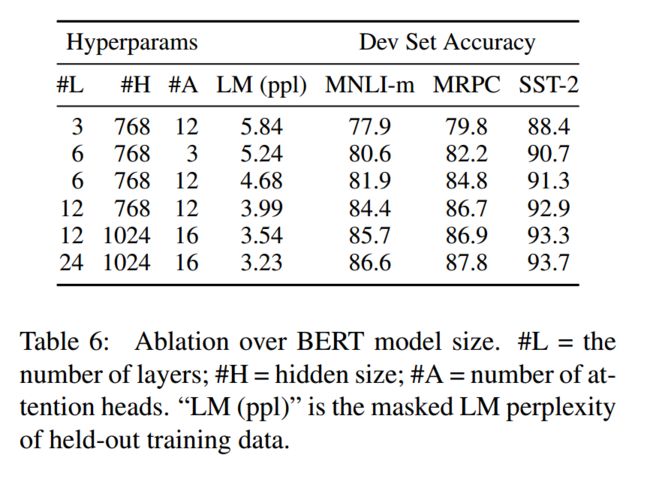
采用不同的hidden size(隐层大小)、number of layers(子层数目)、number of attention heads(多头个数),可以得到不同大小的模型。performance也会有一定的变化。如下
基本可以认为模型越大,performance越高。常用的base和large模型超参如下
bert-base: (L=12, H=768, A=12, Total Parameters=110M)
bert-large: (L=24, H=1024, A=16, Total Parameters=340M)
3.6.2 fine-tune超参选择
fine-tune的超参可以和pretrain时差不多,下面几个超参均可以得到不错的下游任务结果。
Batch size: 16, 32
Learning rate (Adam): 5e-5, 3e-5, 2e-5
Number of epochs: 2, 3, 4
可见bert超参的泛化能力很强。特别是当下游任务训练数据较多时(10万量级),超参变得不敏感。
3.7 feature-based和fine-tune
下游任务中可以采用两种方法来使用bert,feature-based和fine-tune。二者的区别在于,feature-based方法中,bert的Variable不会参与到训练。而fine-tune则会利用下游任务数据,来调整bert参数。fine-tune方法的效果会好一些,但它需要有监督数据。feature-based方法效果差一些,但不需要监督数据(如bert-as-service提取句向量)。二者的performance对比如下

4 总结
BERT的推出意义重大,引领了NLP领域的一股风潮,大大加速了NLP在各工业界的落地。但它也有很多缺点,如pretrain fine-tune两阶段不一致,中文字mask方式过于简单粗暴,语料仍可丰富,预训练速度过慢等问题。后续诸多模型,如XLNet、ERNIE、SpanBERT、Roberta、T5、distillBERT、TinyBERT、Electra对它进行了优化和改进,我们后续再详细分析。


