YOLOX安装、测试,自定义coco数据集进行测试
官网链接:https://github.com/Megvii-BaseDetection/YOLOX
一、配置环境
本机环境是
Ubuntu 18.04
Cuda 10.2
RTX 2080ti
1、创建虚拟环境
conda create -n yolox python=3.7
2.安装torch
conda activate yolox
pip install torch==1.7.1 torchvision==0.8.2 torchaudio==0.7.2
3、安装YOLOX
git clone https://github.com/Megvii-BaseDetection/YOLOX
cd YOLOX
pip install -U pip && pip install -r requirements.txt
pip install -v -e .  # or  python setup.py develop(注意e后面有个.)
4、安装apex
git clone https://github.com/NVIDIA/apex
cd apex
pip install -v --disable-pip-version-check --no-cache-dir --global-option="--cpp_ext" --global-option="--cuda_ext" ./
或
python setup.py install
在这里踩了一个坑,按照官方给的说明在安装apex编译时报以下错误,这是在github(https://github.com/NVIDIA/apex/issues/802)上找到的解决方式为使用后没有效果,按照第二种安装方式后成功了。
ERROR: Command errored out with exit status 1
pip install cython
pip install pycocotools
6、验证
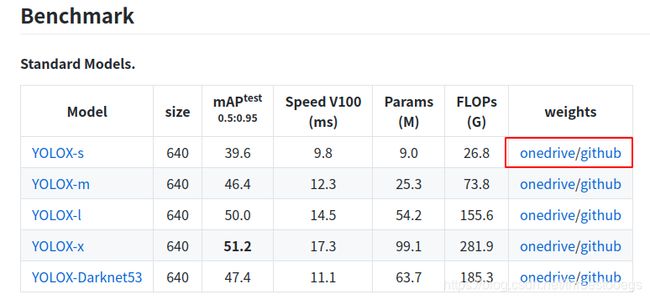
从官网下载模型进行测试,我下载的是YOLOX-s模型,下载完成后在YOLOX文件夹中新建文件夹存放模型。

python tools/demo.py image -n yolox-s -c pth/yolox_s.pth --path assets/dog.jpg --conf 0.25 --nms 0.45 --tsize 640 --save_result --device gpu
测试出来的图片存放在YOLOX/YOLOX_outputs/yolox_s/vis_res/2021_08_06_15_19_20
中,图片能够正常检测出代表环境安装成功。

二、使用自定义coco数据集进行训练
官方给了voc和coco两种数据集格式训练,我使用的coco格式的数据集新型训练,数据准备完成后需要执行以下操作。
1、修改类别名称
YOLOX/yolox/data/datasets/coco_classes.py #修改类别名称,换乘自己的
2、修改配置文件
YOLOX/yolox/exp/yolox_base.py #这是整个网络的配置文件
首先将num_classes修改为自己的类别数量,然后修改数据集地址。


3、开始训练
python tools/train.py -n yolox-s -d 1 -b 8 -o
- -d: number of gpu devices #-d是显卡的数量
- -b: total batch size, the recommended number for -b is num-gpu * 8 #-b是batchsize 推荐为显卡数量*8
这样整个训练流程就算是跑通了,训练相关模型保存在YOLOX_outputs中,训练默认是300epoch,在我本机RTX2080ti大概需要30多个小时。


三、测试自定义数据集
使用yolox中的tools/demo.py工具可以直接测试coco格式的数据集,如果想测试voc格式的数据集参考这篇文章windows10搭建YOLOx环境 训练+测试+评估
python tools/demo1.py image -n yolox-s -c /home/cv/YOLOX/best_ckpt.pth --path /home/cv/YOLOX/A1__01h_59m_06s_598930f_0.784_o.jpg --conf 0.3 --nms 0.65 --tsize 640 --save_result
demo.py的具体用法如下:
(yolox) cv@cv-System-Product-Name:~/YOLOX$ python tools/demo.py --help
usage: YOLOX Demo! [-h] [-expn EXPERIMENT_NAME] [-n NAME] [--path PATH]
                   [--camid CAMID] [--save_result] [-f EXP_FILE] [-c CKPT]
                   [--device DEVICE] [--conf CONF] [--nms NMS] [--tsize TSIZE]
                   [--fp16] [--fuse] [--trt]
                   demo

positional arguments:
  demo                  demo type, eg. image, video and webcam

optional arguments:
  -h, --help            show this help message and exit
  -expn EXPERIMENT_NAME, --experiment-name EXPERIMENT_NAME
  -n NAME, --name NAME  model name
  --path PATH           path to images or video
  --camid CAMID         webcam demo camera id
  --save_result         whether to save the inference result of image/video
  -f EXP_FILE, --exp_file EXP_FILE
                        pls input your expriment description file
  -c CKPT, --ckpt CKPT  ckpt for eval
  --device DEVICE       device to run our model, can either be cpu or gpu
  --conf CONF           test conf
  --nms NMS             test nms threshold
  --tsize TSIZE         test img size
  --fp16                Adopting mix precision evaluating.
  --fuse                Fuse conv and bn for testing.
  --trt                 Using TensorRT model for testing.
踩雷
训练模型跑到第10轮的时候报错了,之前用的版本是cuda 10.2 , torch 1.7.0 , torchvision 0.8.0 , torchaudio 0.7.0 , python 3.7,查了查原因应该是cuda、torch、torchvision版本不匹配的原因。
卸载了之前的版本换到了torch 1.7.1 , torchvision 0.8.2 , torchaudio 0.7.2后运行正常。
RuntimeError: Could not run 'torchvision::nms' with arguments from the 'CUDA' backend. 'torchvision::nms' is only available for these backends: [CPU, BackendSelect, Named, AutogradOther, AutogradCPU, AutogradCUDA, AutogradXLA, Tracer, Autocast, Batched, VmapMode].

CPU: registered at /root/project/torchvision/csrc/vision.cpp:59 [kernel]
BackendSelect: fallthrough registered at /pytorch/aten/src/ATen/core/BackendSelectFallbackKernel.cpp:3 [backend fallback]
Named: registered at /pytorch/aten/src/ATen/core/NamedRegistrations.cpp:7 [backend fallback]
AutogradOther: fallthrough registered at /pytorch/aten/src/ATen/core/VariableFallbackKernel.cpp:35 [backend fallback]
AutogradCPU: fallthrough registered at /pytorch/aten/src/ATen/core/VariableFallbackKernel.cpp:39 [backend fallback]
AutogradCUDA: fallthrough registered at /pytorch/aten/src/ATen/core/VariableFallbackKernel.cpp:43 [backend fallback]
AutogradXLA: fallthrough registered at /pytorch/aten/src/ATen/core/VariableFallbackKernel.cpp:47 [backend fallback]
Tracer: fallthrough registered at /pytorch/torch/csrc/jit/frontend/tracer.cpp:967 [backend fallback]
Autocast: fallthrough registered at /pytorch/aten/src/ATen/autocast_mode.cpp:254 [backend fallback]
Batched: registered at /pytorch/aten/src/ATen/BatchingRegistrations.cpp:511 [backend fallback]
VmapMode: fallthrough registered at /pytorch/aten/src/ATen/VmapModeRegistrations.cpp:33 [backend fallback]
推荐
1、windows10搭建YOLOx环境 训练+测试+评估
2、YOLOX自定义VOC格式数据集训练
