文档扫描OCR(Python3.7)
假期水一波文章,介绍一个小项目,基于pytesseract实现图片OCR扫描。简单来讲,就是有一张照片(可能是拍摄的PPT/发票/文档),我们先识别出有效区域(文档区域),然后识别该区域中的文字。
实验环境:Python3.7+OpenCV3.4
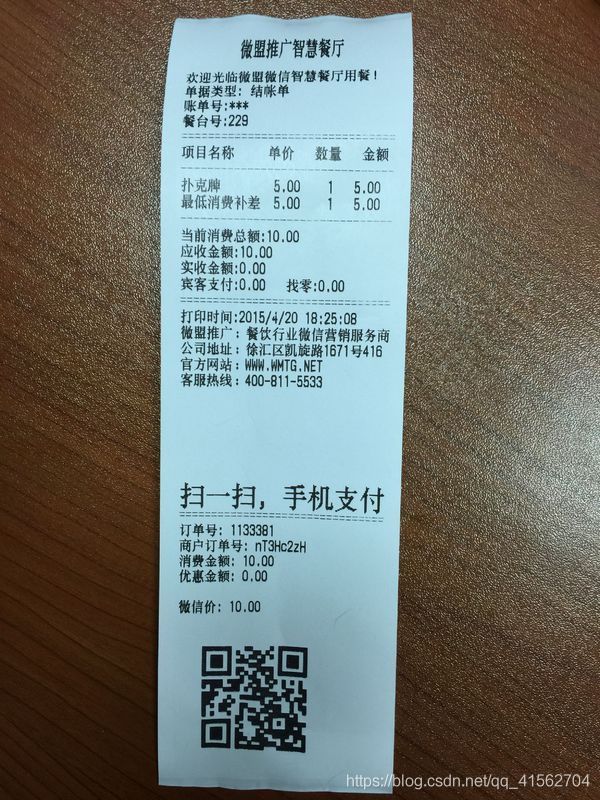
测试图片(小票图片源自必应):

需要注意的是本次项目针对有效区域为四边形的图片,所以在挑选测试图片的时候需要注意下。
环境准备好我们就可以愉快地码代码了!
轮廓检测
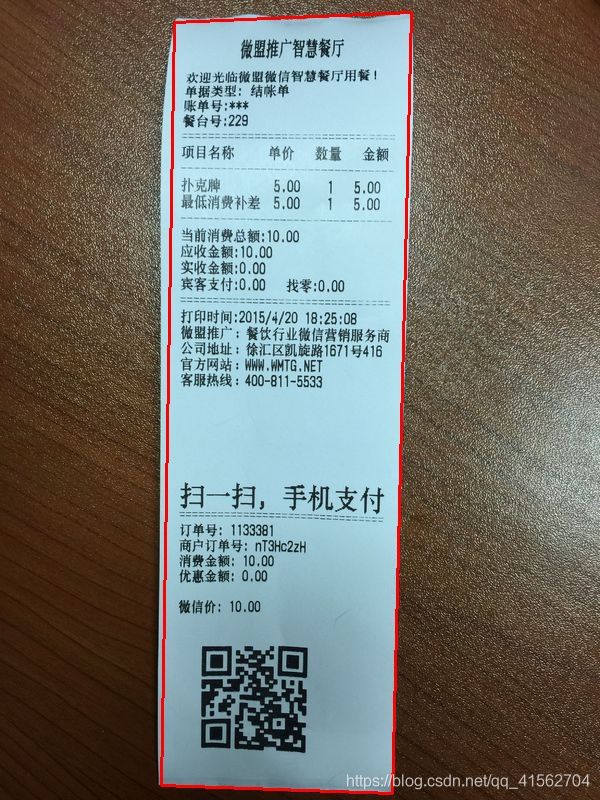
本部分需要检测出小票的区域。具体操作:二值化->高斯滤波->Canny边缘检测->轮廓检测->轮廓排序取面积最大的->找到轮廓曲线为四边形的轮廓
import cv2
#检测轮廓
def find_contours(imgPath):
    image = cv2.imread(imgPath)
    # 预处理操作
    gray = cv2.cvtColor(image, cv2.COLOR_BGR2GRAY) #二值化
    gray = cv2.GaussianBlur(gray, (5, 5), 0) #高斯滤波
    edged = cv2.Canny(gray, 75, 200) #canny检测
    # 轮廓检测
    h = cv2.findContours(edged, cv2.RETR_EXTERNAL, cv2.CHAIN_APPROX_NONE)  # 寻找轮廓
    contours = h[1] #获取轮廓坐标点
    # 对一系列轮廓点坐标按它们围成的区域面积进行排序,取前5个
    contours = sorted(contours, key=cv2.contourArea, reverse=True)[:5]
    #找到第一个轮廓线为矩形的,即为我们要找的轮廓线
    for contour in contours:
        peri = cv2.arcLength(contour, True)  # 周长,闭合
        approx = cv2.approxPolyDP(contour, 0.02 * peri, True)  # 检测出来的轮廓可能是离散的点,故因在此做近似计算,使其形成一个矩形
        # 做精度控制,原始轮廓到近似轮廓的最大的距离,较小时可能为多边形;较大时可能为矩形
        # True表示闭合
        if len(approx) == 4:  # 如果检测出来的是矩形,则break本段if
            screenCnt = approx
            break
    img = cv2.drawContours(image, [screenCnt], -1, (0, 0, 255), 2)  # 绘制轮廓,-1表示全部绘制
    cv2.imshow("img", img)
    cv2.imwrite('./test_contours.jpg', img) #保存结果图片
    cv2.waitKey(0)
    cv2.destroyAllWindows()
    return screenCnt
#测试
if __name__ == "__main__":
    contour = find_contours("./test.jpg")
变换
刚刚圈出来的区域虽然是一个矩形,但并不正,这一步就是将找到的区域提取出来摆正。
def transform(imgPath, contour):
    img = cv2.imread(imgPath)
    wraped = four_point_transform(img, contour.reshape(4, 2))  # 透视变换:摆正图像内容
    wraped = cv2.cvtColor(wraped, cv2.COLOR_BGR2GRAY) #二值化
    ref = cv2.threshold(wraped, 150, 255, cv2.THRESH_BINARY)[1] #将图片变为黑白,设置阈值,超过150显示黑色
    cv2.imwrite('./test_transform.jpg', ref)  # 保存结果图片
    cv2.imshow("img", ref)
    cv2.waitKey(0)
    cv2.destroyAllWindows()
    return ref

if __name__ == "__main__":
    imgPath = "./test.jpg"
    contour = find_contours(imgPath)
    transform(imgPath, contour)
OCR识别
使用pytesseract,安装参考:关于windows下pytesseract的安装
需要注意一点tesseract要安装3.0以上版本,博主直接安装的目前最新的。
if __name__ == "__main__":
    imgPath = "./test.jpg"
    contour = find_contours(imgPath)
    imgref = transform(imgPath, contour)
    text = pytesseract.image_to_string(imgref,lang='chi_sim')  #设置语言为中文简体
    print(text)
识别结果:
庆认技广智站瞧厅
区迎光临做起撤个乔妨逢下用由|
节揪类型: 结哩
位间寺:人
此台是:229
项目必称 人全 从星人鱼灿
扑 一      1 5.00
| 5
 | 机 吕
找才:0.00
01574720 19:25:08
交饮行业伍坟背销县务疝
窗谍区饥旗路1671 0416
,MTG .NET
3; 400-811-5533
扫一扫,手机支付
弛单寻: 1133981
和
贰多领; 10,
让 0.史
提供价: 10.00
效果有点不忍直视,需要自己训练tesseract,后面再更新~
完整代码
import cv2
from imutils.perspective import four_point_transform
import pytesseract

def find_contours(imgPath):
    image = cv2.imread(imgPath)
    # 预处理操作
    gray = cv2.cvtColor(image, cv2.COLOR_BGR2GRAY) #二值化
    gray = cv2.GaussianBlur(gray, (5, 5), 0) #高斯滤波
    edged = cv2.Canny(gray, 75, 200) #canny检测
    # 轮廓检测
    h = cv2.findContours(edged, cv2.RETR_EXTERNAL, cv2.CHAIN_APPROX_NONE)  # 寻找轮廓
    contours = h[1] #获取轮廓坐标点
    # 对一系列轮廓点坐标按它们围成的区域面积进行排序,取前5个
    contours = sorted(contours, key=cv2.contourArea, reverse=True)[:5]
    #找到第一个轮廓线为矩形的,即为我们要找的轮廓线
    for contour in contours:
        peri = cv2.arcLength(contour, True)  # 周长,闭合
        approx = cv2.approxPolyDP(contour, 0.02 * peri, True)  # 检测出来的轮廓可能是离散的点,故因在此做近似计算,使其形成一个矩形
        # 做精度控制,原始轮廓到近似轮廓的最大的距离,较小时可能为多边形;较大时可能为矩形
        # True表示闭合
        if len(approx) == 4:  # 如果检测出来的是矩形,则break本段if
            screenCnt = approx
            break
    img = cv2.drawContours(image, [screenCnt], -1, (0, 0, 255), 2)  # 绘制轮廓,-1表示全部绘制
    cv2.imwrite('./test_contours.jpg', img) #保存结果图片
    # cv2.imshow("img", img)
    # cv2.waitKey(0)
    # cv2.destroyAllWindows()
    return screenCnt

def transform(imgPath, contour):
    img = cv2.imread(imgPath)
    wraped = four_point_transform(img, contour.reshape(4, 2))  # 透视变换:摆正图像内容
    wraped = cv2.cvtColor(wraped, cv2.COLOR_BGR2GRAY) #二值化
    ref = cv2.threshold(wraped, 150, 255, cv2.THRESH_BINARY)[1] #将图片变为黑白,设置阈值,超过150显示黑色
    cv2.imwrite('./test_transform.jpg', ref)  # 保存结果图片
    # cv2.imshow("img", ref)
    # cv2.waitKey(0)
    # cv2.destroyAllWindows()
    return ref

if __name__ == "__main__":
    imgPath = "./test.jpg"
    contour = find_contours(imgPath)
    imgref = transform(imgPath, contour)
    text = pytesseract.image_to_string(imgref,lang='chi_sim')  #设置语言为中文简体
    print(text)

