Anaconda、Jupyter Notebook、Conda配置学习记录
原文链接:https://blog.csdn.net/zhr199970910/article/details/109909381
本文不断更新中,最新版请查看原文链接!
目录
- 1、Jupyter Notebook相关
-
- 1.1、Jupyter Notebook中添加conda虚拟环境
- 1.2、Jupyter Notebook代码补全
- 1.3、Jupyter Notebook字体大小
- 1.4、Jupyter Notebook修改启动路径
- 2、conda相关
-
- 2.1、conda命令大全
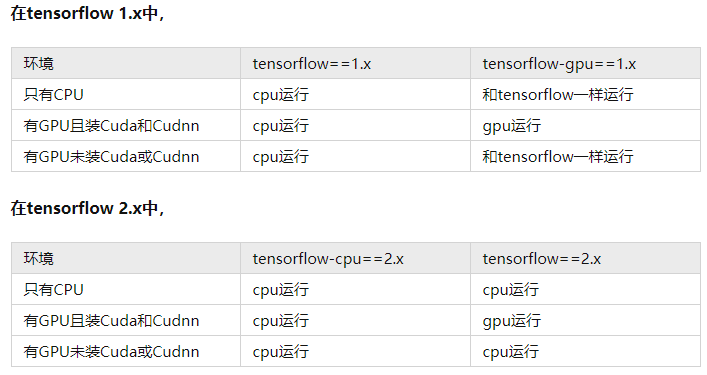
- 2.2、CPU和GPU版本tensorflow安装区别:
- 2.3、conda配置流程顺序
- 2.4、Pytorch下载网址
- 2.5、GPU笔记本配置记录
- 3、cuda相关
-
- 3.1、部分命令
- 3.2、版本备份
- 4、报错
-
- 4.1、ImportError: DLL load failed: 找不到指定的模块。
- 5、小技巧
-
- 5.1、查看第三方包位置
- 6、环境变量备份
-
- 6.1、用户变量
- 6.2、系统变量
1、Jupyter Notebook相关
1.1、Jupyter Notebook中添加conda虚拟环境
conda activate 虚拟环境名称
conda install ipykernel
python -m ipykernel install --user --name 虚拟环境名称 --display-name "Jupyter环境名称"
#“虚拟环境名称”为当前虚拟环境的名称
#最后面引号内的字符串是该虚拟环境显示在jupyter notebook界面的名字,可以随意修改。

jupyter kernelspec remove Jupyter环境名称
#删除kernel环境
1.2、Jupyter Notebook代码补全
参考文章:https://www.jianshu.com/p/0ab80f63af8a
安装
#如果之前安装过显示目录功能的话,这一步骤可以跳过。
pip install jupyter_contrib_nbextensions

配置
#安装完之后需要配置 nbextension,注意配置的时候要确保已关闭 Jupyter Notebook:
jupyter contrib nbextension install --user --skip-running-check

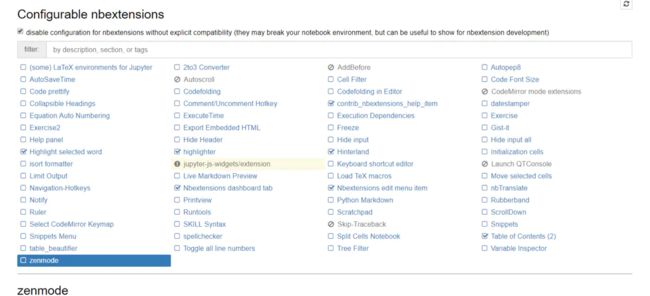
启动 Jupyter Notebook,勾选设置
上面两个步骤都没报错后,启动 Jupyter Notebook,上面选项栏会出现 Nbextensions 的选项

点开 Nbextensions 的选项,并勾选 Hinterland
1.3、Jupyter Notebook字体大小
参考文章:https://blog.csdn.net/qq_16026001/article/details/109094816
anaconda环境下:
\Anaconda3\Lib\site-packages\notebook\static\components\codemirror\lib\codemirror.css
虚拟环境下:
\Anaconda3\envs\环境名字\Lib\site-packages\notebook\static\components\codemirror\lib\codemirror.css
经测试,本机设base环境设置后有效,虚拟环境env设置后无效
字体大小15px即可,过大排版就乱
font-family:字体样式
font-size:字体大小(单位使用px或者%)
line-height:行高
.CodeMirror pre.CodeMirror-line,
.CodeMirror pre.CodeMirror-line-like {
  /* Reset some styles that the rest of the page might have set */
  -moz-border-radius: 0; -webkit-border-radius: 0; border-radius: 0;
  border-width: 0;
  background: transparent;
  font-family: Deja Vu Sans Mono;
  font-size: 20px;
  margin: 0;
  white-space: pre;
  word-wrap: normal;
  line-height: 120%;
  color: inherit;
  z-index: 2;
  position: relative;
  overflow: visible;
  -webkit-tap-highlight-color: transparent;
  -webkit-font-variant-ligatures: contextual;
  font-variant-ligatures: contextual;
}
1.4、Jupyter Notebook修改启动路径
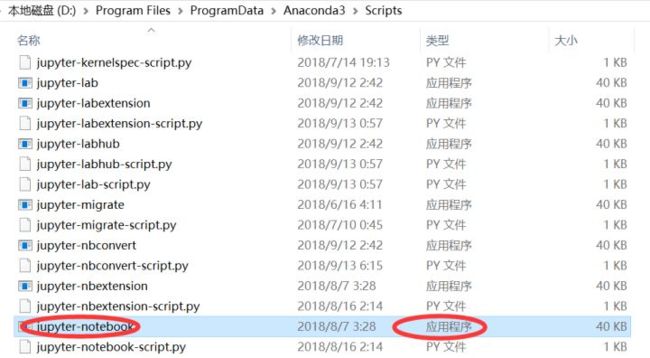
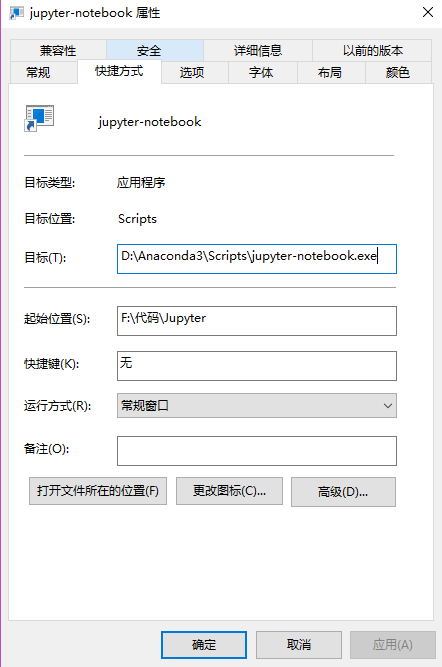
1、将图中exe程序发送快捷方式到桌面,并修改起始位置
#修改配置文件,修改开始栏快捷方式的方法经实验均无效
2、conda相关
2.1、conda命令大全
conda info
#查看conda信息

conda search -f python
#查看所有python版本

conda create -n python365 python=3.6.5
#创建虚拟环境

conda env list
#查看所有虚拟环境

activate python365
deactivate python365
#激活与退出虚拟环境

conda remove -n python365 --all
#删除虚拟环境

windows相关源
conda config --add channels https://mirrors.tuna.tsinghua.edu.cn/anaconda/pkgs/free/
conda config --add channels https://mirrors.tuna.tsinghua.edu.cn/anaconda/pkgs/main/
#以上两条是Anaconda官方库的镜像
conda config --add channels https://mirrors.tuna.tsinghua.edu.cn/anaconda/cloud/conda-forge/
conda config --add channels https://mirrors.tuna.tsinghua.edu.cn/anaconda/cloud/pytorch/
#以上是Anaconda第三方库 Conda Forge和pytorch的镜像

ubuntu相关源
conda config --add channels https://mirrors.tuna.tsinghua.edu.cn/anaconda/pkgs/free/linux-64/
conda config --add channels https://mirrors.tuna.tsinghua.edu.cn/anaconda/pkgs/main/linux-64/

conda install pytorch torchvision cudatoolkit=10.1
#清华镜像安装GPU版pytorch,一定用conda安装
conda install pytorch torchvision torchaudio cpuonly -c pytorch
#pytorch.org官网命令如上一行所示,-c的作用是指定通道,但用清华镜像的话去掉后边的"-c pytorch"

conda config --set show_channel_urls yes
#设置搜索时显示通道地址

conda config --show-sources
#查看当前使用的所有镜像源

conda config --remove channels https://mirrors.tuna.tsinghua.edu.cn/anaconda/pkgs/free/
#删除指定源

conda config --remove-key channels
#恢复默认源

pip install tensorflow-gpu==2.3.0
#安装GPU版tensorflow
pip install tensorflow-cpu
#安装CPU版tensorflow,如果机器没有GPU一定要加上-cpu
import tensorflow as tf
print(tf.test.is_gpu_available())
print(tf.__version__)
#查看是否安装成功

conda search --full-name python
查看所有python版本

%APPDATA%
pip config set global.index-url https://pypi.tuna.tsinghua.edu.cn/simple
#配置清华镜像为默认pip源,此时自动生成文件

pip --version
pip -V
#查看pip版本

tensorboard --logdir=装有events.out文件的文件夹名称
#要对比两个模型,可将events.out文件放到不同的文件夹中,尽量使用绝对路径
tensorboard --logdir=ComparedTest
ComparedTest文件夹
	--test1文件夹
		----events.out文件
	--test2
		----events.out文件

import torch
print(torch.version.cuda)
print(torch.backends.cudnn.version())
print(torch.cuda.is_available())
print(torch.__version__)

print(torch.cuda.current_device())
#查看当前gpu索引号
print(torch.cuda.current_stream(device=0))
#查看当前cuda流
print(torch.cuda.device(1))
#选择device
print(torch.cuda.device_count())
#查看有多少个GPU设备
print(torch.cuda.get_device_capability(device=0))
#查看gpu的容量
2.2、CPU和GPU版本tensorflow安装区别:
https://zhuanlan.zhihu.com/p/268081812

2.3、conda配置流程顺序
1、首先配置conda源
conda config --add channels https://mirrors.tuna.tsinghua.edu.cn/anaconda/pkgs/free/
conda config --add channels https://mirrors.tuna.tsinghua.edu.cn/anaconda/pkgs/main/
conda config --add channels https://mirrors.tuna.tsinghua.edu.cn/anaconda/cloud/conda-forge/
conda config --add channels https://mirrors.tuna.tsinghua.edu.cn/anaconda/cloud/pytorch/

2、查看源是否添加成功
conda config --show-sources

3、设置搜索时显示通道地址
conda config --set show_channel_urls yes

4、创建虚拟环境
conda create -n 虚拟环境名称 python=3.6.5

5、激活虚拟环境
conda activate 虚拟环境名称

6、虚拟环境内配置清华镜像为默认pip源,此时自动生成文件
pip config set global.index-url https://pypi.tuna.tsinghua.edu.cn/simple

7、安装CPU版pytorch
conda install pytorch torchvision torchaudio cpuonly

8、检查pytorch是否安装成功,没报错就是安装成功
python
import torch
2.4、Pytorch下载网址
https://download.pytorch.org/whl
2.5、GPU笔记本配置记录
清华anaconda镜像配置:https://mirror.tuna.tsinghua.edu.cn/help/anaconda
conda install pytorch torchvision torchaudio cudatoolkit=11.3 -c pytorch
#去除-c貌似会报错

conda源须直接用清华镜像官网的配置,否则也报错,原因未知,之前是不报错的,下面代码直接复制
channels:
  - defaults
show_channel_urls: true
default_channels:
  - https://mirrors.tuna.tsinghua.edu.cn/anaconda/pkgs/main
  - https://mirrors.tuna.tsinghua.edu.cn/anaconda/pkgs/r
  - https://mirrors.tuna.tsinghua.edu.cn/anaconda/pkgs/msys2
custom_channels:
  conda-forge: https://mirrors.tuna.tsinghua.edu.cn/anaconda/cloud
  msys2: https://mirrors.tuna.tsinghua.edu.cn/anaconda/cloud
  bioconda: https://mirrors.tuna.tsinghua.edu.cn/anaconda/cloud
  menpo: https://mirrors.tuna.tsinghua.edu.cn/anaconda/cloud
  pytorch: https://mirrors.tuna.tsinghua.edu.cn/anaconda/cloud
  pytorch-lts: https://mirrors.tuna.tsinghua.edu.cn/anaconda/cloud
  simpleitk: https://mirrors.tuna.tsinghua.edu.cn/anaconda/cloud
3、cuda相关
CUDA与Driver的对应版本
参考链接:https://docs.nvidia.com/cuda/cuda-toolkit-release-notes/index.html
cuda8.0与Linux系统以及GCC的对应关系
参考链接:https://docs.nvidia.com/cuda/archive/8.0/cuda-installation-guide-linux/index.html
cuda9.0与Linux系统以及GCC的对应关系
参考链接:https://docs.nvidia.com/cuda/archive/9.0/cuda-installation-guide-linux/index.html
cuda10.0与Linux系统以及GCC的对应关系
参考链接:https://docs.nvidia.com/cuda/cuda-installation-guide-linux/index.html
3.1、部分命令

参考链接:https://blog.csdn.net/qq_40750972/article/details/123835847
ubuntu-drivers devices
#系统推荐安装的驱动版本

nvcc -V
#查看nvidia cuda compiler的版本信息

gcc --version
3.2、版本备份
新机器
ubuntu	18.04
GCC		7.5.0
nvidia驱动 440.100
cuda	10.2
cudnn	7.6.5
nvcc	10.2.89
老机器
ubuntu	18.04
GCC		7.5.0
nvidia驱动 440.33.01
cuda	10.2
cudnn	7.6.5
nvcc	10.1.105
4、报错
4.1、ImportError: DLL load failed: 找不到指定的模块。
先是加入环境变量 D:\Anaconda;D:\Anaconda\Scripts;D:\Anaconda\Library\bin 重启后没有用,后来证明的确不是环境变量的原因。
然后查到可能是numpy的问题
pip uninstall numpy
pip install numpy
成功解决,但是卸载前后numpy的版本并没有变化
5、小技巧
5.1、查看第三方包位置
安装位置或虚拟环境位置\lib\site-packages
6、环境变量备份
6.1、用户变量
PATH
D:\Anaconda3;
D:\Anaconda3\Library\mingw-w64\bin;
D:\Anaconda3\Library\usr\bin;
D:\Anaconda3\Library\bin;
D:\Anaconda3\Scripts;
%PyCharm%;
C:\Users\自定义用户名\AppData\Local\Programs\Common\Microsoft\Visual C++ for Python\9.0
Pycharm
D:\Program Files\JetBrains\PyCharm 2020.1.1\bin;
6.2、系统变量
CLASSPATH
.;
%JAVA_HOME%\jdk1.8.0_121\bin\lib;
%JAVA_HOME%\jdk1.8.0_121\bin\lib\tools.jar
JAVA_HOME
C:\Program Files\Java\jdk1.8.0_121
PATH
%JAVA_HOME%\jdk1.8.0_121\bin;
%JAVA_HOME%\jre1.8.0_121\bin;
C:\ProgramData\Oracle\Java\javapath;
%SystemRoot%\system32;
%SystemRoot%;
%SystemRoot%\System32\Wbem;
%SYSTEMROOT%\System32\WindowsPowerShell\v1.0\;
D:\Program Files\MySQL\bin;
D:\Program Files\Git\bin;
D:\Program Files\MATLAB\R2016a\runtime\win64;
D:\Program Files\MATLAB\R2016a\bin;
D:\Program Files\MATLAB\R2016a\polyspace\bin


