FreeRTOS实验使用02
1:队列集使用
主要就是函数xQueueSelectFromSet 返回值的判断,用于判断里面的消息谁有效

Pend (or block) on multiple RTOS queues and semaphores in a set (freertos.org)
官方给的例程更好,更规范
2:任务通知使用
xR = xTaskNotify(Task2_Handler,4,eIncrement); //返回值一直为1,分析源码返回值为pdPASS=1
xReturn = ulTaskNotifyTake(pdFALSE ,portMAX_DELAY );//这个保持不变
 pdTRUE:把通知值清零;pdFALSE:把通知值减一
更改任务通知方式
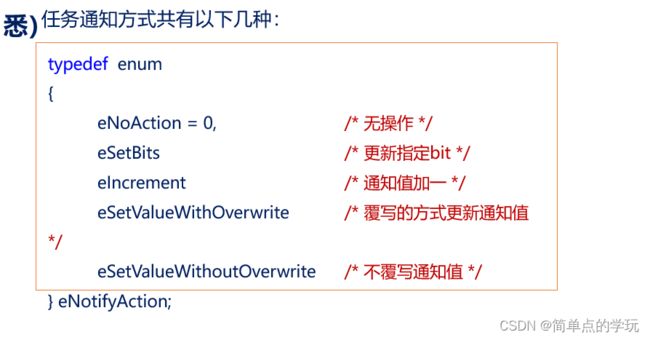
任务通知方式如何理解--分析源码


xTaskGenericNotify()源码分析
BaseType_t xTaskGenericNotify( TaskHandle_t xTaskToNotify, uint32_t ulValue, eNotifyAction eAction, uint32_t *pulPreviousNotificationValue )
	{
	TCB_t * pxTCB;
	BaseType_t xReturn = pdPASS;

		pxTCB = ( TCB_t * ) xTaskToNotify;//xTaskToNotify是任务句柄,接收方

		taskENTER_CRITICAL();
		{
			if( pulPreviousNotificationValue != NULL ) //不为NULL,就保存之前的值
			{
				*pulPreviousNotificationValue = pxTCB->ulNotifiedValue;
			}

			switch( eAction ) //任务更新方式
			{
				case eSetBits	:
					pxTCB->ulNotifiedValue |= ulValue;//此时的ulValue的值为某一位,把该为置一
					break;

				case eIncrement	:
					( pxTCB->ulNotifiedValue )++;//把原先的值加一
					break;

				case eSetValueWithOverwrite	:
					pxTCB->ulNotifiedValue = ulValue;//覆盖原来的值
					break;

				case eSetValueWithoutOverwrite :
					if( ucOriginalNotifyState != taskNOTIFICATION_RECEIVED )//如果你是第一次进来就执行if里面的,如果不是则执行下面的,一般都是第一次进来
					{
						pxTCB->ulNotifiedValue = ulValue;
					}
					else
					{
						/* The value could not be written to the task. */
						xReturn = pdFAIL;
					}
					break;

				case eNoAction:
					/* The task is being notified without its notify value being
					updated. */
					break;
			}

			traceTASK_NOTIFY();


		taskEXIT_CRITICAL();

		return xReturn;
	}
ulTaskNotifyTake源码分析
uint32_t ulTaskNotifyTake( BaseType_t xClearCountOnExit, TickType_t xTicksToWait )
	{
	uint32_t ulReturn;

		taskENTER_CRITICAL();
		{
			/* Only block if the notification count is not already non-zero. */
			if( pxCurrentTCB->ulNotifiedValue == 0UL )
			{
//判断你发送的通知值是否为0,为0表示没发送,那么把此时的状态变成阻塞等待
				/* Mark this task as waiting for a notification. */
				pxCurrentTCB->ucNotifyState = taskWAITING_NOTIFICATION;

				if( xTicksToWait > ( TickType_t ) 0 )
				{
					prvAddCurrentTaskToDelayedList( xTicksToWait, pdTRUE );
					traceTASK_NOTIFY_TAKE_BLOCK();

					/* All ports are written to allow a yield in a critical
					section (some will yield immediately, others wait until the
					critical section exits) - but it is not something that
					application code should ever do. */
					portYIELD_WITHIN_API();
				}
				else
				{
					mtCOVERAGE_TEST_MARKER();
				}
			}
			else
			{
				mtCOVERAGE_TEST_MARKER();
			}
		}
		taskEXIT_CRITICAL();

		taskENTER_CRITICAL();
		{
			traceTASK_NOTIFY_TAKE();
			ulReturn = pxCurrentTCB->ulNotifiedValue;

			if( ulReturn != 0UL )
			{
				if( xClearCountOnExit != pdFALSE )
				{
					pxCurrentTCB->ulNotifiedValue = 0UL;//二值信号量情况
				}
				else
				{
					pxCurrentTCB->ulNotifiedValue = ulReturn - 1;//然后赋值回去--计数型信号量
				}
			}
			else
			{
				mtCOVERAGE_TEST_MARKER();
			}

			pxCurrentTCB->ucNotifyState = taskNOT_WAITING_NOTIFICATION;
		}
		taskEXIT_CRITICAL();

		return ulReturn;
	}
模拟二值信号量
我们只需要关注有没有发通知即可,不需要关注发的内容是啥
xR = xTaskNotifyGive(Task2_Handler); //xR的值为1
xTaskNotifyGive这个函数自带加一,所以接收到了1,然后清零,等待下一次
xReturn = ulTaskNotifyTake(pdTRUE ,portMAX_DELAY ); //xReturn的值为1
pdTRUE清零,为了下次继续,如果改成不清零,改成减一呢?
结果是一样的,发过去为1,再减一,变成0了,就不会继续下一次了,除非我们发的通知值为大于1的值
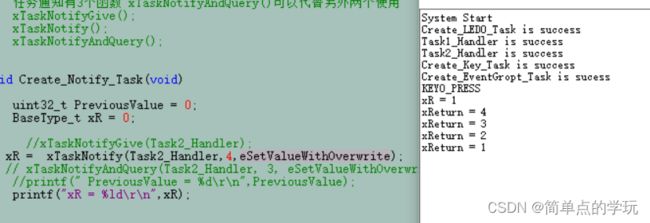
xR = xTaskNotify(Task2_Handler,4,eNoAction); //结果NotifyTask is fail
分析上面的源码就知道为什么是错误了,因为它啥都没有干,所以错误
xR = xTaskNotify(Task2_Handler,4,eIncrement);//xReturn = 1,为什么不是4呢?因为我没有覆盖,源码上是原来的值加一,而原来的值是0,因此这个4是没用的
xR = xTaskNotify(Task2_Handler,4,eSetValueWithOverwrite);//会打印四次,因为通知值变成了4覆盖了,接收到了4,然后减一,变成了3,此时又满足了,因此接收到了3,除非你清零就不会了
如果只是想单纯的接收值得话,需要更换另外一个接收函数xTaskNotifyWait
模拟计数信号量
发送者10ms延时,接收者1000ms延时,两者需要存在时间差,不然成功不了
任务通知发送键值,接收键值
这里可以衍生到发送其他数据啊等,但是一次性只能发送一个数据
 BaseType_t xReturn;
    uint32_t pulNotificationValue;
    while(1)
    {
     // xReturn =  ulTaskNotifyTake(pdFALSE ,portMAX_DELAY ); //模拟信号量  //pdFALSE           pdTRUE
      xReturn =  xTaskNotifyWait(0,0XFFFF, &pulNotificationValue,portMAX_DELAY);
//        switch()
//        {
//             //对通知值进行操作
//        }
       if(xReturn == pdTRUE)
       {
            printf("pulNotificationValue = %ld\r\n",pulNotificationValue);
       }
       else
       {

            printf("NotifyTask is fail\r\n");
}任务通知发送设置不同标志位
按键0设置第二位(0X02),按键1设置第三位(0X04)
xTaskNotify(Task2_Handler,0X02,eSetBits);

xTaskNotify(Task2_Handler,0X04,eSetBits);

 xReturn =  xTaskNotifyWait(0,0XFFFFFFFF, &pulNotificationValue,portMAX_DELAY);
0XFFFFFFFF是把标志位清零,为0的话,上一次的会被记录下来,因此会一直成立打印K0K1
  if(pulNotificationValue & 0X02)//如果成立,表示按键0按下
        {
            printf("K0\r\n");
            event_bit |= 0x02;
        }
         if(pulNotificationValue & 0X04)//如果成立,表示按键1按下
        {
            printf("K1\r\n");
            event_bit |= 0x04;
        }
        if(event_bit == (0x02 | 0x04 ))                             //如果成立,表示按键0和按键1都发生了
        {
             printf("K0K1\r\n");
            event_bit = 0;
        }
低功耗源码分析
#if ( configUSE_TICKLESS_IDLE != 0 )
		{
		TickType_t xExpectedIdleTime;

			/* It is not desirable to suspend then resume the scheduler on
			each iteration of the idle task.  Therefore, a preliminary
			test of the expected idle time is performed without the
			scheduler suspended.  The result here is not necessarily
			valid. */
			xExpectedIdleTime = prvGetExpectedIdleTime();//获取下一个任务的解锁时间,即进入低功耗的时间

			if( xExpectedIdleTime >= configEXPECTED_IDLE_TIME_BEFORE_SLEEP )
			{
//如果大于
				vTaskSuspendAll();
				{
					/* Now the scheduler is suspended, the expected idle
					time can be sampled again, and this time its value can
					be used. */
					configASSERT( xNextTaskUnblockTime >= xTickCount );
					xExpectedIdleTime = prvGetExpectedIdleTime();

					if( xExpectedIdleTime >= configEXPECTED_IDLE_TIME_BEFORE_SLEEP )
					{
						traceLOW_POWER_IDLE_BEGIN();
						portSUPPRESS_TICKS_AND_SLEEP( xExpectedIdleTime );//这个就是核心函数
						traceLOW_POWER_IDLE_END();
					}
					else
					{
						mtCOVERAGE_TEST_MARKER();
					}
				}
				( void ) xTaskResumeAll();
			}
			else
			{
				mtCOVERAGE_TEST_MARKER();
			}
		}
		#endif /* configUSE_TICKLESS_IDLE */
	}
低功耗实际操作
就是操作两个函数即可--自己宏定义的函数
/* 低功耗模式 */
#define configPRE_SLEEP_PROCESSING(x) PRE_SLEEP_PROCESSING()
#define configPOSR_SLEEP_PROCESSING(x) POSR_SLEEP_PROCESSING()