使用tensorflow2.3训练数字识别模型并量化为tflite后部署到openMV上
前言
本文将介绍使用tensorflow2.3训练手写数字的模型并量化为TFlite后,将其部署到openMV或者openart mini上面运行,本文抛砖引玉,大家可以用自己的数据集训练其他分类模型并量化部署到机器上。
一、环境介绍
软件环境:
tensorflow2.3版本
openMV IDE
硬件介绍:
openMV4 H7 PLUS/或者openART mini(训练好后的模型普通的H7非PLUS版本好像也可以跑,但是输出的数据很奇怪,数据没有归一化而且非常奇怪,openART mini就是逐飞科技的那款摄像头,熟悉全国大学生智能车比赛(视觉组)的小伙伴应该知道这个摄像头)
有关tensorflow的解释此处不多做介绍,作者也是在校大学生,对tensorflow也只能算是一个小白的水平(手动狗头.jpg)
作者使用的是这一款openART
二、模型训练
在此假设你已经安装好了tensorflow2.3版本,如果有不会的小伙伴可以在CSDN上查看教程机器视觉系列(02)---TensorFlow2.3 + win10 + GPU安装_美摄科技-CSDN博客
废话不多说,直接上代码:
原始代码:
#环境为tensorflow2.3
import tensorflow as tf
from tensorflow.keras import datasets, layers, models
import matplotlib.pyplot as plt
import numpy as np

# 导入数据
(x_train, y_train), (x_test, y_test) = tf.keras.datasets.mnist.load_data()
# 观察数据
print (x_train.shape)
plt.imshow(x_train[1000])
print (y_train[1000])

train_images=x_train/255.0

#(train_images, train_labels), (test_images, test_labels) = datasets.cifar10.load_data()
# 归一化
x_train, x_test = x_train / 255.0, x_test / 255.0

class_names = ['0', '1', '2', '3', '4','5', '6', '7', '8', '9']

plt.imshow(x_train[2000])


x_train = x_train.reshape((x_train.shape[0],28,28,1)).astype('float32')
x_test = x_test.reshape((x_test.shape[0],28,28,1)).astype('float32') #-1代表那个地方由其余几个值算来的
x_train = x_train/255
x_test = x_test/255
x_train = np.pad(x_train, ((0,0),(2,2),(2,2),(0,0)), 'constant')
x_test = np.pad(x_test, ((0,0),(2,2),(2,2),(0,0)), 'constant')
print (x_train.shape)

########################################################################################
#模型建立

#序贯模型(Sequential):单输入单输出
model = tf.keras.Sequential()

from tensorflow.keras.layers import Conv2D
from tensorflow.keras.layers import MaxPooling2D
from tensorflow.keras.layers import Flatten
from tensorflow.keras.layers import Dense
from tensorflow.keras.layers import InputLayer, Dropout, Conv1D, Flatten

#我加的这一层
model.add(InputLayer(input_shape=(32,32,1), name='x_input'))

#Layer 1
#Conv Layer 1
model.add(Conv2D(filters = 6, kernel_size = 5, strides = 1, activation = 'relu', input_shape = (32,32,1)))
#Pooling layer 1
model.add(MaxPooling2D(pool_size = 2, strides = 2))

#Layer 2
#Conv Layer 2
model.add(Conv2D(filters = 16, kernel_size = 5,strides = 1,activation = 'relu',input_shape = (14,14,6)))
#Pooling Layer 2
model.add(MaxPooling2D(pool_size = 2, strides = 2))
#Flatten
model.add(Flatten())

#Layer 3
#Fully connected layer 1
model.add(Dense(units = 120, activation = 'relu'))

#Layer 4
#Fully connected layer 2
model.add(Dense(units = 42, activation = 'relu'))######

#Layer 5
#Output Layer
model.add(Dense(units = 10, activation = 'softmax'))
model.compile(optimizer = 'adam',  loss=tf.keras.losses.SparseCategoricalCrossentropy(), metrics = ['accuracy'])

model.summary()
#########################################################################################

model.compile(optimizer='adam',
              loss=tf.keras.losses.SparseCategoricalCrossentropy(from_logits=True),
              metrics=['accuracy'])

history = model.fit(x_train, y_train, epochs=50,batch_size=16,
                    validation_data=(x_test, y_test))

history.history.keys()#可视化
#准确率训练数据可视化
plt.plot(history.epoch, history.history.get('accuracy'),label='accuracy')
plt.plot(history.epoch, history.history.get('val_accuracy'),label='val_accuracy')
plt.legend()

model.save('E:/model_path/h5path/LeNet_5.h5')#keras保存模型,名字可以任取,但要由.h5后缀,可以更改为自己的路径
#测试模型
model.evaluate(x_test, y_test)

# 模型保存
save_path = "E:/model_path/pbpath"#pb模型保存路径
model.save(save_path)

train_images = x_train
train_images.shape[2]

#int8真的量化成功了!!!!
#还可以部署到openMV上!!!
def representative_data_gen():
    for image in train_images[0:100,:,:]:
        yield[image.reshape(-1,train_images.shape[1],train_images.shape[2],1).astype("float32")]

converter = tf.lite.TFLiteConverter.from_keras_model(model)
converter.optimizations = [tf.lite.Optimize.DEFAULT]
converter.representative_dataset = representative_data_gen

#--------新增加的代码--------------------------------------------------------
# 确保量化操作不支持时抛出异常
converter.target_spec.supported_ops = [tf.lite.OpsSet.TFLITE_BUILTINS_INT8]
# 设置输入输出张量为uint8格式
converter.inference_input_type = tf.int8 #or unit8
converter.inference_output_type = tf.int8 #or unit8
#----------------------------------------------------------------------------

tflite_model_quant = converter.convert()
#保存转换后的模型
FullInt_name = "int8.tflite"
open(FullInt_name, "wb").write(tflite_model_quant)

#查看输入输出类型
interpreter = tf.lite.Interpreter(model_content=tflite_model_quant)
input_type = interpreter.get_input_details()[0]['dtype']
print('input: ', input_type)
output_type = interpreter.get_output_details()[0]['dtype']
print('output: ', output_type)
这个代码其实也是我从网上down来的,亲测可用!!!如果你正常运行的话应该会得到下面的结果:
笔者使用的是jupyter_notebook训练的模型,上述代码运行后会在notebook的根目录下生成这个tflite模型文件
![]()
这个模型是可以直接上机器上面跑起来的,会部署的同学可以移步到文章最后,这里先介绍一下代码内容,有能力优化的同学可以自行优化。
代码介绍:
导入环境依赖包:
#环境为tensorflow2.3
import tensorflow as tf
from tensorflow.keras import datasets, layers, models
import matplotlib.pyplot as plt
import numpy as np
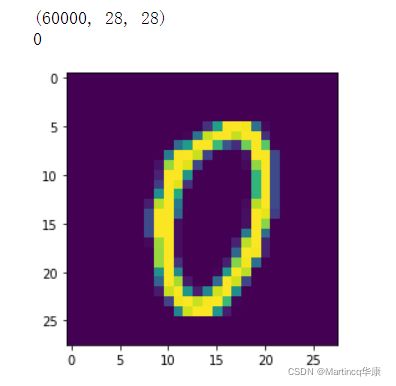
下载数据集:
# 导入数据
(x_train, y_train), (x_test, y_test) = tf.keras.datasets.mnist.load_data()
# 观察数据
print (x_train.shape)
plt.imshow(x_train[1000])
print (y_train[1000])

train_images=x_train/255.0

#(train_images, train_labels), (test_images, test_labels) = datasets.cifar10.load_data()
# 归一化
x_train, x_test = x_train / 255.0, x_test / 255.0

class_names = ['0', '1', '2', '3', '4','5', '6', '7', '8', '9']
这个数据集是Google的mnist手写数字数据集,由0~10的数字组成,大约有六万张图片,上面的代码运行后会得到以下的结果:
设置训练集和测试集:
x_train = x_train.reshape((x_train.shape[0],28,28,1)).astype('float32')
x_test = x_test.reshape((x_test.shape[0],28,28,1)).astype('float32') #-1代表那个地方由其余几个值算来的
x_train = x_train/255
x_test = x_test/255
x_train = np.pad(x_train, ((0,0),(2,2),(2,2),(0,0)), 'constant')
x_test = np.pad(x_test, ((0,0),(2,2),(2,2),(0,0)), 'constant')
print (x_train.shape)
模型搭建:
#序贯模型(Sequential):单输入单输出
model = tf.keras.Sequential()

from tensorflow.keras.layers import Conv2D
from tensorflow.keras.layers import MaxPooling2D
from tensorflow.keras.layers import Flatten
from tensorflow.keras.layers import Dense
from tensorflow.keras.layers import InputLayer, Dropout, Conv1D, Flatten

#我加的这一层
model.add(InputLayer(input_shape=(32,32,1), name='x_input'))

#Layer 1
#Conv Layer 1
model.add(Conv2D(filters = 6, kernel_size = 5, strides = 1, activation = 'relu', input_shape = (32,32,1)))
#Pooling layer 1
model.add(MaxPooling2D(pool_size = 2, strides = 2))

#Layer 2
#Conv Layer 2
model.add(Conv2D(filters = 16, kernel_size = 5,strides = 1,activation = 'relu',input_shape = (14,14,6)))
#Pooling Layer 2
model.add(MaxPooling2D(pool_size = 2, strides = 2))
#Flatten
model.add(Flatten())

#Layer 3
#Fully connected layer 1
model.add(Dense(units = 120, activation = 'relu'))

#Layer 4
#Fully connected layer 2
model.add(Dense(units = 42, activation = 'relu'))######

#Layer 5
#Output Layer
model.add(Dense(units = 10, activation = 'softmax'))
model.compile(optimizer = 'adam',  loss=tf.keras.losses.SparseCategoricalCrossentropy(), metrics = ['accuracy'])

model.summary()
这个模型非常简单是lenet5数字识别模型,大家可以自行优化,模型结构长这个样子
模型训练:
model.compile(optimizer='adam',
              loss=tf.keras.losses.SparseCategoricalCrossentropy(from_logits=True),
              metrics=['accuracy'])

history = model.fit(x_train, y_train, epochs=50,batch_size=16,
                    validation_data=(x_test, y_test))
开始模型训练,这里我设置的是50轮训练次数,实际上10多次的时候模型已经达到稳定状态了。训练结束后会得到这样的结果:
训练过程可视化:
history.history.keys()#可视化
#准确率训练数据可视化
plt.plot(history.epoch, history.history.get('accuracy'),label='accuracy')
plt.plot(history.epoch, history.history.get('val_accuracy'),label='val_accuracy')
plt.legend()
这是作者的训练结果:
可以看到这个模型收敛速度挺快的
模型测试与保存:
model.save('E:/model_path/h5path/LeNet_5.h5')#保存模型,名字可以任取,但要由.h5后缀
#测试模型
model.evaluate(x_test, y_test)这里保存的是keras模型,可以把h5模型量化为nn模型,同样也可以部署在openMV上,不过nn模型的话得用逐飞科技的seekfree_nncu_tool_master可以参考这篇文章:第十六届全国大学生智能车| AI视觉组新手入门教程_TSINGHUAJOKING-CSDN博客_ai视觉组![]() https://blog.csdn.net/zhuoqingjoking97298/article/details/115335260?ops_request_misc=&request_id=&biz_id=102&utm_term=seekfree_nncu_tool_master&utm_medium=distribute.pc_search_result.none-task-blog-2~all~sobaiduweb~default-0-115335260.first_rank_v2_pc_rank_v29&spm=1018.2226.3001.4187。下面是这段代码运行后的结果,可以看到测试结果准确度还是挺高的:
https://blog.csdn.net/zhuoqingjoking97298/article/details/115335260?ops_request_misc=&request_id=&biz_id=102&utm_term=seekfree_nncu_tool_master&utm_medium=distribute.pc_search_result.none-task-blog-2~all~sobaiduweb~default-0-115335260.first_rank_v2_pc_rank_v29&spm=1018.2226.3001.4187。下面是这段代码运行后的结果,可以看到测试结果准确度还是挺高的:
保存为PB模型
# 模型保存
save_path = "E:/model_path/pbpath"
model.save(save_path)
pb模型为tensorflow保存的标准模型,没有损失任何精度
模型量化:
#int8真的量化成功了!!!!
train_images = x_train

def representative_data_gen():
    for image in train_images[0:100,:,:]:
        yield[image.reshape(-1,train_images.shape[1],train_images.shape[2],1).astype("float32")]

converter = tf.lite.TFLiteConverter.from_keras_model(model)
converter.optimizations = [tf.lite.Optimize.DEFAULT]
converter.representative_dataset = representative_data_gen

#--------新增加的代码--------------------------------------------------------
# 确保量化操作不支持时抛出异常
converter.target_spec.supported_ops = [tf.lite.OpsSet.TFLITE_BUILTINS_INT8]
# 设置输入输出张量为uint8格式
converter.inference_input_type = tf.int8 #or unit8
converter.inference_output_type = tf.int8 #or unit8
#----------------------------------------------------------------------------

tflite_model_quant = converter.convert()
#保存转换后的模型
FullInt_name = "int8.tflite"
open(FullInt_name, "wb").write(tflite_model_quant)

#查看输入输出类型
interpreter = tf.lite.Interpreter(model_content=tflite_model_quant)
input_type = interpreter.get_input_details()[0]['dtype']
print('input: ', input_type)
output_type = interpreter.get_output_details()[0]['dtype']
print('output: ', output_type)在这里讲一个小插曲,我之前将模型量化的时候用的官方的代码结果量化成了uint8模型,结果放到openMV上死!活!跑!不!通!一直报错:OSError: C:/Users/nxf48054/Desktop/share/tensorflow/tensorflow/lite/micro/kernels/quantize.cc:67 input->type == kTfLiteFloat32 || input->type == kTfLiteInt16 || input->type == kTfLi was not true.
Node QUANTIZE (number 0f) failed to prepare with status 1
AllocateTensors() failed!
后来我在openMV的官方论坛上查了一两天才发现原来openMV只能跑int8模型······焯!!!!!
模型结束
不出意外的话你将会在jupyternotebook根目录上得到这个模型:
![]()
找到这个模型的路径,我的模型是放在了E盘下面:
剩下的事情就简单了
将tflite模型部署到openMV上
将模型拷贝到sd卡上
这里还需要标签文件和micropython的代码,标签文件就是个txt文档,打开就是这样:
另外一个openMV的运行代码是我直接拿Edge Impulse训练出来的模型代码改的。
话不多说,直接上代码:
# Edge Impulse - OpenMV Image Classification Example

import sensor, image, time, os, tf

sensor.reset()                         # Reset and initialize the sensor.
sensor.set_pixformat(sensor.RGB565)    # Set pixel format to RGB565 (or GRAYSCALE)
sensor.set_framesize(sensor.QVGA)      # Set frame size to QVGA (320x240)
sensor.set_windowing((240, 240))       # Set 240x240 window.
sensor.skip_frames(time=2000)          # Let the camera adjust.

net = "int8.tflite"
#labels = [line.rstrip('\n') for line in open("sd/labels.txt")]
labels = [line.rstrip('\n') for line in open("sd/labels.txt")]

clock = time.clock()
while(True):
    clock.tick()

    img = sensor.snapshot()

    # default settings just do one detection... change them to search the image...
    for obj in tf.classify(net, img, min_scale=1.0, scale_mul=0.8, x_overlap=0.5, y_overlap=0.5):
        print("**********\nPredictions at [x=%d,y=%d,w=%d,h=%d]" % obj.rect())
        img.draw_rectangle(obj.rect())
        # This combines the labels and confidence values into a list of tuples
        predictions_list = list(zip(labels, obj.output()))

        for i in range(len(predictions_list)):
            #print("%s = %f" % (predictions_list[i][0], predictions_list[i][1]))
            if predictions_list[i][1]>0.8:
                print(predictions_list[i][0])


    print(clock.fps(), "fps")
这里我改了一点标签路径:
如果是用OpenMV4 H7 plus的话可以把标签路径"sd/labels.txt"里的“sd/”给去掉,但是如果要在OpenART mini上运行的话得加上sd/
实机测试
可以看出模型运行效果还不错,识别的还挺准的,速度的话每秒也能跑到18帧。
OK,文章到此就结束了。讲点题外话,作者也是个在校本科生,之前参加了20年和21年的电赛,当时第一次参加电赛的时候单片机编程的什么啥都不会,后面感谢arduino带我一步一步地步入单片机的深坑。21年电赛的时候选了F题送命小车,又遇到了神经网络图像识别的深坑,当时啥都不会,跟着学搭建模型,结果没学完建模型就比赛时间结束了。今年又参加了十七届全国大学大学生智能车比赛又遇到了openMV,不过这次准备时间还挺长的,网上东学一点西学一点还真就把模型整上去了,后面也得考研了,估计后面的时间就会告别单片机了。
今天大年初一,祝大家虎年快乐哇,虎虎生威~


