Halcon例程分析10:仿射变换物体的测量
打开halcon,按下ctrl+e打开halcon自带例程。方法->模板匹配(基于形状)->pm_measure_board.hdev
*********************************************************************************
* This example program shows the use of pattern matching with shape models
* to locate an object. Furthermore, it shows how to use the detected position
* and rotation of the object to construct search spaces for inspection tasks.
* In this particular example, the print on an IC is used to find the IC. From the
* found position and rotation, two measurement rectangles are constructed to
* measure the spacing between the leads of the IC. Because of the lighting
* used in this example, the leads have the saturated gray value of 255 at several
* positions and rotations, which enlarges the apparent width of the leads, and
* hence seems to reduce the spacing between the leads, although the same
* board is used in all images.
*********************************************************************************
dev_update_pc ('off')
dev_update_window ('off')
dev_update_var ('off')
*虚拟图像采集,seq文件是一个文本序列,对其中的文字逐行读取,打开对应文本路径的图像,模拟一个相机采集图像
open_framegrabber ('File', 1, 1, 0, 0, 0, 0, 'default', -1, 'default', -1, 'default', 'board/board.seq', 'default', -1, 1, FGHandle)
*采集单帧图像,获得图像宽高
grab_image (Image, FGHandle)
get_image_size (Image, Width, Height)
dev_close_window ()
dev_open_window (0, 0, Width, Height, 'black', WindowHandle)
dev_open_window (Height + 70, 0, Width, 120, 'black', WindowHandleText)
*激活图像窗口,设置显示字符样式
dev_set_window (WindowHandle)
set_display_font (WindowHandle, 16, 'mono', 'true', 'false')
set_display_font (WindowHandleText, 16, 'mono', 'true', 'false')
dev_set_color ('red')
dev_display (Image)
*定义生成矩形的变量,左上角与右下角坐标
Row1 := 188
Column1 := 182
Row2 := 298
Column2 := 412
*生成矩形ROI区域
gen_rectangle1 (Rectangle, Row1, Column1, Row2, Column2)
*获得ROI区域中心坐标
area_center (Rectangle, Area, Row, Column)
*定义变量用于生成上下两个测量矩形
Rect1Row := -102
Rect1Col := 5
Rect2Row := 107
Rect2Col := 5
RectPhi := 0
*测量芯片引脚矩形长170,宽5
RectLength1 := 170
RectLength2 := 5
*生成两个测量矩形,以矩形ROI区域为基准,第一个上移102,第二个下移107,水平方向
gen_rectangle2 (Rectangle1, Row + Rect1Row, Column + Rect1Col, RectPhi, RectLength1, RectLength2)
gen_rectangle2 (Rectangle2, Row + Rect2Row, Column + Rect2Col, RectPhi, RectLength1, RectLength2)
*处理矩形ROI区域,在原图上截取ROI区域做处理
reduce_domain (Image, Rectangle, ImageReduced)
*创建模板
*第一个参数创建模板的ROI区域图像
*第二个参数金子塔层数
*第三个参数模板的起始角度
*第四个参数模板的总角度
*第五个参数是模板的角度步长,这里设置为1°,也就是说这里总共会创建出360个模板用于寻找图像
*第六个参数是否优化模板点,这里选择不优化
*第七个参数极性选择,选择使用极性则必须是在与模板相同的背景下选择物体,例如模板中是在白色背景下选择黑色的目标物,则查找的时候也是在白色背景下找黑色目标物
*第八个参数是模板灰度阈值,即灰度差值超过这个数值的点才会选择为模板点,
*第九个参数是最小灰度值,用于去除噪声影响的
*最后一个参数模板ID,后面需要用到模板就通过这个ID查找
create_shape_model (ImageReduced, 4, 0, rad(360), rad(1), 'none', 'use_polarity', 30, 10, ModelID)
*获取模板的亚像素轮廓
get_shape_model_contours (ShapeModel, ModelID, 1)
*生成单位矩阵,用于平移变换,不生成单位矩阵直接使用下面的vector_angle_to_rigid也是一样的
hom_mat2d_identity (HomMat2DIdentity)
hom_mat2d_translate (HomMat2DIdentity, Row, Column, HomMat2DTranslate)
*vector_angle_to_rigid (0, 0, 0, Row, Column, 0, HomMat2DTranslate)
*把查找到的轮廓平移到图像中的相应位置上。从ROI区域上找到的模板轮廓实际上默认位置是中心与原图像原点重合的,
*所以要显示在图像相应位置上需要经过一定的旋转平移变换
affine_trans_contour_xld (ShapeModel, ShapeModelTrans, HomMat2DTranslate)
*把模板轮廓显示到原图像上
dev_display (Image)
dev_set_color ('green')
dev_display (ShapeModelTrans)
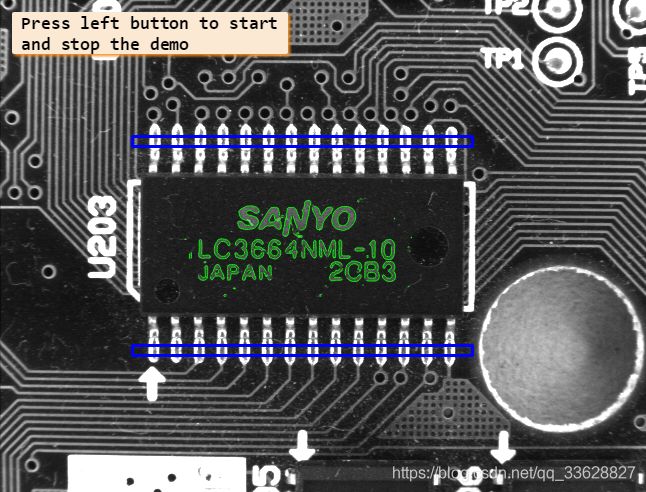
dev_set_color ('blue')
dev_set_draw ('margin')
dev_set_line_width (3)
dev_display (Rectangle1)
dev_display (Rectangle2)
dev_set_draw ('fill')
dev_set_line_width (1)
dev_set_color ('yellow')
disp_message (WindowHandle, ['Press left button to start','and stop the demo'], 'window', 12, 12, 'black', 'true')
*阻塞程序,等待鼠标左键按下才往下执行
get_mbutton (WindowHandle, Row3, Column3, Button1)
wait_seconds (0.5)
Button := 0
*一直执行,当鼠标左键按下Button=1时程序退出循环
while (Button != 1)
dev_set_window (WindowHandle)
dev_set_part (0, 0, Height - 1, Width - 1)
*从虚拟相机里获取一帧图像
grab_image (ImageCheck, FGHandle)
dev_display (ImageCheck)
count_seconds (S1)
*查找模板
*第一个参数用于查找的图像
*第二个参数模板ID
*第三个参数起始角度
*第四个参数查找的总角度值,这里是360度全方位查找
*第五个参数最小分数,查找到的图像与原模板会有一个相似度比较,越接近1图像越相似
*第六个参数查找的个数,为0时是把所有目标查找出来
*第七个参数是最大重叠度,表示找到的两个目标间可以有多大比例重叠
*第八个参数亚像素精度选择
*第九个参数金字塔层数
*第十个参数搜索贪婪度,越大搜索得越快,表示搜索得越不仔细
*第十一个参数搜索到的目标物的行坐标,搜到多个目标时这个参数是一个数组
*第十二个参数搜索到的目标物的列坐标,搜到多个目标时这个参数是一个数组
*第十三个参数搜索到的目标物的角度值,搜到多个目标时这个参数是一个数组
*第十四个参数搜索到的目标物的分数值,越接近1与模板越相似,搜到多个目标时这个参数是一个数组
find_shape_model (ImageCheck, ModelID, 0, rad(360), 0.7, 1, 0.5, 'least_squares', 4, 0.7, RowCheck, ColumnCheck, AngleCheck, Score)
count_seconds (S2)
dev_display (ImageCheck)
*判断是否搜到目标
if (|Score| > 0)
dev_set_color ('green')
*对模板进行旋转平移变换,变换到搜索到的区域位置,方便在原图上直观显示
*hom_mat2d_identity (HomMat2DIdentity)
*hom_mat2d_translate (HomMat2DIdentity, RowCheck, ColumnCheck, HomMat2DTranslate)
*hom_mat2d_rotate (HomMat2DTranslate, AngleCheck, RowCheck, ColumnCheck, HomMat2DRotate)
*vector_angle_to_rigid是以上两个函数的综合,既有平移,也有旋转
vector_angle_to_rigid (0, 0, 0, RowCheck, ColumnCheck, AngleCheck, HomMat2DRotate)
*HomMat2DRotate是从图像原点旋转平移到查找到的目标中心点的旋转平移矩阵
affine_trans_contour_xld (ShapeModel, ShapeModelTrans, HomMat2DRotate)
*显示平移旋转后的模板轮廓
dev_display (ShapeModelTrans)
*例程中把矩形中心位置平移回原点对应的位置上,再对这个点通过HomMat2DRotate旋转平移矩阵旋转到新图像上对应的位置处
*即第二个参数Rect1Row=Row+Rect1Row-Row,第三个参数Rect1Col=Column+Rect1Col-Column
*affine_trans_pixel (HomMat2DRotate, Rect1Row, Rect1Col, Rect1RowCheck, Rect1ColCheck)
*affine_trans_pixel (HomMat2DRotate, Rect2Row, Rect2Col, Rect2RowCheck, Rect2ColCheck)
*下面我自己写的方法:求出原图上模板中心点与检测出来的目标点中心位置对应的旋转平移矩阵,
*那么就可以用这个矩阵求出原模板上任意点在新图像上的坐标了,再在这个坐标上画出测量矩形
*HomMat2D是原图像上模板中心点坐标到检测图像上检测出的模板的中心坐标的平移变换矩阵
vector_angle_to_rigid (Row, Column, 0, RowCheck, ColumnCheck, AngleCheck, HomMat2D)
affine_trans_pixel (HomMat2D, Rect1Row+Row, Rect1Col+Column, Rect11RowCheck, Rect11ColCheck)
affine_trans_pixel (HomMat2D, Rect2Row+Row, Rect2Col+Column, Rect22RowCheck, Rect22ColCheck)
*在相应位置上生成测量矩形
gen_rectangle2 (Rectangle1Check, Rect11RowCheck, Rect11ColCheck, AngleCheck, RectLength1, RectLength2)
gen_rectangle2 (Rectangle2Check, Rect22RowCheck, Rect22ColCheck, AngleCheck, RectLength1, RectLength2)
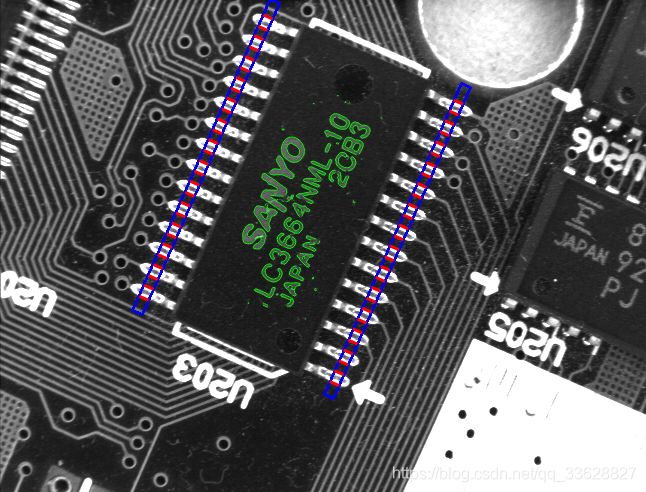
*显示测量矩形
dev_set_color ('blue')
dev_set_draw ('margin')
dev_set_line_width (3)
dev_display (Rectangle1Check)
dev_display (Rectangle2Check)
dev_set_draw ('fill')
count_seconds (S3)
*生成测量矩形
gen_measure_rectangle2 (Rect11RowCheck, Rect11ColCheck, AngleCheck, RectLength1, RectLength2, Width, Height, 'bilinear', MeasureHandle1)
gen_measure_rectangle2 (Rect22RowCheck, Rect22ColCheck, AngleCheck, RectLength1, RectLength2, Width, Height, 'bilinear', MeasureHandle2)
*下面这个函数是提取与测试矩形垂直方向上的的边缘对,想象一下在矩形长轴方向上做灰度差分,得到的曲线应该是每个一段距离出现一个上尖角与一个下尖角
*第一个上尖角的X坐标RowEdgeFirst,第一个上尖角的Y坐标ColumnEdgeFirst
*第一个下尖角的X坐标RowEdgeSecond,第一个下尖角的Y坐标ColumnEdgeSecond
*第一个参数输入图像
*第二个参数测量矩形的句柄
*第三个参数(1.5)是高斯平滑sigma值
*第四个参数(30)是最低阈值,对应上述尖角的高度值
*第五个参数('negative')是上述差分值的黑白方向,为negative时是白到黑为第一点,如果是为positive时为黑到白为第一点
*第六个参数是('all')是返回所有的测量到的值,即返回所有的尖角位置
*第九个参数(AmplitudeFirst)是上尖角最大幅值的大小
*(PinwWidth)是上尖角与下尖角之间的距离
*(PinDistance)是下尖角与上尖角之间的距离
measure_pairs (ImageCheck, MeasureHandle1, 2, 90, 'positive', 'all', RowEdgeFirst1, ColumnEdgeFirst1, AmplitudeFirst1, RowEdgeSecond1, ColumnEdgeSecond1, AmplitudeSecond1, IntraDistance1, InterDistance1)
measure_pairs (ImageCheck, MeasureHandle2, 2, 90, 'positive', 'all', RowEdgeFirst2, ColumnEdgeFirst2, AmplitudeFirst2, RowEdgeSecond2, ColumnEdgeSecond2, AmplitudeSecond2, IntraDistance2, InterDistance2)
count_seconds (S4)
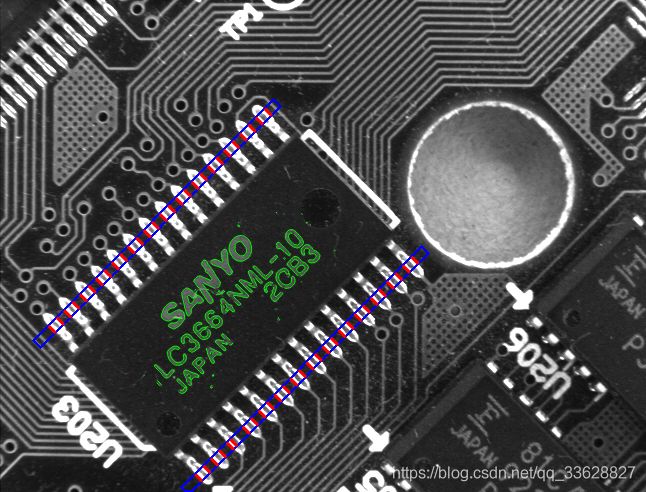
*显示检测出来的小直线
dev_set_color ('red')
disp_line (WindowHandle, RowEdgeFirst1 - RectLength2 * cos(AngleCheck), ColumnEdgeFirst1 - RectLength2 * sin(AngleCheck), RowEdgeFirst1 + RectLength2 * cos(AngleCheck), ColumnEdgeFirst1 + RectLength2 * sin(AngleCheck))
disp_line (WindowHandle, RowEdgeSecond1 - RectLength2 * cos(AngleCheck), ColumnEdgeSecond1 - RectLength2 * sin(AngleCheck), RowEdgeSecond1 + RectLength2 * cos(AngleCheck), ColumnEdgeSecond1 + RectLength2 * sin(AngleCheck))
disp_line (WindowHandle, RowEdgeFirst2 - RectLength2 * cos(AngleCheck), ColumnEdgeFirst2 - RectLength2 * sin(AngleCheck), RowEdgeFirst2 + RectLength2 * cos(AngleCheck), ColumnEdgeFirst2 + RectLength2 * sin(AngleCheck))
disp_line (WindowHandle, RowEdgeSecond2 - RectLength2 * cos(AngleCheck), ColumnEdgeSecond2 - RectLength2 * sin(AngleCheck), RowEdgeSecond2 + RectLength2 * cos(AngleCheck), ColumnEdgeSecond2 + RectLength2 * sin(AngleCheck))
dev_set_line_width (1)
*引脚总数目是两边引脚数之和
NumLeads := |IntraDistance1| + |IntraDistance2|
MinDistance := min([InterDistance1,InterDistance2])
*打开个小窗口显示文字信息
dev_set_window (WindowHandleText)
dev_set_part (0, 0, 119, Width - 1)
dev_clear_window ()
disp_message (WindowHandleText, 'Matching: Time: ' + ((S2 - S1) * 1000)$'5.2f' + 'ms , Score: ' + Score$'7.5f', 'image', 20, 20, 'green', 'false')
disp_message (WindowHandleText, 'Measure: Time: ' + ((S4 - S3) * 1000)$'5.2f' + ' ms, Num. leads: ' + NumLeads$'2d', 'image', 50, 20, 'red', 'false')
disp_message (WindowHandleText, ' Min. lead dist: ' + MinDistance$'6.3f', 'image', 80, 20, 'red', 'false')
endif
dev_error_var (Error, 1)
dev_set_check ('~give_error')
*获取鼠标点状态信息,也可以响应键盘的事件,程序不阻塞
*R是鼠标行坐标,C是鼠标点击处的列坐标,Button指示是那个按键被按下
*0:No button,1:Left button,2:Middle button,4:Right button,8:Shift key,16:Ctrl key,32:Alt key.
get_mposition (WindowHandle, R, C, Button)
dev_error_var (Error, 0)
dev_set_check ('give_error')
if (Error != H_MSG_TRUE)
Button := 0
endif
endwhile
dev_set_window (WindowHandleText)
dev_close_window ()
*关闭虚拟相机
close_framegrabber (FGHandle)模板图像
查找测试图像