15.服务数据的定义与使用
学习视频:https://www.bilibili.com/video/BV1zt411G7Vn?p=15
目标:服务数据的自定义,客户端发布显示个人信息的请求,服务端处理请求及反馈应答。
一、自定义服务数据
1.定义srv文件
mkdir ~/catkin_ws/src/learning_service/srv
gedit ~/catkin_ws/src/learning_service/srv/Person.srv
运行命令打开Person.srv文件,复制下面代码保存退出。
string name
uint8  age
uint8  sex

uint8 unknown = 0
uint8 male    = 1
uint8 female  = 2

---
string result
2.在package.xml中添加功能包依赖
运行命令打开package.xml文件
gedit ~/catkin_ws/src/learning_service/package.xml
加入下列代码保存退出。
<build_depend>message_generation</build_depend>
<exec_depend>message_runtime</exec_depend>

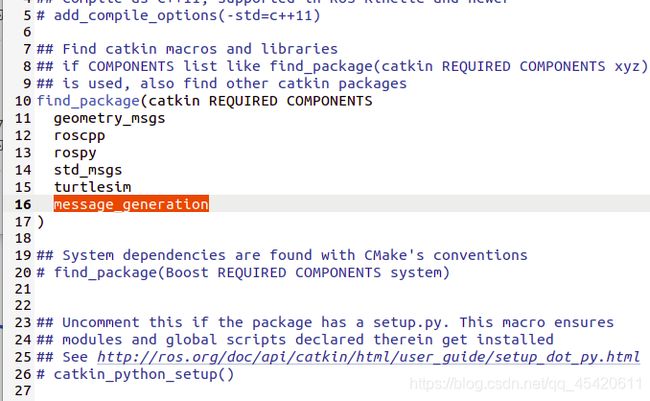
3.在CMakeLists.txt添加编译选项
运行命令打开CMakeList.txt文件。
gedit ~/catkin_ws/src/learning_service/CMakeLists.txt
首先在find_package函数中添加 message_generation依赖功能包
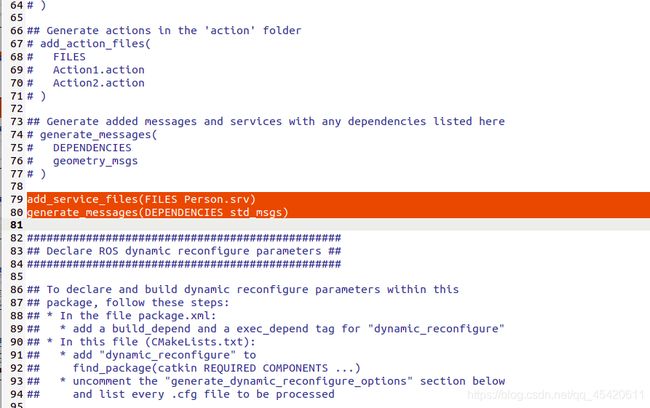
然后添加下面代码
add_service_files(FILES Person.srv)
generate_messages(DEPENDENCIES std_msgs)
如下图所示位置
最后在catkin_package函数中添加message_runtime依赖功能包
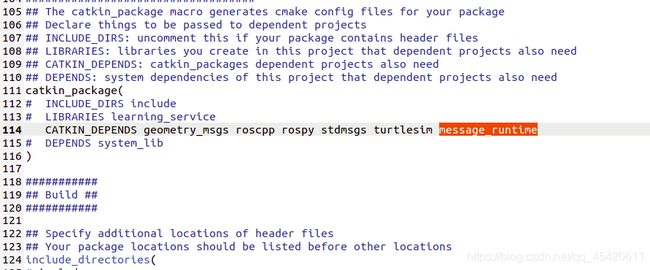
保存退出文件。
4.编译生成语言相关文件
cd ~/catkin_ws
catkin_make
可以在devel/include/learning_server文件夹下生成3个头文件。

二、用C++创建服务端与客户端代码
1.创建服务端代码
运行命令打开person_server.cpp文件
gedit ~/catkin_ws/src/learning_service/src/person_server.cpp
复制下面代码保存退出。
/***********************************************************************
Copyright 2020 GuYueHome (www.guyuehome.com).
***********************************************************************/
/**
* 该例程将执行/show_person服务,服务数据类型learning_service::Person
*/
#include 2.创建客户端代码
运行命令打开person_client.cpp文件。
gedit ~/catkin_ws/src/learning_service/src/person_client.cpp
复制下面代码保存退出。
/***********************************************************************
Copyright 2020 GuYueHome (www.guyuehome.com).
***********************************************************************/
/**
* 该例程将请求/show_person服务,服务数据类型learning_service::Person
*/
#include 3.配置代码编译规则
运行指令打开CMakeLists.txt文件。
gedit ~/catkin_ws/src/learning_service/CMakeLists.txt
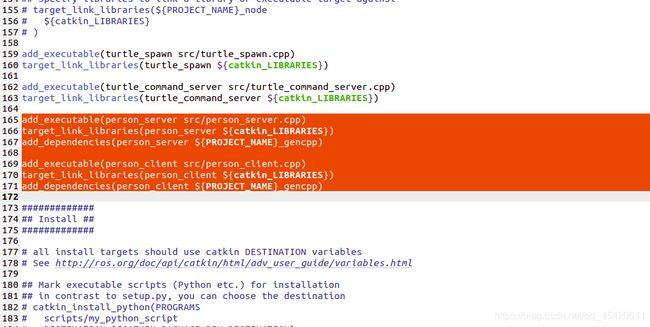
添加下列代码,如图所示
add_executable(person_server src/person_server.cpp)
target_link_libraries(person_server ${catkin_LIBRARIES})
add_dependencies(person_server ${PROJECT_NAME}_gencpp)

add_executable(person_client src/person_client.cpp)
target_link_libraries(person_client ${catkin_LIBRARIES})
add_dependencies(person_client ${PROJECT_NAME}_gencpp)
保存退出文件。
三、用Python创建服务端和客户端代码
1.创建服务端代码
运行执行打开person_server.py文件
gedit ~/catkin_ws/src/learning_service/scripts/person_server.py
复制下面代码,保存退出文件
#!/usr/bin/env python3
# -*- coding: utf-8 -*-

########################################################################
####          Copyright 2020 GuYueHome (www.guyuehome.com).          ###
########################################################################

# 该例程将执行/show_person服务,服务数据类型learning_service::Person

import rospy
from learning_service.srv import Person, PersonResponse

def personCallback(req):
	# 显示请求数据
    rospy.loginfo("Person: name:%s  age:%d  sex:%d", req.name, req.age, req.sex)

	# 反馈数据
    return PersonResponse("OK")

def person_server():
	# ROS节点初始化
    rospy.init_node('person_server')

	# 创建一个名为/show_person的server,注册回调函数personCallback
    s = rospy.Service('/show_person', Person, personCallback)

	# 循环等待回调函数
    print ("Ready to show person informtion.")
    rospy.spin()

if __name__ == "__main__":
    person_server()
设置person_server.py 文件运行权限
cd ~/catkin_ws/src/learning_service/scripts
chmod +x person_server.py
2.创建客户端代码
运行执行打开person_client.py文件
gedit ~/catkin_ws/src/learning_service/scripts/person_client.py
复制下面代码,保存退出文件
#!/usr/bin/env python3
# -*- coding: utf-8 -*-

########################################################################
####          Copyright 2020 GuYueHome (www.guyuehome.com).          ###
########################################################################

# 该例程将请求/show_person服务,服务数据类型learning_service::Person

import sys
import rospy
from learning_service.srv import Person, PersonRequest

def person_client():
	# ROS节点初始化
    rospy.init_node('person_client')

	# 发现/spawn服务后,创建一个服务客户端,连接名为/spawn的service
    rospy.wait_for_service('/show_person')
    try:
        person_client = rospy.ServiceProxy('/show_person', Person)

		# 请求服务调用,输入请求数据
        response = person_client("Tom", 20, PersonRequest.male)
        return response.result
    except rospy.ServiceException as e:
        print ("Service call failed: %s" %e)

if __name__ == "__main__":
	#服务调用并显示调用结果
    print ("Show person result : %s" %(person_client()))
设置person_client.py 文件运行权限
cd ~/catkin_ws/src/learning_service/scripts
chmod +x person_client.py
四、编译功能包(Python不需要本步骤)
命令行输入
cd ~/catkin_ws/
catkin_make
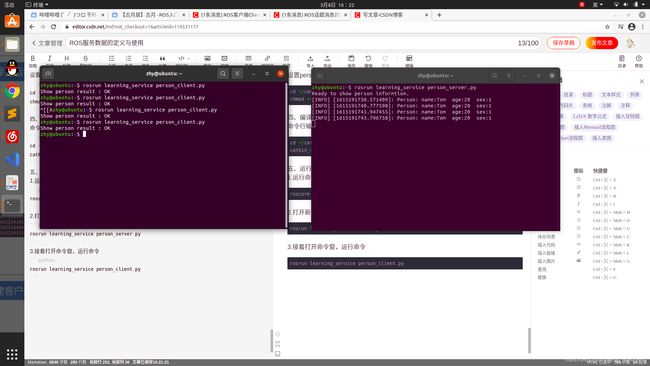
五、运行程序
1.运行命令
roscore
2.打开新的命令窗,运行命令
rosrun learning_service person_server.py
3.接着打开命令窗,运行命令
rosrun learning_service person_client.py
4.运行效果