pytorch官方demo实现图像分类(LeNet)
深度学习学习笔记
导师博客:https://blog.csdn.net/qq_37541097/article/details/103482003
导师github:https://github.com/WZMIAOMIAO/deep-learning-for-image-processing
代码用的导师的,自己又加了些备注,就放在自己的github里了:
https://github.com/Petrichor223/Deep_Learning/tree/master
网络是以LeNet网络搭建的,文件分为三部分:
official-demo
├─ model.py
├─ predict.py
├─ train.py
1. model.py
import torch.nn as nn
import torch.nn.functional as F


class LeNet(nn.Module):         #在Pytorch中搭建模型首先要定义一个类,这个类要继承于nn.Module这个副类
    def __init__(self):         #在该类中首先要初始化函数,实现在搭建网络过程中需要使用到的网络层结构,#然后在forward中定义正向传播的过程
        super(LeNet, self).__init__()      #super能够解决在多重继承中调用副类可能出现的问题
        self.conv1 = nn.Conv2d(3, 16, 5)   #这里输入深度为3,卷积核个数为16,大小为5x5
        self.pool1 = nn.MaxPool2d(2, 2)    #最大池化核大小为2x2,步长为2
        self.conv2 = nn.Conv2d(16, 32, 5)  #经过Conv2d的16个卷积核处理后,输入深度变为16
        self.pool2 = nn.MaxPool2d(2, 2)
        self.fc1 = nn.Linear(32*5*5, 120)  #全连接层的输入是一维的向量,因此将输入的特征矩阵进行展平处理(32x5x5),然后根据网络设置输出
        self.fc2 = nn.Linear(120, 84)
        self.fc3 = nn.Linear(84, 10)       #输出有几个类别就设置几

    def forward(self, x):     #在forward中定义正向传播的过程
        x = F.relu(self.conv1(x))    # input(3, 32, 32) output(16, 28, 28)    可通过矩阵尺寸大小计算公式得
        x = self.pool1(x)            # output(16, 14, 14)
        x = F.relu(self.conv2(x))    # output(32, 10, 10)
        x = self.pool2(x)            # output(32, 5, 5)
        x = x.view(-1, 32*5*5)       # output(32*5*5)
        x = F.relu(self.fc1(x))      # output(120)
        x = F.relu(self.fc2(x))      # output(84)
        x = self.fc3(x)              # output(10)
        return x
可以通过Pytorch官网的Docs进行查看相关函数
Pytorch Tensor的通道排序:[batch,channel,height,width]
1.1 Conv2d
torch.nn.Conv2d(in_channels, out_channels, kernel_size, stride=1, padding=0, dilation=1, groups=1, bias=True, padding_mode='zeros', device=None, dtype=None)
in_channels:代表输入特征矩阵的深度,比如输入为RGB彩色图像,则in_channels为3。
out_channels:使用卷积核的个数
kernel_size:卷积核的大小
stride:卷积核的步长,这里默认为1
padding:补零处理,这里默认为0
1.2 MaxPool2d
MaxPool2d(kernel_size, stride) #最大池化(池化核大小,步长)
1.3 展平处理 view()
将特征矩阵通过view函数展平为一维向量
= x.view(-1, 32*5*5) #-1为自动推理第一个维度(batch),第二个维度为展平后的节点个数
2. 定义完模型后的测试
import torch
input1 =torch.rand([32,3,32,32])     #定义随机生成数据的shape
model = LeNet()                      #实例化模型
print(model)
output = model(input1)               #将数据输入到网络中进行正向传播
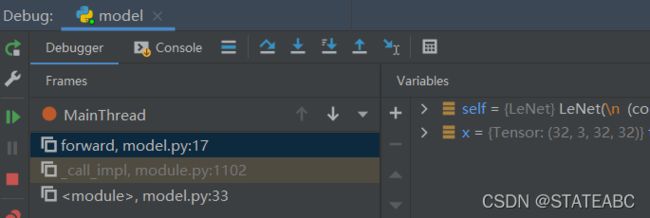
在正向传播处打上断点后进行Debug:
可以看到x的输入即为(32,3,32,32,)

在终端中会将每一层的详细信息打印出来

然后进行单步运行(Steo Over),可以看到现在的x变成了32x16x28x28![]()
然后再进行单步运行,经过第一个池化层![]()
后面同理。
3. cifar10数据集
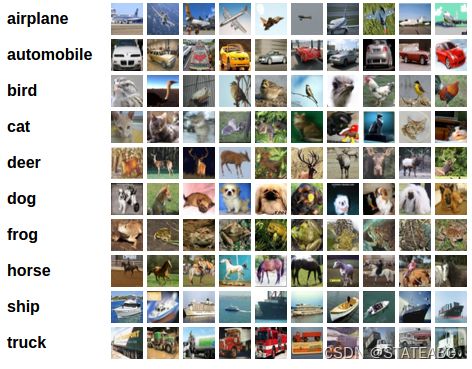
CIFAR10数据集有以下类别:“飞机”、“汽车”、“鸟”、“猫”、“鹿”、“狗”、“青蛙”、“马”、“船”、“卡车”。图像大小为 3x32x32,即 32x32 像素大小的 3 通道彩色图像。

利用torchvision.datasets函数可以在线导入pytorch中的数据集
导师给的数据集下载地址:链接:https://pan.baidu.com/s/1NBHp0SxEOJ5EIyYUsDHm_g
提取码:qp3k
4. train.py
4.1 导入训练集
# 导入50000张训练图片
train_set = torchvision.datasets.CIFAR10(root='./data', 	 # 数据集存放目录,这里是当前目录的data文件夹下
										 train=True,		 # 如果是True,就会导入cifar10训练集的样本
                                        download=True,  	 # 第一次运行时为True,下载数据集,下载完成后改为False
                                        transform=transform) # 预处理过程
# 加载训练集,实际过程需要分批次(batch)训练
train_loader = torch.utils.data.DataLoader(train_set, 	  # 导入的训练集
										   batch_size=50, # 每批训练的样本数
                                          shuffle=False,  # 是否打乱训练集
                                          num_workers=0)  # 使用线程数,在windows下设置为0
4.2 训练集预处理
    transform = transforms.Compose(   #通过transforms.Compose函数将使用的预处理方法打包成一个整体
        [transforms.ToTensor(),       #将PIL图像或numpy数据转化成tensor,即将shape (H x W x C) in the range [0, 255]转换成shape (C x H x W) in the range [0.0, 1.0]
         transforms.Normalize((0.5, 0.5, 0.5), (0.5, 0.5, 0.5))])     #标准化的过程
4.3 导入测试集
# 10000张验证图片
# 第一次使用时要将download设置为True才会自动去下载数据集
val_set = torchvision.datasets.CIFAR10(root='./data', train=False,
                                        download=False, transform=transform)
val_loader = torch.utils.data.DataLoader(val_set, batch_size=5000,
                                         shuffle=False, num_workers=0)
# 获取测试集中的图像和标签,用于accuracy计算
val_data_iter = iter(val_loader)
val_image, val_label = val_data_iter.next()
4.4 参数设置
net = LeNet()                                               #实例化模型
loss_function = nn.CrossEntropyLoss()                       #定义损失函数,在nn.CrossEntropyLoss中已经包含了Softmax函数
optimizer = optim.Adam(net.parameters(), lr=0.001)          #定义优化器,这里使用Adam优化器,net是定义的LeNet,parameters将LeNet所有可训练的参数都进行训练,lr=learning rate
4.5 训练过程
使用下面语句可以在有GPU时使用GPU,无GPU时使用CPU进行训练
device = torch.device("cuda" if torch.cuda.is_available() else "cpu")
print(device)
对应的,需要用to()函数来将Tensor在CPU和GPU之间相互移动,分配到指定的device中计算
net = LeNet()                                                     #实例化模型
net.to(device)                                                    #将网络分配到指定的device中
loss_function = nn.CrossEntropyLoss()                             #定义损失函数,在nn.CrossEntropyLoss中已经包含了Softmax函数
optimizer = optim.Adam(net.parameters(), lr=0.001)                #定义优化器,这里使用Adam优化器,net是定义的LeNet,parameters将LeNet所有可训练的参数都进行训练,lr=learning rate

for epoch in range(5):  # loop over the dataset multiple times    #将训练集迭代的次数

    running_loss = 0.0                                            #累加训练过程的损失
    time_start = time.perf_counter()
    for step, data in enumerate(train_loader, start=0):           #遍历训练集样本
        # get the inputs; data is a list of [inputs, labels]
        inputs, labels = data                                     #将得到的数据分离成输入和标签

        # zero the parameter gradients
        optimizer.zero_grad()                                     #将历史损失梯度清零,如果不清楚历史梯度,就会对计算的历史梯度进行累加(通过这个特性能够变相实现一个很大的batch)
        # forward + backward + optimize
        outputs = net(inputs.to(device))                          # 将inputs分配到指定的device中
        loss = loss_function(outputs, labels.to(device))          # 将labels分配到指定的device中
        #outputs = net(inputs)                                    #将图片输入到网络进行正向传播得到输出
        #loss = loss_function(outputs, labels)                    #计算损失,outputs为网络预测值,labels为输入图片对应的真实标签
        loss.backward()                                           #将loss进行反向传播
        optimizer.step()                                          #进行参数更新

        # print statistics
        running_loss += loss.item()                               #计算完loss完之后将其累加到running_loss
        if step % 500 == 499:    # print every 500 mini-batches   #每隔500次打印一次训练的信息
            with torch.no_grad():                                 #with是一个上下文管理器
                outputs = net(val_image.to(device))               # 将test_image分配到指定的device中
                #outputs = net(val_image)  # [batch, 10]
                predict_y = torch.max(outputs, dim=1)[1]          #在维度1上进行最大值的预测,[1]为index索引
                accuracy = (predict_y == val_label.to(device)).sum().item() / val_label.size(0)  # 将test_label分配到指定的device中
                #accuracy = torch.eq(predict_y, val_label).sum().item() / val_label.size(0)      #将预测的标签类别与真实的标签类别进行比较,在相同的地方返回值为1,否则为0,用此计算预测对了多少样本

                print('[%d, %5d] train_loss: %.3f  test_accuracy: %.3f' %
                          (epoch + 1, step + 1, running_loss / 500, accuracy))

                print('%f s' % (time.perf_counter() - time_start))
                running_loss = 0.0

print('Finished Training')

save_path = './Lenet.pth'                                        #保存权重
torch.save(net.state_dict(), save_path)                          #将网络的所有参数及逆行保存
4. predict.py
调用模型权重进行预测
def main():
    transform = transforms.Compose(
        [transforms.Resize((32, 32)),               #首先需resize成跟训练集图像一样的大小
         transforms.ToTensor(),
         transforms.Normalize((0.5, 0.5, 0.5), (0.5, 0.5, 0.5))])

    classes = ('plane', 'car', 'bird', 'cat',
               'deer', 'dog', 'frog', 'horse', 'ship', 'truck')

    net = LeNet()                                    #实例化网络
    net.load_state_dict(torch.load('Lenet.pth'))     #载入保存的权重文件

    im = Image.open('1.jpg')                         #导入要测试的图片
    im = transform(im)  # [C, H, W]
    im = torch.unsqueeze(im, dim=0)  # [N, C, H, W]  #对数据增加一个新维度,因为tensor的参数是[batch, channel, height, width]

    with torch.no_grad():
        outputs = net(im)
        predict = torch.max(outputs, dim=1)[1].numpy()
    print(classes[int(predict)])