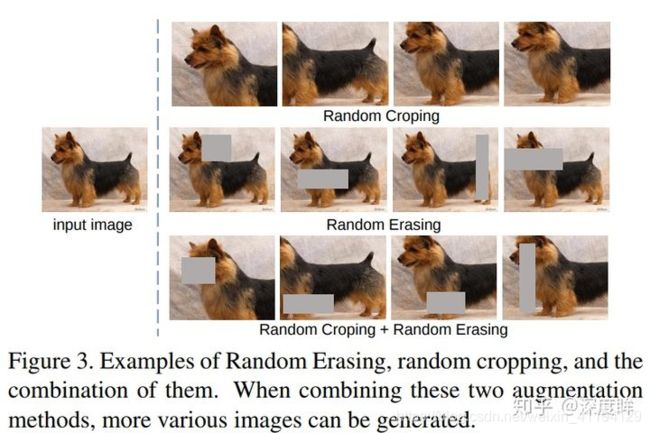
YOLO自带的图像数据增强方法
yolo数据增强code:
V3:
https://github.com/ultralytics/yolov3/blob/master/utils/datasets.py
V4:
https://github.com/klauspa/Yolov4-tensorflow/blob/master/data.py
https://github.com/Tianxiaomo/pytorch-YOLOv4/blob/master/dataset.py
推荐参考文章:https://zhuanlan.zhihu.com/p/139764729

原理:主要参考了CutMix数据增强方式。
CutMix:随机选择一部分区域并且填充训练集中的其他数据的区域像素值,分类标签按一定的比例进行平滑软化(smooth label)
论文地址:https://arxiv.org/abs/1905.04899v2
代码地址:https://github.com/clovaai/CutMix-PyTorch
优点:
1.在训练过程中不会出现非信息像素,从而能够提高训练效率
2.保留了regional dropuot的优势,能够关注目标的non-discriminative parts;
3.通过要求模型从局部视图识别对象,对cut区域中添加其他样本的信息,能够进一步增强模型的定位能力;
4.不会有图像混合后不自然的情形,能够提升模型分类的表现
5.训练和推理代价不变.
参考链接:https://blog.csdn.net/weixin_38145317/article/details/106374555
步骤如下:
从数据集中每次随机读取四张图片
分别对四张图片进行翻转(对原始图片进行左右的翻转)、缩放(对原始图片进行大小的缩放)、色域变化(对原始图片的明亮度、饱和度、色调进行改变)等操作
拼接。操作完成之后然后再将原始图片按照 第一张图片摆放在左上,第二张图片摆放在左下,第三张图片摆放在右下,第四张图片摆放在右上四个方向位置摆好
4、进行图片的组合和框的组合 完成四张图片的摆放之后,我们利用矩阵的方式将四张图片它固定的区域截取下来,然后将它们拼接起来,拼接成一
张新的图片,新的图片上含有框框等一系列的内容
其他方法理解参考:
1、 cutmix:假设有A,B两张图,都是448*448,现随机生成一个box,假设生成(50,60,70,80),50和60分别表示box的左上角左边,70,80分别表示box的右下角。然后在A图上将box对应所在的位置用B图上对应位置进行替代。
如何计算loss:使用的loss是交叉熵,计算lam = box的面积占图片面积的比例=
(70-50)(80-60)/(448*448),loss有两部分,第一部分是没有替代时候的target与模型输出做交叉熵,然后这部分乘以(1-lam),理解为:对所有图片中未被替代的部分做loss乘以未被替代部分占原始图像的比例。第二部分,是被替代的部分的target与模型输出做交叉熵,然后乘以lam,理解为:对所有图片中被替代的部分做loss乘以被替代部分占原始图像的比例。2、 cutout:假设有一张图A,448*448,现随机生成一个box,假设生成(50,60,70,80),50和60分别表示box的左上角左边,70,80分别表示box的右下角。直接将A上将box对应的位置上的图扣掉,也就是将box对应位置上的所有像素值置为0。
如何计算loss:如果理解了cutmix的loss计算原理,就知道这个loss只有cutmix loss 的前一部分。
3、mixup:假设有A,B两张图片,对应的标签为target_a,target_b,随机生成一个lam介于(0,1)之间,这个lam作为融合比例。A,B两张图片像素相加进行融合生成C,C=lam*A+(1-lam)*B,将C输入到网络中,得到输出output,
计算loss =
lam*crossEntropyLoss(output,target_a)+(1-lam)*crossEntropyLoss(output,target_b)。4、 mosaic:假设有A,B,C,D四张图片,对应标签为target_a,target_btarget_c,target_d,都是448448,同时生成一张空白的图片E,shape也为448448,首先将ABCD进行翻转,缩放,色域变换等操作,然后将E分成224224,224224,224224,224224四个部分,将ABCD分别放在E的四个部分,每个部分超出224的部分都裁剪掉。例如假如对A进行了缩放,缩放的结果为345256,那么直接将A裁剪成224224。最后将E送入到网络中得到output
,计算loss: 同上面的计算方法一致。首先计算每个部分占E的比例,在此处的例子中,每个部分都占1/4,所以loss=
1/4(crossEntropyLoss(output,target_a)+crossEntropyLoss(output,target_b)+crossEntropyLoss(output,target_c)+crossEntropyLoss(output,target_d)
)
参考链接:https://blog.csdn.net/qq_40395121/article/details/119345892
对于yolov4来说,数据增强的代码为:
from PIL import Image, ImageDraw
import numpy as np
from matplotlib.colors import rgb_to_hsv, hsv_to_rgb
import math


def rand(a=0, b=1):
    return np.random.rand() * (b - a) + a


def merge_bboxes(bboxes, cutx, cuty):
    merge_bbox = []
    for i in range(len(bboxes)):
        for box in bboxes[i]:
            tmp_box = []
            x1, y1, x2, y2 = box[0], box[1], box[2], box[3]

            if i == 0:
                if y1 > cuty or x1 > cutx:
                    continue
                if y2 >= cuty and y1 <= cuty:
                    y2 = cuty
                    if y2 - y1 < 5:
                        continue
                if x2 >= cutx and x1 <= cutx:
                    x2 = cutx
                    if x2 - x1 < 5:
                        continue
            if i == 1:
                if y2 < cuty or x1 > cutx:
                    continue
                if y2 >= cuty and y1 <= cuty:
                    y1 = cuty
                    if y2 - y1 < 5:
                        continue
                if x2 >= cutx and x1 <= cutx:
                    x2 = cutx
                    if x2 - x1 < 5:
                        continue
            if i == 2:
                if y2 < cuty or x2 < cutx:
                    continue
                if y2 >= cuty and y1 <= cuty:
                    y1 = cuty
                    if y2 - y1 < 5:
                        continue
                if x2 >= cutx and x1 <= cutx:
                    x1 = cutx
                    if x2 - x1 < 5:
                        continue
            if i == 3:
                if y1 > cuty or x2 < cutx:
                    continue
                if y2 >= cuty and y1 <= cuty:
                    y2 = cuty
                    if y2 - y1 < 5:
                        continue
                if x2 >= cutx and x1 <= cutx:
                    x1 = cutx
                    if x2 - x1 < 5:
                        continue
            tmp_box.append(x1)
            tmp_box.append(y1)
            tmp_box.append(x2)
            tmp_box.append(y2)
            tmp_box.append(box[-1])
            merge_bbox.append(tmp_box)
    return merge_bbox


def get_random_data(annotation_line, input_shape, random=True, hue=.1, sat=1.5, val=1.5, proc_img=True):
    '''random preprocessing for real-time data augmentation'''
h, w = input_shape
    min_offset_x = 0.4
    min_offset_y = 0.4
    scale_low = 1 - min(min_offset_x, min_offset_y)
    scale_high = scale_low + 0.2
    image_datas = []
    box_datas = []
    index = 0
    place_x = [0, 0, int(w * min_offset_x), int(w * min_offset_x)]
    place_y = [0, int(h * min_offset_y), int(w * min_offset_y), 0]
    for line in annotation_line:
        # 每一行进行分割
        line_content = line.split()
        # 打开图片
        image = Image.open(line_content[0])
        image = image.convert("RGB")
        # 图片的大小
        iw, ih = image.size
        # 保存框的位置
        box = np.array([np.array(list(map(int, box.split(',')))) for box in line_content[1:]])
        # image.save(str(index)+".jpg")
        # 是否翻转图片
        flip = rand() < .5
        if flip and len(box) > 0:
            image = image.transpose(Image.FLIP_LEFT_RIGHT)
            box[:, [0, 2]] = iw - box[:, [2, 0]]
        # 对输入进来的图片进行缩放
        new_ar = w / h
        scale = rand(scale_low, scale_high)
        if new_ar < 1:
            nh = int(scale * h)
            nw = int(nh * new_ar)
        else:
            nw = int(scale * w)
            nh = int(nw / new_ar)
        image = image.resize((nw, nh), Image.BICUBIC)
        # 进行色域变换
        hue = rand(-hue, hue)
        sat = rand(1, sat) if rand() < .5 else 1 / rand(1, sat)
        val = rand(1, val) if rand() < .5 else 1 / rand(1, val)
        x = rgb_to_hsv(np.array(image) / 255.)
        x[..., 0] += hue
        x[..., 0][x[..., 0] > 1] -= 1
        x[..., 0][x[..., 0] < 0] += 1
        x[..., 1] *= sat
        x[..., 2] *= val
        x[x > 1] = 1
        x[x < 0] = 0
        image = hsv_to_rgb(x)

        image = Image.fromarray((image * 255).astype(np.uint8))
        # 将图片进行放置,分别对应四张分割图片的位置
        dx = place_x[index]
        dy = place_y[index]
        new_image = Image.new('RGB', (w, h), (128, 128, 128))
        new_image.paste(image, (dx, dy))
        image_data = np.array(new_image) / 255
        # Image.fromarray((image_data*255).astype(np.uint8)).save(str(index)+"distort.jpg")
        index = index + 1
        box_data = []
        # 对box进行重新处理
        if len(box) > 0:
            np.random.shuffle(box)
            box[:, [0, 2]] = box[:, [0, 2]] * nw / iw + dx
            box[:, [1, 3]] = box[:, [1, 3]] * nh / ih + dy
            box[:, 0:2][box[:, 0:2] < 0] = 0
            box[:, 2][box[:, 2] > w] = w
            box[:, 3][box[:, 3] > h] = h
            box_w = box[:, 2] - box[:, 0]
            box_h = box[:, 3] - box[:, 1]
            box = box[np.logical_and(box_w > 1, box_h > 1)]
            box_data = np.zeros((len(box), 5))
            box_data[:len(box)] = box

        image_datas.append(image_data)
        box_datas.append(box_data)

        img = Image.fromarray((image_data * 255).astype(np.uint8))
        for j in range(len(box_data)):
            thickness = 3
            left, top, right, bottom = box_data[j][0:4]
            draw = ImageDraw.Draw(img)
            for i in range(thickness):
                draw.rectangle([left + i, top + i, right - i, bottom - i], outline=(255, 255, 255))
        img.show()
    # 将图片分割,放在一起
    cutx = np.random.randint(int(w * min_offset_x), int(w * (1 - min_offset_x)))
    cuty = np.random.randint(int(h * min_offset_y), int(h * (1 - min_offset_y)))

    new_image = np.zeros([h, w, 3])
    new_image[:cuty, :cutx, :] = image_datas[0][:cuty, :cutx, :]
    new_image[cuty:, :cutx, :] = image_datas[1][cuty:, :cutx, :]
    new_image[cuty:, cutx:, :] = image_datas[2][cuty:, cutx:, :]
    new_image[:cuty, cutx:, :] = image_datas[3][:cuty, cutx:, :]
    # 对框进行进一步的处理
    new_boxes = merge_bboxes(box_datas, cutx, cuty)

    return new_image, new_boxes


def normal_(annotation_line, input_shape):
    '''random preprocessing for real-time data augmentation'''
line = annotation_line.split()
    image = Image.open(line[0])
    box = np.array([np.array(list(map(int, box.split(',')))) for box in line[1:]])

    iw, ih = image.size
    image = image.transpose(Image.FLIP_LEFT_RIGHT)
    box[:, [0, 2]] = iw - box[:, [2, 0]]

    return image, box


if __name__ == "__main__":
    with open("2007_train.txt") as f:
        lines = f.readlines()
    a = np.random.randint(0, len(lines))
    # index = 0
    # line_all = lines[a:a+4]
    # for line in line_all:
    #     image_data, box_data = normal_(line,[416,416])
    #     img = image_data
    #     for j in range(len(box_data)):
    #         thickness = 3
    #         left, top, right, bottom  = box_data[j][0:4]
    #         draw = ImageDraw.Draw(img)
    #         for i in range(thickness):
    #             draw.rectangle([left + i, top + i, right - i, bottom - i],outline=(255,255,255))
    #     img.show()
    #     # img.save(str(index)+"box.jpg")
    #     index = index+1
    # 传入四张图片
    # line = lines[a:a + 4]
    line = lines[0:4]
    image_data, box_data = get_random_data(line, [416, 416])
    img = Image.fromarray((image_data * 255).astype(np.uint8))
    for j in range(len(box_data)):
        thickness = 3
        left, top, right, bottom = box_data[j][0:4]
        draw = ImageDraw.Draw(img)
        for i in range(thickness):
            draw.rectangle([left + i, top + i, right - i, bottom - i], outline=(255, 255, 255))
    img.show()
    # img.save("box_all.jpg")
参考文献:
https://blog.csdn.net/weixin_38715903/article/details/103999227?utm_mediu
https://blog.csdn.net/RayChiu757374816/article/details/119563690?utm_medium2
YOLOv4中的数据增强
https://blog.csdn.net/u011984148/article/details/107572526?ops_request_misc
图像数据增强的方法合集
https://zhuanlan.zhihu.com/p/265184712
YOLOV4-Mosaic数据增强详解 (含代码解析)
https://blog.csdn.net/Q1u1NG/article/details/106388904?utm_medium
voc数据集对有标签的数据集数据增强
https://blog.csdn.net/m0_37940759/article/details/115212083
推荐一篇粘贴数据增强方法:
https://arxiv.org/abs/2012.07177v2
https://github.com/conradry/copy-paste-aug