微信小程序学习
此html用于CLY的知识总结
(一)微信开放文档
https://developers.weixin.qq.com/miniprogram/dev/framework/
(二)wx小程序基础函数
2.1 页面加载函数
2.1.1 onLoad:function(){}
第一次打开页面的时候会调用,第二次就不会调用了
onLoad() 应该在第一次显示页面的时候调用,以后再次切换到该页面时,不会再调用这个函数
2.1.2 onShow 页面显示
页面显示,每次打开页面都会调用一次。
2.1.3 onReady 页面初次渲染完成
一个页面只会调用一次,代表页面已经准备妥当,可以和视图层进行交互。
对界面的设置如wx.setNavigationBarTitle请在onReady之后设置。详见生命周期
2.1.4 页面加载函数的区分
- onLoad(Object query) 页面加载时触发。一个页面只会调用一次,可以在 onLoad的参数中获取打开当前页面路径中的参数。
- onShow() 页面显示/切入前台时触发。
- onReady() 页面初次渲染完成时触发。一个页面只会调用一次,代表页面已经准备妥当,可以和视图层进行交互。
所以加载顺序是先加载onLoad,再是onShow,最后onReady
2.1.5 onHide: 页面隐藏
当navigateTo或底部tab切换时调用。
2.1.6 onUnload: 页面卸载
当redirectTo或navigateBack的时候调用
2.2 wx.request 向后台请求数据
wx.request({
      url: myUrl+'/ServletAction?action=get_device_record',
      data:{  //向后台传输的数据
      id:myId;
      name:myName;
		},
      header:{"content-type":"applicaiton/x-www-form-urlencoded","x-requested-with":"XMLHttpRequest"},
      success(res){ //res是返回的结果,res.data是结果中的数据
        that.setData({ //前面要设置that=this; 原因见this详解
     	 todoList:res.data.aaData,
    })
      },
      fail(res){
        console.log(fail);
      }
    })
2.2.3 res返回数据详解
我们打印一个普通后台返回的res数据:
2.2.4 onLoad方法中的options传值
小程序页面加载的时候,可以通过options获取到上一个页面标签的属性以及属性值
例子:
在查询页面中放入:
- 要转化成string格式
JSON.stringify - 使用wx.navigateTo
 var record=JSON.stringify({"id":id,"device_name":deviceName,"device_id":deviceId})
  wx.navigateTo({
    url: "../modify/modify?record=" + record,
  })
在修改页面中获得属性值:
注意!要将options.record用JSON.parse()转化成JSON数据格式
  onLoad: function (options) {
    console.log(options.record);
    var record=JSON.parse(options.record);
    this.setData({
      id:record.id,
      deviceName:record.device_name,
      deviceId:record.device_id,
    });
  },
2.2.5 page的data在各个函数中的更新
每个js页面都有全局data:
Page({
  data: {
    todoList:[],
    deviceId:'',
    deviceName:'',
    id:'',
  },
)}
在自己定义的函数中想要更新data数据。必须调用this.setData来完成数据的更新:
 this.setData({
      id:record.id,
      deviceName:record.device_name,
      deviceId:record.device_id,
    });
this.setData({
todoList:res.data.aaData,
})
2.3 wx.uploadFile 上传图片
2.3.1 代码示例
wx.uploadFile({
          filePath: res.tempFilePath[0],
          name: 'img',
          url: myUrl+'/ServletAction?action=upload_record',
          header:{"content-type":"applicaiton/x-www-form-urlencoded","x-requested-with":"XMLHttpRequest"},
          success(res){
            //后端存储图片后 返回attachment_id
            console.log(JSON.parse(res.data));
            _this.data.uploadAttachmentId.push(data.attachment_id);
            console.log(_this.data.uploadAttachmentId); //将attachmeng_id存入全局变量
          },
          fail(res){
            console.log(JSON.stringify(res));
          }
        })
- uploadfile 返回的数据格式
 success(res){
         //在这个地方 uploadfile返回的数据不是JSON格式的,需要用JSON.parse(res.data)转换格式
            console.log(JSON.parse(res.data));
            _this.data.uploadAttachmentId.push(data.attachment_id);
            console.log(_this.data.uploadAttachmentId); //将attachmeng_id存入全局变量
          },
2.3.1
(三)微信小程序中的event事件
3.1 什么是事件?
参考链接:https://www.cnblogs.com/nosqlcoco/p/5954453.html
- 事件是视图层到逻辑层的通讯方式。
- 事件可以将用户的行为反馈到逻辑层进行处理。
- 事件可以绑定在组件上,当达到触发事件,就会执行逻辑层中对应的事件处理函数。
- 事件对象可以携带额外信息,如id, dataset, touches。
3.2 事件分类
- touchstart 手指触摸
- touchmove 手指触摸后移动
- touchcancel 手指触摸动作被打断,如弹窗和来电提醒
- touchend 手指触摸动作结束
- tap 手指触摸后离开
- longtap 手指触摸后后,超过350ms离开
…
[剩余部分请参考原链接,作者暂不允许转载]
3.3 详细例子
在”请点击我“文本上创建一个点击事件【bindtap=“send_mes”】
绑定data-id=“2”
<text bindtap="send_mes" data-id="2">请点击我text>
新建一个函数send_mes,并给这个函数传递一个参数event,同时将event这个对象在控制台打印出来,代码如下:
send_mes:function(event){ //也可以写成:send_mes:function(e)

var myId=event.currentTarget.dataset.id;

console.log(event);
console.log(JSON.stringify(event)); //这两个好像有区别 我忘记尝试了
console.log(myId); //这里会输出  2

}
type:表示时间的类型
currentTarget表示事件附带的内容
detail:表示点击事件发生的坐标,格式:(x,y)

另一个例子:
wxml:
<text bindtap="onModifyRecord" data-itemid="{{item.id}}"
						data-itemdevicename="{{item.device_name}}"
						data-itemdeviceid="{{item.device_id}}">修改</text>
js:
  var id=e.currentTarget.dataset.itemid;
  var deviceName=e.currentTarget.dataset.itemdevicename;
  var deviceId=e.currentTarget.dataset.itemdeviceid;
(三)容易出错的地方
3.1 globalData全局变量的设置
在app.js中设置全局服务器Url:
  globalData: {
    userInfo: null,
    serverUrl:"https://127.0.0.1"
  }
在query.js开头引用全局serverUrl:
var app = getApp();
var myUrl = app.globalData.serverUrl;
3.2 JSON和JS对象
参考教程 https://www.runoob.com/js/js-json.html
1)JS对象 和 JSON (本质:格式字符串)
//js对象
var obj = {a: 'Hello', b: 'World'}; //这是一个js对象,注意js对象的键名也是可以使用引号包裹的,这里的键名就不用引号包含

//json字符串
var json = '{"a": "Hello", "b": "World"}'; //这是一个 JSON 字符串,本质是一个字符串
2)相关转换函数 JSON.parse() | JSON.stringify
- JSON.parse() —— 用于将一个 JSON 字符串转换为 JavaScript 对象
- JSON.stringify() —— 用于将 JavaScript 值转换为 (JSON) 字符串
实现从JSON字符串转换为JS对象,使用 JSON.parse() 方法:
var obj = JSON.parse('{"a": "Hello", "b": "World"}'); //结果是 {a: 'Hello', b: 'World'} 一个对象
实现从JS对象转换为JSON字符串,使用 JSON.stringify() 方法:
var json = JSON.stringify({a: 'Hello', b: 'World'}); //结果是 '{"a": "Hello", "b": "World"}' 一个JSON格式的字符串
3)什么时候使用?
通常我们从服务器中读取 JSON 数据,然后用json.parse()将JSON转化为js对象,并在网页中显示数据。
简单起见,我们网页中直接设置 JSON 字符串 (你还可以阅读我们的 JSON 教程):
首先,创建 JavaScript 字符串,字符串为 JSON 格式的数据:
var text = '{ "sites" : [' +
'{ "name":"Runoob" , "url":"www.runoob.com" },' +
'{ "name":"Google" , "url":"www.google.com" },' +
'{ "name":"Taobao" , "url":"www.taobao.com" } ]}';
然后,使用 JavaScript 内置函数 JSON.parse() 将字符串转换为 JavaScript 对象:
var obj = JSON.parse(text);
最后,在你的页面中使用新的 JavaScript 对象:
实例
var text = '{ "sites" : [' +
    '{ "name":"Runoob" , "url":"www.runoob.com" },' +
    '{ "name":"Google" , "url":"www.google.com" },' +
    '{ "name":"Taobao" , "url":"www.taobao.com" } ]}';

obj = JSON.parse(text);
document.getElementById("demo").innerHTML = obj.sites[1].name + " " + obj.sites[1].url;
3.4 ajax示例应用
3.3 this关键字使用
1)Javascript 中的 this关键词详解
https://www.w3school.com.cn/js/js_this.asp
关键在于:
JavaScript this 关键词指的是它所属的对象。
它拥有不同的值,具体取决于它的使用位置:
- 在方法中,this 指的是所有者对象。
- 单独的情况下,this 指的是全局对象。
- 在函数中,this 指的是全局对象。
- 在函数中,严格模式下,this 是 undefined。[请看第二点wx小程序中的this]
- 在事件中,this 指的是接收事件的元素。
- 像 call() 和 apply() 这样的方法可以将 this 引用到任何对象。
谁调用这个函数或方法,this关键字就指向谁
2) wx小程序中的this : 指向全局对象 ?是undefined来着
参考链接(1)https://blog.csdn.net/u012717715/article/details/90667758
参考链接(2)
https://blog.csdn.net/qq_33956478/article/details/81348453
函数没有所属对象:指向全局对象
var myObject = {value: 100};
myObject.getValue = function () {
  var foo = function () {
    console.log(this.value) // => undefined
    console.log(this);// 输出全局对象 global
  };

  foo();

  return this.value;
};
console.log(myObject.getValue()); // => 100
在上述代码块中,foo 函数虽然定义在 getValue 的函数体内,但实际上它既不属于 getValue 也不属于 myObject。foo 并没有被绑定在任何对象上,所以当调用时,它的 this 指针指向了全局对象 global。
据说这是个设计错误。
3) wx中正确的 使用this修改data数据
在微信小程序中我们一般通过以下方式来修改data中的数据
doCalc:function(){
    wx.request({
      url: url,
      method:'POST',
      header: {
        'content-type': 'application/json' // 默认值
      },
      success: function (res) {
        if (res.data.code == 0){
          this.setData({ //这里试图使用全局变量进行修改
          //结果:`this.setData is not a function`
            maxCount: res.data.maxCount
          });
        }
      }
    })
  }
这是因为this作用域指向问题 ,success函数实际是一个闭包 , 无法直接通过this来setData
那么需要怎么修改呢?
方法1:赋给一个新的对象
我们通过将当前对象赋给一个新的对象
var that = this;
然后使用that 来setData就行了
doCalc:function(){
    var that = this;
    wx.request({
      url: url,
      method:'POST',
      header: {
        'content-type': 'application/json' // 默认值
      },
      success: function (res) {
        if (res.data.code == 0){
          that.setData({
            maxCount: res.data.maxCount
          });
        }
      }
    })
  }
方法2:使用箭头函数
箭头函数语法:
- 之前:
hello = function() {
  return "Hello World!";
}
- 用了箭头函数之后:
hello = () => {
  return "Hello World!";
}
另外说一下 , 在es6中 , 使用箭头函数是不存在这个问题的
例如 :
setTimeout( () => {
            console.log(this.type + ' says ' + say)
        }, 1000)
当我们使用箭头函数时,函数体内的this对象,就是定义时所在的对象,而不是使用时所在的对象。
并不是因为箭头函数内部有绑定this的机制,实际原因是箭头函数根本没有自己的this,它的this是继承外面的,因此内部的this就是外层代码块的this。
箭头函数里面根本没有自己的this,而是引用外层的this。
  /**
   * 页面的初始数据
   */
  data: {
    imageSrc: '',
  },

  /**
   * 图片选择事件
   */
  chooseImage: function() {
    // var self = this;    // 这里不用复制
    wx.chooseImage({
      count: 1, // 默认9
      sizeType: ['original', 'compressed'], // 可以指定是原图还是压缩图,默认二者都有
      sourceType: ['album', 'camera'],      // 可以指定来源是相册还是相机,默认二者都有
      success: res => {
        // 返回选定照片的本地文件路径列表,tempFilePath可以作为img标签的src属性显示图片
        var tempFilePaths = res.tempFilePaths;
        console.log(res.tempFilePaths);
        this.setData({
          imageSrc: res.tempFilePaths[0],
        })
      },
    });
  },
(四)IDEA部署wx - java后端
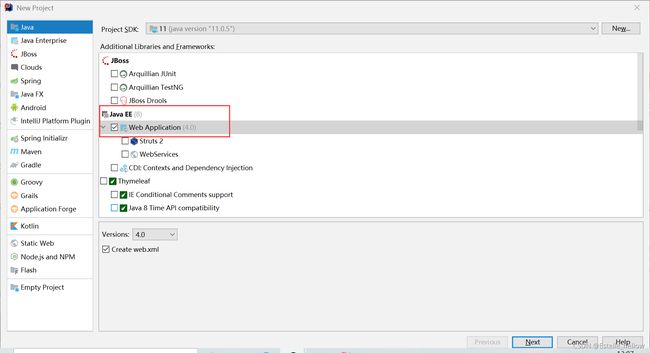
4.1 创建项目
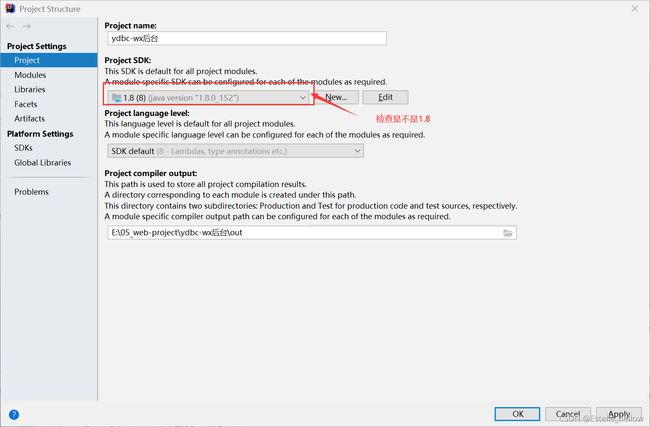
4.2 配置SDK tomcat服务器…
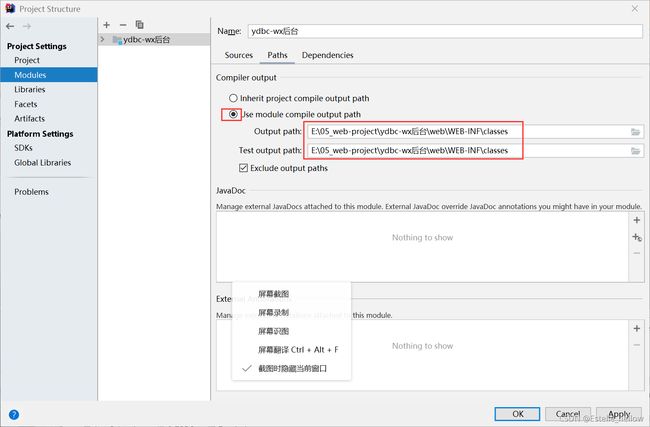
- 更改这个path路径:
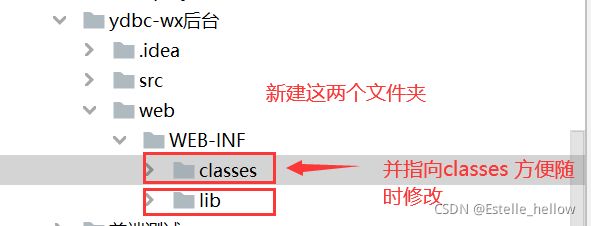
- 没有classes和lib就新建
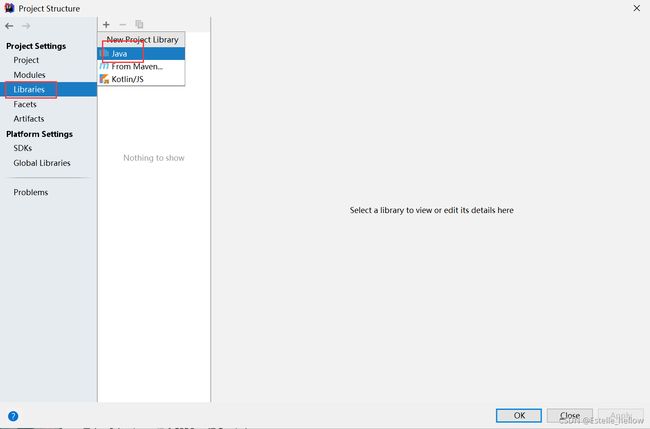
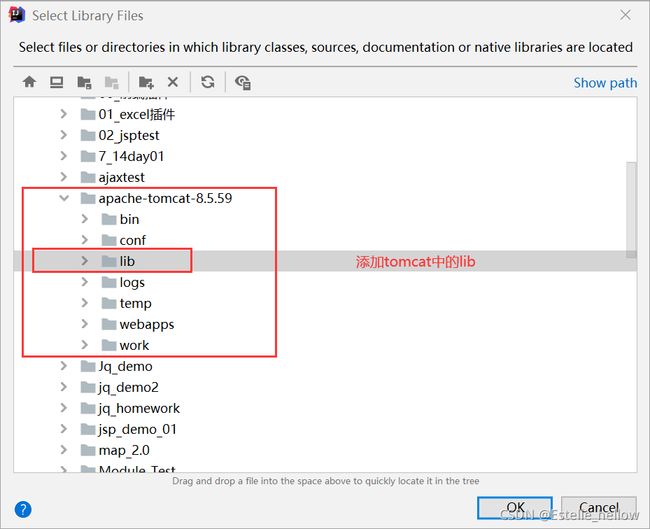
- 添加tomcat的lib进去:
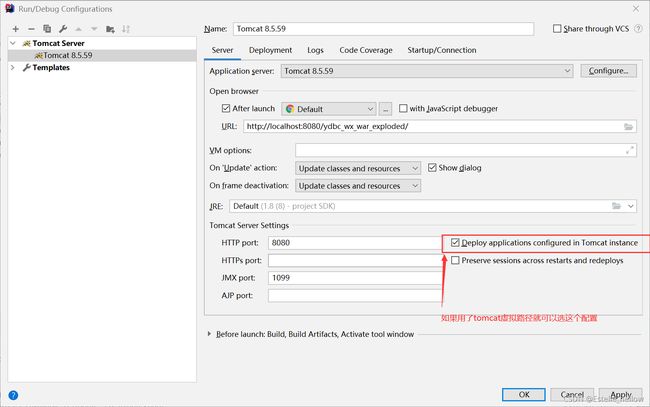
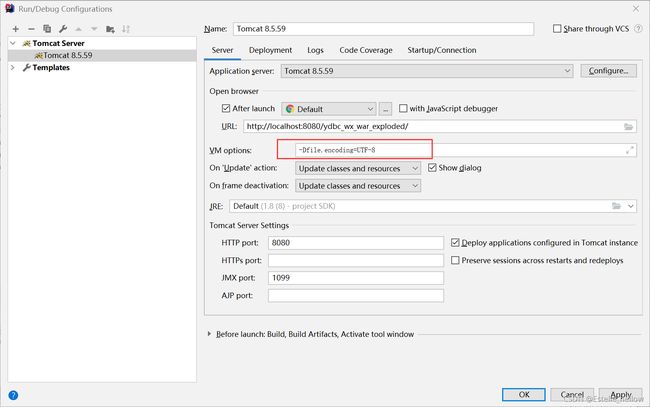
- 配置tomcat服务器
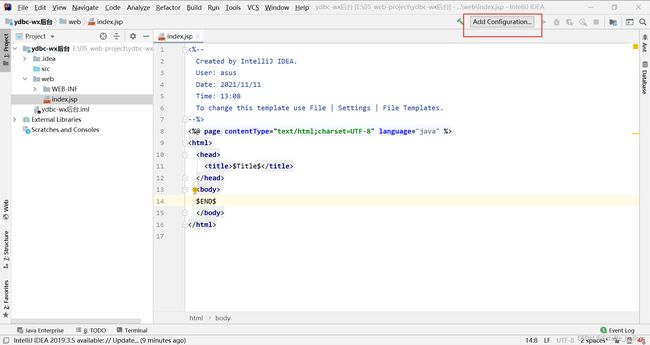
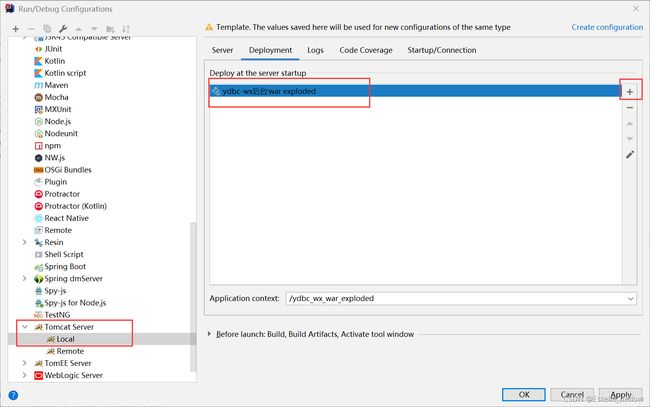
- 点击+增加tomcat-local template
- 然后在deployment中添加
- 前面的几个也改一下
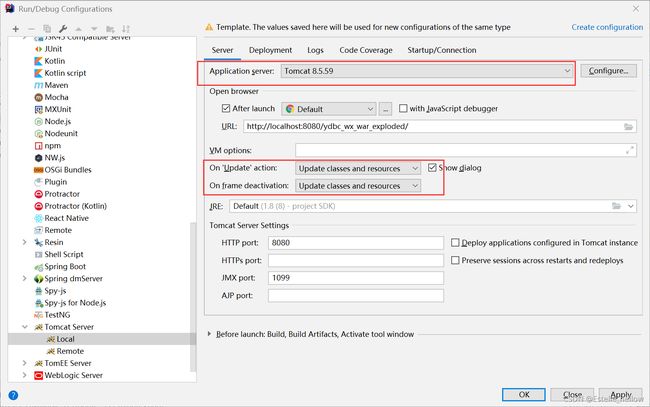
- 虚拟路径选项
