自制数据集 数据增强
在用数据集进行测试的时候,不光是已经配置好的数据集,下面讲一下自己的数据集该怎么生成训练数据集。
1.观察数据集结构,配成特征标签对
上面文件夹存放的是数据集的图片,其中训练集60000张,测试集10000张,txt文件存放的是对应图片的标签
2.在代码中写上这四个文件的路径,以及s生成的npy数据集的路径
train_path = 'G:\Desktop\mooc\class4\MNIST_FC\mnist_image_label\mnist_train_jpg_60000/'
train_txt = 'G:\Desktop\mooc\class4\MNIST_FC\mnist_image_label\mnist_train_jpg_60000.txt'
x_train_savepath = 'G:\Desktop\mooc\class4\MNIST_FC\mnist_image_label\mnist_x_train.npy'
y_train_savepath = 'G:\Desktop\mooc\class4\MNIST_FC\mnist_image_label\mnist_y_train.npy'

test_path = 'G:\Desktop\mooc\class4\MNIST_FC\mnist_image_label\mnist_test_jpg_10000/'
test_txt = 'G:\Desktop\mooc\class4\MNIST_FC\mnist_image_label\mnist_test_jpg_10000.txt'
x_test_savepath = 'G:\Desktop\mooc\class4\MNIST_FC\mnist_image_label\mnist_x_test.npy'
y_test_savepath = 'G:\Desktop\mooc\class4\MNIST_FC\mnist_image_label\mnist_y_test.npy'
3.创建generateds函数,来生成数据集
·先逐行读入txt文件中的标签文本
·用空格分隔图片名称和标签,拼接路径
·将图片变为8位宽灰度值的np.array格式,在这里也就是用0~255表示的灰度值(数据归一化0~1之间灰度值),将每个图片变为矩阵格式28*28的矩阵
·x矩阵记录了60000个图片灰度值矩阵格式三维矩阵
·y_矩阵记录了对应的标签
·最后返回生成的数据集x,y_
def generateds(path, txt):
    f = open(txt, 'r')  # 以只读形式打开txt文件
    contents = f.readlines()  # 读取文件中所有行
    f.close()  # 关闭txt文件
    x, y_ = [], []  # 建立空列表
    for content in contents:  # 逐行取出
        value = content.split()  # 以空格分开,图片路径为value[0] , 标签为value[1] , 存入列表
        img_path = path + value[0]  # 拼出图片路径和文件名
        img = Image.open(img_path)  # 读入图片
        img = np.array(img.convert('L'))  # 图片变为8位宽灰度值的np.array格式
        # print("img")
        # print(img)
        img = img / 255.  # 数据归一化 (实现预处理)
        x.append(img)  # 归一化后的数据,贴到列表x
        y_.append(value[1])  # 标签贴到列表y_
        print('loading : ' + content)  # 打印状态提示

    x = np.array(x)  # 变为np.array格式
    # print(x)#中包含了60000个二维数组
    y_ = np.array(y_)  # 变为np.array格式
    # print(y_)
    y_ = y_.astype(np.int64)  # 变为64位整型
    return x, y_  # 返回输入特征x,返回标签y_
4.判断数据集是否生成
如果已经生成了数据集,就之家加载,如果没有生成,先生成数据集再拿去数据。
# os.path.exists判断括号中的文件是否存在,
if os.path.exists(x_train_savepath) and os.path.exists(y_train_savepath) and os.path.exists(
        x_test_savepath) and os.path.exists(y_test_savepath):
    print('-------------Load Datasets-----------------')
    x_train_save = np.load(x_train_savepath)
    y_train = np.load(y_train_savepath)
    x_test_save = np.load(x_test_savepath)
    y_test = np.load(y_test_savepath)
    x_train = np.reshape(x_train_save, (len(x_train_save), 28, 28))
    print("x_train")
    print(x_train)
    x_test = np.reshape(x_test_save, (len(x_test_save), 28, 28))
else:
    print('-------------Generate Datasets-----------------')
    x_train, y_train = generateds(train_path, train_txt)
    x_test, y_test = generateds(test_path, test_txt)

    print('-------------Save Datasets-----------------')
    x_train_save = np.reshape(x_train, (len(x_train), -1))
    x_test_save = np.reshape(x_test, (len(x_test), -1))
    np.save(x_train_savepath, x_train_save)
    np.save(y_train_savepath, y_train)
    np.save(x_test_savepath, x_test_save)
    np.save(y_test_savepath, y_test)
print("--------------------Generate Data sets------------------")
x_train,y_train = generateds(train_path,train_txt)
x_test,y_test = generateds(test_path,test_txt)
5.神经网络中训练测试
model = tf.keras.models.Sequential([
    tf.keras.layers.Flatten(),
    tf.keras.layers.Dense(128, activation='relu'),
    tf.keras.layers.Dense(10, activation='softmax')
])

model.compile(optimizer='adam',
              loss=tf.keras.losses.SparseCategoricalCrossentropy(from_logits=False),
              metrics=['sparse_categorical_accuracy'])

model.fit(x_train, y_train, batch_size=32, epochs=5, validation_data=(x_test, y_test), validation_freq=1)
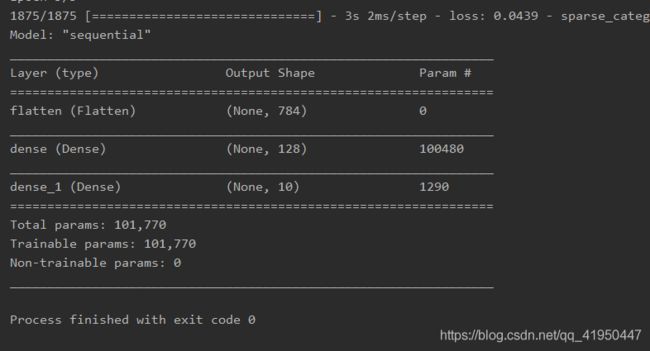
model.summary()数据增强
很多实际的项目,我们都难以有充足的数据来完成任务,要保证完美的完成任务,有两件事情需要做好:(1)寻找更多的数据。(2)充分利用已有的数据进行数据增强
数据增强也叫数据扩增,意思是在不实质性的增加数据的情况下,让有限的数据产生等价于更多数据的价值。使数据又更好的泛化能力。
import tensorflow as tf
from tensorflow.keras.preprocessing.image import ImageDataGenerator

mnist = tf.keras.datasets.mnist
(x_train, y_train), (x_test, y_test) = mnist.load_data()
x_train, x_test = x_train / 255.0, x_test / 255.0
x_train = x_train.reshape(x_train.shape[0], 28, 28, 1)  # 给数据增加一个维度,从(60000, 28, 28)reshape为(60000, 28, 28, 1)

image_gen_train = ImageDataGenerator(
    rescale=1. / 1.,  # 如为图像,分母为255时,可归至0~1
    rotation_range=45,  # 随机45度旋转
    width_shift_range=.15,  # 宽度偏移
    height_shift_range=.15,  # 高度偏移
    horizontal_flip=False,  # 水平翻转
    zoom_range=0.5  # 将图像随机缩放阈量50%
)
image_gen_train.fit(x_train)

model = tf.keras.models.Sequential([
    tf.keras.layers.Flatten(),
    tf.keras.layers.Dense(128, activation='relu'),
    tf.keras.layers.Dense(10, activation='softmax')
])

model.compile(optimizer='adam',
              loss=tf.keras.losses.SparseCategoricalCrossentropy(from_logits=False),
              metrics=['sparse_categorical_accuracy'])

model.fit(image_gen_train.flow(x_train, y_train, batch_size=32), epochs=5, validation_data=(x_test, y_test),
          validation_freq=1)
model.summary()
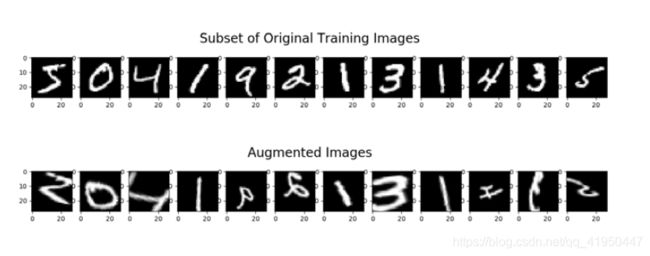
可视化数据增强
#
# 数据增强可视化
#
import tensorflow as tf
from tensorflow.keras.preprocessing.image import ImageDataGenerator
import matplotlib.pyplot as plt
import numpy as np

mnist = tf.keras.datasets.mnist
(x_train, y_train), (x_test, y_test) = mnist.load_data()
x_train = x_train.reshape(x_train.shape[0], 28, 28, 1)  # 给数据增加一个维度,从(60000, 28, 28)reshape为(60000, 28, 28, 1)
# ImageDataGenerator()是keras.preprocessing.image模块中的图片生成器,可以每一次给模型“喂”一个batch_size大小的样本数据,同时也可以在每一个批次中对这batch_size个样本数据进行增强,扩充数据集大小,增强模型的泛化能力。比如进行旋转,变形,归一化等等。
image_gen_train = ImageDataGenerator(
    rescale=1. / 1.,  # 如为图像,分母为255时,可归至0~1
    rotation_range=45,  # 随机45度旋转
    width_shift_range=.15,  # 宽度偏移
    height_shift_range=.15,  # 高度偏移
    horizontal_flip=False,  # 水平翻转
    zoom_range=0.5  # 将图像随机缩放阈量50%
)
# 将数据生成器用于某些样本数据数据。它基于一组样本数据,计算与数据转换相关的内部数据统计
image_gen_train.fit(x_train)#这里的fit需要输入4维数据

print(x_train.shape) # (60000, 28, 28, 1)
# 去除数据中的一维
x_train_subset1=np.squeeze(x_train[:12])
print(x_train_subset1.shape)# (12, 28, 28)
x_train_subset2 = x_train[:12]  # 一次显示12张图片
print("xtrain_subset2",x_train_subset2.shape)

fig=plt.figure(figsize=(10,10))
plt.set_cmap('gray')

# 显示原始数据
for i in range(len(x_train_subset1)):
    #表示就是这个画布分为1行12列,i+1是图片的在这12个画布中的位置
    ax = fig.add_subplot(3,4,i+1)
    plt.imshow(x_train_subset1[i])
fig.suptitle('Subset of Original Training Images', fontsize=20)
plt.show()

# 显示增强后的图片
fig = plt.figure(figsize=(10,10))
# 显示增强后的图片

# flow采集数据和标签数组,生成批量增强数据。shuffle: 布尔值 (默认为 True)。
for x_batch in image_gen_train.flow(x_train_subset2, batch_size=12, shuffle=False):
    for i in range(0, 12):
        ax = fig.add_subplot(3, 4, i + 1)
        ax.imshow(np.squeeze(x_batch[i]))
    fig.suptitle('Augmented Images', fontsize=20)
    plt.show()
    break;
数据增强后的图片形状,发生变化


