《白话机器学习的数学》线性不可分分类的实现代码理解
-
-(theta[0] + theta[1] * x1 + theta[3] * x1 ** 2) / theta[2]
理解代码的时候有点好奇为什么每个直线或者曲线的分母都是 theta[2] 。故将公式对比起来分析分析。
![]()
![]()
![]()
可以看到,每个结果的直线或曲线都是 x2 分母自然也是 θ2 。所以 x2 是我们设定的求解过程的未知量 ,也是分类决策边界的结果。
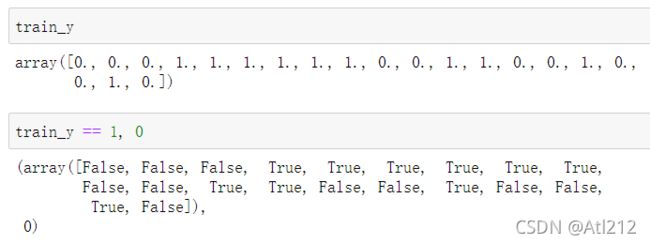
- 开始不知道这 plot() 函数 x y 的位置写了什么东西。输出了各个参数后才明白是什么意思。
plt.plot(train_z[train_y == 1, 0], train_z[train_y == 1, 1], 'o')
plt.plot(train_z[train_y == 0, 0], train_z[train_y == 0, 1], 'x')
可以看到,train_y 是标签 1 或 0 的数组 。令 train_y == 1 判断可以得到 True 和 False 判断结果的数组。结合右边的 0 是列。故 train_y == 1, 0 放入 train_z 可以得到标签是 1 列为 0 的坐标 x。同理,右边的 train_z[train_y == 1, 1] 也是标签为 1 列为 1 即坐标 y 。
另一行按同样思路分析即可。
-
# 分类函数
def classify(x):
    return (f(x) >= 0.5).astype(np.int)

for _ in range(epoch):
    theta = theta - ETA * np.dot(f(X) - train_y, X)

    # 计算现在的精度
    result = classify(X)  == train_y
    accuracy = len(result[result == True]) / len(result)
    accuracies.append(accuracy)
classify(X) == train_y。 分类函数返回X概率大于或小于0.5的 0 或 1 值,与 train_y 的标签进行判断,将判断结果记录在 result 。
![]()
accuracy。 分子是正确归类的个数,分母是总个数,相比计算精度。
最后将本次循环精度记录在 accuracies 数组里。
# 实现代码
import numpy as np
import matplotlib.pyplot as plt

# 读入训练数据
train = np.loadtxt('data3.csv', delimiter=',', skiprows=1)
train_x = train[:,0:2]
train_y = train[:,2]

# 参数初始化
theta = np.random.rand(4)

# 标准化
mu = train_x.mean(axis=0)
sigma = train_x.std(axis=0)
def standardize(x):
    return (x - mu) / sigma

train_z = standardize(train_x)

# 增加 x0 和 x3
def to_matrix(x):
    x0 = np.ones([x.shape[0], 1])
    x3 = x[:,0,np.newaxis] ** 2
    return np.hstack([x0, x, x3])

X = to_matrix(train_z)

# sigmoid 函数
def f(x):
    return 1 / (1 + np.exp(-np.dot(x, theta)))

# 分类函数
def classify(x):
    return (f(x) >= 0.5).astype(np.int)

# 学习率
ETA = 1e-3

# 重复次数
epoch = 5000

# 更新次数
count = 0

# 重复学习
for _ in range(epoch):
    theta = theta - ETA * np.dot(f(X) - train_y, X)

    # 日志输出
    count += 1
    print('第 {} 次 : theta = {}'.format(count, theta))

# 绘图确认
x1 = np.linspace(-2, 2, 100)
x2 = -(theta[0] + theta[1] * x1 + theta[3] * x1 ** 2) / theta[2]
plt.plot(train_z[train_y == 1, 0], train_z[train_y == 1, 1], 'o')
plt.plot(train_z[train_y == 0, 0], train_z[train_y == 0, 1], 'x')
plt.plot(x1, x2, linestyle='dashed')
plt.show()

# 参数初始化
theta = np.random.rand(4)

# 精度的历史记录
accuracies = []

# 重复学习
for _ in range(epoch):
    theta = theta - ETA * np.dot(f(X) - train_y, X)

    # 计算现在的精度
    result = classify(X)  == train_y
    accuracy = len(result[result == True]) / len(result)
    accuracies.append(accuracy)

#将精度画成图
x= np.arange(len(accuracies))

plt.plot(x,accuracies)
plt.show()
