从头开始opencv(二)——core:Mat
从头开始opencv(二)——core:Mat
- Mat - The Basic Image Container
-
- Goal
- Mat
- Storing methods
- Load and Display an Image
- Load, Modify, and Save an Image
- Creating a Mat object explicitly
参考资料
Mat - The Basic Image Container

Goal
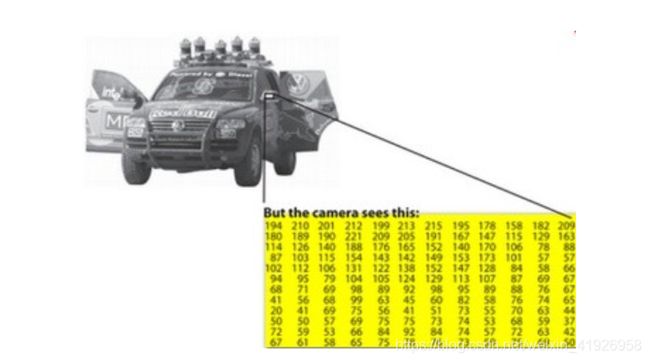
图像在计算机中是以像素点阵的形式进行存储的。
Mat
OpenCV has been around since 2001. In those days the library was built around a C interface and to store the image in the memory they used a C structure called IplImage. This is the one you'll see in most of the older tutorials and educational materials. The problem with this is that it brings to the table all the minuses of the C language. The biggest issue is the manual memory management. It builds on the assumption that the user is responsible for taking care of memory allocation and deallocation. While this is not a problem with smaller programs, once your code base grows it will be more of a struggle to handle all this rather than focusing on solving your development goal.
OpenCV库在早先是围绕C接口构建的,为了将图像存储在内存中,使用了称为IplImage的C结构(这种做法保留了C的所有缺点)。
最大的问题是manual memory management.(用户需要负责所有的内存分配和释放.)这种手动的方式非常低效且容易出奇怪的问题,在设计时,更应该关注如何实现需求而不是纠结于细枝末节不是吗。
Luckily C++ came around and introduced the concept of classes making easier for the user through automatic memory management (more or less). The good news is that C++ is fully compatible with C so no compatibility issues can arise from making the change. Therefore, OpenCV 2.0 introduced a new C++ interface which offered a new way of doing things which means you do not need to fiddle with memory management, making your code concise (less to write, to achieve more). The main downside of the C++ interface is that many embedded development systems at the moment support only C. Therefore, unless you are targeting embedded platforms, there's no point to using the old methods (unless you're a masochist programmer and you're asking for trouble).
C++带着class的概念出现了,从此就可以实现automatic memory management,大大简化了用户的操作,同时C++完全兼容C,所以并不会出现兼容上的问题(真是一个好消息),由此省去了大量分配内存的麻烦工作。
The first thing you need to know about Mat is that you no longer need to manually allocate its memory and release it as soon as you do not need it. While doing this is still a possibility, most of the OpenCV functions will allocate its output data automatically. As a nice bonus if you pass on an already existing Mat object, which has already allocated the required space for the matrix, this will be reused. In other words we use at all times only as much memory as we need to perform the task.
此段近似于废话,吹嘘了一通Mat的好处,和前文几乎没有区别。
Mat is basically a class with two data parts: the matrix header (containing information such as the size of the matrix, the method used for storing, at which address is the matrix stored, and so on) and a pointer to the matrix containing the pixel values (taking any dimensionality depending on the method chosen for storing) . The matrix header size is constant, however the size of the matrix itself may vary from image to image and usually is larger by orders of magnitude.
Mat由两部分组成:Mat头(包含有mat大小、存储方式、存储地址等信息)和指向存储数据的地址块的指针。
OpenCV is an image processing library. It contains a large collection of image processing functions. To solve a computational challenge, most of the time you will end up using multiple functions of the library. Because of this, passing images to functions is a common practice. We should not forget that we are talking about image processing algorithms, which tend to be quite computational heavy. The last thing we want to do is further decrease the speed of your program by making unnecessary copies of potentially large images.
核心思想:我们需要思考的是算法,而这往往会使得计算非常的繁杂。同时,copy操作也会浪费大量的计算资源。
To tackle this issue OpenCV uses a reference counting system. The idea is that each Mat object has its own header, however the matrix may be shared between two instance of them by having their matrix pointers point to the same address. Moreover, the copy operators will only copy the headers and the pointer to the large matrix, not the data itself.
openCV使用reference counting system。也就是说,两个Mat共享一块地址的数据,copy并不是copy数据,而是copy了Mat的文件头和地址。
Mat A, C;                          // creates just the header parts
A = imread(argv[1], IMREAD_COLOR); // here we'll know the method used (allocate matrix)
Mat B(A);                                 // Use the copy constructor
C = A;                                    // Assignment operator
All the above objects, in the end, point to the same single data matrix. Their headers are different, however, and making a modification using any of them will affect all the other ones as well. In practice the different objects just provide different access method to the same underlying data. Nevertheless, their header parts are different. The real interesting part is that you can create headers which refer to only a subsection of the full data. For example, to create a region of interest (ROI) in an image you just create a new header with the new boundaries:
A,B,C所访问的区域是同一块区域【类比于多媒体数据库概念中的视图和基本表,我们可以将真正的数据当成基本表,而A,B,C就可以看成是可引用基本表的视图部分,可以引用数据中的某一部分,如下面的例子所示】
Mat D (A, Rect(10, 10, 100, 100) ); // using a rectangle
Mat E = A(Range::all(), Range(1,3)); // using row and column boundaries
Now you may ask if the matrix itself may belong to multiple Mat objects who takes responsibility for cleaning it up when it's no longer needed. The short answer is: the last object that used it. This is handled by using a reference counting mechanism. Whenever somebody copies a header of a Mat object, a counter is increased for the matrix. Whenever a header is cleaned this counter is decreased. When the counter reaches zero the matrix too is freed. Sometimes you will want to copy the matrix itself too, so OpenCV provides the cv::Mat::clone() and cv::Mat::copyTo() functions.
当想要复制matrix本身时,openCV提供了cv::Mat::clone()和cv::Mat::copyTo()两个函数。
Mat F = A.clone();
Mat G;
A.copyTo(G);
Now modifying F or G will not affect the matrix pointed by the Mat header.
此时修改F或G不会影响A所指向的矩阵,也就是实现了matrix中数据的复制。
【注意事项】

Storing methods
This is about how you store the pixel values. You can select the color space and the data type used. The color space refers to how we combine color components in order to code a given color. The simplest one is the gray scale where the colors at our disposal are black and white. The combination of these allows us to create many shades of gray.
关于如何存储图像的像素值,最常用的是灰度图。
For colorful ways we have a lot more methods to choose from. Each of them breaks it down to three or four basic components and we can use the combination of these to create the others. The most popular one is RGB, mainly because this is also how our eye builds up colors. Its base colors are red, green and blue. To code the transparency of a color sometimes a fourth element: alpha (A) is added.
此段话是基本的图像像素存储形式:三通道RGB或者四通道(加了alpha通道)
There are, however, many other color systems each with their own advantages:

【注意事项】 openCV使用BGR颜色空间。
Each of the building components has their own valid domains. This leads to the data type used. How we store a component defines the control we have over its domain. The smallest data type possible is char, which means one byte or 8 bits. This may be unsigned (so can store values from 0 to 255) or signed (values from -127 to +127). Although in case of three components this already gives 16 million possible colors to represent (like in case of RGB) we may acquire an even finer control by using the float (4 byte = 32 bit) or double (8 byte = 64 bit) data types for each component. Nevertheless, remember that increasing the size of a component also increases the size of the whole picture in the memory.
component的类型不是固定的,可以自定义,比如说定义成char类型或float类型。
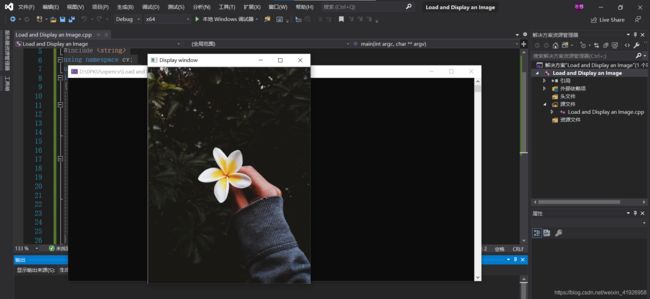
Load and Display an Image
参考链接
#include 结果:
Load, Modify, and Save an Image
参考链接
#include 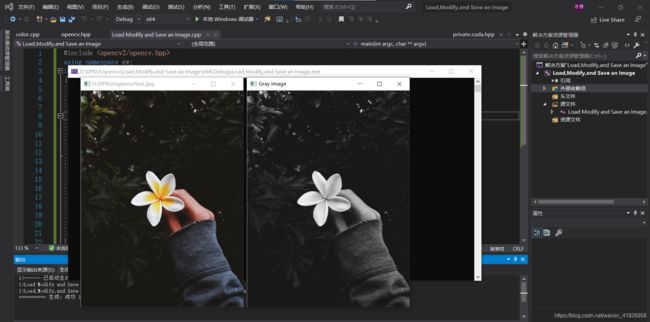
cvtColor()函数以最简单的RGB2Gray中最简单的一种实现为例【思想就是把RGB分量经过计算得到Y分量】:
template<typename _Tp> struct RGB2Gray
{
    typedef _Tp channel_type;

    RGB2Gray(int _srccn, int blueIdx, const float* _coeffs) : srccn(_srccn)
    {
        static const float coeffs0[] = { R2YF, G2YF, B2YF };
        memcpy( coeffs, _coeffs ? _coeffs : coeffs0, 3*sizeof(coeffs[0]) );
        if(blueIdx == 0)
            std::swap(coeffs[0], coeffs[2]);
    }

    void operator()(const _Tp* src, _Tp* dst, int n) const
    {
        int scn = srccn;
        float cb = coeffs[0], cg = coeffs[1], cr = coeffs[2];
        for(int i = 0; i < n; i++, src += scn)
            dst[i] = saturate_cast<_Tp>(src[0]*cb + src[1]*cg + src[2]*cr);
    }
    int srccn;
    float coeffs[3];
};
Creating a Mat object explicitly
In the Load, Modify, and Save an Image tutorial you have already learned how to write a matrix to an image file by using the cv::imwrite() function. However, for debugging purposes it's much more convenient to see the actual values. You can do this using the << operator of Mat. Be aware that this only works for two dimensional matrices.
<<符号用来查看Mat里面数据,但是只适用于二维的matrix。
Although Mat works really well as an image container, it is also a general matrix class. Therefore, it is possible to create and manipulate multidimensional matrices.
Mat依然是通用的矩阵类(但他同时是非常好的用来存储图像像素数据的container)
Mat可以有多种创建的格式:
- cv::Mat::Mat Constructor
    Mat M(2,2, CV_8UC3, Scalar(0,0,255));
    cout << "M = " << endl << " " << M << endl << endl;
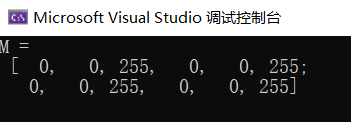
![]()
CV_8UC3的含义:8位的unsigned char类型,同时每个像素有3个通道。cv::Scalar是用来初始化所有矩阵点的函数。
- Use C/C++ arrays and initialize via constructor
	int sz[3] = { 2,2,2 };
	Mat L(3, sz, CV_8UC(1), Scalar::all(0));
上面的示例显示了如何创建一个二维以上的矩阵。
- cv::Mat::create function
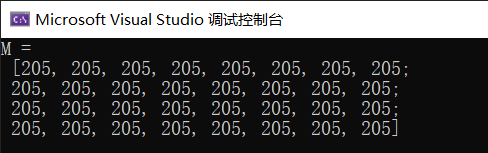
    M.create(4,4, CV_8UC(2));
    cout << "M = "<< endl << " "  << M << endl << endl;
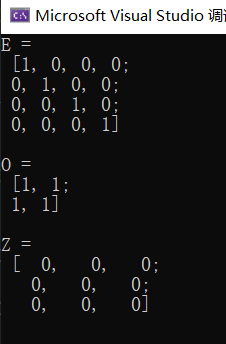
- MATLAB style initializer: cv::Mat::zeros , cv::Mat::ones , cv::Mat::eye . Specify size and data type to use
	Mat E = Mat::eye(4, 4, CV_64F);
	cout << "E = " << endl << " " << E << endl << endl;
	Mat O = Mat::ones(2, 2, CV_32F);
	cout << "O = " << endl << " " << O << endl << endl;
	Mat Z = Mat::zeros(3, 3, CV_8UC1);
	cout << "Z = " << endl << " " << Z << endl << endl;
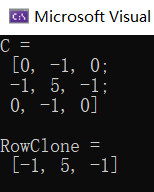
- For small matrices you may use comma separated initializers or initializer lists (C++11 support is required in the last case)
    Mat C = (Mat_<double>(3,3) << 0, -1, 0, -1, 5, -1, 0, -1, 0);
    cout << "C = " << endl << " " << C << endl << endl;

	Mat C = (Mat_<double>({ 0, -1, 0, -1, 5, -1, 0, -1, 0 })).reshape(9);
	cout << "C = " << endl << " " << C << endl << endl;

- Create a new header for an existing Mat object and cv::Mat::clone or cv::Mat::copyTo it.
	Mat C = (Mat_<double>({ 0, -1, 0, -1, 5, -1, 0, -1, 0 })).reshape(3);
	cout << "C = " << endl << " " << C << endl << endl;
	Mat RowClone = C.row(1).clone();
	cout << "RowClone = " << endl << " " << RowClone << endl << endl;
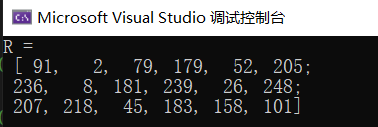
【注意】可以使用随机数来填充矩阵,需要为随机数提供上限值和下限值。
	Mat R = Mat(3, 2, CV_8UC3);
	randu(R, Scalar::all(0), Scalar::all(255));
	cout << "R = " << endl << " " << R << endl << endl;