提示:文章写完后,目录可以自动生成,如何生成可参考右边的帮助文档
最近在做一个项目,使用opencv的VideoCapture拉流并把帧送进模型推理,结果发现VideoCapture本身使用的是cpu的软解码,占用了大量的资源,后来就去研究使用设备本身的硬解码资源去分摊cpu的压力。
Xavier NX 使用OpenCV+GStreamer实现硬解码
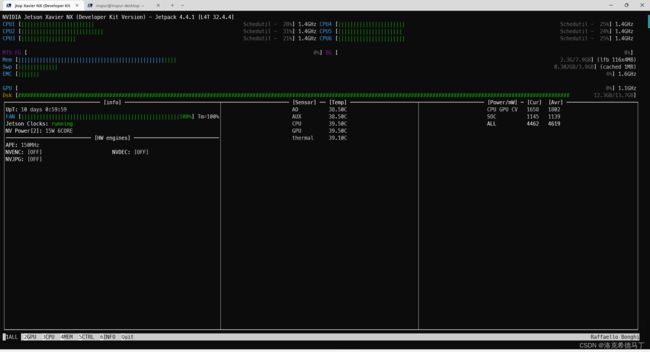
NX的硬解码叫NVDEC,硬编码交NVENC,这两个都是专门的硬件去做的,效率比cpu高很多。这里要多说一句,NX是共享内存,就是gpu,vpu和cpu都是一个内存,不像台式机有专用显存,显存与内存数据格式不一样,需要转换(实测0-2ms),不能拿来直接用。NX就没有这个问题,但是这里我们不讨论这么深的问题,感兴趣的可以私下里去研究下。先上个图,这里需要使用jtop看
注意看红框里面的,如果解码器没有用这个就是OFF,旁边的就是编码器,不在这次讨论范围内。
首先你要安装了opencv+gstreamer,具体安装方法我会在另一篇文章里面介绍,这里不多说,直接上代码。这里我们使用官方提供的代码
# --------------------------------------------------------
# Camera sample code for Tegra X2/X1
#
# This program could capture and display video from
# IP CAM, USB webcam, or the Tegra onboard camera.
# Refer to the following blog post for how to set up
# and run the code:
# https://jkjung-avt.github.io/tx2-camera-with-python/
#
# Written by JK Jung
# --------------------------------------------------------
import sys
import argparse
import subprocess
import cv2
WINDOW_NAME = 'CameraDemo'
def parse_args():
# Parse input arguments
desc = 'Capture and display live camera video on Jetson TX2/TX1'
parser = argparse.ArgumentParser(description=desc)
parser.add_argument('--rtsp', dest='use_rtsp',
help='use IP CAM (remember to also set --uri)',
action='store_true')
parser.add_argument('--uri', dest='rtsp_uri',
help='RTSP URI, e.g. rtsp://192.168.1.64:554',
default=None, type=str)
parser.add_argument('--latency', dest='rtsp_latency',
help='latency in ms for RTSP [200]',
default=200, type=int)
parser.add_argument('--usb', dest='use_usb',
help='use USB webcam (remember to also set --vid)',
action='store_true')
parser.add_argument('--vid', dest='video_dev',
help='device # of USB webcam (/dev/video?) [1]',
default=1, type=int)
parser.add_argument('--width', dest='image_width',
help='image width [1920]',
default=1920, type=int)
parser.add_argument('--height', dest='image_height',
help='image height [1080]',
default=1080, type=int)
args = parser.parse_args()
return args
def open_cam_rtsp(uri, width, height, latency):
#H264的写法
#gst_str = ('rtspsrc location={} latency={} ! '
# 'rtph264depay ! h264parse ! omxh264dec ! '
# 'nvvidconv ! '
# 'video/x-raw, width=(int){}, height=(int){}, '
# 'format=(string)BGRx ! '
# 'videoconvert ! appsink').format(uri, latency, width, height)
#H265的写法
gst_str = ('rtspsrc location={} latency={} ! '
'rtph265depay ! h265parse ! omxh265dec ! '
'nvvidconv ! '
'video/x-raw, width=(int){}, height=(int){}, '
'format=(string)BGRx ! '
'videoconvert ! appsink').format(uri, latency, width, height)
return cv2.VideoCapture(gst_str, cv2.CAP_GSTREAMER)
def open_cam_usb(dev, width, height):
# We want to set width and height here, otherwise we could just do:
# return cv2.VideoCapture(dev)
gst_str = ('v4l2src device=/dev/video{} ! '
'video/x-raw, width=(int){}, height=(int){} ! '
'videoconvert ! appsink').format(dev, width, height)
return cv2.VideoCapture(gst_str, cv2.CAP_GSTREAMER)
def open_cam_onboard(width, height):
gst_elements = str(subprocess.check_output('gst-inspect-1.0'))
if 'nvcamerasrc' in gst_elements:
# On versions of L4T prior to 28.1, add 'flip-method=2' into gst_str
gst_str = ('nvcamerasrc ! '
'video/x-raw(memory:NVMM), '
'width=(int)2592, height=(int)1458, '
'format=(string)I420, framerate=(fraction)30/1 ! '
'nvvidconv ! '
'video/x-raw, width=(int){}, height=(int){}, '
'format=(string)BGRx ! '
'videoconvert ! appsink').format(width, height)
elif 'nvarguscamerasrc' in gst_elements:
gst_str = ('nvarguscamerasrc ! '
'video/x-raw(memory:NVMM), '
'width=(int)1920, height=(int)1080, '
'format=(string)NV12, framerate=(fraction)30/1 ! '
'nvvidconv flip-method=2 ! '
'video/x-raw, width=(int){}, height=(int){}, '
'format=(string)BGRx ! '
'videoconvert ! appsink').format(width, height)
else:
raise RuntimeError('onboard camera source not found!')
return cv2.VideoCapture(gst_str, cv2.CAP_GSTREAMER)
def open_window(width, height):
cv2.namedWindow(WINDOW_NAME, cv2.WINDOW_NORMAL)
cv2.resizeWindow(WINDOW_NAME, width, height)
cv2.moveWindow(WINDOW_NAME, 0, 0)
cv2.setWindowTitle(WINDOW_NAME, 'Camera Demo for Jetson TX2/TX1')
def read_cam(cap):
show_help = True
full_scrn = False
help_text = '"Esc" to Quit, "H" for Help, "F" to Toggle Fullscreen'
font = cv2.FONT_HERSHEY_PLAIN
while True:
#if cv2.getWindowProperty(WINDOW_NAME, 0) < 0:
# Check to see if the user has closed the window
# If yes, terminate the program
# break
_, img = cap.read() # grab the next image frame from camera
# if show_help:
# cv2.putText(img, help_text, (11, 20), font,
# 1.0, (32, 32, 32), 4, cv2.LINE_AA)
# cv2.putText(img, help_text, (10, 20), font,
# 1.0, (240, 240, 240), 1, cv2.LINE_AA)
# cv2.imshow(WINDOW_NAME, img)
key = cv2.waitKey(10)
if key == 27: # ESC key: quit program
break
elif key == ord('H') or key == ord('h'): # toggle help message
show_help = not show_help
elif key == ord('F') or key == ord('f'): # toggle fullscreen
full_scrn = not full_scrn
if full_scrn:
cv2.setWindowProperty(WINDOW_NAME, cv2.WND_PROP_FULLSCREEN,
cv2.WINDOW_FULLSCREEN)
else:
cv2.setWindowProperty(WINDOW_NAME, cv2.WND_PROP_FULLSCREEN,
cv2.WINDOW_NORMAL)
def main():
args = parse_args()
print('Called with args:')
print(args)
print('OpenCV version: {}'.format(cv2.__version__))
if args.use_rtsp:
cap = open_cam_rtsp(args.rtsp_uri,
args.image_width,
args.image_height,
args.rtsp_latency)
elif args.use_usb:
cap = open_cam_usb(args.video_dev,
args.image_width,
args.image_height)
else: # by default, use the Jetson onboard camera
cap = open_cam_onboard(args.image_width,
args.image_height)
if not cap.isOpened():
sys.exit('Failed to open camera!')
#open_window(args.image_width, args.image_height)
read_cam(cap)
cap.release()
#cv2.destroyAllWindows()
if __name__ == '__main__':
main()
这里我不需要显示,所以我把显示代码注释掉了,需要的可自行打开,前提是你需要一个显示页面。再看看jtop
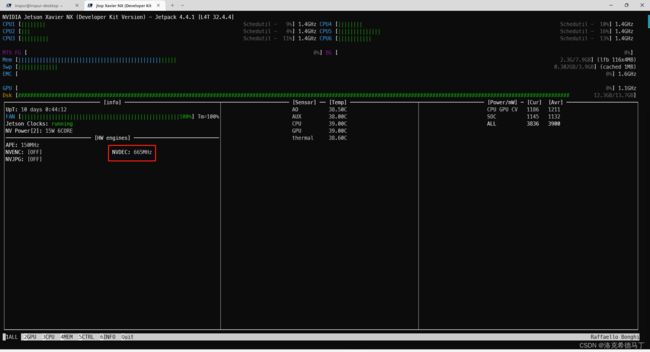
再看看红框里面的,如果有数值,说明硬解码成功了,如果没有那就是你本身的环境装的不对。
补充:这里多说一句,关于怎么提前知道流的信息,我们需要借用ffprobe的指令
ffprobe -show_streams -v quiet -show_format -print_format json -i <url>
{
"streams": [
{
"index": 0,
"codec_name": "hevc",
"codec_long_name": "H.265 / HEVC (High Efficiency Video Coding)",
"profile": "Main",
"codec_type": "video",
"codec_tag_string": "[0][0][0][0]",
"codec_tag": "0x0000",
"width": 1920,
"height": 1080,
"coded_width": 1920,
"coded_height": 1080,
"closed_captions": 0,
"has_b_frames": 2,
"pix_fmt": "yuv420p",
"level": 153,
"color_range": "tv",
"chroma_location": "left",
"refs": 1,
"r_frame_rate": "25/1",
"avg_frame_rate": "0/0",
"time_base": "1/90000",
"start_pts": 3600,
"start_time": "0.040000",
"disposition": {
"default": 0,
"dub": 0,
"original": 0,
"comment": 0,
"lyrics": 0,
"karaoke": 0,
"forced": 0,
"hearing_impaired": 0,
"visual_impaired": 0,
"clean_effects": 0,
"attached_pic": 0,
"timed_thumbnails": 0
}
}
],
"format": {
"filename": "rtsp://10.0.42.30/record_hevc_0",
"nb_streams": 1,
"nb_programs": 0,
"format_name": "rtsp",
"format_long_name": "RTSP input",
"start_time": "0.040000",
"probe_score": 100,
"tags": {
"title": "No Name"
}
}
}
index 就是音视频的索引,我用的这个流是不带声音的,所以只有一个index,一般0是视频,1是音频。codec_name 就是编码格式,你可以先用这个方法获取编码格式再决定选用哪种编码方式,由于H264和H265是最普遍的两种格式,几乎所有的设备都是支持的。所以这里我不介绍其他的了,有兴趣的可自行研究。
其他的参数如帧率,比特率都是可以通过这个命令获取的,rtsp是没有duration的,这个选项不可用,因为流是一直推的,视频文件这个参数是有效的。其它参数请大家自行研究。
由于我需要看硬解码状态所以使用了jtop,jtop对cpu占用还是比较大的,大家可以使用top来看,top对资源占用很少。不过就算这样硬解码的优势还是很明显的。
总体来讲是比较简单的,H264和H265两兄弟也基本上能满足日常绝大多数场景的需求了。