【OpenCV】:OpenCV人脸识别项目杂记
项目目标:
1.图片人脸识别
2.视频人脸识别
3.ESP32Cam摄像头网页视频人脸识别
项目效果视频:
ESP32Cam摄像头人脸识别
OpenCV本地视频人脸识别
ESP32Cam摄像头人脸检测
项目基础代码内容:
一、读取图片
# 导入cv模块
import cv2 as cv

# 读取图片
img = cv.imread('face1.jpg')
# 显示图片
cv.imshow('read_img', img)
# 等待
cv.waitKey(0)
# 释放内存
cv.destroyAllWindows()
二、灰度转换
# 导入cv模块
import cv2 as cv

# 读取图片
img = cv.imread('face1.jpg')
# 灰度转换
gray_img = cv.cvtColor(img, cv.COLOR_BGR2GRAY)
# 显示灰度图片
cv.imshow('gray', gray_img)
# 保存灰度图片
cv.imwrite('gray_face1.jpg', gray_img)
# 显示图片
cv.imshow('read_img', img)
# 等待
cv.waitKey(0)
# 释放内存
cv.destroyAllWindows()
三、修改显示窗口尺寸
# 导入cv模块
import cv2 as cv

# 读取图片
img = cv.imread('face1.jpg')
# 修改尺寸
resize_img = cv.resize(img, dsize=(200, 200))
# 显示原图
cv.imshow('img', img)
# 显示修改后的
cv.imshow('resize_img', resize_img)
# 打印原图尺寸大小
print('未修改:', img.shape)
# 打印修改后的大小
print('修改后:', resize_img.shape)
# 等待
while True:
    if ord('q') == cv.waitKey(0):
        break
# 释放内存
cv.destroyAllWindows()
四、绘制识别后框选的矩形和圆形
# 导入cv模块
import cv2 as cv

# 读取图片
img = cv.imread('face1.jpg')
# 坐标
x, y, w, h = 100, 100, 100, 100
# 绘制矩形
cv.rectangle(img, (x, y, x + w, y + h), color=(0, 0, 255), thickness=1)
# 绘制圆形
cv.circle(img, center=(x + w, y + h), radius=100, color=(255, 0, 0), thickness=5)
# 显示
cv.imshow('re_img', img)
while True:
    if ord('q') == cv.waitKey(0):
        break
# 释放内存
cv.destroyAllWindows()
五、本地图片人脸检测
# 导入cv模块
import cv2 as cv

# 检测函数
def face_detect_demo():
    gary = cv.cvtColor(img, cv.COLOR_BGR2GRAY)
    face_detect = cv.CascadeClassifier('D:/opencv/opencv/sources/data/haarcascades/haarcascade_frontalface_alt2.xml')
    face = face_detect.detectMultiScale(gary, 1.01, 5, 0, (100, 100), (300, 300))
    for x, y, w, h in face:
        cv.rectangle(img, (x, y), (x + w, y + h), color=(0, 0, 255), thickness=2)
    cv.imshow('result', img)

# 读取图像
img = cv.imread('face1.jpg')
# 检测函数
face_detect_demo()
# 等待
while True:
    if ord('q') == cv.waitKey(0):
        break
# 释放内存
cv.destroyAllWindows()
六、本地图片中多个人脸检测
# 导入cv模块
import cv2 as cv

# 检测函数
def face_detect_demo():
    gary = cv.cvtColor(img, cv.COLOR_BGR2GRAY)
    face_detect = cv.CascadeClassifier('D:/opencv/opencv/sources/data/haarcascades/haarcascade_frontalface_default.xml')
    face = face_detect.detectMultiScale(gary)
    for x, y, w, h in face:
        cv.rectangle(img, (x, y), (x + w, y + h), color=(0, 0, 255), thickness=2)
    cv.imshow('result', img)

# 读取图像
img = cv.imread('face2.jpg')
# 检测函数
face_detect_demo()
# 等待
while True:
    if ord('q') == cv.waitKey(0):
        break
# 释放内存
cv.destroyAllWindows()
七、本地视频人脸检测
   def face_Video():
        # 加载视频
        cap = cv2.VideoCapture(r'./image/1.mp4')
        # 创建一个级联分类器 加载一个.xml分类器文件 它既可以是Haar特征也可以是LBP特征的分类器
        face_detect = cv2.CascadeClassifier(r'./face_detection/haarcascades/haarcascade_frontalface_default.xml')

        while True:
            # 读取视频片段
            ret, frame = cap.read()
            if not ret:  # 读完视频后falg返回False
                break
            frame = cv2.resize(frame, None, fx=0.5, fy=0.5)
            # 灰度处理
            gray = cv2.cvtColor(frame, cv2.COLOR_BGR2GRAY)
            # 多个尺度空间进行人脸检测   返回检测到的人脸区域坐标信息
            face_zone = face_detect.detectMultiScale(gray, scaleFactor=1.2, minNeighbors=8)
            # 绘制矩形和圆形检测人脸
            for x, y, w, h in face_zone:
                cv2.rectangle(frame, pt1=(x, y), pt2=(x + w, y + h), color=[0, 0, 255], thickness=2)
                cv2.circle(frame, center=(x + w // 2, y + h // 2), radius=w // 2, color=[0, 255, 0], thickness=2)
            # 显示图片
            cv2.imshow('video', frame)
            # 设置退出键和展示频率
            if ord('q') == cv2.waitKey(40):
                break

        # 释放资源
        cv2.destroyAllWindows()
        cap.release()
八、本地摄像头拍照保存照片到本地文件夹
# 导入模块
import cv2

# 摄像头
cap = cv2.VideoCapture(0)
falg = 1
num = 1
while cap.isOpened():  # 检测是否在开启状态
    ret_flag, Vshow = cap.read()  # 得到每帧图像
    cv2.imshow("Capture_Test", Vshow)  # 显示图像
    k = cv2.waitKey(1) & 0xFF  # 按键判断s
    if k == ord('s'):  # 保存
        cv2.imwrite("F:/opencv/data/" + str(num) + ".123" + ".jpg", Vshow)
        print("success to save" + str(num) + ".jpg")
        print("-------------------")
        num += 1
    elif k == ord(' '):  # 退出
        break
# 释放摄像头
cap.release()
# 释放内存
cv2.destroyAllWindows()
九、训练人脸数据
import os
import cv2
import sys
from PIL import Image
import numpy as np


def getImageAndLabels(path):
    facesSamples = []
    ids = []
    imagePaths = [os.path.join(path, f) for f in os.listdir(path)]
    # 检测人脸
    face_detector = cv2.CascadeClassifier('D:/opencv/opencv/sources/data/haarcascades/haarcascade_frontalface_alt2.xml')
    # 打印数组imagePaths
    print('数据排列:', imagePaths)
    # 遍历列表中的图片
    for imagePath in imagePaths:
        # 打开图片,黑白化
        PIL_img = Image.open(imagePath).convert('L')
        # 将图像转换为数组,以黑白深浅
        # PIL_img = cv2.resize(PIL_img, dsize=(400, 400))
        img_numpy = np.array(PIL_img, 'uint8')
        # 获取图片人脸特征
        faces = face_detector.detectMultiScale(img_numpy)
        # 获取每张图片的id和姓名
        id = int(os.path.split(imagePath)[1].split('.')[0])
        # 预防无面容照片
        for x, y, w, h in faces:
            ids.append(id)
            facesSamples.append(img_numpy[y:y + h, x:x + w])
        # 打印脸部特征和id
        # print('fs:', facesSamples)
        print('id:', id)
        # print('fs:', facesSamples[id])
    print('fs:', facesSamples)
    # print('脸部例子:',facesSamples[0])
    # print('身份信息:',ids[0])
    return facesSamples, ids


if __name__ == '__main__':
    # 图片路径
    path = './data/jm/'
    # 获取图像数组和id标签数组和姓名
    faces, ids = getImageAndLabels(path)
    # 获取训练对象
    recognizer = cv2.face.LBPHFaceRecognizer_create()
    # recognizer.train(faces,names)#np.array(ids)
    recognizer.train(faces, np.array(ids))
    # 保存文件
    recognizer.write('trainer/trainer.yml')
    # save_to_file('names.txt',names)
十、人脸识别
import cv2
import numpy as np
import os
# coding=utf-8
import urllib
import urllib.request
import hashlib

# 加载训练数据集文件
recogizer = cv2.face.LBPHFaceRecognizer_create()
recogizer.read('trainer/trainer.yml')
names = []
warningtime = 0


# 准备识别的图片
def face_detect_demo(img):
    gray = cv2.cvtColor(img, cv2.COLOR_BGR2GRAY)  # 转换为灰度
    face_detector = cv2.CascadeClassifier('D:/opencv/opencv/sources/data/haarcascades/haarcascade_frontalface_alt2.xml')
    face = face_detector.detectMultiScale(gray, 1.1, 5, cv2.CASCADE_SCALE_IMAGE, (100, 100), (300, 300))
    # face=face_detector.detectMultiScale(gray)
    for x, y, w, h in face:
        cv2.rectangle(img, (x, y), (x + w, y + h), color=(0, 0, 255), thickness=2)
        cv2.circle(img, center=(x + w // 2, y + h // 2), radius=w // 2, color=(0, 255, 0), thickness=1)
        # 人脸识别
        ids, confidence = recogizer.predict(gray[y:y + h, x:x + w])
        # print('标签id:',ids,'置信评分:', confidence)
        if confidence > 80:
            cv2.putText(img, 'unkonw', (x + 10, y - 10), cv2.FONT_HERSHEY_SIMPLEX, 0.75, (0, 255, 0), 1)
        else:
            cv2.putText(img, str(names[ids - 1]), (x + 10, y - 10), cv2.FONT_HERSHEY_SIMPLEX, 0.75, (0, 255, 0), 1)
    cv2.imshow('result', img)
    # print('bug:',ids)


def name():
    path = './data/jm/'
    # names = []
    imagePaths = [os.path.join(path, f) for f in os.listdir(path)]
    for imagePath in imagePaths:
        name = str(os.path.split(imagePath)[1].split('.', 2)[1])
        names.append(name)


cap = cv2.VideoCapture('1.mp4')
name()
while True:
    flag, frame = cap.read()
    if not flag:
        break
    face_detect_demo(frame)
    if ord(' ') == cv2.waitKey(10):
        break
cv2.destroyAllWindows()
cap.release()
# print(names)
项目注意事项:
一、下载库
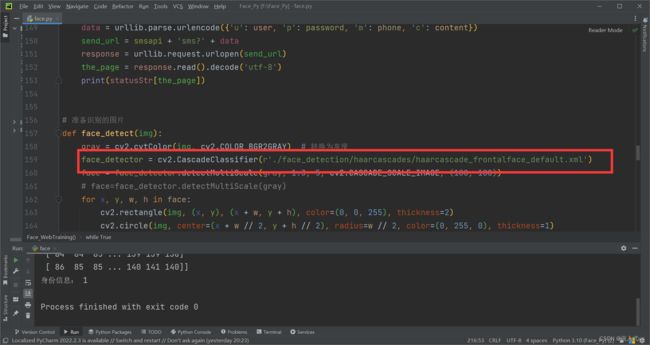
以上框选,这是OpenCV库中提供的分类器,需要下载库,下载链接:
GitHub - opencv/opencv: Open Source Computer Vision Library
二、问题描述
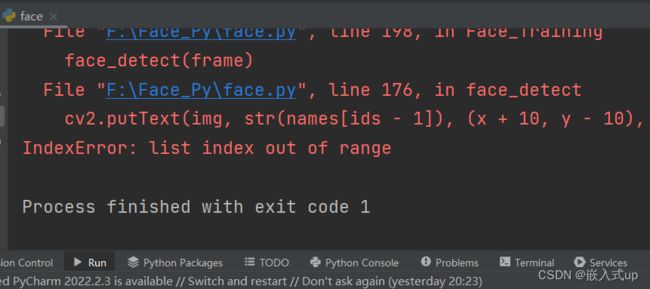
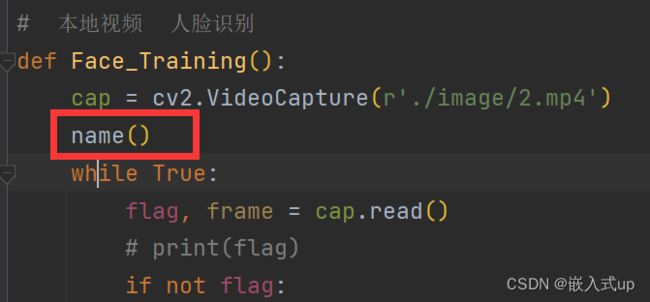
当整个屏幕是个人脸的时候就会报这个错的话,只是因为没有函数化nemes这个列表,只要将neme函数加上即可解决。
人脸识别项目下载链接:
百度网盘 请输入提取码


