【双目相机】双目摄像头测距并导出世界坐标数据进入txt【python】
1.双目测距,通过鼠标点击像素导出像素的世界坐标
代码如下,核心是threeD,图片内所有像素对应的世界坐标都储存在threeD内
#从excel里读取数据
#144行fps帧率不准
import cv2
import pandas as pd
import numpy as np
import time
import random
import math

# -----------------------------------双目相机的基本参数---------------------------------------------------------
#   left_camera_matrix          左相机的内参矩阵
#   right_camera_matrix         右相机的内参矩阵
#
#   left_distortion             左相机的畸变系数    格式(K1,K2,P1,P2,0)
#   right_distortion            右相机的畸变系数
# -------------------------------------------------------------------------------------------------------------
# 左镜头的内参,如焦距
file_path = r'C:\out1.xlsx'   # r对路径进行转义,windows需要
raw_data = pd.read_excel(file_path)  # header=0表示第一行是表头,就自动去除了
#raw_data = pd.read_excel(file_path, header=0)
#print(raw_data)
data = raw_data.values     # 只提取表中信息
#print(data)
np.array([1,2,3,4,5,6,7,8,9],dtype='float32');
left_camera_matrix = np.array((data[4:7, 1:4]),dtype='float64');
right_camera_matrix = np.array((data[9:12, 1:4]),dtype='float64');
# 畸变系数,K1、K2、K3为径向畸变,P1、P2为切向畸变:[K1,K2,P1,P2,K3]
K1left= np.array((data[7:8, 1:2]),dtype='float64');
K2left= np.array((data[7:8, 2:3]),dtype='float64');
K3left= np.array((data[7:8, 3:4]),dtype='float64');
P1left= np.array((data[8:9, 1:2]),dtype='float64');
P2left= np.array((data[8:9, 2:3]),dtype='float64');
K1right= np.array((data[12:13, 1:2]),dtype='float64');
K2right= np.array((data[12:13, 2:3]),dtype='float64');
K3right= np.array((data[12:13, 3:4]),dtype='float64');
P1right= np.array((data[13:14, 1:2]),dtype='float64');
P2right= np.array((data[13:14, 2:3]),dtype='float64');
#畸变系数,K1、K2、K3为径向畸变,P1、P2为切向畸变:[K1,K2,P1,P2,K3]
left_distortion =np.hstack((K1left,K2left,P1left,P2left,K3left))
right_distortion =np.hstack((K1right,K2right,P1right,P2right,K3right))
# 旋转矩阵
R = np.array((data[1:4, 1:4]),dtype='float64');
# 平移矩阵
T = np.array(np.transpose(data[0:1, 1:4]),dtype='float64');
#T = np.array([-55.4164455,-0.307896388,-3.669759334])

size = (320, 180)
R1, R2, P1, P2, Q, validPixROI1, validPixROI2 = cv2.stereoRectify(left_camera_matrix, left_distortion,
                                                                  right_camera_matrix, right_distortion, size, R,
                                                                  T)

# 校正查找映射表,将原始图像和校正后的图像上的点一一对应起来
left_map1, left_map2 = cv2.initUndistortRectifyMap(left_camera_matrix, left_distortion, R1, P1, size, cv2.CV_16SC2)
right_map1, right_map2 = cv2.initUndistortRectifyMap(right_camera_matrix, right_distortion, R2, P2, size, cv2.CV_16SC2)
print(Q)

# --------------------------鼠标回调函数---------------------------------------------------------
#   event               鼠标事件
#   param               输入参数
# -----------------------------------------------------------------------------------------------
def onmouse_pick_points(event, x, y, flags, param):
    if event == cv2.EVENT_LBUTTONDOWN:
        threeD = param
        print('\n像素坐标 x = %d, y = %d' % (x, y))
        # print("世界坐标是:", threeD[y][x][0], threeD[y][x][1], threeD[y][x][2], "mm")
        print("世界坐标xyz 是:", threeD[y][x][0] / 1000.0, threeD[y][x][1] / 1000.0, threeD[y][x][2] / 1000.0, "m")
        distance = math.sqrt(threeD[y][x][0] ** 2 + threeD[y][x][1] ** 2 + threeD[y][x][2] ** 2)
        distance = distance / 1000.0  # mm -> m
        print("距离是:", distance, "m")
        with open ('C:/threeDD.txt', 'w') as outfile:
            for slice_2d in threeD:
                np.savetxt(outfile, slice_2d, fmt = '%f', delimiter = ',')

# 加载视频文件
capture = cv2.VideoCapture(0)
WIN_NAME = 'Deep disp'
cv2.namedWindow(WIN_NAME, cv2.WINDOW_AUTOSIZE)

# 读取视频
fps = 0.0
ret, frame = capture.read()
while ret:
    # 开始计时
    t1 = time.time()
    # 是否读取到了帧,读取到了则为True
    ret, frame = capture.read()
    # 切割为左右两张图片
    frame1 = frame[150:330, 0:320]
    frame2 = frame[150:330, 320:640]
    # 将BGR格式转换成灰度图片,用于畸变矫正
    imgL = cv2.cvtColor(frame1, cv2.COLOR_BGR2GRAY)
    imgR = cv2.cvtColor(frame2, cv2.COLOR_BGR2GRAY)

    # 重映射,就是把一幅图像中某位置的像素放置到另一个图片指定位置的过程。
    # 依据MATLAB测量数据重建无畸变图片,输入图片要求为灰度图
    img1_rectified = cv2.remap(imgL, left_map1, left_map2, cv2.INTER_LINEAR)
    img2_rectified = cv2.remap(imgR, right_map1, right_map2, cv2.INTER_LINEAR)

    # 转换为opencv的BGR格式
    imageL = cv2.cvtColor(img1_rectified, cv2.COLOR_GRAY2BGR)
    imageR = cv2.cvtColor(img2_rectified, cv2.COLOR_GRAY2BGR)

    # ------------------------------------SGBM算法----------------------------------------------------------
    #   blockSize                   深度图成块,blocksize越低,其深度图就越零碎,0
    #   img_channels                BGR图像的颜色通道,img_channels=3,不可更改
    #   numDisparities              SGBM感知的范围,越大生成的精度越好,速度越慢,需要被16整除,如numDisparities
    #                               取16、32、48、64等
    #   mode                        sgbm算法选择模式,以速度由快到慢为:STEREO_SGBM_MODE_SGBM_3WAY、
    #                               STEREO_SGBM_MODE_HH4、STEREO_SGBM_MODE_SGBM、STEREO_SGBM_MODE_HH。精度反之
    # ------------------------------------------------------------------------------------------------------
    blockSize = 3
    img_channels = 3
    stereo = cv2.StereoSGBM_create(minDisparity=1,
                                   numDisparities=64,
                                   blockSize=blockSize,
                                   P1=8 * img_channels * blockSize * blockSize,
                                   P2=32 * img_channels * blockSize * blockSize,
                                   disp12MaxDiff=-1,
                                   preFilterCap=1,
                                   uniquenessRatio=10,
                                   speckleWindowSize=100,
                                   speckleRange=100,
                                   mode=cv2.STEREO_SGBM_MODE_HH)
    # 计算视差
    disparity = stereo.compute(img1_rectified, img2_rectified)

    # 归一化函数算法,生成深度图(灰度图)
    disp = cv2.normalize(disparity, disparity, alpha=0, beta=255, norm_type=cv2.NORM_MINMAX, dtype=cv2.CV_8U)

    # 生成深度图(颜色图)
    dis_color = disparity
    dis_color = cv2.normalize(dis_color, None, alpha=0, beta=255, norm_type=cv2.NORM_MINMAX, dtype=cv2.CV_8U)
    dis_color = cv2.applyColorMap(dis_color, 2)

    # 计算三维坐标数据值
    threeD = cv2.reprojectImageTo3D(disparity, Q, handleMissingValues=True)
    # 计算出的threeD,需要乘以16,才等于现实中的距离
    threeD = threeD * 16

    # 鼠标回调事件
    cv2.setMouseCallback("depth", onmouse_pick_points, threeD)

    #完成计时,计算帧率
    fps = (fps + (1. / (time.time() - t1+0.1))) / 2
    frame = cv2.putText(frame, "fps= %.2f" % (fps), (0, 40), cv2.FONT_HERSHEY_SIMPLEX, 1, (0, 255, 0), 2)

    cv2.imshow("depth", dis_color)
    cv2.imshow("left", frame1)
    cv2.imshow(WIN_NAME, disp)  # 显示深度图的双目画面,WIN_NAME = 'Deep disp'
    # 若键盘按下q则退出播放
    if cv2.waitKey(1) & 0xff == ord('q'):
        break

# 释放资源
capture.release()

# 关闭所有窗口
cv2.destroyAllWindows()
测距时需用到matlab导出的相机标定参数,详见【双目相机】基于matlab的参数标定2-使用matlab标定
注意:使用之前必须新建立一个空的txt文件(如代码内的threeDD.txt),新建立的文件必须是空的(即不含任何内容)
使用此代码,在鼠标点击事件发生时即可记录此时刻的threeD内容
threeD即双目相机对应的图片的所有像素的世界坐标,通过其像素坐标(x,y)索引,索引公式:列数=320y+x+1)
2.将txt转化为excel索引数据
步骤如下所示
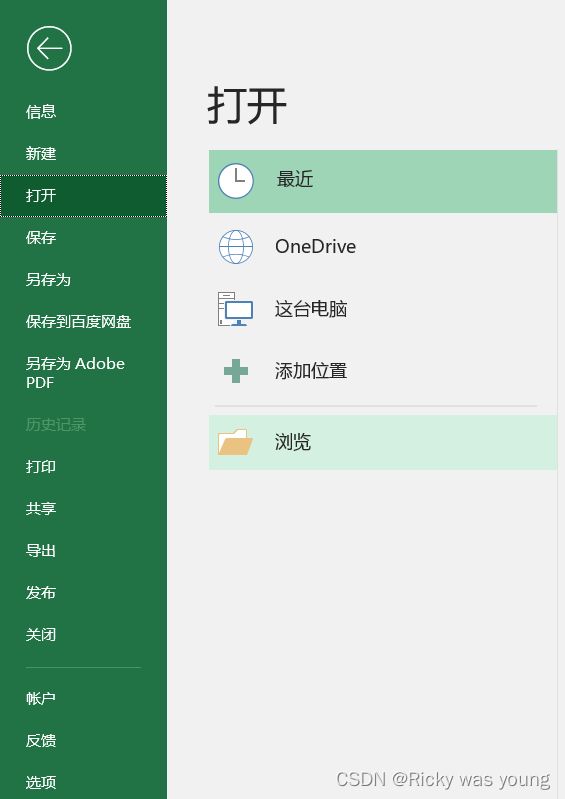
1.excel选择 打开
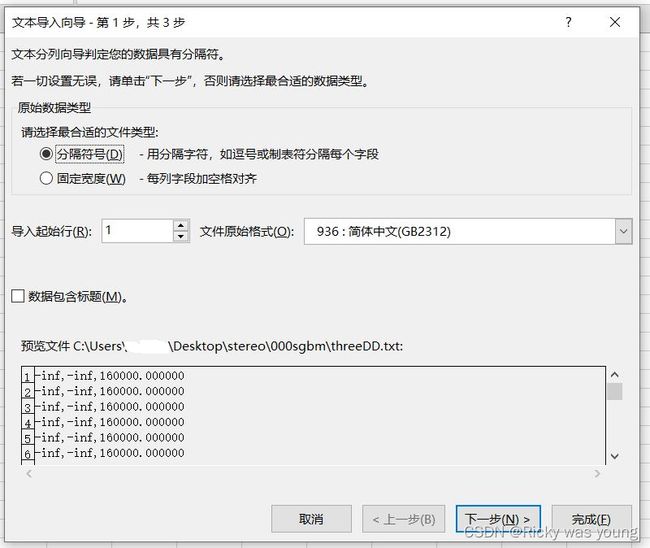
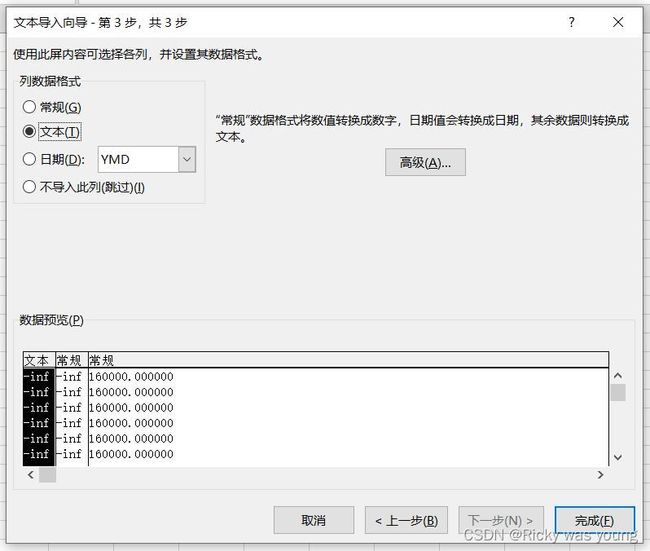
 2.点击要打开的txt文件,依次按照如下步骤进行


 完毕,即可在excel中查看数据
3.数据索引
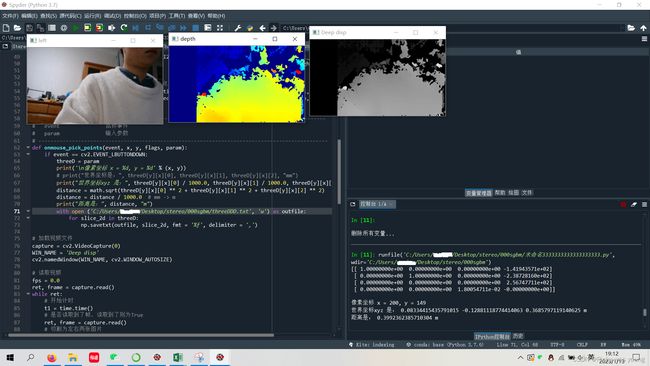
如下图所示,假设python中点击像素(x,y)=(200,149)输出结果如下:
 按照公式:
按照公式:
索引公式:列数=320y+x+1

