pytorch的应用---神经网络模型
构建神经网络流程:
1.定义一个拥有可学习参数的神经网络
2.遍历训练数据集
3.处理输入数据使其流经神经网络
4.计算损失值
5.将网络参数的梯度进行反向传播
6.以一定规则更新网络的权重
关于torch.nn:
使用Pytorch来构建神经网络, 主要的工具都在torch.nn包中.
nn依赖于autograd来定义模型, 并对其自动求导.
我们首先定义一个Pytorch实现的神经网络:
我们通过扩展PyTorch神经网络模块类并定义一些层作为类属性来开始构建CNN。通过在构造函数中指定它们,我们定义了两个卷积层和三个线性层。
构造层时,我们将每个参数的值传递给层的构造函数。对于我们的卷积层,有三个参数,线性层有两个参数。
卷积层

    in_channels

    out_channels

    kernel_size

线性层

    in_features

    out_features
self.conv1 = nn.Conv2d(in_channels=1, out_channels=6, kernel_size=5)
self.conv2 = nn.Conv2d(in_channels=6, out_channels=12, kernel_size=5)


self.fc1 = nn.Linear(in_features=12 * 4 * 4, out_features=120)
self.fc2 = nn.Linear(in_features=120, out_features=60)
self.out = nn.Linear(in_features=60, out_features=10)
第一个convolutional layer的in_channels取决于训练集中图像中出现的彩色通道的数量。因为我们处理的是灰度图像,所以我们知道这个值应该是 1.
输出层的out_features取决于训练集中的类的数量。因为Fashion-MNIST数据集中有10个服装类,所以我们知道我们需要10个输出特性。
通常,一层的输入是上一层的输出,所以conv层中的所有in_channels和线性层中的in_features都依赖于上一层的数据。
当我们从一个conv层转换到一个线性层时,我们必须使我们的张量变平。这就是为什么我们有12 * 4 * 4。12是前一层输出通道的数量,
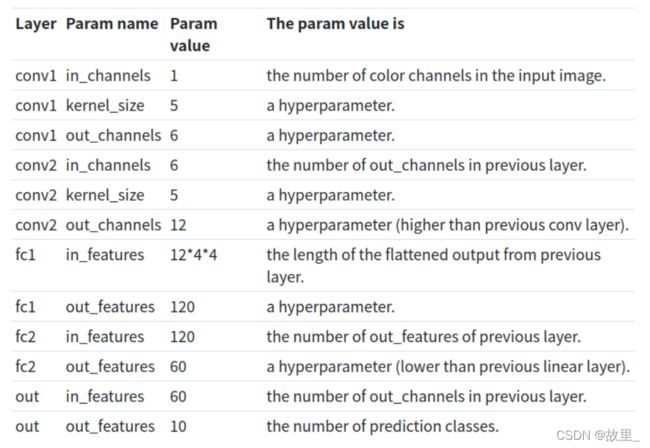 4 * 4实际上是12个输出通道中每个通道的高度和宽度。
我们从1 x 28 x 28输入张量开始。这样就给出了一个单一的彩色通道,即28 x 28的图像,并且在我们的张量到达第一 Linear 层时,尺寸已经改变。
通过卷积和池化操作,将高度和宽度尺寸从28 x 28减小到4 x 4。
卷积和池化操作是对高度和宽度尺寸的化简操作。我们将在下一篇文章中看到这是如何工作的,并看到用于计算这些减少量的公式。现在,让我们完成实现此forward() 方法。
张量重构后,我们将展平的张量传递给 Linear 层,并将此结果传递给relu() 激活函数。
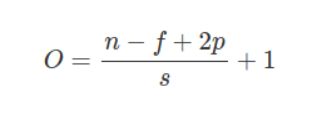
CNN输出大小公式
让我们看一下在执行卷积和池化操作之后计算张量的输出大小的公式。
一、CNN输出大小公式(平方)
假设有一个 n * n 输入。

假设有一个 f*f 的滤波器。

假设填充大小为 p 和步长为 s
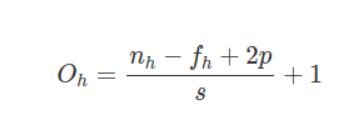
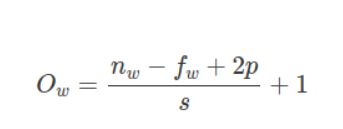
二、CNN输出大小公式(非平方)
假设有一个  nh×nw 的输入

假设有一个 fh×fw 的滤波器

假设填充大小为 p 和步长为 s
输出大小Ow 的高度由以下公式给出:
在这里插入图片描述
# 导入若干工具包
import torch
import torch.nn as nn
import torch.nn.functional as F


# 定义一个简单的网络类
class Net(nn.Module):

    def __init__(self):
        super(Net, self).__init__()
        # 定义第一层卷积神经网络, 输入通道维度=1, 输出通道维度=6, 卷积核大小3*3
        self.conv1 = nn.Conv2d(1, 6, 3)
        # 定义第二层卷积神经网络, 输入通道维度=6, 输出通道维度=16, 卷积核大小3*3
        self.conv2 = nn.Conv2d(6, 16, 3)
        # 定义三层全连接网络
        self.fc1 = nn.Linear(16 * 6 * 6, 120)
        self.fc2 = nn.Linear(120, 84)
        self.fc3 = nn.Linear(84, 10)

    def forward(self, x):
        # 在(2, 2)的池化窗口下执行最大池化操作
        x = F.max_pool2d(F.relu(self.conv1(x)), (2, 2))
        x = F.max_pool2d(F.relu(self.conv2(x)), 2)
        x = x.view(-1, self.num_flat_features(x))
        x = F.relu(self.fc1(x))
        x = F.relu(self.fc2(x))
        x = self.fc3(x)
        return x

    def num_flat_features(self, x):
        # 计算size, 除了第0个维度上的batch_size
        size = x.size()[1:]
        num_features = 1
        for s in size:
            num_features *= s
        return num_features


net = Net()
print(net)
Net(
	  (conv1): Conv2d(1, 6, kernel_size=(3, 3), stride=(1, 1))
	  (conv2): Conv2d(6, 16, kernel_size=(3, 3), stride=(1, 1))
	  (fc1): Linear(in_features=576, out_features=120, bias=True)
	  (fc2): Linear(in_features=120, out_features=84, bias=True)
	  (fc3): Linear(in_features=84, out_features=10, bias=True)
	)
模型中所有的可训练参数, 可以通过net.parameters()来获得.
params = list(net.parameters())
print(len(params))
print(params[0].size())


10
torch.Size([6, 1, 3, 3])

input = torch.randn(1, 1, 32, 32)
out = net(input)
print(out)

tensor([[ 0.1242,  0.1194, -0.0584, -0.1140,  0.0661,  0.0191, -0.0966,  0.0480,
          0.0775, -0.0451]], grad_fn=)
有了输出张量后, 就可以执行梯度归零和反向传播的操作了.
net.zero_grad()
out.backward()
torch.nn构建的神经网络只支持mini-batches的输入, 不支持单一样本的输入.
比如: nn.Conv2d 需要一个4D Tensor, 形状为(nSamples, nChannels, Height, Width). 如果你的输入只有单一样本形式, 则需要执行input.unsqueeze(0), 主动将3D Tensor扩充成4D Tensor.
损失函数
损失函数的输入是一个输入的pair: (output, target), 然后计算出一个数值来评估output和target之间的差距大小.
在torch.nn中有若干不同的损失函数可供使用, 比如nn.MSELoss就是通过计算均方差损失来评估输入和目标值之间的差距.
应用nn.MSELoss计算损失的一个例子:
output = net(input)
target = torch.randn(10)
改变target的形状为二维张量, 为了和output匹配
target = target.view(1, -1)
criterion = nn.MSELoss()
loss = criterion(output, target)
print(loss)
输出结果:
tensor(1.1562, grad_fn=)
关于方向传播的链条: 如果我们跟踪loss反向传播的方向, 使用.grad_fn属性打印, 将可以看到一张完整的计算图如下:
input -> conv2d -> relu -> maxpool2d -> conv2d -> relu -> maxpool2d
      -> view -> linear -> relu -> linear -> relu -> linear
      -> MSELoss
      -> loss
当调用loss.backward()时, 整张计算图将对loss进行自动求导, 所有属性requires_grad=True的Tensors都将参与梯度求导的运算, 并将梯度累加到Tensors中的.grad属性中.
print(loss.grad_fn)  # MSELoss
print(loss.grad_fn.next_functions[0][0])  # Linear
print(loss.grad_fn.next_functions[0][0].next_functions[0][0])  # ReLU
输出结果:
反向传播(backpropagation)
在Pytorch中执行反向传播非常简便, 全部的操作就是loss.backward().
在执行反向传播之前, 要先将梯度清零, 否则梯度会在不同的批次数据之间被累加.
执行一个反向传播的小例子:
Pytorch中执行梯度清零的代码
net.zero_grad()

print('conv1.bias.grad before backward')
print(net.conv1.bias.grad)
Pytorch中执行反向传播的代码
loss.backward()

print('conv1.bias.grad after backward')
print(net.conv1.bias.grad)
输出结果:
conv1.bias.grad before backward
tensor([0., 0., 0., 0., 0., 0.])
conv1.bias.grad after backward
tensor([-0.0002,  0.0045,  0.0017, -0.0099,  0.0092, -0.0044])
更新网络参数
更新参数最简单的算法就是SGD(随机梯度下降).
具体的算法公式表达式为: weight = weight - learning_rate * gradient
首先用传统的Python代码来实现SGD如下:
learning_rate = 0.01
for f in net.parameters():
    f.data.sub_(f.grad.data * learning_rate)
然后使用Pytorch官方推荐的标准代码如下:
首先导入优化器的包, optim中包含若干常用的优化算法, 比如SGD, Adam等
import torch.optim as optim
通过optim创建优化器对象
optimizer = optim.SGD(net.parameters(), lr=0.01)
将优化器执行梯度清零的操作
optimizer.zero_grad()

output = net(input)
loss = criterion(output, target)
对损失值执行反向传播的操作
loss.backward()
参数的更新通过一行标准代码来执行
optimizer.step()
import torch
import torchvision
from torch.utils.data import DataLoader
from torch import nn
from torch.utils.tensorboard import SummaryWriter

train_data = torchvision.datasets.CIFAR10(root="./data", train=True, transform=torchvision.transforms.ToTensor(),
                                          download=True)
test_data = torchvision.datasets.CIFAR10(root="./data", train=True, transform=torchvision.transforms.ToTensor(),
                                         download=True)
# length 长度
train_data_size = len(train_data)
test_data_size = len(test_data)
print("训练数据集的长度为:{}".format(train_data_size))
print("测试数据集的长度为:{}".format(test_data_size))
# 利用dataloader加载数据集
train_dataloader = DataLoader(train_data, batch_size=64)
test_dataloader = DataLoader(test_data, batch_size=64)
# 创建网络模型
class Module(nn.Module):
    def __init__(self):
        super(Module, self).__init__()
        self.model = nn.Sequential(
            nn.Conv2d(3, 32, 5, 1, 2),
            nn.MaxPool2d(2),
            nn.Conv2d(32, 32, 5, 1, 2),
            nn.MaxPool2d(2),
            nn.Conv2d(32, 64, 5, 1, 2),
            nn.MaxPool2d(2),
            nn.Flatten(),
            nn.Linear(64 * 4 * 4, 64),
            nn.Linear(64, 10)

        )

    def forward(self, x):
        x = self.model(x)
        return x
module = Module()
if torch.cuda.is_available():
    modele=module.cuda()
# 损失函数
loss_fn = nn.CrossEntropyLoss()
if torch.cuda.is_available():
    loss_fn=loss_fn.cuda()
# 优化器
learn_rate = 0.01
optimizer = torch.optim.SGD(module.parameters(), learn_rate)
# 设置训练网络的一些参数
# 记录训练次数
total_train_step = 0
# 记录测试的次数
total_test_step = 0
# 训练次数
epoch = 10

# 添加tensoboard
writer = SummaryWriter("./logs_train")
for i in range(epoch):
    print("---------第{}轮训练开始------------".format((i + 1)))
    # 训练开始
    for data in train_dataloader:
        imgs, targets = data
        if torch.cuda.is_available():
            imgs=imgs.cuda()
            targets=targets.cuda()
        output = module(imgs)
        loss = loss_fn(output, targets)
        # 优化器模型优化
        optimizer.zero_grad()
        loss.backward()
        optimizer.step()
        total_train_step = total_train_step + 1
        if total_train_step % 100 == 0:
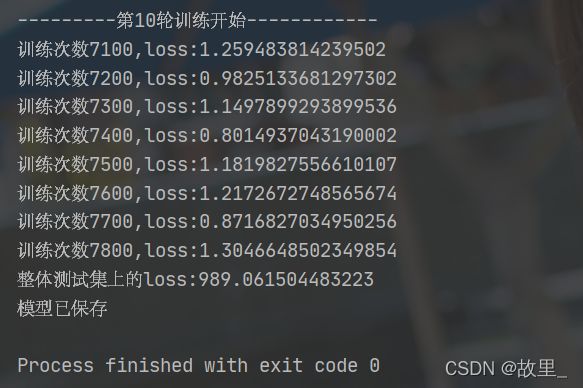
            print("训练次数{},loss:{}".format(total_train_step, loss.item()))
            writer.add_scalar("train_loss", loss.item(), total_train_step)
    # 测试步骤开始
    toatal_test_loss = 0
    with torch.no_grad():
        for data in test_dataloader:
            imgs, targets = data
            if torch.cuda.is_available():
                imgs = imgs.cuda()
                targets = targets.cuda()
            output = module(imgs)
            loss = loss_fn(output, targets)
            toatal_test_loss = toatal_test_loss + loss.item()
    print("整体测试集上的loss:{}".format(toatal_test_loss))
    writer.add_scalar("test_loss", toatal_test_loss, total_test_step)
    total_test_step += 1
    torch.save(module, "module_{}.pth".format(i))
    print("模型已保存")
writer.close()

# tensorboard --logdir=logs_train 终端输入打开tensorboard
Flatten():运行的过程中可能会报错,原因是版本问题,因为torch1.0版本没有这个模块
解决办法:
1.升级torch版本
2.将torch1.9版本的Flatten()加进来
链接:https://pan.baidu.com/s/1k_8cibBLzshBHOGaf9lnPg?pwd=g9fk
提取码:g9fk
第一步,找到本地安装pytorch的路径,我是通过ANACONDA安装,路径如下
E:\Anaconda3\envs\PyTorch\Lib\site-packages\torch\nn\modules
对其中的__init__文件修改
解压找到目录D:xx\pytorch-1.9.0\pytorch-1.9.0\torch\nn\modules中的flatten.py文件复制到自己电脑安装的相同路径下
3.第三步,替换第二个文件
找到你下载的1.9.0的文件下的D:xx\pytorch-1.9.0\torch的types.py文件
也放到原来的同样的位置
E:\Anaconda3\envs\PyTorch\Lib\site-packages\torch
4.最后,修改刚刚复制过来的types.py文件的第21行,注释掉这行
