Working Together: SQL Server 2008 R2 Reporting Services Integration in SharePoint 2010
SQL Server and SharePoint have always worked together well. When SharePoint Server 2010 and SQL Server 2008 R2 were released, there were some significant improvements to the integration between SharePoint and SQL Server 2008 R2 Reporting Services (SSRS). Here’s a look at how to configure and use the latest enhancements.
Server Integration Architecture
The Reporting Services Add-in for SharePoint is what truly drives the integration between the two servers. You install the add-in, which is available as a free download from the Microsoft Download Center, on all SharePoint 2010 Web Front End (WFE) servers that require integration with a Report Server. Figure 1 shows the architecture of the integration components.
On the SharePoint 2010 WFE, the add-in installs three components: the SSRS Proxy, a Report Viewer Web Part, and the application pages that allow you to view, store, and manage report server content on a SharePoint site or farm. The SSRS Proxy facilitates communication between the WFE and the Report Server. On the Central Administration Reporting Services pages within SharePoint, you configure the proxy with the Report Server you want to access, as well as the authentication method and credentials to access the server. For the integration to work, you must configure the Report Server to run in SharePoint Integrated mode.
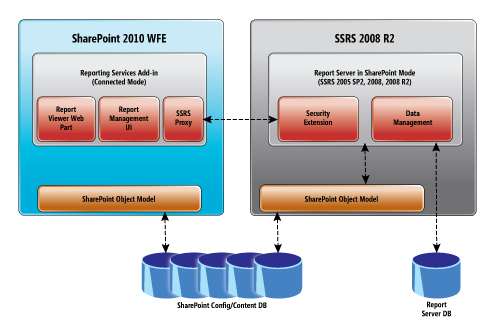
Figure 1 Server Integration Architecture
One item to note in Figure1 is the SharePoint Object Model component on the Report Server. For the Report Server to understand the reporting information stored in SharePoint and to be able to secure it, the Report Server has to interact with the configuration and content databases on your SharePoint site or farm. You can achieve this by installing a minimum copy of SharePoint on the Report Server and joining it to the farm.
The version of SharePoint you install on the Report Server must be the same as the version used throughout the farm. You need to do this only if you’re running your Report Server on a separate machine. If you are running both SharePoint and Reporting Services on the same machine, you only need to install the add-in.
Configuring Integration
Overall, configuring integration has been simplified with SharePoint 2010 and SQL Server 2008 R2. The order in which you perform the configuration depends on what you’ve already installed. Even if you’re starting from scratch or from an existing installation, the key is to have all the main components installed before you configure the SSRS Proxy in SharePoint. For best results when integrating SQL Server Reporting Service 2008 R2 with SharePoint 2010, the recommended order if starting from scratch is:
- Run the SharePoint 2010 prerequisite installer—this will install the SSRS 2008 R2 Add-in for SharePoint.
- Install and configure SharePoint 2010 in a farm configuration.
- Repeat steps 1 and 2 on the Report Server machine if it is separate from the SharePoint WFE machine, and configure it to join the SharePoint farm created in step 2.
- Install SQL Server Reporting Services in SharePoint Integrated mode.
- Configure the SSRS Proxy via the Reporting Services Integration page and activate the Reporting Services feature.
If you don’t see the Reporting Services content types in your site under the Document| New menu, you’ll need to manually add them. I describe how to add the Report Server Content types later in this article under Integration with Report Builder 3.0.
In this scenario, I’d use the SQL Server for the SharePoint database, rather than the embedded edition that SharePoint defaults to. If you plan to install all the components on one machine, step 5 is redundant. Steps 1 and 2 can be combined within the SQL Server installation process.
If you have an existing SharePoint installation, you can download and install the add-in at any time. The add-in installation process adds the necessary pages to the SharePoint Central Administration as well as the new Report Server content types for existing SharePoint Libraries in sites using the Business Intelligence (BI) Center site template.
On the SharePoint side, you can configure integration on either SharePoint Server 2010 or SharePoint Foundation 2010. Both support the installation of the Reporting Services Add-in. If you install SharePoint and Reporting Services on different machines, you must install the same version of SharePoint on the Report Server. For example, you would not be able to install SharePoint Foundation 2010 on the Report Server if you were using SharePoint Server 2010 as your Web Front End.
The add-in installation is very simple; besides entering you name and company, no other configuration is required. If you’re installing SharePoint for the first time, you install the add-in before you install SharePoint; this is done automatically when you run the SharePoint 2010 prerequisite.
Configuring the Report Server is straightforward. The key considerations are:
- The edition of SQL Server has to be Standard, Enterprise or higher.
- The Report Server database must be created for SharePoint Integrated mode.
- If you are using separate machines for SharePoint and Report Server, you’ll need a minimal installation of SharePoint and this must be joined to the farm on the Report Server.
A Report Server is implemented as a single Windows service that runs under a built-in account or a local or domain Windows user account. In SharePoint Integrated mode, the Report Server service account is provisioned appropriately to access to the SharePoint configuration and content database as well as SharePoint object model resources. This happens when configuring the Reporting Services integration with SharePoint via the Reporting Services Integration page.
When the authentication mode is “Windows Integrated,” the Windows user logged into SharePoint will be impersonated when connecting from the WFE to the Report Server. When the authentication mode is a trusted account, the SharePoint user context of the user logged into SharePoint is passed on to Report Server in the form of the SharePoint user token. The SharePoint WFE’s application pool account is used to make the connection from the WFE to Report Server. You’ll find a summary of the Service Account Configuration in the TechNet article “Configuring Reporting Services for SharePoint 2010 Integration.”
If you’ve already installed Reporting Services using the default settings, the Reporting Services database will be in Native mode. To operate in SharePoint Integrated mode, you’ll need to return to the Reporting Services Configuration tool and, from the Database Settings page, change the mode from Native to SharePoint Integrated.
You can change the Report Server mode from Native to SharePoint Integrated at any time; however, this does not convert the existing database. Each time you switch you must either create a new database or connect to an existing one.
Before configuring the Reporting Services Proxy options within SharePoint, there’s one other configuration you need to make. You should ensure anonymous access has not been enabled on the Web application. While this will not stop you from configuring the Reporting Services Proxy settings, your users will get an error when they run reports. You can choose to use Windows or any claims-based authentication fromthe other authentication providers, and if you are configuring integration between a report server and a SharePoint farm, each SharePoint Web application in the farm can be configured to use different authentication providers.
The Add-in creates a new Reporting Services section within the SharePoint Central Administration General Application Settings page. On the Reporting Services Integration page you enter the Report Server URL and the authentication details and activation of the Reporting Services feature on all or selective site collections in the farm.
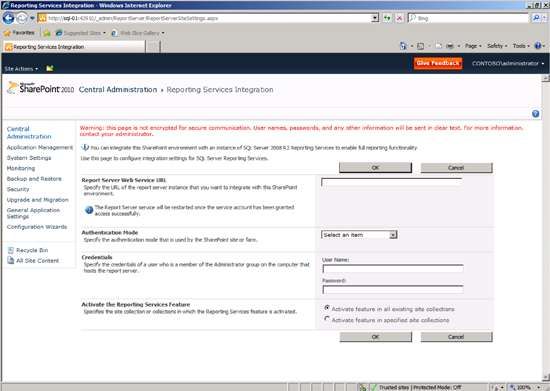
Figure 2 Configuring the Reporting Services Proxy
Once you complete the page shown in Figure 2, the integration configuration process is complete.
Integration with Report Builder 3.0
The main benefit of the integration between SharePoint and Reporting Services is that it allows users to create, modify and publish reports from within SharePoint. Reporting Services provides some predefined content types that are used to manage various files, including the shared Report data source (.rsds) files, the Report Builder model (.smdl), and the Report Builder report definition (.rdl) files. After you have configured integration to allow users to create and manage these new content types from the ribbon and the context menus, you need to enable the new content types on those libraries.
If you are using the BI Center site template, you do not have to do anything; the content types are automatically enabled with the template and for all sites created using this template. For all other sites and document libraries, you’ll need to carry out a two-step configuration process. First, you need to enable Content Type Management within the libraries; by default it is off. Then you need to enable the content types for the library. To enable content type management for a document library, follow the procedure in the TechNet article “How to: Add Report Server Content Types to a Library (Reporting Services in SharePoint Integrated Mode).”
Once these new content types have been added to a library, three new options will appear from the New Document drop-down on the Documents tab. If you now select the Report Builder Report option, Report Builder 3.0 will be downloaded to the client and run. You can alter this behavior from the SharePoint Central Administration. The Reporting Services Server Defaults allows you to turn off this option as well as configure an alternate URL for Report Builder.
Using the Report Viewer Web Part on a SharePoint Site
The Report Viewer Web Part is a custom Web Part that is installed by the Reporting Services Add-in. You can use the Web Part to view, navigate, print and export reports on a report server. To add this Web Part to a page, you can use the steps in the TechNet article “How to: Add the Report Viewer Web Part to a Web Page (Reporting Services in SharePoint Integrated Mode).”
Each Report Viewer Web Part renders one report at a time based on the absolute URL to the report file (.rdl) specified in the Report property. The URL must be the fully qualified path to a report on the current SharePoint site or on a site within the same Web application or farm. The URL must resolve to a document library or to a folder within a document library that contains the report. The report URL must include the .rdl file extension. If the report depends on a model or shared data source files, you don’t need to specify those files in the URL. The report contains references to the files it needs.
Claims Authentication and Reporting Services
One of the new features introduced with SharePoint Server 2010 is support for claims-based authentication. In claims-aware applications, clients present “claims” to the application. These claims are pieces of information about the user, such as user name, e-mail address, or manager name. This provides the application with more information than it would receive using Kerberos. Take, for example, a purchasing application: Two of the claims passed to the application could be the user’s manager’s e-mail address and the user’s purchasing limit. In a non-claims-aware application, this information would have to be managed by the application.
In the SharePoint world, claims authentication solves the problem of sharing SharePoint sites across organizations. Using a product like Active Directory Federation Services (AD FS), two organizations with different authentication methods can set up claims that allow SharePoint to identify a user and assign the correct permissions.
Because this functionality is built into SharePoint 2010 products, Reporting Services can work with this authentication model. Reporting Services is not claims-aware; instead it communicates with SharePoint through a trusted account. The proxy service within the SQL Server 2008 R2 add-in uses the SharePoint object model to convert the claims token into a corresponding SharePoint user context in the form of a SharePoint user token that the Report Server can understand and use to validate against the SharePoint database. In a nutshell, the process works like this:
- SharePoint performs the appropriate claims authentication and, using the SharePoint Secure Token Service, communicates the claims token to the Reporting Services proxy.
- The Reporting Services proxy then uses the claims token to communicate with the SharePoint object model and generate a corresponding SharePoint user token that it forwards to the Report Server.
- The Report Server uses the SharePoint user token against the local SharePoint object model to generate the correct SharePoint user context.
- If the user has the required permission, Report Server sends the requested information back to SharePoint using the appropriate SharePoint user context as it would normally.
Native List Reporting
SQL Server 2008 R2 Reporting Services now supports SharePoint lists as a data source. This support allows you to retrieve list data from SharePoint Foundation 2010, SharePoint Server 2010, Windows SharePoint Services 3.0, and Office SharePoint Server 2007. The ability to access list data is not reliant on the add-in or running Report Server in Native or SharePoint Integrated mode. The functionality is built into Report Server. What changes in the different configurations is the method of access.
There are two methods by which SharePoint list data is accessed. One is via the lists.asmx web service and the other is via the SharePoint object model APIs. On any SharePoint installation, if you enter the URL http://<sharepoint_server_name>\lists.asmx, you’ll get an XML list of all the lists on the SharePoint site that you’re able to access. By using this method, Report Builder 3.0 is able to retrieve the lists. A Report Server configured in Native mode also uses this method.
The SharePoint object model API method can be used in two scenarios. One is where a Report Server is configured in SharePoint Integration mode and the list exists in the same SharePoint farm Reporting Services is integrated with, and this is all on the same machine; remember that in this scenario there is a copy of SharePoint running on the Report Server that gives it access to the API set. The other scenario is where you have SharePoint 2010 installed along with the add-in, but you have no Report Server. This is called local mode and is covered later in the section “Reporting Without Reporting Services.”
To use data obtained from a SharePoint list within a report first requires you create a data source, then a dataset that uses that data source. In Report Builder 3.0, there is a new connection type on the Data Source properties page called Microsoft SharePoint List, as shown in Figure 3. Along with this option, you enter the URL of your SharePoint site—no need to add lists.asmx to the URL. The data source can also be configured with different credentials to use when accessing the SharePoint server.
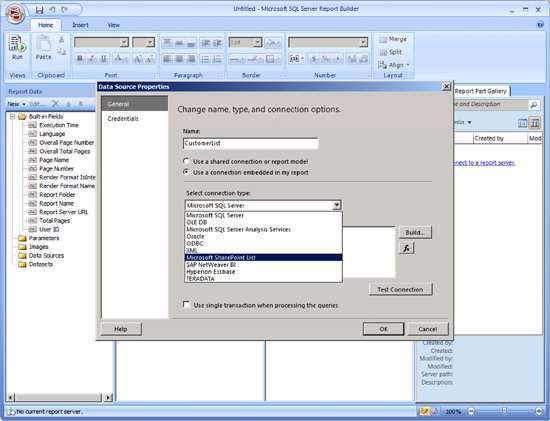
Figure3 SharePoint List Connection Type
When you create a new dataset based on this data source, you will be given a list of all the SharePoint lists on the site you have access to. You can then drill down into a list and access the individual list items, create filters, create parameters and create reports just as if this were a SQL database table.
Alternate Access Mapping Support
Another integration enhancement is support for Alternate Access Mapping (AAM). AAM has been in SharePoint since the 2007 version, but Reporting Services did not support it. Now if you configure an alternate access mapping within SharePoint Central Administration, the Reporting Service Add-in will maintain the URL structure, as shown in the very simple report in Figure 4. Both http://sql-01 and http://www.contoso.com render the same report.
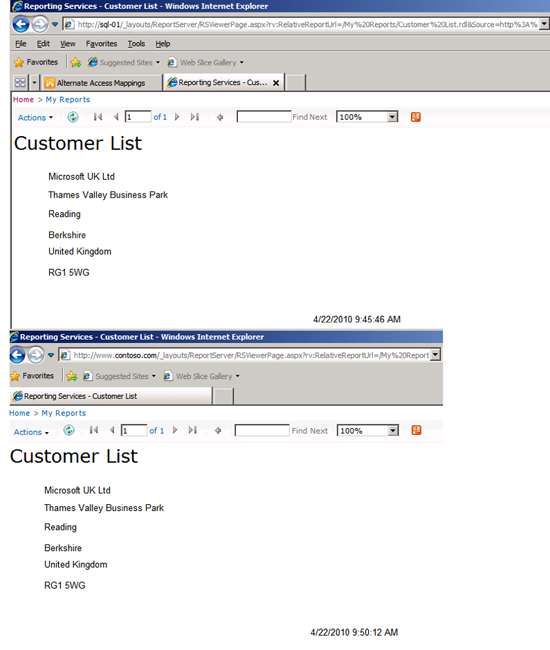
Figure 4 Alternate Access Mapping
Reporting Without Reporting Services
So far, all the information in this article has pertained to what is called connected mode. In the previous versions of Reporting Services, this was the only mode available and meant that SharePoint had to be connected to a Reporting Services report server configured in SharePoint Integrated mode in order to render reports using the Report Viewer.
With the release of SQL Server 2008 R2, you can render reports without integrating your SharePoint site or farm with a Reporting Services report server. Instead, you can use the Report Viewer to directly render reports from SharePoint when the data extension supports local mode reporting. Out of the box, only the SharePoint List and the Microsoft Access 2010 reporting extension support this.
When you’re in local mode, you can also render a report that has an embedded data source or a shared data source from an .rsds file. However, you can’t manage the report or its associated data source as this is not supported in local mode.
Supported Combinations of the SharePoint Add-in and Report Server
With the release of SQL Server 2008 R2 and SharePoint Server 2010, there are now three versions of SQL, three versions of the add-in, and two versions of SharePoint. The integration components can work on any of these releases, but you have to mix and match the right versions. The table in Figure 5 provides the supported combinations of products.
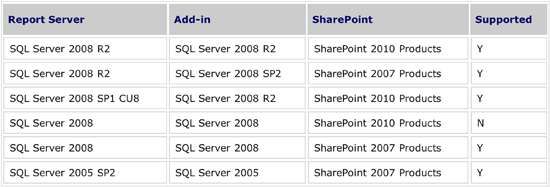
Figure 5 Supported Combinations of the SharePoint Add-in and Report Server
reference:http://technet.microsoft.com/en-us/magazine/ff686706.aspx