SpringBoot2
一、配置文件
在resource下的application.properties文件(默认)
3中配置文件类型 application.properties、application.yml(主流格式)、application.yaml 优先级从左到右
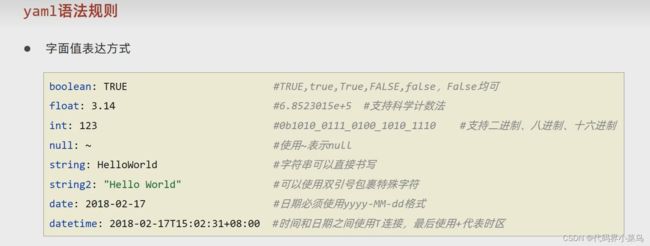
yaml语法规则:#表示注释 数据冒号后面有一个空格
读取yaml单一属性数据
name: zhangsan
address:
  grandmother: china
  province: changsha

@SpringBootTest
class Springboot01QuickstartApplicationTests {

    @Value("${name}")
    private String name;

    @Value("${address.province}")
    private String province;

    @Test
    public void testGetByPage(){
        System.out.println(name+province);
    }
}
yaml文件中的变量引用
baseDir: c:\windows
#使用${属性名}引用数据
tempDir: ${baseDir}\temp
#使用引号包裹的字符串,其中的转义字符可以生效
tempDir: "${baseDir}\temp \t1 \t2"
读取yaml的全部属性数据
name: zhangsan
address:
  grandmother: china
  province: changsha

//使用自动装配所有的数据封装到一个对象Environment
@Autowired
private Environment env;

@Test
public void testGetByPage(){
    System.out.println(env.getProperty("name"));
}
读取yaml引用数据属性数据
address:
  grandmother: china
  province: changsha

@Data
//1.定义数据模型封装yaml文件中对应的数据
//2.定义为spring管控的bean
@Component
//3.指定加载的数据
@ConfigurationProperties(prefix = "address")
public class Address {
    private String grandmother;
    private String province;
}

//测试
@SpringBootTest
class Springboot01QuickstartApplicationTests {
    @Autowired
    private Address address;
    @Test
    public void testGetByPage(){
        System.out.println(address);
    }
}
配置数据模型上方爆红,导入下方坐标
    org.springframework.boot
    spring-boot-configuration-processor
    true
二、SpringBoot整合第三方技术
整合Junit:
@SpringBootTest测试类注解 设置JUnit加载的SpringBoot启动类
@SpringBootTest
class Springboot01QuickstartApplicationTests {}
换了位置不可用 classes
@SpringBootTest(classes = SpringBootApplication.class)
class Springboot01QuickstartApplicationTests {}
整合MyBatis
问题一:mysql8版本 解决方法:url: jdbc:mysql://localhost:3306/jdbc?serverTimezone=UTC
问题二:驱动过过时 解决方法:com.mysql.cj.jdbc.Driver
//1.导入相关坐标

  org.mybatis.spring.boot
  mybatis-spring-boot-starter
  2.3.0


  mysql
  mysql-connector-java
  8.0.31
  runtime

//2.配置相关信息
spring:
  datasource:
    driver-class-name: com.mysql.cj.jdbc.Driver
    url: jdbc:mysql://localhost:3306/jdbc?serverTimezone=UTC
    username: root
    password: root
//3.创建UserDao接口
@Mapper
public interface UserDao{
    @Select("select * from account where id = #{id}")
    Account selectById(int id);
}
//4.测试
@SpringBootTest
class Springboot01QuickstartApplicationTests {
    @Autowired
    private UserDao userDao;
    @Test
    public void testGetByPage(){
        Account account = userDao.selectById(1);
        System.out.println(account);
    }
}
整合MyBatisPlus
//1.导入相关坐标

   com.baomidou
   mybatis-plus-boot-starter
   3.4.3


   mysql
   mysql-connector-java
   8.0.31
   runtime

//2.导入相关配置属性
spring:
  datasource:
    driver-class-name: com.mysql.cj.jdbc.Driver
    url: jdbc:mysql://localhost:3306/jdbc?serverTimezone=UTC
    username: root
    password: root
//3.修改UserDao
@Mapper
public interface UserDao extends BaseMapper {
}
//4.测试
@SpringBootTest
class Springboot01QuickstartApplicationTests {
    @Autowired
    private UserDao userDao;
    @Test
    public void testGetByPage(){
        Account account = userDao.selectById(2);
        System.out.println(account);
    }
}
整合druid
//1.导入坐标

  com.alibaba
  druid-spring-boot-starter
  1.2.6

//2.配置方法一
spring:
  datasource:
    driver-class-name: com.mysql.cj.jdbc.Driver
    url: jdbc:mysql://localhost:3306/jdbc?serverTimezone=UTC
    username: root
    password: root
    type: com.alibaba.druid.pool.DruidDataSource
//3.配置方法二(推荐使用)
spring:
  datasource:
    druid:
      driver-class-name: com.mysql.cj.jdbc.Driver
      url: jdbc:mysql://localhost:3306/jdbc?serverTimezone=UTC
      username: root
      password: root
三、基于SpringBoot的SSMP整合案例
案例实现方案分析
实体类开发-------使用Lombok快速制作实体类
Dao开发------整合MyBatisPlus,制作数据层测试类
Service开发-------基于MyBatisPlus进行增量开发,制作业务层测试类
Controller开发-------基于Restful开发,使用PostMan测试接口功能
Controller开发--------前后端开发协议制作
页面开发------无所谓,我会--------列表、新增、删除、修改、分页、查询
项目异常处理
按条件查询-------页面功能调整、Controller修正功能、Service修正功能
初始化项目
//1.导入坐标

   com.baomidou
   mybatis-plus-boot-starter
   3.4.3


   mysql
   mysql-connector-java
   8.0.31
   runtime


   com.alibaba
   druid-spring-boot-starter
   1.2.6

//2.编写配置类
server:
  port: 80
spring:
  datasource:
    druid:
      driver-class-name: com.mysql.cj.jdbc.Driver
      url: jdbc:mysql://localhost:3306/jdbc?serverTimezone=UTC
      username: root
      password: root
初始化表和实体类
@Data
public class Book {
    //使用这个Integer包装类,因为他的默认值是null
    private Integer id;
    private String name;
    private String type;
    private String description;
    //标识是否删除
    private Integer deleted;
}
增加MP相关配置
mybatis-plus:
  global-config:
    db-config:
      logic-delete-field: deleted
      logic-delete-value: 1 #删除的值
      logic-not-delete-value: 0 #未删除的值
      table-prefix: tbl_  #表名以tbl_开头
      id-type: auto #id为自增
  configuration:
    log-impl: org.apache.ibatis.logging.stdout.StdOutImpl #开启日志
新建dao.BookDao操作数据层
@Mapper
public interface BookDao extends BaseMapper {
}
分页
编写MyBatisPlus配置类:
@Configuration
public class MPConfig{
    @Bean
    public MybatisPlusInterceptor mpInterceptor(){
        MybatisPlusInterceptor mpInterceptor = new MybatisPlusInterceptor();
        mpInterceptor.addInnerInterceptor(new PaginationInnerInterceptor());
        return mpInterceptor;
    }
}
分页实例测试代码:
@SpringBootTest
class Springboot01QuickstartApplicationTests {
    @Autowired
    private BookDao bookDao;

    @Test
    public void test(){
        //分页从第1页开始,第二个参数表示每页多少条数据
        IPage page = new Page(1,3);
        bookDao.selectPage(page,null);
        System.out.println(page);
    }
}
查询条件(实例):
@SpringBootTest
class Springboot01QuickstartApplicationTests {
    @Autowired
    private BookDao bookDao;

    @Test
    public void test(){
        String name = "长篇";
        LambdaQueryWrapper lqw = new LambdaQueryWrapper<>();
        lqw.like(name != null,Book::getType,name);
        List books = bookDao.selectList(lqw);
    }
}
业务层标准开发(基础CRUD):
com.itheima.service.BookService的接口
public interface BookService {
    public List selectAll();
}
com.itheima.service.impl.BookServiceImpl的实现类
@Service
public class BookServiceImpl implements BookService {
    @Autowired
    private BookDao bookDao;

    @Override
    public List selectAll() {
        List books = bookDao.selectList(null);
        return books;
    }
}
测试
@SpringBootTest
class Springboot01QuickstartApplicationTests {
    @Autowired
    private BookService bookService;

    @Test
    public void test() {
        System.out.println(bookService.selectAll());
    }
}
业务层快速开发(基于MyBatisPlus构建)
快速开发方案:
使用MyBatisPlus提供有业务层通用接口(IService
在通用类基础上作功能重载或功能追加
注意重载时不要覆盖原始操作,避免原始提供的功能丢失
com.itheima.service.BookService的接口上面的修改
public interface BookService extends IService {
}
com.itheima.service.impl.BookServiceImpl的实现类
@Service
public class BookServiceImpl extends ServiceImpl implements BookService {
}
测试
@SpringBootTest
class Springboot01QuickstartApplicationTests {
    @Autowired
    private BookService bookService;

    @Test
    public void test() {
        System.out.println(bookService.list());
    }
}
表现层标准开发
Post提交的参数使用:@RequestBody Book book
Get通过路径提交的参数为:@PathVariable Integer id
com.itheima.controller下创建BookController
@RestController
@RequestMapping("/book")
public class BooController {
    @Autowired
    private BookServiceImpl bookService;

    @GetMapping
    public List getAllBook(){
        return bookService.list();
    }
}
表现层数据一致性处理(R对象)
在com.itheima.controller.utils.Result
@Data
public class Result {
    private Integer code;
    private Object data;
    private String message;

    public Result() {
    }

    public Result(Integer code, Object data) {
        this.code = code;
        this.data = data;
    }

    public Result(Integer code, String message) {
        this.code = code;
        this.message = message;
    }
}
修改controller的返回结果
@RestController
@RequestMapping("/book")
public class BooController {
    @Autowired
    private BookServiceImpl bookService;

    @GetMapping
    public Result getAllBook(){
        return new Result(201,bookService.list());
    }
}
异常消息处理
在com.itheima.controller.utils.ProjectExceptionAdvice异常处理器
//作为springmvc的异常处理器
//@ControllerAdvice
@RestControllerAdvice
public class ProjectExceptionAdvice {
    //拦截所有的异常信息
    @ExceptionHandler
    public Result doException(Exception ex){
        //记录日志
        //通知运维
        //通知开发
        ex.printStackTrace();
        return new Result(302,"服务器故障,请稍后再试!");
    }
}
四、打包与运行
程序打包运行(Windows)
跳过测试 运行clear 运行package 输入java -jar springboot.jar
程序打包运行(Linux)
跳过测试 运行clear 运行package 输入java -jar springboot.jar
五、配置高级
临时属性
例如java -jar springboot.jar --server.port=8080 多个临时属性用空格设置
关闭临时属性:可以关闭启动文件的args传入
public static void main(String[] args) {
   SpringApplication.run(Springboot01QuickstartApplication.class);
}
配置文件的4级分类
六、多环境开发
多环境开发yaml版本
# 应用环境
# 公共配置
spring:
  profiles:
    active: dev
---
# 设置环境
# 生产环境
spring:
  profiles: pro
server:
  port: 80
---
# 开发环境
spring:
  profiles: dev
server:
  port: 81
---
# 测试环境
# 取消过时方法
spring:
  config:
    activate:
      on-profile: test
server:
  port: 82
---
多环境开发多文件版(yaml版)
# 应用环境
# 公共配置
spring:
  profiles:
    active: dev  #通过这个指定文件

# application-dev
server
    port: 80
# application-pro
server
    port: 81
# application-test
server
    port: 82
七、日志操作
快速生成日志:
@Slf4j
@RestController
@RequestMapping("/book")
public class BooController {
    log.info("日志信息")
}
文件记录日志(运维使用篇)
logging:
  pattern:
  #    console: "" 控制日志输出格式
  file:
    name: server.log  #将日志输出到这个文件
八、热部署
手工热部署
添加热部署依赖
    org.springframework.boot
    spring-boot-devtools
    2.7.5
点击builder-->builder project 或者 ctrl+f9
自动热部署
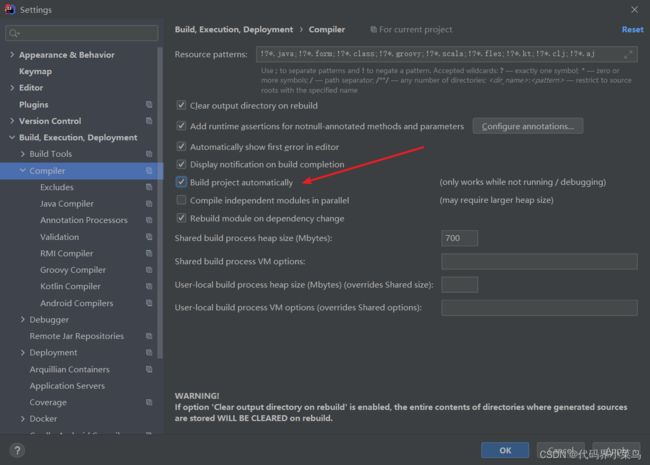
设置自动build project
第二步
第三步
自动热部署的范围配置
spring
  devtools:
    restart:
      #设置不参与热部署的文件
      exclude: static/**
关闭热部署
public static void main(String[] args) {
    System.setProperty("spring.devtools.restart.enabled","false");
    SpringApplication.run(Springboot01QuickstartApplication.class, args);
}
九、配置高级
配置类报错:
配置文件注入类
导入坐标
    javax.validation
    validation-api


    org.hibernate.validator
    hibernate-validator
实体类
@Component
@ConfigurationProperties(prefix = "server")
//2.开启当前bean的属性注入校验
@Validated
public class ServerConfig {
    //3.设置具体的规则
    @Max(value = 8888,message = "最大值不能超过8888")
    private int port;
}
ymal语法规则
十、测试
测试专用属性
//properties属性可以为当前测试用例添加临时的属性配置
//@SpringBootTest(properties = {"test.prop=testValue1"})
@SpringBootTest(args = {"test.prop=testValue1"})
class Springboot01QuickstartApplicationTests {}
加载测试专用配置
使用@Import({MPConfig.class})
测试类中测试web层
@SpringBootTest(webEnvironment = SpringBootTest.WebEnvironment.NONE)加入事务回滚
@Service
@Transactional
public class BookServiceImpl extends ServiceImpl implements BookService {}


想在测试用例中提交事务,可以通过@Rollback注解设置
@Rollback
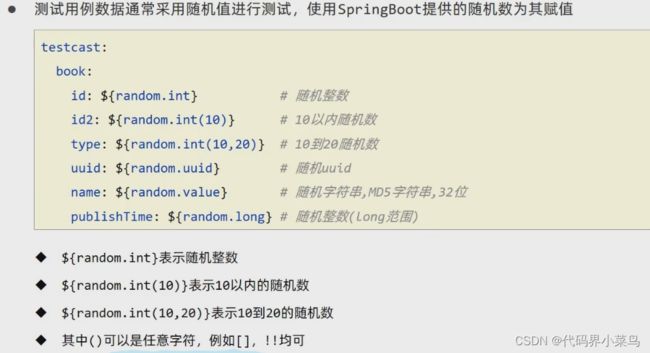
测试用例--随机数据
十一、Redis
Redis是一款key-value存储结构的内存级NoSQL数据库
支持多种数据存储格式、支持持久化、支持集群
导入依赖
      org.springframework.boot
      spring-boot-starter-data-redis
配置
spring
  redis:
    host: localhost
    port: 6379
使用RedisTemplate爆红不影响
@SpringBootTest
class Springboot01QuickstartApplicationTests {

    @Autowired
    private RedisTemplate redisTemplate;

    @Test
    public void set() {
        ValueOperations ops = redisTemplate.opsForValue();
        ops.set("province","changsha");
    }

    @Test
    public void get() {
        ValueOperations ops = redisTemplate.opsForValue();
        Object province = ops.get("province");
        System.out.println(province);
    }

    @Test
    public void hset() {
        HashOperations ops = redisTemplate.opsForHash();
        ops.put("info","a","aaa");
    }

    @Test
    public void hget() {
        HashOperations ops = redisTemplate.opsForHash();
        Object province = ops.get("info","a");
        System.out.println(province);
    }
}
StringRedisTemplate(常用) RedisTemplate
@SpringBootTest
class Springboot01QuickstartApplicationTests {

    @Autowired
    private StringRedisTemplate stringRedisTemplate;

    @Test
    public void get() {
        ValueOperations ops = stringRedisTemplate.opsForValue();
        ops.get("province");
    }
}
十二、Mongodb
导入依赖
    org.springframework.boot
    spring-boot-starter-data-mongodb
配置
spring:
  data:
    mongodb:
      uri: mongodb://localhost/itheima
使用
@SpringBootTest
class Springboot01QuickstartApplicationTests {

    @Autowired
    private MongoTemplate mongoTemplate;

    @Test
    public void save() {
        Book book = new Book();
        book.setId(1);
        book.setName("哈哈");
        book.setDescription("描述");
        book.setDeleted(1);
        mongoTemplate.save(book);
    }

    @Test
    public void findAll() {
        List all = mongoTemplate.findAll(Book.class);
        System.out.println(all);
    }
}
十三、Elasticsearch(ES)
Elasticsearch是一个分布式全文搜索引擎
运行:bin/elasticsearch.bat 打开
索引操作:


