Vue拾遗 —— vue-router 基本使用
什么是路由?
- 说起路由想起了什么?
- 路由是一个网络工程里面的术语。
- 路由(routing)就是通过互联的网络把信息从源地址传输到目的地址的活动。
- 生活中,关于路由的概念很自然想到路由器
- 路由器提供两种机制:路由和传送
- 路由是决定数据包从来源到目的地的路径
- 转送将输入端的数据转移到合适的输出端
- 路由有一个非常重要的概念叫路由表
- 路由表本质上是一个映射表,决定了数据包的指向
后端路由阶段
- 早期的网站开发整个HTML页面是由服务器来渲染的(jsp)
- 服务器直接生产渲染好对应的HTML页面,返回给客户端进行展示
- 但是一个网站,这么多页面,服务器如何处理?
- 一个页面有自己对应的网址,也就是URL。
- URL会发送到服务器,服务器会通过正则对该URL进行匹配,并且最后交给一个Controller进行处理
- Controller进行各种处理,最终生成HTML或者数据,返回给前端。
- 这就完成了一个IO操作。
- 上面这种操作,就是后端路由(处理URL和页面之间的映射关系)
- 当我们页面中需要请求不同的路径内容时,交给服务器来进行处理,服务器渲染好整个页面,并且将页面返回给客户端
- 这种情况下渲染好的页面,不需要单独加载任何js和css,可以直接交给浏览器展示,这样也有利于SEO的优化。
- 后端路由的缺点
- 一种情况是整个页面的模块由后端人员来编写和维护的
- 另一种情况是前端开发人员如果要开发页面,需要通过PHP和Java等语言来编写页面代码
- 而且通常情況下HTML代码和数据以及对应的逻辑会混在一起,编写和维护都是非常糟糕的事情.
前端路由阶段
- 前后端分离阶段
- 随着Ajax的出现,有了前后端分离的开发模式
- 后端只提供API来返回数据,前端通过Ajax获取数据,并且可以通过JavaScript将数据渲染到页面中
- 这样做最大的优点就是前后端责任清晰,后端专注于数据上,前端专注于交互和可视化上
- 并且当移动端(iOS/Android)出现后,后端不需要进行任何处理,依然使用之前的一套API即可
- 目前很多网站依然采用这种模式开发。
- 单页面富应用阶段:
- 其实SPA最主要的特点就是在前后端分离的基础上加了一层前端路由
- 也就是前端来维护一套路由规则
- 前端路由的核心是什么?
- 改变URL,但是页面不进行整体的刷新
- 如何实现呢?
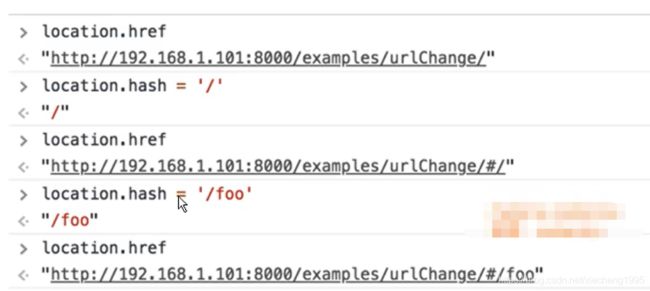
URL的hash
HTML5的history模式:pushState
HTML5的history模式:replaceState
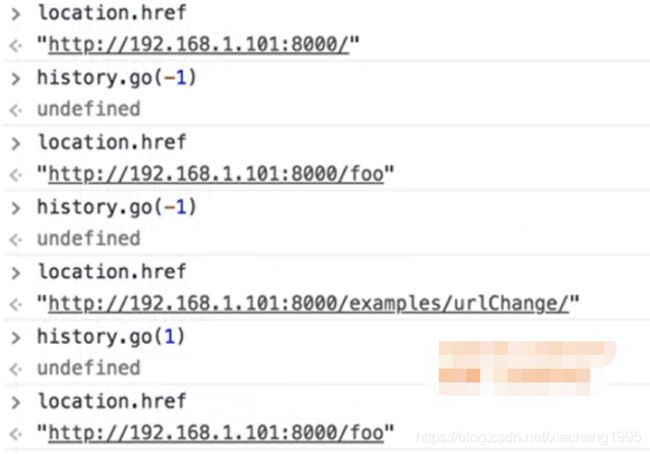
HTML5的history模式:go
- history.go()

补充说明: - 上面只演示了三个方法
- 因为 history. back()等价于history. go(-1)
- history.forward()则等价于 history. go(1)
- 这三个接口等同于浏览器界面的前进后退。
认识vue-router
- vue-router是基于路由和组件的
- 路由用于设定访问路径,将路径和组件映射起来
- 在vue-router的单页面应用中,页面的路径的改变就是组件的切换
安装和使用vue-router
- 步骤一:安装vue-router
npm intall vue-router --save
- 步骤二:在模块化工程中使用它(因为是一个插件,所以可以通过Vue.use()来安装路由功能)
- 第一步:导入路由对象,并且调用Vue.use(VueRouter)
- 第二步:创建路由实例,并且传入路由映射配置
- 第三步:在Vue实例中挂载创建的路由实例
- 使用vue-router的步骤:
- 第一步:创建路由组件
- 第二步:配置路由映射:组件和路径映射关系
- 第三步: 使用路由:通过
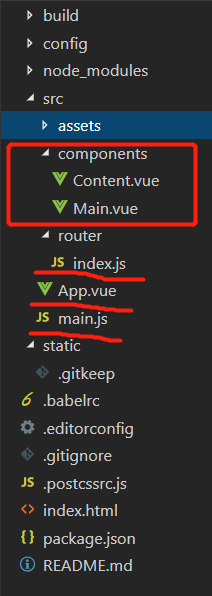
Vue路由项目文件基础结构
自定义组件(components)
定义两个组件,最后希望实现同一页面中两个组件的自由跳转。
Content.vue
<template>
  <h1>内容页h1>
template>

<script>

export default {
  name: 'Content'
}
script>

<style scoped>

style>
Main.vue
<template>
  <h1>主页h1>
template>

<script>

export default {
  name: 'Main'
}
script>

<style scoped>

style>
路由配置文件(router文件夹下的index.js)
文件内容包括:
- 引入路由
- 引入自定义组件
- 配置路由的路径、路由名称(可也不添加)及跳转的组件
import Vue from 'vue'
import VueRouter from 'vue-router' // 1

// 2
import Content from '../components/Content'
import Main from '../components/Main'

Vue.use(VueRouter)

export default new VueRouter({
    // 3
    routes:[
    {
        // 路由的路径
        path:'/content',
        // 路由名称(可以不添加)
        name:'content',
        // 跳转的组件
        component:Content
    },
    {
        // 路由的路径
        path:'/main',
        // 路由名称(可以不添加)
        name:'main',
        // 跳转的组件
        component:Main
    }
]
})
主配置文件下引入路由配置文件
main.js,此文件为项目执行入口
import Vue from 'vue'
import App from './App'
import router from './router' // 引入路由配置文件
Vue.config.productionTip = false
new Vue({
el: '#app',
router, //配置路由
components: { App },
template: '路由的使用
App.vue
其中router-link为路由链接标签,router-view为跳转组件显示标签。
<template>
  <div id="app">
    <h1>vue-router 使用h1>
    <router-link to="/main">首页router-link>
    <router-link to="/content">内容页router-link>
    <router-view>router-view>
  div>
template>

<script>

export default {
  name: 'App'
}
script>
效果
标签- 网页的其他内容,比如顶部的标题/导航,或者底部的一些版权信息等会和
- 在路由切换时,切换的是
< router-view>挂载的组件,其他内容不会发生改变
路由的默认路径
- 我们这里还有一个不太好的实现:
- 默认情况下,进入网站的首页,我们希望
- 但是我们的实现中,默认没有显示首页组件,必须让用户点击才可以
- 默认情况下,进入网站的首页,我们希望
- 如何可以让路径默认跳到首页,并且
< router-view>渲染首页组件呢?- 非常简单,我们只需要多配置一个映射就可以了
const routes = [
	{
		path: '/',
		redirect: '/home'
	}
]
- 配置解析:
- 我们在routes中又配置了一个映射
- path配置的是根路径:/
- redirect是重定向,也就是我们将根路径重定向到 /home 的路径下,这样就可以得到我们想要的结果了
HTML5的History模式
- 改变路径的方式有两种:
- URL的hash
- HTML5的history
- 默认情况下,路径的改变使用的URL的hash
- 如果希望使用HTML5的history模式,进行如下配置即可:
const router = new VueRouter({
	routes,
	mode: 'history'
})
router-link补充
- 在前面的
- tag:tag可以指定
- tag:tag可以指定
<router-link to='/home' tag='button'>
- replace:replace不会留下history记录,所以指定replace的情况下,后退键返回不能返回到上一个页面中
<router-link to='/home' replace>
- active-class:当
- 在进行高亮显示的导航菜单或者底部tabar时,会使用到该类
- 但是通常不会修改类的属性,会直接使用默认的router-link-active即可
方式一:
<router-link to='/home' active-class="active">
.active {
	color: red;
}
方式二:
const router = new VueRouter({
	routes,
	linkActiveClass: 'active'
})
路由代码跳转
- 当页面跳转需要执行js代码时,可以使用下面跳转方式:
两种方式:
this.$router.push('/home')  // push方式(可返回)
this.$router.replace('/home') // replace方式(不可返回)
动态路由
路由路径添加参数(abc)
routes:[
    {
        path:'/user/:abc',
        component: User
    }
]
路由
<router-link :to="'/user/' + userId" active-class="active">用户router-link>

data() {
	return {
		userId: 'zhangsan'
	}
}
跳转组件,引入参数
- 方式1
<h2>{{ userId }}h2>

computed: {
	userId() {
		return this.$route.params.abc
	}
}
- 方式2
<h2>{{ $route.params.abc }}h2>
认识路由的懒加载
- 官方解释:
- 当打包构建应用时,Javascript包会变得非常大,影响页面加载。
- 如果我们能把不同路由对应的组件分割成不同的代码块,然后当路由被访问的时候才加载对应组件,这样就更加高效了
- 官方在说什么呢?
- 首先,我们知道路由中通常会定义很多不同的页面
- 这个页面最后被打包在哪里呢?一般情况下,是放在一个js文件中
- 但是,页面这么多放在一个js文件中,必然会造成这个页面非常的大
- 如果我们一次性从服务器请求下来这个页面,可能需要花费一定的时间,甚至用户的电脑上还出现了短暂空白的情况
- 如何避免这种情况呢?使用路由懒加载就可以了
- 路由懒加载做了什么?
- 路由懒加载的主要作用就是将路由对应的组件打包成一个个的js代码块
- 只有在这个路由被访问到的时候,才加载对应的组件
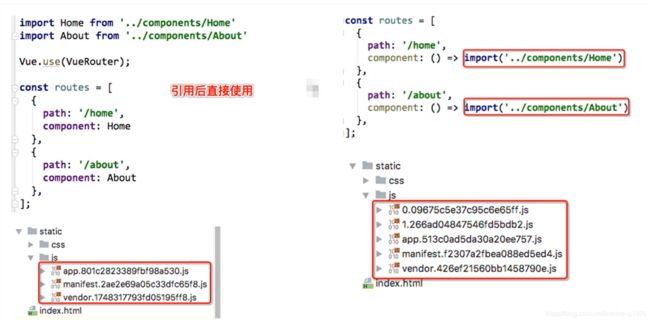
路由懒加载的效果
- 方式一:结合Vue的异步组件和Webpack的代码分析
- 方式二:AMD写法
![]()
- 方式三:在ES6中,我们可以有更加简单的写法来组织Vue异步组件和Webpack的代码分割(推荐写法)
const Home = () => import('../components/Home.vue')
认识嵌套路由
- 嵌套路由是一个很常见的功能
- 比如在home页面中,我们希望通过/home/news和/home/message访问一些内容
- 一个路径映射一个组件,访问这两个路径也会分别渲染两个组件
- 路径和组件的关系如下:

- 实现嵌套路由有两个步骤:
- 创建对应的子组件,并且在路由映射中配置对应的子路由.
- 在组件内部使用
router/index.js:
const Home = () => import('../components/Home.vue')
const Message = () => import('../components/message.vue')
const News = () => import('../components/news.vue')
const About = () => import('../components/About.vue')

const routes = [
	{
		path: '/home',
		component: Home,
		children:[
			{
				path: 'messgae',
				component: Message
			},
			{
				path: 'news',
				component: News
			}
		]
	}
]
Home.vue:
<router-link to="/home/message">消息router-link>
<router-link to="/home/news">新闻router-link>
<router-view><router-view>
传递参数的方式
- 传递参数主要有两种类型:params和query
- params的类型(参考上面动态路由)
- 配置路由格式:/router/:id
- 传递的方式:在path后面跟上对应的值
- 传递后形成的路径:/router/123,/router/abc
- query的类型:
- 配置路由格式:/router,也就是普通配置
- 传递方式:对象中使用query的key作为传递方式
- 传递后形成的路径:/router?id=123,/router?id=abc
发送参数:
- router-link方式
<router-link :to="{path: '/profile', query:{name:'why', age: 18, height:1.88}}">
档案
router-link>

<router-view>router-view>
- 代码跳转方式
profileClick() {
	this.$router.push({
		path: '/profile',
		query: {
			name: 'why',
			age: 18,
			height:1.88
		}
	})
}
接收参数:
<h2>{{ $route.query.name }}h2>
<h2>{{ $route.query.age }}h2>
<h2>{{ $route.query.height }}h2>
$router和$route区别
$router为 VueRouter实例,想要导航到不同URL,则使用$router. push方法
$route为当前 router跳转对象里面可以获取name、path、query、params等

注:给Object添加新属性
// 给obj添加age属性
const obj = {
	name: 'why'
}

Object.defineProperty(obj, 'age', 18)
导航守卫
为什么使用导航守卫?
- 考虑一个需求:在一个SPA应用中,如何改变网页的标题?
- 网页标题是通过
来显示的,但是SPA只有一个固定的HTML,切换不同的页面时,标题并不会改变</li> <li>但是我们可以通过Javascript来修改<title>的内容window.document.title = ‘新的标题’</li> <li>那么在Vue项目中,在哪里修改?什么时候修改比较合适呢?</li> <li>建议使用导航守卫</li> </ul> </li> </ul> <h2>导航守卫基本使用</h2> <ul> <li>我们利用beforeEach来完成标题的修改 <ul> <li>首先,我们可以在钩子当中定义一些标题,可以利用meta来定义</li> <li>其次,利用导航守卫修改我们的标题</li> </ul> </li> </ul> <p>meta定义标题:</p> <pre><code class="prism language-js"><span class="token comment">// 设置路由配置</span> <span class="token punctuation">{</span> path<span class="token punctuation">:</span> <span class="token string">'/home'</span><span class="token punctuation">,</span> component<span class="token punctuation">:</span> Home<span class="token punctuation">,</span> meta<span class="token punctuation">:</span> <span class="token punctuation">{</span> title<span class="token punctuation">:</span> <span class="token string">'主页'</span> <span class="token punctuation">}</span> <span class="token punctuation">}</span><span class="token punctuation">,</span> <span class="token punctuation">{</span> path<span class="token punctuation">:</span> <span class="token string">'/create'</span><span class="token punctuation">,</span> component<span class="token punctuation">:</span> Create<span class="token punctuation">,</span> meta<span class="token punctuation">:</span> <span class="token punctuation">{</span> title<span class="token punctuation">:</span> <span class="token string">'创作'</span> <span class="token punctuation">}</span> <span class="token punctuation">}</span><span class="token punctuation">,</span> <span class="token punctuation">{</span> path<span class="token punctuation">:</span> <span class="token string">'/setting'</span><span class="token punctuation">,</span> component<span class="token punctuation">:</span> Setting<span class="token punctuation">,</span> meta<span class="token punctuation">:</span> <span class="token punctuation">{</span> title<span class="token punctuation">:</span> <span class="token string">'设置'</span> <span class="token punctuation">}</span> <span class="token punctuation">}</span> </code></pre> <p>导航守卫修改标题:</p> <pre><code class="prism language-js"><span class="token keyword">const</span> router <span class="token operator">=</span> <span class="token keyword">new</span> <span class="token class-name">VueRouter</span><span class="token punctuation">(</span><span class="token punctuation">{</span> routes<span class="token punctuation">,</span> mode<span class="token punctuation">:</span> <span class="token string">'history'</span> <span class="token comment">// 路由方式改成history模式</span> <span class="token punctuation">}</span><span class="token punctuation">)</span> <span class="token comment">// 前置守卫(guard),路由跳转之前执行的函数</span> router<span class="token punctuation">.</span><span class="token function">beforeEach</span><span class="token punctuation">(</span><span class="token punctuation">(</span>to<span class="token punctuation">,</span> <span class="token keyword">from</span><span class="token punctuation">,</span> next<span class="token punctuation">)</span> <span class="token operator">=></span> <span class="token punctuation">{</span> <span class="token comment">// 从from跳转到to,to表示当前路由对象</span> document<span class="token punctuation">.</span>title <span class="token operator">=</span> to<span class="token punctuation">.</span>matched<span class="token punctuation">[</span><span class="token number">0</span><span class="token punctuation">]</span><span class="token punctuation">.</span>meta<span class="token punctuation">.</span>title <span class="token comment">// console.log(to)</span> <span class="token function">next</span><span class="token punctuation">(</span><span class="token punctuation">)</span> <span class="token punctuation">}</span> </code></pre> <ul> <li>导航钩子的三个参数解析: <ul> <li>to:即将要进入的目标的路由对象</li> <li>from:当前导航即将要离开的路由对象</li> <li>next:调用该方法后,才能进入下一个钩子</li> </ul> </li> </ul> <h2>导航守卫补充</h2> <ul> <li>后置钩子(不需要调用next函数)</li> </ul> <pre><code class="prism language-js"><span class="token comment">// 前置守卫(guard),路由跳转之前执行的函数</span> router<span class="token punctuation">.</span><span class="token function">beforeEach</span><span class="token punctuation">(</span><span class="token punctuation">(</span>to<span class="token punctuation">,</span> <span class="token keyword">from</span><span class="token punctuation">,</span> next<span class="token punctuation">)</span> <span class="token operator">=></span> <span class="token punctuation">{</span> <span class="token comment">// 从from跳转到to,to表示当前路由对象</span> document<span class="token punctuation">.</span>title <span class="token operator">=</span> to<span class="token punctuation">.</span>matched<span class="token punctuation">[</span><span class="token number">0</span><span class="token punctuation">]</span><span class="token punctuation">.</span>meta<span class="token punctuation">.</span>title <span class="token comment">// console.log(to)</span> <span class="token function">next</span><span class="token punctuation">(</span><span class="token punctuation">)</span> <span class="token punctuation">}</span> <span class="token comment">// 后置钩子(hook),路由跳转之后执行的函数</span> router<span class="token punctuation">.</span><span class="token function">afterEach</span><span class="token punctuation">(</span><span class="token punctuation">(</span>to<span class="token punctuation">,</span> <span class="token keyword">from</span><span class="token punctuation">)</span><span class="token operator">=></span><span class="token punctuation">{</span> <span class="token comment">// 从from跳转到to,to表示当前路由对象</span> <span class="token punctuation">}</span><span class="token punctuation">)</span> </code></pre> <p>路由独享守卫:</p> <pre><code class="prism language-js"><span class="token punctuation">{</span> path<span class="token punctuation">:</span> <span class="token string">'/home'</span><span class="token punctuation">,</span> component<span class="token punctuation">:</span> Home<span class="token punctuation">,</span> beforeEnter<span class="token punctuation">:</span> <span class="token punctuation">(</span>to<span class="token punctuation">,</span><span class="token keyword">from</span><span class="token punctuation">.</span>next<span class="token punctuation">)</span> <span class="token operator">=></span> <span class="token punctuation">{</span> <span class="token comment">// 与全局前置守卫的方法参数一致</span> <span class="token punctuation">}</span> <span class="token punctuation">}</span> </code></pre> <h1>keep-alive</h1> <p>以Home.vue中为例:</p> <pre><code class="prism language-js"><span class="token function">created</span><span class="token punctuation">(</span><span class="token punctuation">)</span> <span class="token punctuation">{</span> console<span class="token punctuation">.</span><span class="token function">log</span><span class="token punctuation">(</span><span class="token string">'created'</span><span class="token punctuation">)</span> <span class="token punctuation">}</span> <span class="token comment">// 下面这两个函数,只有该组件被保持了状态使用了keep-alive时,才是有效的</span> <span class="token function">activated</span><span class="token punctuation">(</span><span class="token punctuation">)</span> <span class="token punctuation">{</span> <span class="token keyword">this</span><span class="token punctuation">.</span>$router<span class="token punctuation">.</span><span class="token function">push</span><span class="token punctuation">(</span><span class="token keyword">this</span><span class="token punctuation">.</span>path<span class="token punctuation">)</span> console<span class="token punctuation">.</span><span class="token function">log</span><span class="token punctuation">(</span><span class="token string">'activated'</span><span class="token punctuation">)</span> <span class="token punctuation">}</span> <span class="token function">deactivated</span><span class="token punctuation">(</span><span class="token punctuation">)</span> <span class="token punctuation">{</span> console<span class="token punctuation">.</span><span class="token function">log</span><span class="token punctuation">(</span><span class="token string">'deactivated'</span><span class="token punctuation">)</span> <span class="token punctuation">}</span> <span class="token comment">// 首页中使用path属性记录离开时的路径,在beforeRouteLeave中记录</span> <span class="token function">beforeRouteLeave</span><span class="token punctuation">(</span>to<span class="token punctuation">,</span> <span class="token keyword">from</span><span class="token punctuation">,</span> next<span class="token punctuation">)</span> <span class="token punctuation">{</span> <span class="token keyword">this</span><span class="token punctuation">.</span>path <span class="token operator">=</span> <span class="token keyword">this</span><span class="token punctuation">.</span>$route<span class="token punctuation">.</span>path <span class="token function">next</span><span class="token punctuation">(</span><span class="token punctuation">)</span> <span class="token punctuation">}</span> </code></pre> <p>App.vue中:</p> <pre><code class="prism language-html"><span class="token tag"><span class="token tag"><span class="token punctuation"><</span>keep-alive</span><span class="token punctuation">></span></span> <span class="token tag"><span class="token tag"><span class="token punctuation"><</span>router-view</span> <span class="token punctuation">/></span></span> <span class="token tag"><span class="token tag"><span class="token punctuation"></</span>keep-alive</span><span class="token punctuation">></span></span> </code></pre> <ul> <li>keep-alive是Vue内置的一个组件,可以使被包含的组件保留状态,或避免重新渲染 <ul> <li>include:字符串或正则表达式,只有匹配的组件会被缓存</li> <li>exclude:字符串或正则表达式,任何匹配的组件都不会被缓存</li> </ul> </li> </ul> <pre><code class="prism language-html"><span class="token comment"><!-- 1. Profile,User是组件的name属性对应的值 --></span> <span class="token comment"><!-- 2. Profile,User之间没有空格 --></span> <span class="token tag"><span class="token tag"><span class="token punctuation"><</span>keep-alive</span> <span class="token attr-name">exclude</span><span class="token attr-value"><span class="token punctuation">=</span><span class="token punctuation">"</span>Profile,User<span class="token punctuation">"</span></span><span class="token punctuation">></span></span> <span class="token tag"><span class="token tag"><span class="token punctuation"><</span>router-view</span> <span class="token punctuation">/></span></span> <span class="token tag"><span class="token tag"><span class="token punctuation"></</span>keep-alive</span><span class="token punctuation">></span></span> </code></pre> <ul> <li>router-view也是一个组件,如果直接被包在keep-alive里面,所有路径匹配到的视图组件都会被缓存</li> </ul> </div> </div> </div> </div> </div> <!--PC和WAP自适应版--> <div id="SOHUCS" sid="1615553484088705024"></div> <script type="text/javascript" src="/views/front/js/chanyan.js"></script> <!-- 文章页-底部 动态广告位 --> <div class="youdao-fixed-ad" id="detail_ad_bottom"></div> </div> <div class="col-md-3"> <div class="row" id="ad"> <!-- 文章页-右侧1 动态广告位 --> <div id="right-1" class="col-lg-12 col-md-12 col-sm-4 col-xs-4 ad"> <div class="youdao-fixed-ad" id="detail_ad_1"> </div> </div> <!-- 文章页-右侧2 动态广告位 --> <div id="right-2" class="col-lg-12 col-md-12 col-sm-4 col-xs-4 ad"> <div class="youdao-fixed-ad" id="detail_ad_2"></div> </div> <!-- 文章页-右侧3 动态广告位 --> <div id="right-3" class="col-lg-12 col-md-12 col-sm-4 col-xs-4 ad"> <div class="youdao-fixed-ad" id="detail_ad_3"></div> </div> </div> </div> </div> </div> </div> <div class="container"> <h4 class="pt20 mb15 mt0 border-top">你可能感兴趣的:(Vue,vue,vue-router)</h4> <div id="paradigm-article-related"> <div class="recommend-post mb30"> <ul class="widget-links"> <li><a href="/article/1903166833196855296.htm" title="emit作用" target="_blank">emit作用</a> <span class="text-muted">肉肉不吃 肉</span> <a class="tag" taget="_blank" href="/search/vue.js/1.htm">vue.js</a><a class="tag" taget="_blank" href="/search/javascript/1.htm">javascript</a><a class="tag" taget="_blank" href="/search/%E5%89%8D%E7%AB%AF/1.htm">前端</a> <div>emit是Vue3中用于子组件向父组件传递事件和数据的机制。它允许子组件触发一个自定义事件,父组件可以监听这个事件并执行相应的逻辑。emit的作用子组件向父组件通信:子组件通过emit触发一个自定义事件,父组件监听这个事件并执行相应的逻辑。传递数据:子组件可以通过emit向父组件传递数据,父组件可以在事件处理函数中接收这些数据。解耦组件逻辑:子组件不需要知道父组件的具体实现,只需要触发事件,父组件</div> </li> <li><a href="/article/1903121803090391040.htm" title="【致100位技术同路人:代码无边界,GIS×编程的双向奔赴!】" target="_blank">【致100位技术同路人:代码无边界,GIS×编程的双向奔赴!】</a> <span class="text-muted">喆星时瑜</span> <a class="tag" taget="_blank" href="/search/%E7%95%99%E8%A8%80/1.htm">留言</a><a class="tag" taget="_blank" href="/search/%E6%84%9F%E8%B0%A2%E4%BD%A0%E4%BB%AC%E7%9A%84%E5%85%B3%E6%B3%A8/1.htm">感谢你们的关注</a> <div>今天在地理信息科学的坐标系里标记了一个闪亮锚点——我的CSDN粉丝破百啦!✨破百节点亮起的不只是GISer,还有无数程序员伙伴的坐标!感谢你们的关注,是你们的每一次的让这些文章有了生命力,每一次的都化作我深夜调试的动力。作为穿梭在GIS与通用编程之间的开发者,我始终相信:空间算法是经纬度的代码诗,而工程思维是让地理智能落地的坐标系。未来会继续用PostGIS的严谨写空间索引,用React/Vue的</div> </li> <li><a href="/article/1903102883256135680.htm" title="免费界面库 python_一个非常简单好用的Python图形界面库(PysimpleGUI)" target="_blank">免费界面库 python_一个非常简单好用的Python图形界面库(PysimpleGUI)</a> <span class="text-muted">不妧</span> <a class="tag" taget="_blank" href="/search/%E5%85%8D%E8%B4%B9%E7%95%8C%E9%9D%A2%E5%BA%93/1.htm">免费界面库</a><a class="tag" taget="_blank" href="/search/python/1.htm">python</a> <div>前一阵,我在为朋友编写一个源代码监控程序的时候,发现了一个Python领域非常简单好用的图形界面库。说起图形界面库,你可能会想到TkInter、PyQt、PyGUI等流行的图形界面库,我也曾经尝试使用,一个很直观的感受就是,这太难用了。就去网上搜搜,看看有没有一些demo,拿来改改,结果很少有,当时我就放弃了这些图形库的学习,转而使用了vue+flask的形式以浏览器网页作为程序界面,因为我会这个</div> </li> <li><a href="/article/1903089639758032896.htm" title="50个常见的python毕业设计/课程设计(源码+文档)" target="_blank">50个常见的python毕业设计/课程设计(源码+文档)</a> <span class="text-muted">冷琴1996</span> <a class="tag" taget="_blank" href="/search/Python%E7%B3%BB%E7%BB%9F%E8%AE%BE%E8%AE%A1/1.htm">Python系统设计</a><a class="tag" taget="_blank" href="/search/python/1.htm">python</a><a class="tag" taget="_blank" href="/search/%E8%AF%BE%E7%A8%8B%E8%AE%BE%E8%AE%A1/1.htm">课程设计</a><a class="tag" taget="_blank" href="/search/%E5%BC%80%E5%8F%91%E8%AF%AD%E8%A8%80/1.htm">开发语言</a> <div>计算机课程设计/毕业设计指南,为计算机相关专业毕业生提供源码、数据库安装、远程调试等相关服务,提供功能讲解视频。下面是50个基于python/django/vue的毕业设计/课程设计。1.网上商城系统这是一个基于python+vue开发的商城网站,平台采用B/S结构,后端采用主流的Python语言进行开发,前端采用主流的Vue.js进行开发。整个平台包括前台和后台两个部分。前台功能包括:首页、商品</div> </li> <li><a href="/article/1903065045613473792.htm" title="如何在 Vue 项目中实现动态组件加载,有什么应用场景?" target="_blank">如何在 Vue 项目中实现动态组件加载,有什么应用场景?</a> <span class="text-muted">前端大白话</span> <a class="tag" taget="_blank" href="/search/%E5%A4%A7%E7%99%BD%E8%AF%9D%E5%89%8D%E7%AB%AF%E5%85%AB%E8%82%A1/1.htm">大白话前端八股</a><a class="tag" taget="_blank" href="/search/vue.js/1.htm">vue.js</a><a class="tag" taget="_blank" href="/search/javascript/1.htm">javascript</a><a class="tag" taget="_blank" href="/search/%E5%89%8D%E7%AB%AF/1.htm">前端</a> <div>大白话如何在Vue项目中实现动态组件加载,有什么应用场景?什么是动态组件加载在Vue项目里,动态组件加载就是能够在程序运行时动态地决定要渲染哪个组件。打个比方,就像你去餐馆点菜,不同的时间你可能想吃不同的菜,动态组件加载就好比你可以随时更换菜单上的菜品,而不需要重新做一份新菜单。实现动态组件加载的步骤1.创建不同的组件首先,你得有几个不同的组件,就像餐馆里有不同的菜品一样。下面是三个简单的组件示例</div> </li> <li><a href="/article/1903052678578106368.htm" title="PakePlus支持将vue/react等项目打包为跨平台桌面软件了" target="_blank">PakePlus支持将vue/react等项目打包为跨平台桌面软件了</a> <span class="text-muted">1024小神</span> <a class="tag" taget="_blank" href="/search/%E5%A4%9A%E7%AB%AF%E5%BC%80%E5%8F%91/1.htm">多端开发</a><a class="tag" taget="_blank" href="/search/vue.js/1.htm">vue.js</a><a class="tag" taget="_blank" href="/search/%E5%89%8D%E7%AB%AF/1.htm">前端</a><a class="tag" taget="_blank" href="/search/javascript/1.htm">javascript</a> <div>PakePLus介绍Turnanywebpage/Vue/ReactandsoonintoadesktopappandmobileappwithRust.轻松将任意网站/Vue/React等项目构建为轻量级(仅5M)多端桌面应用和多端手机应用。pakeplus开源地址:GitHub-Sjj1024/PakePlus:Turnanywebpage/Vue/Reactandsoonintoadeskt</div> </li> <li><a href="/article/1903050155028967424.htm" title="Vue.js 中的 Memoization:提升性能的缓存技术" target="_blank">Vue.js 中的 Memoization:提升性能的缓存技术</a> <span class="text-muted">vvilkim</span> <a class="tag" taget="_blank" href="/search/vue/1.htm">vue</a><a class="tag" taget="_blank" href="/search/vue.js/1.htm">vue.js</a><a class="tag" taget="_blank" href="/search/%E5%89%8D%E7%AB%AF/1.htm">前端</a><a class="tag" taget="_blank" href="/search/javascript/1.htm">javascript</a> <div>在现代前端开发中,性能优化是一个永恒的话题。随着应用规模的增大,复杂的计算和频繁的函数调用可能会导致性能瓶颈。Vue.js作为一个流行的前端框架,提供了多种优化手段,其中memoization(记忆化)就是一种非常有效的技术。本文将详细介绍Vue.js中的memoization,以及如何利用它来提升应用性能。什么是Memoization?Memoization是一种优化技术,通过缓存函数的结果来避</div> </li> <li><a href="/article/1903050152067788800.htm" title="Vue.js 性能优化:虚拟 DOM 与虚拟滚动" target="_blank">Vue.js 性能优化:虚拟 DOM 与虚拟滚动</a> <span class="text-muted">vvilkim</span> <a class="tag" taget="_blank" href="/search/vue/1.htm">vue</a><a class="tag" taget="_blank" href="/search/vue.js/1.htm">vue.js</a><a class="tag" taget="_blank" href="/search/%E5%89%8D%E7%AB%AF/1.htm">前端</a><a class="tag" taget="_blank" href="/search/javascript/1.htm">javascript</a> <div>在现代前端开发中,性能优化是一个永恒的话题。Vue.js作为一款流行的前端框架,提供了许多强大的工具和技术来提升应用的性能。其中,虚拟DOM和虚拟滚动是两个非常重要的概念。本文将深入探讨它们的原理、优势以及如何在Vue.js中使用它们来优化性能。什么是虚拟DOM?虚拟DOM(VirtualDOM)是Vue.js用于提升性能的核心技术之一。它是一个轻量级的JavaScript对象树,用于表示真实DO</div> </li> <li><a href="/article/1903046245459488768.htm" title="Vscode niuhe 插件使用教程 - xorm 代码生成" target="_blank">Vscode niuhe 插件使用教程 - xorm 代码生成</a> <span class="text-muted">诗意地回家</span> <a class="tag" taget="_blank" href="/search/niuhe/1.htm">niuhe</a><a class="tag" taget="_blank" href="/search/%E6%8F%92%E4%BB%B6/1.htm">插件</a><a class="tag" taget="_blank" href="/search/vscode/1.htm">vscode</a><a class="tag" taget="_blank" href="/search/ide/1.htm">ide</a><a class="tag" taget="_blank" href="/search/%E7%BC%96%E8%BE%91%E5%99%A8/1.htm">编辑器</a> <div>官方教程已经上线,请访问:http://niuhe.zuxing.net本文相关项目:vue3-element-admin基于niuhe插件的管理后台模板niuhe-mdbookniuhe插件示例项目在日常开发中,新增数据库表时通常需要编写大量重复的增删改查代码。为提高开发效率,niuhe插件0.3.4版本新增Xorm基础代码生成功能,可自动生成:数据库表对应的Golang模型结构体基础CURD操</div> </li> <li><a href="/article/1903043097965686784.htm" title="响应式数据 和 Pinia 状态" target="_blank">响应式数据 和 Pinia 状态</a> <span class="text-muted">肉肉不吃 肉</span> <a class="tag" taget="_blank" href="/search/%E5%89%8D%E7%AB%AF/1.htm">前端</a><a class="tag" taget="_blank" href="/search/vue.js/1.htm">vue.js</a><a class="tag" taget="_blank" href="/search/pinia/1.htm">pinia</a> <div>响应式数据和Pinia状态是Vue.js应用中用于管理数据的两种重要机制,它们之间有密切的关系。以下是它们的定义、特点以及关系:1.响应式数据定义响应式数据是Vue.js的核心特性之一,指的是当数据发生变化时,视图会自动更新。Vue.js通过Proxy或Object.defineProperty实现数据的响应式。特点自动更新:当数据变化时,依赖该数据的视图会自动更新。声明式:开发者只需关注数据本身</div> </li> <li><a href="/article/1903034521893269504.htm" title="全网最详细!vue中使用flv.js 播放直播监控视频流" target="_blank">全网最详细!vue中使用flv.js 播放直播监控视频流</a> <span class="text-muted">抄一下你代码</span> <a class="tag" taget="_blank" href="/search/%E5%9C%A8vue%E4%B8%AD%E4%BD%BF%E7%94%A8flv.js/1.htm">在vue中使用flv.js</a><a class="tag" taget="_blank" href="/search/%E6%92%AD%E6%94%BE%E7%9B%91%E6%8E%A7%E6%91%84%E5%83%8F%E5%A4%B4%2F%E7%9B%B4%E6%92%AD/1.htm">播放监控摄像头/直播</a><a class="tag" taget="_blank" href="/search/vue.js/1.htm">vue.js</a> <div>老规矩,先安装flv.js插件npminstallflv.js在组件中的使用**注意事项放后面我怕你们不看呐!!!!1.必须在dom加载完成后再执行直播视频流的填充方法!2.在一个网页中最多同时容纳6个监控视频播放!第七个绝对加载不出来!3.在离开这个页面的时候必须销毁播放容器,不然会占用TCP个数,导致其他页面的监控也播放不了**importflvjsfrom"flv.js";//页面代码//1</div> </li> <li><a href="/article/1903032507322920960.htm" title="[附源码]Python计算机毕业设计SSM基于B-S的心理健康管理系统(程序+LW)" target="_blank">[附源码]Python计算机毕业设计SSM基于B-S的心理健康管理系统(程序+LW)</a> <span class="text-muted">Python、JAVA毕设程序源码</span> <a class="tag" taget="_blank" href="/search/java/1.htm">java</a><a class="tag" taget="_blank" href="/search/%E5%BC%80%E5%8F%91%E8%AF%AD%E8%A8%80/1.htm">开发语言</a> <div>环境配置:Jdk1.8+Tomcat7.0+Mysql+HBuilderX(Webstorm也行)+Eclispe(IntelliJIDEA,Eclispe,MyEclispe,Sts都支持)。项目技术:SSM+mybatis+Maven+Vue等等组成,B/S模式+Maven管理等等。环境需要1.运行环境:最好是javajdk1.8,我们在这个平台上运行的。其他版本理论上也可以。2.IDE环境:</div> </li> <li><a href="/article/1903026817229451264.htm" title="3分钟带你了解Vue3的nextTick()" target="_blank">3分钟带你了解Vue3的nextTick()</a> <span class="text-muted">嫣嫣细语</span> <a class="tag" taget="_blank" href="/search/vue.js/1.htm">vue.js</a><a class="tag" taget="_blank" href="/search/%E5%89%8D%E7%AB%AF/1.htm">前端</a><a class="tag" taget="_blank" href="/search/javascript/1.htm">javascript</a><a class="tag" taget="_blank" href="/search/vue.js/1.htm">vue.js</a><a class="tag" taget="_blank" href="/search/javascript/1.htm">javascript</a><a class="tag" taget="_blank" href="/search/%E5%89%8D%E7%AB%AF/1.htm">前端</a> <div>前言Vue实现响应式并不是数据发生变化之后DOM立即变化,而是按一定的策略进行DOM的更新。简单来说,Vue在修改数据后,视图不会立刻更新,而是等同一事件循环中的所有数据变化完成之后,再统一进行视图更新,nextTick()方法就会在这样的DOM更新循环结束后调用指定的函数。概念在Vue3中nextTick()方法的行为和Vue2中基本相似,但它进行了一些优化,以提高性能和稳定性。nextTick</div> </li> <li><a href="/article/1903025553070419968.htm" title="金融、教育等行业如何高效利用wangEditor实现word文档网页化编辑?" target="_blank">金融、教育等行业如何高效利用wangEditor实现word文档网页化编辑?</a> <span class="text-muted">2501_90699850</span> <a class="tag" taget="_blank" href="/search/%E9%87%91%E8%9E%8D/1.htm">金融</a><a class="tag" taget="_blank" href="/search/word/1.htm">word</a><a class="tag" taget="_blank" href="/search/umeditor%E7%B2%98%E8%B4%B4word/1.htm">umeditor粘贴word</a><a class="tag" taget="_blank" href="/search/ueditor%E7%B2%98%E8%B4%B4word/1.htm">ueditor粘贴word</a><a class="tag" taget="_blank" href="/search/ueditor%E5%A4%8D%E5%88%B6word/1.htm">ueditor复制word</a><a class="tag" taget="_blank" href="/search/ueditor%E4%B8%8A%E4%BC%A0word%E5%9B%BE%E7%89%87/1.htm">ueditor上传word图片</a><a class="tag" taget="_blank" href="/search/ueditor%E5%AF%BC%E5%85%A5word/1.htm">ueditor导入word</a> <div>要求:开源,免费,技术支持编辑器:wangEditor前端:vue2,vue3,vue-cli,html5后端:java,jsp,springboot,asp.net,php,asp,.netcore,.netmvc,.netform群体:学生,个人用户,外包,自由职业者,中小型网站,博客,场景:数字门户,数字中台,站群,内网,外网,信创国产化环境,web截屏行业:医疗,教育,建筑,政府,党政,国</div> </li> <li><a href="/article/1903025549899526144.htm" title="网页编辑器能否满足Word公式与图片的直接复制粘贴?" target="_blank">网页编辑器能否满足Word公式与图片的直接复制粘贴?</a> <span class="text-muted">2501_90699800</span> <a class="tag" taget="_blank" href="/search/%E7%BC%96%E8%BE%91%E5%99%A8/1.htm">编辑器</a><a class="tag" taget="_blank" href="/search/word/1.htm">word</a><a class="tag" taget="_blank" href="/search/umeditor%E7%B2%98%E8%B4%B4word/1.htm">umeditor粘贴word</a><a class="tag" taget="_blank" href="/search/ueditor%E7%B2%98%E8%B4%B4word/1.htm">ueditor粘贴word</a><a class="tag" taget="_blank" href="/search/ueditor%E5%A4%8D%E5%88%B6word/1.htm">ueditor复制word</a><a class="tag" taget="_blank" href="/search/ueditor%E4%B8%8A%E4%BC%A0word%E5%9B%BE%E7%89%87/1.htm">ueditor上传word图片</a><a class="tag" taget="_blank" href="/search/ueditor%E5%AF%BC%E5%85%A5word/1.htm">ueditor导入word</a> <div>要求:开源,免费,技术支持编辑器:百度ueditor前端:vue2,vue3,vue-cli,react,html5用户体验:Ctrl+V快捷键操作功能:导入Word,导入Excel,导入PPT(PowerPoint),导入PDF,复制粘贴word,导入微信公众号内容,web截屏平台:Windows,macOS,Linux,RedHat,CentOS,Ubuntu,中标麒麟,银河麒麟,统信UOS,</div> </li> <li><a href="/article/1902999069261885440.htm" title="Vue3连接SSE,并且返回结果用打字机效果呈现" target="_blank">Vue3连接SSE,并且返回结果用打字机效果呈现</a> <span class="text-muted">陈琦鹏</span> <a class="tag" taget="_blank" href="/search/%E5%89%8D%E7%AB%AF/1.htm">前端</a><a class="tag" taget="_blank" href="/search/javascript/1.htm">javascript</a><a class="tag" taget="_blank" href="/search/%E5%89%8D%E7%AB%AF/1.htm">前端</a><a class="tag" taget="_blank" href="/search/vue.js/1.htm">vue.js</a> <div>话不多说直接上代码连接SSEimport{ref,onMounted,onUnmounted}from'vue';constsse=ref()constreconnectAttempts=ref(0)consttimer=ref()onMounted(()=>{initSSE();})onUnmounted(()=>{if(sse.value){sse.value.close();}//清除定时器</div> </li> <li><a href="/article/1902942561442525184.htm" title="java Spring Boot ruoyi-vue-pro 模型接入微软 OpenAI(chatgpt)方法" target="_blank">java Spring Boot ruoyi-vue-pro 模型接入微软 OpenAI(chatgpt)方法</a> <span class="text-muted">代码简单说</span> <a class="tag" taget="_blank" href="/search/%E5%BC%80%E5%8F%91%E5%BF%85%E5%A4%87/1.htm">开发必备</a><a class="tag" taget="_blank" href="/search/2025%E5%BC%80%E5%8F%91%E5%BF%85%E5%A4%87/1.htm">2025开发必备</a><a class="tag" taget="_blank" href="/search/java%E8%8B%A5%E4%BE%9D/1.htm">java若依</a><a class="tag" taget="_blank" href="/search/ruoyi%E6%95%99%E7%A8%8B/1.htm">ruoyi教程</a><a class="tag" taget="_blank" href="/search/java/1.htm">java</a><a class="tag" taget="_blank" href="/search/spring/1.htm">spring</a><a class="tag" taget="_blank" href="/search/boot/1.htm">boot</a><a class="tag" taget="_blank" href="/search/vue.js/1.htm">vue.js</a><a class="tag" taget="_blank" href="/search/ruoyi-vue-pro/1.htm">ruoyi-vue-pro</a><a class="tag" taget="_blank" href="/search/openai/1.htm">openai</a><a class="tag" taget="_blank" href="/search/chatgpt/1.htm">chatgpt</a><a class="tag" taget="_blank" href="/search/%E5%A4%A7%E6%A8%A1%E5%9E%8B/1.htm">大模型</a> <div>javaSpringBootruoyi-vue-pro模型接入微软OpenAI方法本项目基于SpringAI提供的spring-ai-azure-openai,实现与微软Azure上部署的OpenAI的接入,涵盖AI对话和AI绘画功能。1.申请密钥1.1AzureAPI申请在微软AzureAI申请。社区小伙伴提供过密钥接入,申请流程应不复杂。申请完成后会得到类似模型列表(如图)。购买完成后,在系统</div> </li> <li><a href="/article/1902940921859731456.htm" title="计算机专业毕业设计题目推荐(新颖选题)本科计算机人工智能专业相关毕业设计选题大全✅" target="_blank">计算机专业毕业设计题目推荐(新颖选题)本科计算机人工智能专业相关毕业设计选题大全✅</a> <span class="text-muted">会写代码的羊</span> <a class="tag" taget="_blank" href="/search/%E6%AF%95%E8%AE%BE%E9%80%89%E9%A2%98/1.htm">毕设选题</a><a class="tag" taget="_blank" href="/search/%E8%AF%BE%E7%A8%8B%E8%AE%BE%E8%AE%A1/1.htm">课程设计</a><a class="tag" taget="_blank" href="/search/%E4%BA%BA%E5%B7%A5%E6%99%BA%E8%83%BD/1.htm">人工智能</a><a class="tag" taget="_blank" href="/search/%E6%AF%95%E4%B8%9A%E8%AE%BE%E8%AE%A1/1.htm">毕业设计</a><a class="tag" taget="_blank" href="/search/%E6%AF%95%E8%AE%BE%E9%A2%98%E7%9B%AE/1.htm">毕设题目</a><a class="tag" taget="_blank" href="/search/%E6%AF%95%E4%B8%9A%E8%AE%BE%E8%AE%A1%E9%A2%98%E7%9B%AE/1.htm">毕业设计题目</a><a class="tag" taget="_blank" href="/search/ai/1.htm">ai</a><a class="tag" taget="_blank" href="/search/AI%E7%BC%96%E7%A8%8B/1.htm">AI编程</a> <div>文章目录前言最新毕设选题(建议收藏起来)本科计算机人工智能专业相关的毕业设计选题毕设作品推荐前言2025全新毕业设计项目博主介绍:✌全网粉丝10W+,CSDN全栈领域优质创作者,博客之星、掘金/华为云/阿里云等平台优质作者。技术范围:SpringBoot、Vue、SSM、HLMT、Jsp、PHP、Nodejs、Python、爬虫、数据可视化、小程序、大数据、机器学习等设计与开发。主要内容:免费功能</div> </li> <li><a href="/article/1902937514579128320.htm" title="计算属性set方法没被执行的原因" target="_blank">计算属性set方法没被执行的原因</a> <span class="text-muted">伊小小小凡</span> <a class="tag" taget="_blank" href="/search/web%E5%89%8D%E7%AB%AF%E5%9F%BA%E7%A1%80/1.htm">web前端基础</a><a class="tag" taget="_blank" href="/search/vue.js/1.htm">vue.js</a><a class="tag" taget="_blank" href="/search/%E5%89%8D%E7%AB%AF/1.htm">前端</a><a class="tag" taget="_blank" href="/search/javascript/1.htm">javascript</a> <div>计算属性set方法没被执行的原因在Vue.js中,computed属性的set方法通常在计算属性的值被显式设置时执行。然而,在某些情况下,set方法可能不会被执行。以下是这些情况的详细分析:没有显式设置计算属性的值只有在显式地给计算属性赋值时,set方法才会被触发。如果只是读取计算属性的值,set方法不会执行。//定义计算属性computed:{fullName:{get(){returnthis</div> </li> <li><a href="/article/1902920100223184896.htm" title="前端解决跨域的几种方案" target="_blank">前端解决跨域的几种方案</a> <span class="text-muted">爱分享的程序员</span> <a class="tag" taget="_blank" href="/search/%E5%89%8D%E7%AB%AF/1.htm">前端</a><a class="tag" taget="_blank" href="/search/%E5%89%8D%E7%AB%AF/1.htm">前端</a> <div>以下是前端解决跨域问题的7种主流方案,根据应用场景和实现难度排序,附详细实现示例:一、开发环境解决方案1.WebpackDevServer代理(推荐)//vue.config.js/webpack.config.jsmodule.exports={devServer:{proxy:{'/api':{target:'http://backend-domain.com',//后端地址changeOri</div> </li> <li><a href="/article/1902917327523999744.htm" title="如何使用webpack预加载 CSS 中定义的资源和预加载 CSS 文件" target="_blank">如何使用webpack预加载 CSS 中定义的资源和预加载 CSS 文件</a> <span class="text-muted">混血哲谈</span> <a class="tag" taget="_blank" href="/search/webpack/1.htm">webpack</a><a class="tag" taget="_blank" href="/search/css/1.htm">css</a><a class="tag" taget="_blank" href="/search/%E5%89%8D%E7%AB%AF/1.htm">前端</a> <div>在Webpack中预加载CSS文件及其内部定义的资源(如图片、字体等),可以通过资源预加载(Preloading)技术优化关键资源的加载优先级。以下是具体的实现方法和步骤:一、预加载CSS文件1.使用@vue/preload-webpack-plugin或手动注入Webpack默认不直接支持CSS文件的预加载,但可以通过插件或手动添加实现。方法一:通过@vue/preload-webpack-pl</div> </li> <li><a href="/article/1902863713954754560.htm" title="Vue遇到微信授权登录的一些场景坑和思考" target="_blank">Vue遇到微信授权登录的一些场景坑和思考</a> <span class="text-muted"></span> <a class="tag" taget="_blank" href="/search/%E5%89%8D%E7%AB%AFvue.js%E6%89%AB%E7%A0%81%E7%99%BB%E5%BD%95/1.htm">前端vue.js扫码登录</a> <div>最近,接手一个小的PC商城项目,使用微信扫码授权登录,商城部分有些内容针对游客、用户和会员以及店铺,分别作出不同的展示,当退出登录时,清除所有信息,包括本地存储、pinia,问题就发生在退出账号重新登录,有一部分依赖于pinia的数据没有生效,经过检查发现是重定向后,本该初始化的store没有执行,下面详细说明这个故障是如何发生的,以及解决方案。微信授权登录过程介绍这一部分针对于没有做过第三方授权</div> </li> <li><a href="/article/1902841270674452480.htm" title="HBuilderX的下载、安装" target="_blank">HBuilderX的下载、安装</a> <span class="text-muted">听海边涛声</span> <a class="tag" taget="_blank" href="/search/HBuilderX/1.htm">HBuilderX</a> <div>HBuilderX简称HX,是一款轻量级的、免费的IDE。它具有强大的语法提示和vue支持。访问HBuilderX的官网:https://www.dcloud.io/hbuilderx.html选择要下载的版本,我下载的是v4.08版本:将压缩包下拉以后解压到某个目录下就可以了,不需要安装过程,例如,我解压到D:\HBuilderX目录下面:双击HBuilderX.exe,就可以运行了:注意:HB</div> </li> <li><a href="/article/1902815934175834112.htm" title="Web Component 教程(六):基于 Stencil 脚手架开发 Web Component" target="_blank">Web Component 教程(六):基于 Stencil 脚手架开发 Web Component</a> <span class="text-muted">乐闻x</span> <a class="tag" taget="_blank" href="/search/Web/1.htm">Web</a><a class="tag" taget="_blank" href="/search/Component/1.htm">Component</a><a class="tag" taget="_blank" href="/search/%E5%AD%A6%E4%B9%A0%E8%AE%B0%E5%BD%95/1.htm">学习记录</a><a class="tag" taget="_blank" href="/search/%E5%89%8D%E7%AB%AF/1.htm">前端</a><a class="tag" taget="_blank" href="/search/web/1.htm">web</a><a class="tag" taget="_blank" href="/search/component/1.htm">component</a><a class="tag" taget="_blank" href="/search/stencli/1.htm">stencli</a> <div>前言在现代前端开发中,WebComponent是一种逐渐受到关注的技术,它允许我们创建可以在任何框架或库(如React,Angular,Vue等)中使用的可重用组件。而Stencil是一个强大的开发工具,它帮助我们轻松构建这些WebComponent,使开发过程更高效、更简洁。那么,究竟如何使用Stencil来开发WebComponent呢?今天,我们就来探索这一主题,从安装和设置,到创建和使用组</div> </li> <li><a href="/article/1902796640415182848.htm" title="vue2+elementUI项目国际化踩坑记录" target="_blank">vue2+elementUI项目国际化踩坑记录</a> <span class="text-muted">gladShark</span> <a class="tag" taget="_blank" href="/search/elementui/1.htm">elementui</a><a class="tag" taget="_blank" href="/search/vue.js/1.htm">vue.js</a><a class="tag" taget="_blank" href="/search/javascript/1.htm">javascript</a><a class="tag" taget="_blank" href="/search/%E5%89%8D%E7%AB%AF/1.htm">前端</a><a class="tag" taget="_blank" href="/search/vue/1.htm">vue</a> <div>1.前言vue-i18n插件npmivue-i18nvscoder中的i18nAlly插件目录示例有些解决方法是参考各大网友才得到解决的,我也在此记录一下,谢谢大家支持。内容所有示例仅供参考;有些出现问题的地方大家可能没有遇见,忽略就可以;如有写的不足的地方还请大家指正。2.问题2.1data里面数据被页面作为循环体使用页面示例{{munuI18nFunc(item.title)}}exportd</div> </li> <li><a href="/article/1902796256476983296.htm" title="【Vue3笔记01】如何使用Vue3和Vite搭建前端项目的基础开发环境" target="_blank">【Vue3笔记01】如何使用Vue3和Vite搭建前端项目的基础开发环境</a> <span class="text-muted">Mr.小朱同学</span> <a class="tag" taget="_blank" href="/search/Web%E5%89%8D%E7%AB%AF%E7%AC%94%E8%AE%B0/1.htm">Web前端笔记</a><a class="tag" taget="_blank" href="/search/%E5%89%8D%E7%AB%AF/1.htm">前端</a><a class="tag" taget="_blank" href="/search/%E7%AC%94%E8%AE%B0/1.htm">笔记</a><a class="tag" taget="_blank" href="/search/vue.js/1.htm">vue.js</a><a class="tag" taget="_blank" href="/search/Vue3/1.htm">Vue3</a><a class="tag" taget="_blank" href="/search/Vite/1.htm">Vite</a><a class="tag" taget="_blank" href="/search/%E6%90%AD%E5%BB%BA%E9%A1%B9%E7%9B%AE%E7%8E%AF%E5%A2%83/1.htm">搭建项目环境</a> <div>这篇文章,主要介绍如何使用Vue3和Vite搭建前端项目的基础开发环境【知识星球】。目录一、搭建项目环境1.1、前提条件1.2、开始搭建1.3、下载依赖1.4、启动工程一、搭建项目环境目前前端开发中,使用最多的就是Vue.js框架,目前Vue.js框架常用的有Vue2、Vue3两个版本,Vue3和Vue2在语法上还是存在很大的差异的,这里我将介绍如何搭建Vue3开发环境。1.1、前提条件在创建Vu</div> </li> <li><a href="/article/1902791080596795392.htm" title="vue3+Ts+elementPlus二次封装Table分页表格,表格内展示图片、switch开关、支持" target="_blank">vue3+Ts+elementPlus二次封装Table分页表格,表格内展示图片、switch开关、支持</a> <span class="text-muted">龙井>_<</span> <a class="tag" taget="_blank" href="/search/vue.js/1.htm">vue.js</a><a class="tag" taget="_blank" href="/search/%E5%89%8D%E7%AB%AF/1.htm">前端</a><a class="tag" taget="_blank" href="/search/javascript/1.htm">javascript</a><a class="tag" taget="_blank" href="/search/elementPlus/1.htm">elementPlus</a> <div>目录一.项目文件结构二.实现代码1.子组件(表格组件)2.父组件(使用表格)一.项目文件结构1.表格组件(子组件)位置2.使用表格组件的页面文件(父组件)位置3.演示图片位置elementPlus表格Table表格|ElementPlus4.笑果演示表格笑果点击图片放大显示笑果二.实现代码1.子组件(表格组件)1.src/views/Table.vuehtml部分{{scope.$index+1}</div> </li> <li><a href="/article/1902779359928840192.htm" title="框架基本知识总结 Day17" target="_blank">框架基本知识总结 Day17</a> <span class="text-muted">小斌的Debug日记</span> <a class="tag" taget="_blank" href="/search/%E6%A1%86%E6%9E%B6%E5%AD%A6%E4%B9%A0%E6%97%A5%E8%AE%B0/1.htm">框架学习日记</a><a class="tag" taget="_blank" href="/search/vue/1.htm">vue</a><a class="tag" taget="_blank" href="/search/redis/1.htm">redis</a><a class="tag" taget="_blank" href="/search/gitee/1.htm">gitee</a> <div>token续命每一次操作后都要延长token的过期时间,长时间不操作token才会过期登录延长时间应该是在拦截器中做的,因为它会拦截所有请求前端的拦截需要用到路由守卫响应式“响应式”指的是系统能根据数据变化做出响应,并自动更新相关部分的视图。Vue.js通过数据的变化来响应用户的操作或者应用的状态变化,自动触发视图更新。响应式的核心思想是:当数据发生变化时,视图会自动更新组合式api的响应是数据用</div> </li> <li><a href="/article/1902756913993543680.htm" title="【sgFloatDialog】自定义组件:浮动弹窗,支持修改尺寸、拖拽位置、最大化、还原、最小化、复位" target="_blank">【sgFloatDialog】自定义组件:浮动弹窗,支持修改尺寸、拖拽位置、最大化、还原、最小化、复位</a> <span class="text-muted">你挚爱的强哥</span> <a class="tag" taget="_blank" href="/search/Vue.js/1.htm">Vue.js</a><a class="tag" taget="_blank" href="/search/Sg.js%E6%A1%86%E6%9E%B6/1.htm">Sg.js框架</a><a class="tag" taget="_blank" href="/search/vue.js/1.htm">vue.js</a><a class="tag" taget="_blank" href="/search/javascript/1.htm">javascript</a><a class="tag" taget="_blank" href="/search/%E5%89%8D%E7%AB%AF/1.htm">前端</a> <div>sgFloatDialog{{title}}importsgDragMovefrom"@/vue/components/admin/sgDragMove";importsgDragSizefrom"@/vue/components/admin/sgDragSize";exportdefault{name:"sgFloatDialog",components:{sgDragMove,sgDragSi</div> </li> <li><a href="/article/1902745929342054400.htm" title="UniApp 从Vue2升级为Vue3需要注意哪些方面" target="_blank">UniApp 从Vue2升级为Vue3需要注意哪些方面</a> <span class="text-muted">行思理</span> <a class="tag" taget="_blank" href="/search/App%E5%BC%80%E5%8F%91/1.htm">App开发</a><a class="tag" taget="_blank" href="/search/uni-app/1.htm">uni-app</a><a class="tag" taget="_blank" href="/search/vue.js/1.htm">vue.js</a><a class="tag" taget="_blank" href="/search/javascript/1.htm">javascript</a><a class="tag" taget="_blank" href="/search/Vue3/1.htm">Vue3</a><a class="tag" taget="_blank" href="/search/Vue2/1.htm">Vue2</a> <div>Vue官方已经发布了Vue3,Vue2不再维护,也在建议大家都迁移到Vue3,所以Vue2终会被淘汰。那么UniApp从Vue2升级为Vue3需要注意哪些方面:1、main.js下面请看创建应用实例Vue2与Vue3的不同:Vue2的写法://之前-Vue2importVuefrom'vue'importAppfrom'./App'Vue.config.productionTip=false//v</div> </li> <li><a href="/article/46.htm" title="Maven" target="_blank">Maven</a> <span class="text-muted">Array_06</span> <a class="tag" taget="_blank" href="/search/eclipse/1.htm">eclipse</a><a class="tag" taget="_blank" href="/search/jdk/1.htm">jdk</a><a class="tag" taget="_blank" href="/search/maven/1.htm">maven</a> <div>Maven Maven是基于项目对象模型(POM), 信息来管理项目的构建,报告和文档的软件项目管理工具。 Maven 除了以程序构建能力为特色之外,还提供高级项目管理工具。由于 Maven 的缺省构建规则有较高的可重用性,所以常常用两三行 Maven 构建脚本就可以构建简单的项目。由于 Maven 的面向项目的方法,许多 Apache Jakarta 项目发文时使用 Maven,而且公司</div> </li> <li><a href="/article/173.htm" title="ibatis的queyrForList和queryForMap区别" target="_blank">ibatis的queyrForList和queryForMap区别</a> <span class="text-muted">bijian1013</span> <a class="tag" taget="_blank" href="/search/java/1.htm">java</a><a class="tag" taget="_blank" href="/search/ibatis/1.htm">ibatis</a> <div>一.说明 iBatis的返回值参数类型也有种:resultMap与resultClass,这两种类型的选择可以用两句话说明之: 1.当结果集列名和类的属性名完全相对应的时候,则可直接用resultClass直接指定查询结果类</div> </li> <li><a href="/article/300.htm" title="LeetCode[位运算] - #191 计算汉明权重" target="_blank">LeetCode[位运算] - #191 计算汉明权重</a> <span class="text-muted">Cwind</span> <a class="tag" taget="_blank" href="/search/java/1.htm">java</a><a class="tag" taget="_blank" href="/search/%E4%BD%8D%E8%BF%90%E7%AE%97/1.htm">位运算</a><a class="tag" taget="_blank" href="/search/LeetCode/1.htm">LeetCode</a><a class="tag" taget="_blank" href="/search/Algorithm/1.htm">Algorithm</a><a class="tag" taget="_blank" href="/search/%E9%A2%98%E8%A7%A3/1.htm">题解</a> <div>原题链接:#191 Number of 1 Bits 要求: 写一个函数,以一个无符号整数为参数,返回其汉明权重。例如,‘11’的二进制表示为'00000000000000000000000000001011', 故函数应当返回3。 汉明权重:指一个字符串中非零字符的个数;对于二进制串,即其中‘1’的个数。 难度:简单 分析: 将十进制参数转换为二进制,然后计算其中1的个数即可。 “</div> </li> <li><a href="/article/427.htm" title="浅谈java类与对象" target="_blank">浅谈java类与对象</a> <span class="text-muted">15700786134</span> <a class="tag" taget="_blank" href="/search/java/1.htm">java</a> <div> java是一门面向对象的编程语言,类与对象是其最基本的概念。所谓对象,就是一个个具体的物体,一个人,一台电脑,都是对象。而类,就是对象的一种抽象,是多个对象具有的共性的一种集合,其中包含了属性与方法,就是属于该类的对象所具有的共性。当一个类创建了对象,这个对象就拥有了该类全部的属性,方法。相比于结构化的编程思路,面向对象更适用于人的思维</div> </li> <li><a href="/article/554.htm" title="linux下双网卡同一个IP" target="_blank">linux下双网卡同一个IP</a> <span class="text-muted">被触发</span> <a class="tag" taget="_blank" href="/search/linux/1.htm">linux</a> <div>转自: http://q2482696735.blog.163.com/blog/static/250606077201569029441/ 由于需要一台机器有两个网卡,开始时设置在同一个网段的IP,发现数据总是从一个网卡发出,而另一个网卡上没有数据流动。网上找了下,发现相同的问题不少: 一、 关于双网卡设置同一网段IP然后连接交换机的时候出现的奇怪现象。当时没有怎么思考、以为是生成树</div> </li> <li><a href="/article/681.htm" title="安卓按主页键隐藏程序之后无法再次打开" target="_blank">安卓按主页键隐藏程序之后无法再次打开</a> <span class="text-muted">肆无忌惮_</span> <a class="tag" taget="_blank" href="/search/%E5%AE%89%E5%8D%93/1.htm">安卓</a> <div>遇到一个奇怪的问题,当SplashActivity跳转到MainActivity之后,按主页键,再去打开程序,程序没法再打开(闪一下),结束任务再开也是这样,只能卸载了再重装。而且每次在Log里都打印了这句话"进入主程序"。后来发现是必须跳转之后再finish掉SplashActivity 本来代码: // 销毁这个Activity fin</div> </li> <li><a href="/article/808.htm" title="通过cookie保存并读取用户登录信息实例" target="_blank">通过cookie保存并读取用户登录信息实例</a> <span class="text-muted">知了ing</span> <a class="tag" taget="_blank" href="/search/JavaScript/1.htm">JavaScript</a><a class="tag" taget="_blank" href="/search/html/1.htm">html</a> <div>通过cookie的getCookies()方法可获取所有cookie对象的集合;通过getName()方法可以获取指定的名称的cookie;通过getValue()方法获取到cookie对象的值。另外,将一个cookie对象发送到客户端,使用response对象的addCookie()方法。 下面通过cookie保存并读取用户登录信息的例子加深一下理解。 (1)创建index.jsp文件。在改</div> </li> <li><a href="/article/935.htm" title="JAVA 对象池" target="_blank">JAVA 对象池</a> <span class="text-muted">矮蛋蛋</span> <a class="tag" taget="_blank" href="/search/java/1.htm">java</a><a class="tag" taget="_blank" href="/search/ObjectPool/1.htm">ObjectPool</a> <div>原文地址: http://www.blogjava.net/baoyaer/articles/218460.html Jakarta对象池 ☆为什么使用对象池 恰当地使用对象池化技术,可以有效地减少对象生成和初始化时的消耗,提高系统的运行效率。Jakarta Commons Pool组件提供了一整套用于实现对象池化</div> </li> <li><a href="/article/1062.htm" title="ArrayList根据条件+for循环批量删除的方法" target="_blank">ArrayList根据条件+for循环批量删除的方法</a> <span class="text-muted">alleni123</span> <a class="tag" taget="_blank" href="/search/java/1.htm">java</a> <div>场景如下: ArrayList<Obj> list Obj-> createTime, sid. 现在要根据obj的createTime来进行定期清理。(释放内存) ------------------------- 首先想到的方法就是 for(Obj o:list){ if(o.createTime-currentT>xxx){ </div> </li> <li><a href="/article/1189.htm" title="阿里巴巴“耕地宝”大战各种宝" target="_blank">阿里巴巴“耕地宝”大战各种宝</a> <span class="text-muted">百合不是茶</span> <a class="tag" taget="_blank" href="/search/%E5%B9%B3%E5%8F%B0%E6%88%98%E7%95%A5/1.htm">平台战略</a> <div>“耕地保”平台是阿里巴巴和安徽农民共同推出的一个 “首个互联网定制私人农场”,“耕地宝”由阿里巴巴投入一亿 ,主要是用来进行农业方面,将农民手中的散地集中起来 不仅加大农民集体在土地上面的话语权,还增加了土地的流通与 利用率,提高了土地的产量,有利于大规模的产业化的高科技农业的 发展,阿里在农业上的探索将会引起新一轮的产业调整,但是集体化之后农民的个体的话语权 将更少,国家应出台相应的法律法规保护</div> </li> <li><a href="/article/1316.htm" title="Spring注入有继承关系的类(1)" target="_blank">Spring注入有继承关系的类(1)</a> <span class="text-muted">bijian1013</span> <a class="tag" taget="_blank" href="/search/java/1.htm">java</a><a class="tag" taget="_blank" href="/search/spring/1.htm">spring</a> <div>一个类一个类的注入 1.AClass类 package com.bijian.spring.test2; public class AClass { String a; String b; public String getA() { return a; } public void setA(Strin</div> </li> <li><a href="/article/1443.htm" title="30岁转型期你能否成为成功人士" target="_blank">30岁转型期你能否成为成功人士</a> <span class="text-muted">bijian1013</span> <a class="tag" taget="_blank" href="/search/%E6%88%90%E5%8A%9F/1.htm">成功</a> <div> 很多人由于年轻时走了弯路,到了30岁一事无成,这样的例子大有人在。但同样也有一些人,整个职业生涯都发展得很优秀,到了30岁已经成为职场的精英阶层。由于做猎头的原因,我们接触很多30岁左右的经理人,发现他们在职业发展道路上往往有很多致命的问题。在30岁之前,他们的职业生涯表现很优秀,但从30岁到40岁这一段,很多人</div> </li> <li><a href="/article/1570.htm" title="[Velocity三]基于Servlet+Velocity的web应用" target="_blank">[Velocity三]基于Servlet+Velocity的web应用</a> <span class="text-muted">bit1129</span> <a class="tag" taget="_blank" href="/search/velocity/1.htm">velocity</a> <div>什么是VelocityViewServlet 使用org.apache.velocity.tools.view.VelocityViewServlet可以将Velocity集成到基于Servlet的web应用中,以Servlet+Velocity的方式实现web应用 Servlet + Velocity的一般步骤 1.自定义Servlet,实现VelocityViewServl</div> </li> <li><a href="/article/1697.htm" title="【Kafka十二】关于Kafka是一个Commit Log Service" target="_blank">【Kafka十二】关于Kafka是一个Commit Log Service</a> <span class="text-muted">bit1129</span> <a class="tag" taget="_blank" href="/search/service/1.htm">service</a> <div>Kafka is a distributed, partitioned, replicated commit log service.这里的commit log如何理解? A message is considered "committed" when all in sync replicas for that partition have applied i</div> </li> <li><a href="/article/1824.htm" title="NGINX + LUA实现复杂的控制" target="_blank">NGINX + LUA实现复杂的控制</a> <span class="text-muted">ronin47</span> <a class="tag" taget="_blank" href="/search/lua+nginx+%E6%8E%A7%E5%88%B6/1.htm">lua nginx 控制</a> <div>安装lua_nginx_module 模块 lua_nginx_module 可以一步步的安装,也可以直接用淘宝的OpenResty Centos和debian的安装就简单了。。 这里说下freebsd的安装: fetch http://www.lua.org/ftp/lua-5.1.4.tar.gz tar zxvf lua-5.1.4.tar.gz cd lua-5.1.4 ma</div> </li> <li><a href="/article/1951.htm" title="java-14.输入一个已经按升序排序过的数组和一个数字, 在数组中查找两个数,使得它们的和正好是输入的那个数字" target="_blank">java-14.输入一个已经按升序排序过的数组和一个数字, 在数组中查找两个数,使得它们的和正好是输入的那个数字</a> <span class="text-muted">bylijinnan</span> <a class="tag" taget="_blank" href="/search/java/1.htm">java</a> <div> public class TwoElementEqualSum { /** * 第 14 题: 题目:输入一个已经按升序排序过的数组和一个数字, 在数组中查找两个数,使得它们的和正好是输入的那个数字。 要求时间复杂度是 O(n) 。如果有多对数字的和等于输入的数字,输出任意一对即可。 例如输入数组 1 、 2 、 4 、 7 、 11 、 15 和数字 15 。由于 </div> </li> <li><a href="/article/2078.htm" title="Netty源码学习-HttpChunkAggregator-HttpRequestEncoder-HttpResponseDecoder" target="_blank">Netty源码学习-HttpChunkAggregator-HttpRequestEncoder-HttpResponseDecoder</a> <span class="text-muted">bylijinnan</span> <a class="tag" taget="_blank" href="/search/java/1.htm">java</a><a class="tag" taget="_blank" href="/search/netty/1.htm">netty</a> <div>今天看Netty如何实现一个Http Server org.jboss.netty.example.http.file.HttpStaticFileServerPipelineFactory: pipeline.addLast("decoder", new HttpRequestDecoder()); pipeline.addLast(&quo</div> </li> <li><a href="/article/2205.htm" title="java敏感词过虑-基于多叉树原理" target="_blank">java敏感词过虑-基于多叉树原理</a> <span class="text-muted">cngolon</span> <a class="tag" taget="_blank" href="/search/%E8%BF%9D%E7%A6%81%E8%AF%8D%E8%BF%87%E8%99%91/1.htm">违禁词过虑</a><a class="tag" taget="_blank" href="/search/%E6%9B%BF%E6%8D%A2%E8%BF%9D%E7%A6%81%E8%AF%8D/1.htm">替换违禁词</a><a class="tag" taget="_blank" href="/search/%E6%95%8F%E6%84%9F%E8%AF%8D%E8%BF%87%E8%99%91/1.htm">敏感词过虑</a><a class="tag" taget="_blank" href="/search/%E5%A4%9A%E5%8F%89%E6%A0%91/1.htm">多叉树</a> <div>基于多叉树的敏感词、关键词过滤的工具包,用于java中的敏感词过滤 1、工具包自带敏感词词库,第一次调用时读入词库,故第一次调用时间可能较长,在类加载后普通pc机上html过滤5000字在80毫秒左右,纯文本35毫秒左右。 2、如需自定义词库,将jar包考入WEB-INF工程的lib目录,在WEB-INF/classes目录下建一个 utf-8的words.dict文本文件,</div> </li> <li><a href="/article/2332.htm" title="多线程知识" target="_blank">多线程知识</a> <span class="text-muted">cuishikuan</span> <a class="tag" taget="_blank" href="/search/%E5%A4%9A%E7%BA%BF%E7%A8%8B/1.htm">多线程</a> <div> T1,T2,T3三个线程工作顺序,按照T1,T2,T3依次进行 public class T1 implements Runnable{ @Override </div> </li> <li><a href="/article/2459.htm" title="spring整合activemq" target="_blank">spring整合activemq</a> <span class="text-muted">dalan_123</span> <a class="tag" taget="_blank" href="/search/java+spring+jms/1.htm">java spring jms</a> <div>整合spring和activemq需要搞清楚如下的东东1、ConnectionFactory分: a、spring管理连接到activemq服务器的管理ConnectionFactory也即是所谓产生到jms服务器的链接 b、真正产生到JMS服务器链接的ConnectionFactory还得</div> </li> <li><a href="/article/2586.htm" title="MySQL时间字段究竟使用INT还是DateTime?" target="_blank">MySQL时间字段究竟使用INT还是DateTime?</a> <span class="text-muted">dcj3sjt126com</span> <a class="tag" taget="_blank" href="/search/mysql/1.htm">mysql</a> <div> 环境:Windows XPPHP Version 5.2.9MySQL Server 5.1 第一步、创建一个表date_test(非定长、int时间) CREATE TABLE `test`.`date_test` (`id` INT NOT NULL AUTO_INCREMENT ,`start_time` INT NOT NULL ,`some_content`</div> </li> <li><a href="/article/2713.htm" title="Parcel: unable to marshal value" target="_blank">Parcel: unable to marshal value</a> <span class="text-muted">dcj3sjt126com</span> <a class="tag" taget="_blank" href="/search/marshal/1.htm">marshal</a> <div>在两个activity直接传递List<xxInfo>时,出现Parcel: unable to marshal value异常。 在MainActivity页面(MainActivity页面向NextActivity页面传递一个List<xxInfo>): Intent intent = new Intent(this, Next</div> </li> <li><a href="/article/2840.htm" title="linux进程的查看上(ps)" target="_blank">linux进程的查看上(ps)</a> <span class="text-muted">eksliang</span> <a class="tag" taget="_blank" href="/search/linux+ps/1.htm">linux ps</a><a class="tag" taget="_blank" href="/search/linux+ps+-l/1.htm">linux ps -l</a><a class="tag" taget="_blank" href="/search/linux+ps+aux/1.htm">linux ps aux</a> <div>ps:将某个时间点的进程运行情况选取下来 转载请出自出处:http://eksliang.iteye.com/admin/blogs/2119469 http://eksliang.iteye.com ps 这个命令的man page 不是很好查阅,因为很多不同的Unix都使用这儿ps来查阅进程的状态,为了要符合不同版本的需求,所以这个</div> </li> <li><a href="/article/2967.htm" title="为什么第三方应用能早于System的app启动" target="_blank">为什么第三方应用能早于System的app启动</a> <span class="text-muted">gqdy365</span> <a class="tag" taget="_blank" href="/search/System/1.htm">System</a> <div>Android应用的启动顺序网上有一大堆资料可以查阅了,这里就不细述了,这里不阐述ROM启动还有bootloader,软件启动的大致流程应该是启动kernel -> 运行servicemanager 把一些native的服务用命令启动起来(包括wifi, power, rild, surfaceflinger, mediaserver等等)-> 启动Dalivk中的第一个进程Zygot</div> </li> <li><a href="/article/3094.htm" title="App Framework发送JSONP请求(3)" target="_blank">App Framework发送JSONP请求(3)</a> <span class="text-muted">hw1287789687</span> <a class="tag" taget="_blank" href="/search/jsonp/1.htm">jsonp</a><a class="tag" taget="_blank" href="/search/%E8%B7%A8%E5%9F%9F%E8%AF%B7%E6%B1%82/1.htm">跨域请求</a><a class="tag" taget="_blank" href="/search/%E5%8F%91%E9%80%81jsonp/1.htm">发送jsonp</a><a class="tag" taget="_blank" href="/search/ajax%E8%AF%B7%E6%B1%82/1.htm">ajax请求</a><a class="tag" taget="_blank" href="/search/%E8%B6%8A%E7%8B%B1%E8%AF%B7%E6%B1%82/1.htm">越狱请求</a> <div>App Framework 中如何发送JSONP请求呢? 使用jsonp,详情请参考:http://json-p.org/ 如何发送Ajax请求呢? (1)登录 /*** * 会员登录 * @param username * @param password */ var user_login=function(username,password){ // aler</div> </li> <li><a href="/article/3221.htm" title="发福利,整理了一份关于“资源汇总”的汇总" target="_blank">发福利,整理了一份关于“资源汇总”的汇总</a> <span class="text-muted">justjavac</span> <a class="tag" taget="_blank" href="/search/%E8%B5%84%E6%BA%90/1.htm">资源</a> <div>觉得有用的话,可以去github关注:https://github.com/justjavac/awesome-awesomeness-zh_CN 通用 free-programming-books-zh_CN 免费的计算机编程类中文书籍 精彩博客集合 hacke2/hacke2.github.io#2 ResumeSample 程序员简历</div> </li> <li><a href="/article/3348.htm" title="用 Java 技术创建 RESTful Web 服务" target="_blank">用 Java 技术创建 RESTful Web 服务</a> <span class="text-muted">macroli</span> <a class="tag" taget="_blank" href="/search/java/1.htm">java</a><a class="tag" taget="_blank" href="/search/%E7%BC%96%E7%A8%8B/1.htm">编程</a><a class="tag" taget="_blank" href="/search/Web/1.htm">Web</a><a class="tag" taget="_blank" href="/search/REST/1.htm">REST</a> <div>转载:http://www.ibm.com/developerworks/cn/web/wa-jaxrs/ JAX-RS (JSR-311) 【 Java API for RESTful Web Services 】是一种 Java™ API,可使 Java Restful 服务的开发变得迅速而轻松。这个 API 提供了一种基于注释的模型来描述分布式资源。注释被用来提供资源的位</div> </li> <li><a href="/article/3475.htm" title="CentOS6.5-x86_64位下oracle11g的安装详细步骤及注意事项" target="_blank">CentOS6.5-x86_64位下oracle11g的安装详细步骤及注意事项</a> <span class="text-muted">超声波</span> <a class="tag" taget="_blank" href="/search/oracle/1.htm">oracle</a><a class="tag" taget="_blank" href="/search/linux/1.htm">linux</a> <div>前言: 这两天项目要上线了,由我负责往服务器部署整个项目,因此首先要往服务器安装oracle,服务器本身是CentOS6.5的64位系统,安装的数据库版本是11g,在整个的安装过程中碰到很多的坑,不过最后还是通过各种途径解决并成功装上了。转别写篇博客来记录完整的安装过程以及在整个过程中的注意事项。希望对以后那些刚刚接触的菜鸟们能起到一定的帮助作用。 安装过程中可能遇到的问题(注</div> </li> <li><a href="/article/3602.htm" title="HttpClient 4.3 设置keeplive 和 timeout 的方法" target="_blank">HttpClient 4.3 设置keeplive 和 timeout 的方法</a> <span class="text-muted">supben</span> <a class="tag" taget="_blank" href="/search/httpclient/1.htm">httpclient</a> <div>ConnectionKeepAliveStrategy kaStrategy = new DefaultConnectionKeepAliveStrategy() { @Override public long getKeepAliveDuration(HttpResponse response, HttpContext context) { long keepAlive</div> </li> <li><a href="/article/3729.htm" title="Spring 4.2新特性-@Import注解的升级" target="_blank">Spring 4.2新特性-@Import注解的升级</a> <span class="text-muted">wiselyman</span> <a class="tag" taget="_blank" href="/search/spring+4/1.htm">spring 4</a> <div>3.1 @Import @Import注解在4.2之前只支持导入配置类 在4.2,@Import注解支持导入普通的java类,并将其声明成一个bean 3.2 示例 演示java类 package com.wisely.spring4_2.imp; public class DemoService { public void doSomethin</div> </li> </ul> </div> </div> </div> <div> <div class="container"> <div class="indexes"> <strong>按字母分类:</strong> <a href="/tags/A/1.htm" target="_blank">A</a><a href="/tags/B/1.htm" target="_blank">B</a><a href="/tags/C/1.htm" target="_blank">C</a><a href="/tags/D/1.htm" target="_blank">D</a><a href="/tags/E/1.htm" target="_blank">E</a><a href="/tags/F/1.htm" target="_blank">F</a><a href="/tags/G/1.htm" target="_blank">G</a><a href="/tags/H/1.htm" target="_blank">H</a><a href="/tags/I/1.htm" target="_blank">I</a><a href="/tags/J/1.htm" target="_blank">J</a><a href="/tags/K/1.htm" target="_blank">K</a><a href="/tags/L/1.htm" target="_blank">L</a><a href="/tags/M/1.htm" target="_blank">M</a><a href="/tags/N/1.htm" target="_blank">N</a><a href="/tags/O/1.htm" target="_blank">O</a><a href="/tags/P/1.htm" target="_blank">P</a><a href="/tags/Q/1.htm" target="_blank">Q</a><a href="/tags/R/1.htm" target="_blank">R</a><a href="/tags/S/1.htm" target="_blank">S</a><a href="/tags/T/1.htm" target="_blank">T</a><a href="/tags/U/1.htm" target="_blank">U</a><a href="/tags/V/1.htm" target="_blank">V</a><a href="/tags/W/1.htm" target="_blank">W</a><a href="/tags/X/1.htm" target="_blank">X</a><a href="/tags/Y/1.htm" target="_blank">Y</a><a href="/tags/Z/1.htm" target="_blank">Z</a><a href="/tags/0/1.htm" target="_blank">其他</a> </div> </div> </div> <footer id="footer" class="mb30 mt30"> <div class="container"> <div class="footBglm"> <a target="_blank" href="/">首页</a> - <a target="_blank" href="/custom/about.htm">关于我们</a> - <a target="_blank" href="/search/Java/1.htm">站内搜索</a> - <a target="_blank" href="/sitemap.txt">Sitemap</a> - <a target="_blank" href="/custom/delete.htm">侵权投诉</a> </div> <div class="copyright">版权所有 IT知识库 CopyRight © 2000-2050 E-COM-NET.COM , All Rights Reserved. <!-- <a href="https://beian.miit.gov.cn/" rel="nofollow" target="_blank">京ICP备09083238号</a><br>--> </div> </div> </footer> <!-- 代码高亮 --> <script type="text/javascript" src="/static/syntaxhighlighter/scripts/shCore.js"></script> <script type="text/javascript" src="/static/syntaxhighlighter/scripts/shLegacy.js"></script> <script type="text/javascript" src="/static/syntaxhighlighter/scripts/shAutoloader.js"></script> <link type="text/css" rel="stylesheet" href="/static/syntaxhighlighter/styles/shCoreDefault.css"/> <script type="text/javascript" src="/static/syntaxhighlighter/src/my_start_1.js"></script> </body> </html>
- 网页标题是通过


