零基础入门NLP-Task6 基于深度学习的文本分类3
Transformer 原理

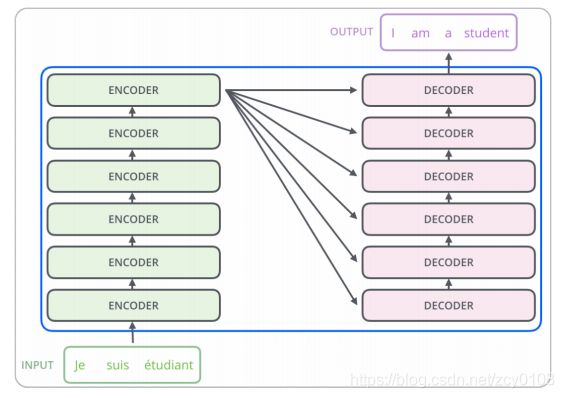
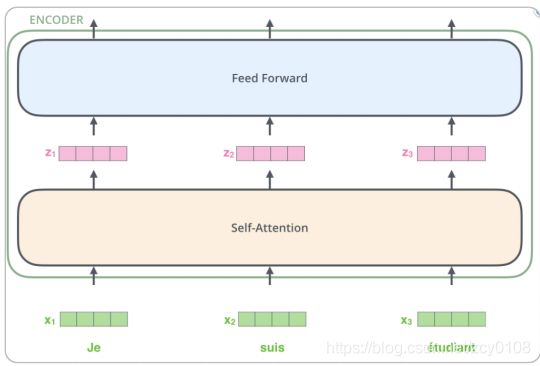
我们重点关注编码部分。他们结构完全相同,但是并不共享参数,每一个编码器都可以拆解成两部分。在对输入序列做词的向量化之后,它们首先流过一个self-attention层,该层帮助编码器在它编码单词的时候能够看到输入序列中的其他单词。self-attention的输出流向一个前向网络(Feed Forward Neural Network),每个输入位置对应的前向网络是独立互不干扰的。最后将输出传入下一个编码器。

这里能看到Transformer的一个关键特性,每个位置的词仅仅流过它自己的编码器路径。在self-attention层中,这些路径两两之间是相互依赖的。前向网络层则没有这些依赖性,但这些路径在流经前向网络时可以并行执行。
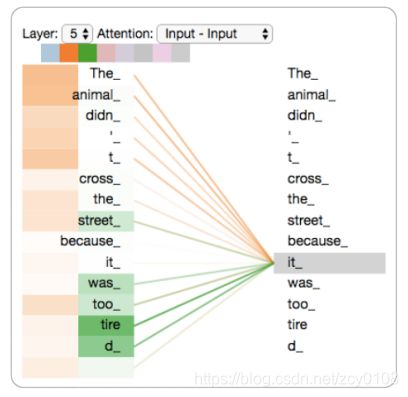
Self-Attention中使用多头机制,使得不同的attention heads所关注的的部分不同。

编码"it"时,一个attention head集中于"the animal",另一个head集中于“tired”,某种意义上讲,模型对“it”的表达合成了的“animal”和“tired”两者。
对于自注意力的详细计算,欢迎大家参考Jay Alammar关于Transformer的博客,这里不再展开。
除此之外,为了使模型保持单词的语序,模型中添加了位置编码向量。如下图所示,每行对应一个向量的位置编码。因此,第一行将是我们要添加到输入序列中第一个单词的嵌入的向量。每行包含512个值—每个值都在1到-1之间。因为左侧是用sine函数生成,右侧是用cosine生成,所以可以观察到中间显著的分隔。
基于Bert的文本分类
预训练过程使用了Google基于Tensorflow发布的BERT源代码。首先从原始文本中创建训练数据,由于本次比赛的数据都是ID,这里重新建立了词表,并且建立了基于空格的分词器
class WhitespaceTokenizer(object):
    """WhitespaceTokenizer with vocab."""
    def __init__(self, vocab_file):
        self.vocab = load_vocab(vocab_file)
        self.inv_vocab = {v: k for k, v in self.vocab.items()}

    def tokenize(self, text):
        split_tokens = whitespace_tokenize(text)
        output_tokens = []
        for token in split_tokens:
            if token in self.vocab:
                output_tokens.append(token)
            else:
                output_tokens.append("[UNK]")
        return output_tokens

    def convert_tokens_to_ids(self, tokens):
        return convert_by_vocab(self.vocab, tokens)

    def convert_ids_to_tokens(self, ids):
        return convert_by_vocab(self.inv_vocab, ids)
预训练由于去除了NSP预训练任务,因此将文档处理多个最大长度为256的段,如果最后一个段的长度小于256/2则丢弃。每一个段执行按照BERT原文中执行掩码语言模型,然后处理成tfrecord格式。
def create_segments_from_document(document, max_segment_length):
    """Split single document to segments according to max_segment_length."""
    assert len(document) == 1
    document = document[0]
    document_len = len(document)

    index = list(range(0, document_len, max_segment_length))
    other_len = document_len % max_segment_length
    if other_len > max_segment_length / 2:
        index.append(document_len)

    segments = []
    for i in range(len(index) - 1):
        segment = document[index[i]: index[i+1]]
        segments.append(segment)

    return segments
在预训练过程中,也只执行掩码语言模型任务,因此不再计算下一句预测任务的loss。
(masked_lm_loss, masked_lm_example_loss, masked_lm_log_probs) = get_masked_lm_output(
    bert_config, model.get_sequence_output(), model.get_embedding_table(),
    masked_lm_positions, masked_lm_ids, masked_lm_weights)

total_loss = masked_lm_loss
为了适配句子的长度,以及减小模型的训练时间,我们采取了BERT-mini模型,详细配置如下。
{
  "hidden_size": 256,
  "hidden_act": "gelu",
  "initializer_range": 0.02,
  "vocab_size": 5981,
  "hidden_dropout_prob": 0.1,
  "num_attention_heads": 4,
  "type_vocab_size": 2,
  "max_position_embeddings": 256,
  "num_hidden_layers": 4,
  "intermediate_size": 1024,
  "attention_probs_dropout_prob": 0.1
}
由于我们的整体框架使用Pytorch,因此需要将最后一个检查点转换成Pytorch的权重。
def convert_tf_checkpoint_to_pytorch(tf_checkpoint_path, bert_config_file, pytorch_dump_path):
    # Initialise PyTorch model
    config = BertConfig.from_json_file(bert_config_file)
    print("Building PyTorch model from configuration: {}".format(str(config)))
    model = BertForPreTraining(config)

    # Load weights from tf checkpoint
    load_tf_weights_in_bert(model, config, tf_checkpoint_path)

    # Save pytorch-model
    print("Save PyTorch model to {}".format(pytorch_dump_path))
    torch.save(model.state_dict(), pytorch_dump_path)
预训练消耗的资源较大,硬件条件不允许的情况下建议直接下载开源的模型
Bert Finetune
微调将最后一层的第一个token即[CLS]的隐藏向量作为句子的表示,然后输入到softmax层进行分类。
sequence_output, pooled_output = \
    self.bert(input_ids=input_ids, token_type_ids=token_type_ids)

if self.pooled:
    reps = pooled_output
else:
    reps = sequence_output[:, 0, :]  # sen_num x 256

if self.training:
    reps = self.dropout(reps)