Docker Swarm
Swarm 是什么?
Docker Swarm 是Docker官方的跨节点的容器编排工具。用户只需要在单一的管理节点上操作,即可管理集群下的所有节点和容器。
主要解决什么问题
1. 解决docker server的集群化管理和部署。
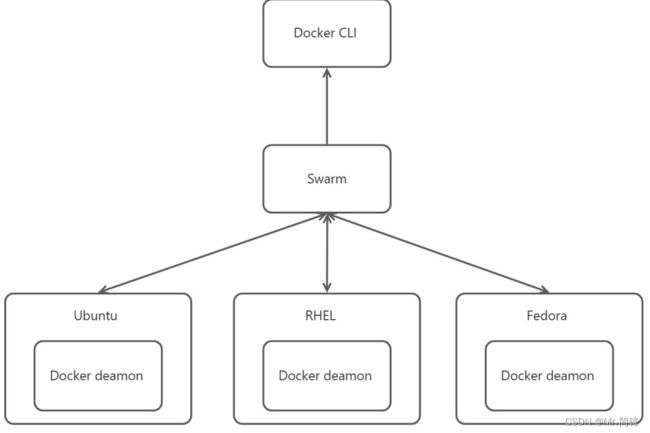
2. Swarm通过对Docker宿主机上添加的标签信息来将宿主机资源进行细粒度分区,通过分区来帮助用户将容器部署到目标宿主机上,同样通过分区方式还能提供更多的资源调度策略扩展。下图为:单对单的Docker宿主机使用方式
下图为:单对多的Docker宿主机使用方式
能做什么
1. 管理节点高可用,原生支持管理节点高可用,采用raft共识算法来支撑管理节点高可用。
2. 应用程序高可用,支持服务伸缩,滚动更新和应用回滚等部署策略
涉及到哪些概念
1. docker的两种模式,单引擎模式和swarm集群模式
单引擎模式,指docker server没有加入任何集群,且自身也没有加入初始化为swarm 节点,简单的说就我我们平时所操作的孤立的docker server。 swarm模式,当docker server 加入到任意swarm集群,或者通过docker swarm init初始化swarm集群 时,docker server会自动切换到swarm 集群模式。
2. swarm集群中节点分类,分为:manager(管理节点)、node(工作节点)
manager:是Swarm Daemon工作的节点,包含了调度器、路由、服务发现等功能,负责接收客户端 的集群管理请求以及调度Node进行具体工作。manager 本身也是一个node节点 Node:接受manager调度,对容器进行创建、扩容和销毁等具体操作。
3. raft共识算法,是实现分布式共识的一种算法,主要用来管理日志复制的一致性。
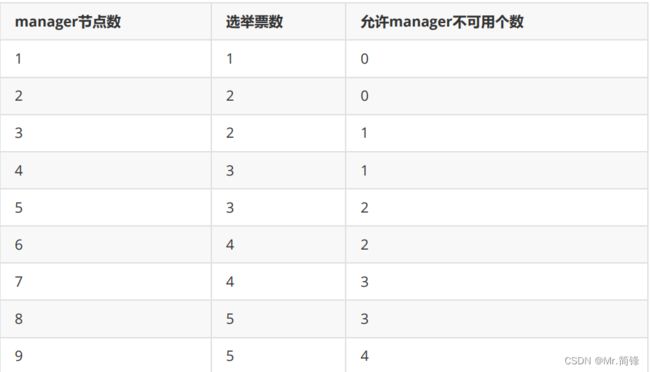
当Docker引擎在swarm模式下运行时,manager节点实现Raft一致性算法来管理全局集群状态。 Docker swarm模式之所以使用一致性算法,是为了确保集群中负责管理和调度任务的所有manager节 点都存储相同的一致状态。 在整个集群中具有相同的一致状态意味着,如果出现故障,任何管理器节点都可以拾取任务并将服务恢 复到稳定状态。例如,如果负责在集群中调度任务的领导管理器意外死亡,则任何其他管理器都可以选 择调度任务并重新平衡任务以匹配所需状态。 使用一致性算法在分布式系统中复制日志的系统需要特别小心。它们通过要求大多数节点在值上达成一 致,确保集群状态在出现故障时保持一致。 Raft最多可承受(N-1)/2次故障,需要(N/2)+1名成员的多数或法定人数才能就向集群提议的值达成 一致。这意味着,在运行Raft的5个管理器集群中,如果3个节点不可用,系统将无法处理更多的请求来 安排其他任务。现有任务保持运行,但如果管理器集不正常,调度程序无法重新平衡任务以应对故障。
4. Swarm管理节点高可用
Swarm管理节点内置有对HA的支持,即使有一个或多个节点发送故障,剩余管理节点也会继续保证 Swarm运转 Swarm实现了一种主从方式的多管理节点的HA,即使有多个管理节点也只有一个节点出于活动状态,处 于活动状态的节点被称为主节点(leader),而主节点也是唯一一个会对Swarm发送控制命令的节点,如 果一个备用管理节点接收到了Swarm命令,则它会将其转发给主节点
5. 集群管理,集群创建和组织。
6. 节点管理,集群下节点角色信息变更,节点任务情况监控。
7. 服务管理,集群服务部署,服务管理等。
需要注意什么
1. manager节点容错
manager数量最好设置为奇数个,可以减少脑裂(Split-Brain)出现情况。在网络被划分成2个部分情况 下,奇数个manager节点能够较高程度的保证有投票结果的可能性
不要部署太多的manager节点(通常3到5个)。对于所有共识算法来说,更多的参与节点意味着需要花 费更多的时间来达成共识,所以最好部署5个或三个节点
Raft最多可承受(N-1)/2次故障,需要(N/2)+1名成员的多数或法定人数才能就向集群提议的值达成一致
集群管理
创建集群
1. 不包含在任何Swarm中的Docker节点,该Docker节点被称为运行于单引擎(Single-Engine)模式, 一旦加入Swarm集群,则切换为Swarm模式
2. docker swarm init 会通知Docker来初始化一个新的Swarm,并且将自身设置为第一个管理节点。 同时也会使该节点开启Swarm模式
3. --advertise-addr IP:2377 指定其他节点用来连接到当前管理节点的IP和端口,这一指令是可选 的,当节点有多个IP时,可以指定其中一个
4. --listen-addr 指定用于承载Swarm流量的IP和端口,其设置通常与--advertise-addr相匹配,但是 当节点上有多个IP的时候,可用于指定具体某个IP
5. --autolock 启用管理器自动锁定(需要解锁密钥才能启动已停止的管理器)
6. --force-new-cluster 强制从当前状态创建新群集
docker swarm init
将节点加入集群
1. 生成join-token
# 生成work节点 join-token
docker swarm join-token worker
# 生成manager节点 join-token
docker swarm join-token manager
2. 加入集群
# 此命令为 join-token 命令执行结果,在相应的节点执行该结果即可加入到集群
docker swarm join --token SWMTKN-1- 36o8i823751vozwd75mpzgsy28h4ti93zbn4o9wht8kywj35ir-6zh4id2t0ck4on4oyw95xs3cs 192.168.239.142:2377
查看集群状态
docker info
将节点从集群中移除
# 将节点从集群中移除 (只能移除worker节点)
docker swarm leave
# 将节点从集群中强制移除(包括manager节点)
docker swarm leave -f
更新集群
# 更新集群的部分参数
docker swarm update --autolock=false
锁定/解锁集群
1. 重启一个旧的管理节点或者进行备份恢复可能对集群造成影响,一个旧的管理节点重新接入Swarm 会自动解密并获得Raft数据库中长时间序列的访问权,这会带来安全隐患。进行备份恢复可能会抹掉最新的Swarm配置
2. 为了规避上述问题,Docker提供自动锁机制来锁定Swarm,这会强制要求重启的管理节点在提供一个集群解锁码之后才有权重新接入集群(也可以防止原来的主节点宕机后重新接入集群,和当前主节点一起成为双主,双主也是一种脑裂问题)
# 设置为自动锁定集群
docker swarm update --autolock=true
# 当集群设置为 --autolock后,可以通过该命令查询解锁集群的秘钥
# 该节点必须为集群有效的管理节点
docker swarm unlock-key
# 重启管理节点,集群将被自动锁定
service docker restart
# 重启后的管理节点必须提供解锁码后才能重新接入集群
docker swarm unlock
节点管理
docker node -h
# 降级节点
demote Demote one or more nodes from manager in the swarm
# 查看节点详情
inspect Display detailed information on one or more nodes
# 查看所有节点
ls List nodes in the swarm
# 升级节点
promote Promote one or more nodes to manager in the swarm
# 查看节点上运行的任务,默认当前节点
ps List tasks running on one or more nodes, defaults to current node
# 删除节点
rm Remove one or more nodes from the swarm
# 更新节点
update Update a node
查看集群节点列表
docker node ls
升级或降级节点
# 降级一个或多个节点
docker node demote
# 通过修改单个节点的role属性,来降级节点
docker node update --role worker
# 升级一个或多个节点
docker node promote
# 通过修改单个节点的role属性,来升级节点
docker node update --role manager
更改节点状态
# 更改节点状态
docker node update --availability active|pause|drain
# active: 正常
# pause:挂起
# drain:排除
1. 正常节点,可正常部署应用
2. 挂起节点,已经部署的应用不会发生变化,新应用将不会部署到该节点
3. 排除节点,已经部署在该节点的应用会被调度到其他节点
删除节点
# 只能删除已关闭服务的工作节点
docker node rm
# 只能强制删除工作节点
docker node rm -f
注:管理节点的删除只能先将管理节点降级为工作节点,再执行删除动作
# 停止
docker server sudo service docker stop
服务部署
素材准备
1. 拉取代码、获取tag
# 拉取代码
git clone https://gitee.com/nickdemo/helloworld.git
# 进入代码目录
cd helloworld
# fetch
git fetch origin
2. 镜像制作
# 切换到1.0.0 tag
git checkout 1.0.0
# 构建1.0.0镜像
docker build -f Dockerfile -t hello:1.0.0 .
# 切换到1.0.1 tag
git checkout 1.0.1
# 构建1.0.1镜像
docker build -f Dockerfile -t hello:1.0.1 .
3. 将镜像推送到仓库(这里使用公共仓库作为演示)
# 登录注册中心
docker login
4. 为镜像重新打tag(格式:用户名/仓库名:tag)
docker tag hello:1.0.0 linuxjianfeng123/hello:1.0.0
docker push linuxjianfeng123/hello:1.0.0
docker tag hello:1.0.1 linuxjianfeng123/hello:1.0.1
docker push linuxjianfeng123/hello:1.0.1
5. 登录https://hub.docker.com/ 查看镜像情况
服务管理
常用命令
docker service -h
# 创建一个服务
create Create a new service
# 查看服务详细信息
inspect Display detailed information on one or more services
# 查看服务日志
logs Fetch the logs of a service or task
# 列出所有服务
ls List services
# 列出一个或多个服务的任务列表
ps List the tasks of one or more services
# 删除一个或多个服务
rm Remove one or more services
# 回滚
rollback Revert changes to a service's configuration
# 弹性伸缩一个或多个服务
scale Scale one or multiple replicated services
# 更新服务
update Update a service
在集群上部署应用
1. 部署一个副本数量
docker service create --name myhello --publish published=81,target=80 --replicas
3 xlhmzch/hello:1.0.0
# 若是采用私有注册中心请加上 --with-registry-auth 选项
2. 查看服务下的任务(容器)
docker service ps myhello
3. 查看节点下的任务(容器)
docker node ps
4. 访问集群中任意节点(包括没有运行任务的节点)对应的端口号均能访问到应用程序,swarm为集 群实现了负载均衡
curl http://localhost:81/ping
5. 查看service详细信息
docker service inspect myhello
6. 查看service日志
docker service logs myhello
7. 伸缩服务
docker service scale myhello=5
8. 修改节点状态,查看任务部署情况
docker node update --availability active|pause|drain
在集群上部署一个带更新策略和回滚策略的应用
1. 部署应用
docker service create \
--name myhello1 \
--publish published=82,target=80 \
--replicas 20 \
--update-delay 5s \
--update-parallelism 2 \
--update-failure-action continue \
--rollback-parallelism 2 \
--rollback-monitor 10s \
--rollback-max-failure-ratio 0.2 \
xlhmzch/hello:1.0.0
# 若是采用私有注册中心请加上 --with-registry-auth 选项
#--update-delay 5s :每个容器依次更新,间隔5s
# --update-parallelism 2 : 每次允许两个服务一起更新
#--update-failure-action continue : 更新失败后的动作是继续
# --rollback-parallelism 2 : 回滚时允许两个一起
# --rollback-monitor 10s :回滚监控时间10s
# --rollback-max-failure-ratio 0.2 : 回滚失败率20%
2. 检查部署后的应用设置项是否都有被成功设置
# 查看并打印友好的详细信息
docker service inspect --pretty myhello1
注意:查看详细信息时,详细信息中时间单位为ns(纳秒)。友好格式下,时间单位为(s)
3. 更新未设置成功的项
docker service update --update-delay 5s --rollback-monitor 10s myhello1
4. 访问服务
curl http://localhost:82/ping
curl http://localhost:82/ping/v1.0.1
更新服务
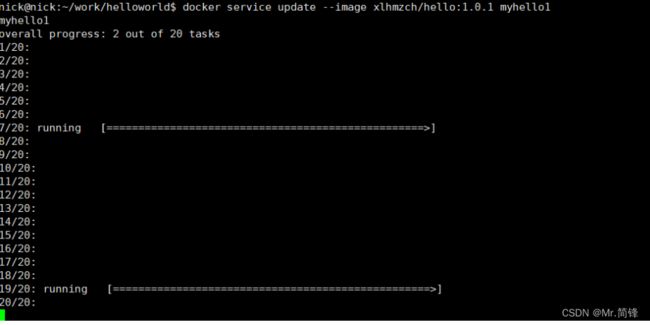
1. 启动更新
docker service update --image xlhmzch/hello:1.0.1 myhello1
# 若是采用私有注册中心请加上 --with-registry-auth 选项
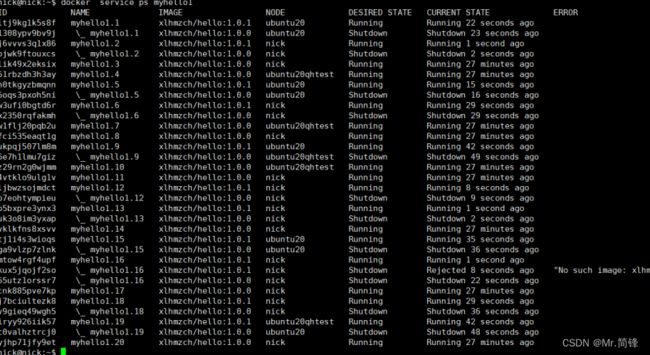
2. 更新完成
3. 访问服务
curl http://localhost:82/ping
curl http://localhost:82/ping/v1.0.1
回滚服务
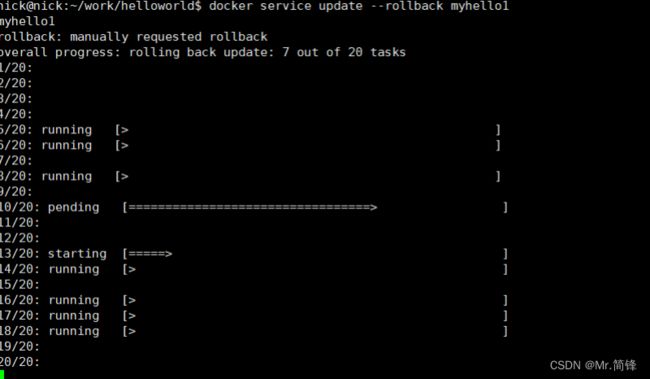
1. 启动回滚(策略是失败后回滚,目前没有失败的情况,我们手动回滚)
docker service update --rollback myhello1
2. 回滚成功
结合docker-compose.yml部署
部署应用
1. 常用命令
# 部署或更新 stack
deploy Deploy a new stack or update an existing stack
# 查看 stack 列表
ls List stacks
# 查看 stack 的任务列表
ps List the tasks in the stack
# 删除 stack
rm Remove one or more stacks
# 查看stack 中的服务列表
services List the services in the stack
2. docker-compose.yml 文件
version: "3.7"
services:
  myhello2:
    image: xlhmzch/hello:1.0.0
    ports:
      - "83:80"
    depends_on:
      - redis
    deploy:
      mode: replicated
      replicas: 20
      endpoint_mode: vip
      rollback_config:
        parallelism: 2
        delay: 10s
        monitor: 10s
        max_failure_ratio: 0.2
      update_config:
        parallelism: 2
        delay: 5s
        failure_action: continue
  redis:
    image: redis:alpine
    deploy:
      mode: replicated
      replicas: 6
      endpoint_mode: dnsrr
      labels:
        description: "This redis service label"
      resources:
        limits:
          cpus: '0.50'
          memory: 50M
        reservations:
          cpus: '0.25'
          memory: 20M
        restart_policy:
          condition: on-failure
          delay: 5s
          max_attempts: 3
          window: 120s
3. 部署stack
docker stack deploy -c docker-compose.yml mystack
4. 查看服务详情
# 查看并打印友好的详细信息
docker service inspect --pretty mystack_myhello2
docker service inspect --pretty mystack_redis
语法说明
endpoint_mode:访问集群服务的方式。
endpoint_mode: vip
# Docker 集群服务一个对外的虚拟 ip。所有的请求都会通过这个虚拟 ip 到达集群服务内部的机器。
endpoint_mode: dnsrr
# DNS 轮询(DNSRR)。所有的请求会自动轮询获取到集群 ip 列表中的一个 ip 地址
labels:在服务上设置标签。可以用容器上的 labels(跟 deploy 同级的配置) 覆盖 deploy 下的 labels。
mode:指定服务提供的模式。
replicated:复制服务,复制指定服务到集群的机器上。
global:全局服务,服务将部署至集群的每个节点。
replicas:mode 为 replicated 时,需要使用此参数配置具体运行的节点数量。
resources:配置服务器资源使用的限制,例如上例子,配置 redis 集群运行需要的 cpu 的百分比 和 内 存的占用。避免占用资源过高出现异常。
restart_policy:配置如何在退出容器时重新启动容器。
condition:可选 none,on-failure 或者 any(默认值:any)。
delay:设置多久之后重启(默认值:0)。
max_attempts:尝试重新启动容器的次数,超出次数,则不再尝试(默认值:一直重试)。
window:设置容器重启超时时间(默认值:0)。
rollback_config:配置在更新失败的情况下应如何回滚服务。
parallelism:一次要回滚的容器数。如果设置为0,则所有容器将同时回滚。
delay:每个容器组回滚之间等待的时间(默认为0s)。
failure_action:如果回滚失败,该怎么办。其中一个 continue 或者 pause(默认pause)。
monitor:每个容器更新后,持续观察是否失败了的时间 (ns|us|ms|s|m|h)(默认为0s)。
max_failure_ratio:在回滚期间可以容忍的故障率(默认为0)。
order:回滚期间的操作顺序。其中一个 stop-first(串行回滚),或者 start-first(并行回滚) (默认 stop-first )。
update_config:配置应如何更新服务,对于配置滚动更新很有用。
parallelism:一次更新的容器数。 delay:在更新一组容器之间等待的时间。 failure_action:如果更新失败,该怎么办。其中一个 continue,rollback 或者pause (默认: pause)。
monitor:每个容器更新后,持续观察是否失败了的时间 (ns|us|ms|s|m|h)(默认为0s)。
max_failure_ratio:在更新过程中可以容忍的故障率。
order:回滚期间的操作顺序。其中一个 stop-first(串行回滚),或者 start-first(并行回滚) (默认stop-first)。
注:仅支持 V3.4 及更高版本

