源码看CAF的线程调度框架
序
本篇文章带着大家来看下CAF(C++ Actor Framwwork)的调度框架,也是算现阶段C++比较成熟的调度框架,大家如果自己完成一个比较大型的项目,任务调度也可以参照CAF。
鉴于篇幅较长,大家如果学习使用如何使用CAF可以参照 http://purecpp.cn/detail?id=2237 内容,如果想要直接学习调度框架,可以直接跳转到任务调度小节。
关于CAF用法
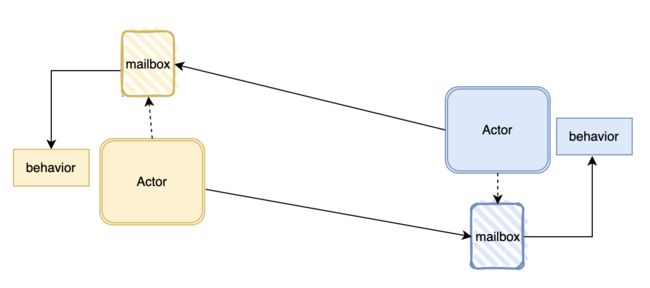
简单说一下CAF的用法或者说一个调用模型,它里边比较关键的概念是Actor,翻译过来就是角色,每个Actor中有beavior(行为)这个概念,beavior里边就是这个角色会做的事情(也就是一个函数)。Actor是基本的计算单元和通信的单元,两个actor相互通信,actor执行自己的behavior。如图所示:
再来看下官方的使用例子,我删了下注释:
using namespace caf;

behavior mirror(event_based_actor* self) {
  return {
    [=](const std::string& what) -> std::string {
      aout(self) << what << std::endl;
      return std::string{what.rbegin(), what.rend()};
    },
  };
}

void hello_world(event_based_actor* self, const actor& buddy) {
  self->request(buddy, std::chrono::seconds(10), "Hello World!")
    .then(
      [=](const std::string& what) {
        aout(self) << what << std::endl;
      });
}

void caf_main(actor_system& sys) {
  // create a new actor that calls 'mirror()'
  auto mirror_actor = sys.spawn(mirror);
  // create another actor that calls 'hello_world(mirror_actor)';
  sys.spawn(hello_world, mirror_actor);
  // the system will wait until both actors are done before exiting the program
}

CAF_MAIN()
我这里帮着大家顺一下这段代码:
- 函数入口在CAF_MAIN宏中,主要是做一些初始化工作,和我们主题相关的是会创建actor_system对象并调用caf_main函数。
- 然后caf_main中调用sys.spawn会创建出来一个actor,我们看mirror_actor的behavior,是在mirror函数中return了一个behavior对象,也就是spawn会调用mirror函数并获得了behavior,然后创建了actor对象。
- 再下一个spawn函数调用hello_world,传入mirror_actor对象,对应于buddy参数,并执行request函数,request传入buddy参数,表示会调用buddy的behavior函数,根据函数参数去找,,request参数的第二个表示该函数的超时时间,第三个之后才是要调用buddy这个actor的behavior的函数参数,那么这里正好可以调用到mirror_actor的behavior,当behavior返回时会自动执行then这个函数。
- 最后整体的执行顺序就是,sys调用spawn创建拥有behavior的actor对象mirror_actor, 第二个spawn会创建出来第二个actor对象,并调用自己的request函数向另外一个actor发送调用信息,也即会调用buddy的bahavior,调用behavior后执行then函数,整体结束。
调度器启动(初始化)
首先调度器的构造或者说初始化是在actor_system的构造函数进行:
// actor_system.cpp

actor_system::actor_system(actor_system_config& cfg) {
  // ...

  auto& sched = modules_[module::scheduler];
  using namespace scheduler;
  using policy::work_sharing;
  using policy::work_stealing;
  using share = coordinator;
  using steal = coordinator;
  if (!sched) {
    enum sched_conf {
      stealing = 0x0001,
      sharing = 0x0002,
      testing = 0x0003,
    };
    sched_conf sc = stealing;
    namespace sr = defaults::scheduler;
    auto sr_policy = get_or(cfg, "caf.scheduler.policy", sr::policy);
    if (sr_policy == "sharing")
      sc = sharing;
    else if (sr_policy == "testing")
      sc = testing;
    else if (sr_policy != "stealing")
      std::cerr << "[WARNING] " << deep_to_string(sr_policy)
                << " is an unrecognized scheduler pollicy, "
                   "falling back to 'stealing' (i.e. work-stealing)"
                << std::endl;
    switch (sc) {
      default: // any invalid configuration falls back to work stealing
        sched.reset(new steal(*this));
        break;
      case sharing:
        sched.reset(new share(*this));
        break;
      case testing:
        sched.reset(new test_coordinator(*this));
    }
  }

  // ...
}
调度器的对象是从modules_这个数组中取出,我们看下module是什么:
// actor_system.hpp
class CAF_CORE_EXPORT actor_system {
  // ...

  class CAF_CORE_EXPORT module {
  public:
    enum id_t {
      scheduler,
      middleman,
      openssl_manager,
      network_manager,
      num_ids
    };

    virtual ~module();
    const char* name() const noexcept;
    virtual void start() = 0;
    virtual void stop() = 0;
    virtual void init(actor_system_config&) = 0;
    virtual id_t id() const = 0;
    virtual void* subtype_ptr() = 0;
  };

  // ...
};
module会提供一些公共接口,init,start,stop等等之类的。我们也看到调度器是属于module的。
然后再回到创建调度器那里,最开始调度器是没有的,然后可以看的出来有三种调度配置,steal(偷取任务),share(共享任务),test(测试模式),我们就忽略测试模式。截止到switch那里,我们知道从配置文件中读取到调度的配置是什么,就去创建相应的调度器。那么调度器的类就是coordinator,work_sharing和work_stealing分别是不同调度配置的实现类,coordinator传入模版参数为调度的策略类(work_sharing和work_stealing)来实现调度器的全部功能。
然后继续往下继续看,目前已经有了调度器的创建,我们大致看下实现调度器共的类大体继承关系:
// coordinator.hpp
template
class coordinator : public abstract_coordinator {
  // ...
};

// abstract_coordinator.hpp
class CAF_CORE_EXPORT abstract_coordinator : public actor_system::module {
  // ...
};
coordinator继承abstract_coordinator,abstract_coordinator然后继承actor_system::module,这就和我们上边说的调度器属于module联系上了。
然后我们继续回到actor_system继续往下走:
// actor_system.cpp
actor_system::actor_system(actor_system_config& cfg) {
  // ...

  for (auto& mod : modules_)
    if (mod)
      mod->init(cfg);

  // ...
}
这里我们看到会调用调度器实现类的init函数,init函数是由abstract_coordinator类实现:
// abstract_coordinator.cpp
void abstract_coordinator::init(actor_system_config& cfg) {
  namespace sr = defaults::scheduler;
  max_throughput_ = get_or(cfg, "caf.scheduler.max-throughput",
                           sr::max_throughput);
  num_workers_ = get_or(cfg, "caf.scheduler.max-threads",
                        default_thread_count());
}
这里实现比较简单,就是从配置获取最大吞吐量(max_throughput_)和worker的数量,worker的数量默认是线程个数。
继续看actor_system构造函数:
// actor_system.cpp

actor_system::actor_system(actor_system_config& cfg) {
  // ...

  for (auto& mod : modules_)
    if (mod)
      mod->start();

  // ...
}
这里就是会调用到coordinator的start函数:
// coordinator.hpp
template
class coordinator : public abstract_coordinator {
  // ...

using worker_type = worker;
void start() override {
    // Create initial state for all workers.
    typename worker_type::policy_data init{this};
    // Prepare workers vector.
    auto num = num_workers();
    workers_.reserve(num);
    // Create worker instances.
    for (size_t i = 0; i < num; ++i)
      workers_.emplace_back(
        std::make_unique(i, this, init, max_throughput_));
    // Start all workers.
    for (auto& w : workers_)
      w->start();

    // ...
  }

  // ...
}
首先获取到worker个数,然后来构造worker放置到workers_的数据结构中。然后调用worker的start函数。我们进入到worker类中去看看顺便看下它的start函数:
// worker.hpp

template
class worker : public execution_unit {
public:
  using coordinator_ptr = coordinator*;
  using policy_data = typename Policy::worker_data;
  worker(size_t worker_id, coordinator_ptr worker_parent,
         const policy_data& init, size_t throughput)
    : execution_unit(&worker_parent->system()),
      max_throughput_(throughput),
      id_(worker_id),
      parent_(worker_parent),
      data_(init) {
    // nop
  }

  void start() {
    CAF_ASSERT(this_thread_.get_id() == std::thread::id{});
    this_thread_ = system().launch_thread("caf.worker", thread_owner::scheduler,
                                          [this] { run(); });
  }

  // ...
};
首先构造函数是传入吞吐量,id,coordinator和policy_data对象。然后当调用start函数时其实就是开启了一个线程执行run函数,那也就是说每个worker其实就是开启一个线程来执行任务而已。再去看下run函数:
// worker.hpp

template
class worker : public execution_unit {
  // ...

private:
  void run() {
    // scheduling loop
    for (;;) {
      auto job = policy_.dequeue(this);
      policy_.before_resume(this, job);
      auto res = job->resume(this, max_throughput_);
      policy_.after_resume(this, job);

      switch (res) {
        case resumable::resume_later: {
          policy_.resume_job_later(this, job);
          break;
        }
        case resumable::done: {
          policy_.after_completion(this, job);
          intrusive_ptr_release(job);
          break;
        }
        case resumable::awaiting_message: {
          intrusive_ptr_release(job);
          break;
        }
        case resumable::shutdown_execution_unit: {
          policy_.after_completion(this, job);
          policy_.before_shutdown(this);
          return;
        }
      }
    }
  }

  Policy policy_;

  // ...
};
我省略了下代码,后边还会回来看。run函数主要就是做几件事,从Policy中获取一个job,执行job(job->resume), 然后判断结果做出不同的行为,这里要说一下的是当执行完job,返回结果时resumable::resume_later时,会继续将这个job丢入到队列中,之后某个时刻会再次调用到这个job
以上就是整个调度器的初始化过程,首先actor_system的构造函数中会根据不同调度策略,创建调度器类(coordinator
actor的创建
我们的例子中CAF创建actor通过actor_system的spawn函数来创建一个actor,简单看下创建的actor的过程:
// actor_system.hpp
infer_handle_from_fun_t spawn(F fun, Ts&&... xs) {
  using impl = infer_impl_from_fun_t;
  check_invariants();
  static constexpr bool spawnable = detail::spawnable();
  static_assert(spawnable,
                "cannot spawn function-based actor with given arguments");
  actor_config cfg;
  return spawn_functor(detail::bool_token{}, cfg, fun,
                          std::forward(xs)...);
}
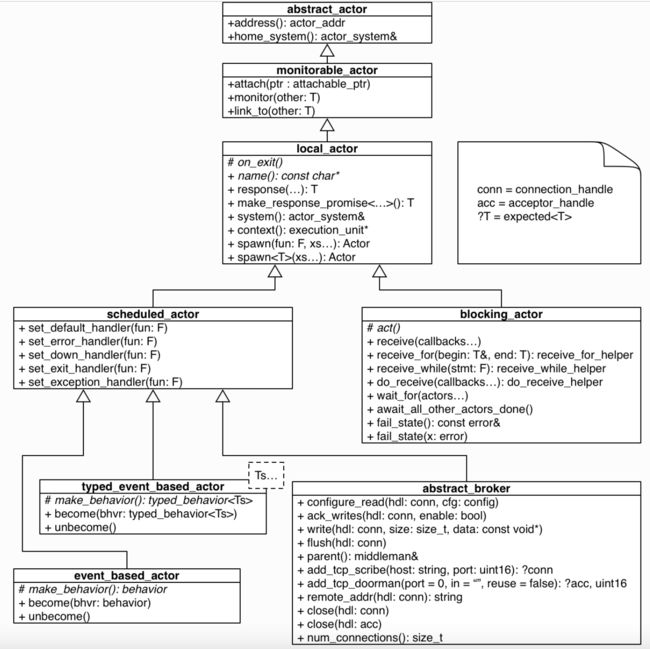
infer_handle_from_fun_t这个我们跟踪进去会发现是actor这个类型,函数内容的第一行的impl是event_based_actor,spawn_functor函数就会创建actor并把相应的的behavior保存下来。然后太多这里先不管关注了,这里大家需要理解的是有两个点,第一个我们这里会创建一个event_based_actor对象,然后使用actor对象来接收并返回,那也就是说CAF的actor中使用actor_control_block对象来持有创建出来的对象,因为创建出来有可能是别的actor类型,那看下所有类型的actor的类图:
第二个点是event_based_actor创建behavior是会调用到event_based_actor的make_behavior函数:
// event_based_actor.cpp
void event_based_actor::initialize() {
  // ...
  auto bhvr = make_behavior();
  if (bhvr) {
    become(std::move(bhvr));
  }
}


behavior event_based_actor::make_behavior() {
  behavior res;
  if (initial_behavior_fac_) {
    res = initial_behavior_fac_(this);
    initial_behavior_fac_ = nullptr;
  }
  return res;
}
后调用become函数,最终会调用到他的父类scheduled_actor的do_become函数;
// scheduled_actor.cpp
void scheduled_actor::do_become(behavior bhvr, bool discard_old) {
  // ...
  if (bhvr)
    bhvr_stack_.push_back(std::move(bhvr));
  // ...
}
这里可以看到会讲behavior放置到scheduled_actor的bhvr_stack_这个成员变量里。
任务调度
创建一个任务
我们上边也看到event_based_actor是继承scheduled_actor这个类,但是实际的继承看起来还有有点绕的:
// event_based_actor.hpp
class CAF_CORE_EXPORT event_based_actor
  : public extend::
           with {

                  // ...
};
这里看到实际上event_based_actor继承extend的with类型,最后大家会发现实际是继承mixin::sender,mixin::requester,mixin::subscriber,mixin::behavior_changer,这四个类型,这四个类型又继承scheduled_actor,这段代码还是有点意思,大家可以去实际去看下。
然后我们回到我们最初的例子,会通过event_based_actor的request函数调用到另外一个actor的behavior里。正好我们request函数是在继承的mixin::requester类里:
// requester.hpp
auto request(const Handle& dest, timeout, Ts&&... xs) {
  // ...
  auto self = static_cast(this);
  auto req_id = self->new_request_id(P);
  auto pending_msg = disposable{};
  if (dest) {
    detail::profiled_send(self, self->ctrl(), dest, req_id, {},
                          self->context(), std::forward(xs)...);
    pending_msg = self->request_response_timeout(timeout, req_id);
  } else {
    //...
  }
  using response_type
    = response_type_t>...>;
  using handle_type
    = response_handle>;
  return handle_type{self, req_id.response_id(), std::move(pending_msg)};
}
生成一个req_id,通过profiled_send发送消息到另外一个actor,并返回response_type。我们后边会调用then函数,也即调用response_type的then,最终会调用到scheduled_actor的add_multiplexed_response_handler函数中:
// scheduled_actor.cpp
void scheduled_actor::add_multiplexed_response_handler(message_id response_id, behavior bhvr) {
  if (bhvr.timeout() != infinite)
    request_response_timeout(bhvr.timeout(), response_id);
  multiplexed_responses_.emplace(response_id, std::move(bhvr));
}
可以看到会把then后边的函数存放在multiplexed_responses_,与response_id相对应。那这里大家应该可以猜到,是发送消息的actor收到回应就会调用到这个函数。
让我们回过头看下profiled_send函数会做什么:
// profiled_send.hpp
void profiled_send(Self* self, SelfHandle&& src, const Handle& dst,
                   message_id msg_id, std::vector stages,
                   execution_unit* context, Ts&&... xs) {
  if (dst) {
    auto element = make_mailbox_element(std::forward(src), msg_id, std::move(stages), std::forward(xs)...);
    dst->enqueue(std::move(element), context);
  } else {
    // ...
  }
}
首先通过make_mailbox_element构造一个message,然后就是直接放到dst的enqueue函数,也把消息放置在目的actor的队列里。
同样这个函数依然是调用到scheduled_actor的enqueue函数。
// scheduled_actor.cpp
bool scheduled_actor::enqueue(mailbox_element_ptr ptr, execution_unit* eu) {
  // ...
  auto mid = ptr->mid;
  auto sender = ptr->sender;
  // ...
  switch (mailbox().push_back(std::move(ptr))) {
    case intrusive::inbox_result::unblocked_reader: {
      // ...
      if (private_thread_)
        private_thread_->resume(this);
      else if (eu != nullptr)
        eu->exec_later(this);
      else
        // ...
      return true;
    }
    case intrusive::inbox_result::success:
      return true;
    default: { // intrusive::inbox_result::queue_closed
      // ...
      return false;
    }
  }
}
这里稍微有点复杂,首先就是需要把message放到scheduled_actor的信箱里,这个信箱也是scheduled_actor的成员,然后会返回结果。
需要比对下返回结果,unblocked_reader的意思是actor未被调度执行behavior,最开始actor没有任务执行那肯定是这样的。success就是表明actor现在正在执行其他的behavior然后直接返回true就可以了。
那为什么要这样区分呢,我们看下没有actor没有调度执行behavior这条分支后边会做什么。首先如果scheduled_actor有自己的私有的线程,一般都是没有的,这里不是重点。然后看下eu是execution_unit对象,那么这个execution_unit是什么呢,大家看代码就会发现execution_unit是被worker继承的。篇幅原因我省略了一些代码讲解,我直接说下原理,当actor在创建的时候会设定下他的上下文(ctx)是某个worker,而这里eu其实是发送方actor的上下文(ctx),也就是worker。这里eu就是worker,我们直接定位到函数:
  void exec_later(job_ptr job) override {
    policy_.internal_enqueue(this, job);
  }
这里其实很关键,我们能发现worker最终消费的job其实是actor,然后把job也就是actor会放到policy的队列中。
现在我们知道为什么消息放到信箱中后需要区分现在actor的状态了,如果actor现在没有执行behavior,需要将actor放到队列中被调度执行,如果现在actor正在执行behavior那么不用管,把message放到信箱里,actor执行完当前的behavior,自然会从信箱拿出新的message从而去执行相应的behavior。
任务调度执行
这一小节算是这篇文章的重点了,限于一些CAF的概念不得不讲了前边很大的一坨。
到目前为止我们明白了actor是被worker调度执行的单元,且actor是存放在policy的队列中。然后被worker消费并执行actor的behavior。
我们钱包讲到了policy其实是有两种,share和steal,顾名思义就是一种是各个policy的任务是共享的,另外一种是一个policy会去别的policy去偷任务执行。具体代码是怎样的呢?我们来看下两个policy的入队列和出队列的函数;
先看worker_stealing这个类的函数:
// worker_stealing.hpp
template
void internal_enqueue(Worker* self, resumable* job) {
  d(self).queue.prepend(job);
}
入队列的函数很简单,仅仅是将job放到self(worker)的worker_data中的队列中。
// worker_stealing.hpp
template
resumable* dequeue(Worker* self) {
  // ...
  auto* job = d(self).queue.try_take_head();
  if (job)
    return job;
  for (size_t k = 0; k < 2; ++k) { // iterate over the first two strategies
    for (size_t i = 0; i < strategies[k].attempts;
          i += strategies[k].step_size) {
      // try to steal every X poll attempts
      if ((i % strategies[k].steal_interval) == 0) {
        job = try_steal(self);
        if (job)
          return job;
      }
      // wait for some work to appear
      job = d(self).queue.try_take_head(strategies[k].sleep_duration);
      if (job)
        return job;
    }
  }
  // ...
}

template
resumable* try_steal(Worker* self) {
  auto p = self->parent();
  if (p->num_workers() < 2) {
    return nullptr;
  }
  // roll the dice to pick a victim other than ourselves
  auto victim = d(self).uniform(d(self).rengine);
  if (victim == self->id())
    victim = p->num_workers() - 1;

  return d(p->worker_by_id(victim)).queue.try_take_tail();
}
简单理解下,当self(worker调用policy的dequeue函数取数据传入worker对象指针)的worker_data的队列中有数据就会从该队列中取得数据,当自己的队列中没有后且满足某些策略后调用try_steal去偷取别的worker下的worker_data的任务。利用worker的parent获取到其他的worker,然后再从其worker_data的队尾取出数据,worker的parent就是调度器的类coodinator,coodinator会持有所有的worker的对象。
接下来看work_sharing的相关函数:
//work_sharing.hpp
template
bool enqueue(Coordinator* self, resumable* job) {
  queue_type l;
  l.push_back(job);
  std::unique_lock guard(d(self).lock);
  d(self).queue.splice(d(self).queue.end(), l);
  d(self).cv.notify_one();
  return true;
}

template
resumable* dequeue(Worker* self) {
  auto& parent_data = d(self->parent());
  std::unique_lock guard(parent_data.lock);
  parent_data.cv.wait(guard, [&] { return !parent_data.queue.empty(); });
  resumable* job = parent_data.queue.front();
  parent_data.queue.pop_front();
  return job;
}
share模式的policy就比较简单,入队列就是将数据放置在coordinator的队列中,然后出队列取数据时,多个worker从其parent也就是coordinator的队列获取数据并返回。
让我们再次回到worker的执行体中:
// worker.hpp
void run() {
    CAF_SET_LOGGER_SYS(&system());
    // scheduling loop
    for (;;) {
      auto job = policy_.dequeue(this);
      policy_.before_resume(this, job);
      auto res = job->resume(this, max_throughput_);
      policy_.after_resume(this, job);

      //...
    }
  }
关键点是我们会从policy调用dequeue函数,传入参数this,然后获取到job,也就是actor,然后调用actor的resume就可以执行相应的behavior了。
我们也简单过一下resume函数:
// scheduled_actor.cpp
resumable::resume_result scheduled_actor::resume(execution_unit* ctx, size_t max_throughput) {
  // ...
  auto handle_async = [this, max_throughput, &consumed](mailbox_element& x) {
    return run_with_metrics(x, [this, max_throughput, &consumed, &x] {
      switch (reactivate(x)) {
        // ...
      }
    });
  };

  while (consumed < max_throughput) {
    mailbox_.fetch_more();

    auto& hq = get_urgent_queue();
    auto& nq = get_normal_queue();
    if (hq.new_round(quantum * 3, handle_async).consumed_items > 0) {

      nq.flush_cache();
    }
    if (nq.new_round(quantum, handle_async).consumed_items > 0) {
      hq.flush_cache();
    }

    auto delta = consumed - prev;
    if (delta > 0) {
      // ...
    } else {
      reset_timeouts_if_needed();
      if (mailbox().try_block())
        return resumable::awaiting_message;
    }
  }
  // ...
}
我只列了下重要的代码,handle_async是实际上会执行behavior的地方,首先mailbox_执行fetch_more会标注mailbox_中可以被消费的消息,然后hq和nq会相继取出消息去调用handle_async执行behavior,最后消费完全后,会使得mailbox设定其状态为block,也就是我们前边说到的actor会认为时当前没有behavior正在执行。
总结
这里来总结下CAF这个是如何调度任务的:
- 首先调度器(coordinator)会被初始化,调度器初始化多个worker,每个worker则为单独运行在一个线程上,然后worker获取任务会有两个policy来选择,共享模式和偷窃模式,共享模式是多个worker共享coordinator中的队列,偷窃模式是当一个worker使用完自己的队列就会去偷取别的worker的队列中的任务。
- 关于CAF特有的则是,创建任务时将消息直接放到actor的信箱里,将actor放到worker的队列中,当worker消费actor并调用其resume函数,actor就可以执行所有的从信箱中获取所有的消息所匹配的behavior。
ref
https://actor-framework.readthedocs.io/en/stable/index.html
http://purecpp.cn/detail?id=2237
https://github.com/actor-framework/actor-framework

