谷歌 colab
Data labelers use special annotation tools for objects annotation. For example, the Computer Vision Annotation Tool (CVAT) is widely known in computer vision. Naturally, it is more convenient for labelers to work with high-resolution images. This is especially true when you need to mark a large number of objects.
数据标记器使用特殊的注释工具进行对象注释。 例如, 计算机视觉注释工具(CVAT)在计算机视觉中是众所周知的。 自然,贴标机使用高分辨率图像更方便。 当您需要标记大量对象时,尤其如此。
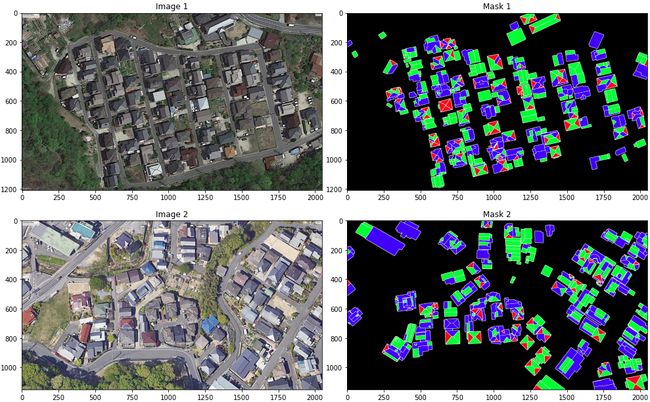
In one of the roof segmentation tasks that I participated in, it was necessary to highlight triangular segments, quadrangular segments, other segments and edges of the roof. An example of such markup is shown in the following figure (white color for edges, red color for triangles, green color for quadrangles, blue color for other polygons):
在我参与的屋顶分割任务之一中,有必要突出显示三角形的部分,四边形的部分,其他部分和屋顶的边缘。 下图显示了这种标记的一个示例(边缘为白色,三角形为红色,四边形为绿色,其他多边形为蓝色):
The original images were obtained from Google Earth at 2048x1208 pixels. The masks were annotated by data labelers using CVAT at the same resolution. To train the model, images and masks should be in a lower resolution (from 128x128 to 512x512 pixels). It is well known that image splitting is a technique most often used to slice a large image into smaller parts. Thus, the logical solution was to split the images and their corresponding masks into the parts with the same resolution.
原始图像是从Google地球以2048x1208像素获得的。 数据标记人员使用CVAT以相同的分辨率对蒙版进行注释。 要训练模型,图像和遮罩应使用较低的分辨率(从128x128到512x512像素)。 众所周知,图像分割是最常用于将大图像切成较小部分的技术。 因此,逻辑解决方案是将图像及其对应的蒙版拆分为具有相同分辨率的部分。
All code for splitting was implemented in Google Colab. Let’s take a closer look. Import libraries:
所有拆分代码均在Google Colab中实现。 让我们仔细看看。 导入库:
import os
import sys
import shutil
import glob
import matplotlib.pyplot as plt
import matplotlib.image as mpimg
from PIL import Image
Mount the Google Drive (with images and masks) to Google Colab:
将Google云端硬盘(带有图片和遮罩)安装到Google Colab:
from google.colab import drive
drive.mount('/content/gdrive')
%cd "gdrive/My Drive/File Folder"
A useful function for creating a new directory and recursively deleting the contents of an existing one:
创建新目录并递归删除现有目录内容的有用功能:
def dir_create(path):
    if (os.path.exists(path)) and (os.listdir(path) != []):
        shutil.rmtree(path)
        os.makedirs(path)
    if not os.path.exists(path):
        os.makedirs(path)
The crop function that goes over the original image are adjusted to the original image limit and contain the original pixels:
覆盖原始图像的裁剪功能被调整为原始图像限制并包含原始像素:
def crop(input_file, height, width):
    img = Image.open(input_file)
    img_width, img_height = img.size
    for i in range(img_height//height):
        for j in range(img_width//width):
            box = (j*width, i*height, (j+1)*width, (i+1)*height)
            yield img.crop(box)
The function for splitting images and masks into smaller parts (the height and width of the cropping window, and the starting number are taken as input parameters):
将图像和遮罩分割成较小部分的功能(裁剪窗口的高度和宽度以及起始编号均作为输入参数):
def split(inp_img_dir, inp_msk_dir, out_dir, height, width,
          start_num):
    image_dir = os.path.join(out_dir, 'images')
    mask_dir = os.path.join(out_dir, 'masks')
    dir_create(out_dir)
    dir_create(image_dir)
    dir_create(mask_dir)
    img_list = [f for f in
                os.listdir(inp_img_dir)
                if os.path.isfile(os.path.join(inp_img_dir, f))]
    file_num = 0
    for infile in img_list:
        infile_path = os.path.join(inp_img_dir, infile)
        for k, piece in enumerate(crop(infile_path,
                                       height, width), start_num):
            img = Image.new('RGB', (height, width), 255)
            img.paste(piece)
            img_path = os.path.join(image_dir,
                                    infile.split('.')[0]+ '_'
                                    + str(k).zfill(5) + '.png')
            img.save(img_path)
        infile_path = os.path.join(inp_msk_dir,
                                   infile.split('.')[0] + '.png')
        for k, piece in enumerate(crop(infile_path,
                                       height, width), start_num):
            msk = Image.new('RGB', (height, width), 255)
            msk.paste(piece)
            msk_path = os.path.join(mask_dir,
                                    infile.split('.')[0] + '_'
                                    + str(k).zfill(5) + '.png')
            msk.save(msk_path)
        file_num += 1
        sys.stdout.write("\rFile %s was processed." % file_num)
        sys.stdout.flush()
Let’s set the necessary variables:
让我们设置必要的变量:
inp_img_dir = ‘./input_dir/images’
inp_msk_dir = ‘./input_dir/masks’
out_dir = ‘./output_dir’
height = 512
width = 512
start_num = 1
Let’s form a list of files with original images and masks and split them:
让我们形成一个包含原始图像和遮罩的文件列表,并将其分割:
input_images_list = glob.glob(inp_img_dir + ‘/*.jpg’)
input_masks_list = glob.glob(inp_msk_dir + ‘/*.png’)
split(inp_img_dir, inp_msk_dir, out_dir, height, width, start_num)
As an example, two original images and masks are shown using the following code:
例如,使用以下代码显示两个原始图像和蒙版:
for i, (image_path, mask_path) in enumerate(zip(input_images_list,
                                                input_masks_list)):
    fig, [ax1, ax2] = plt.subplots(1, 2, figsize=(18, 9))
    image = mpimg.imread(image_path)
    mask = mpimg.imread(mask_path)
    ax1.set_title(‘Image ‘ + str(i+1))
    ax1.imshow(image)
    ax2.imshow(mask)
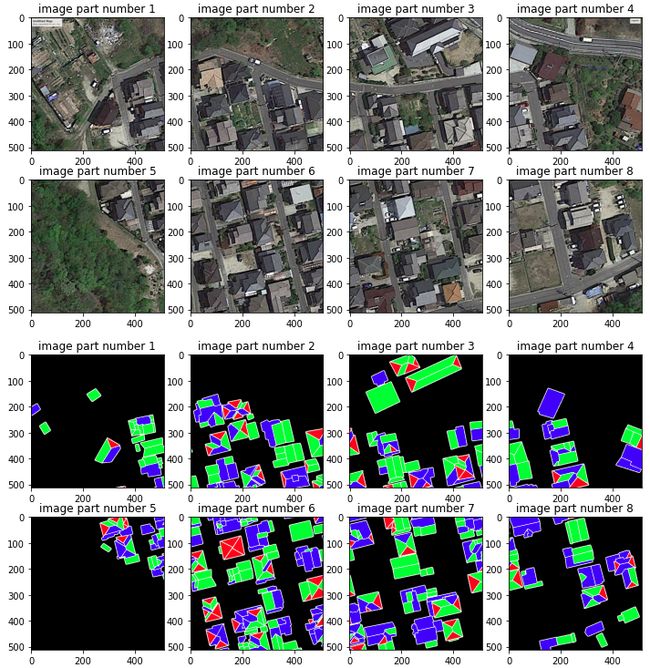
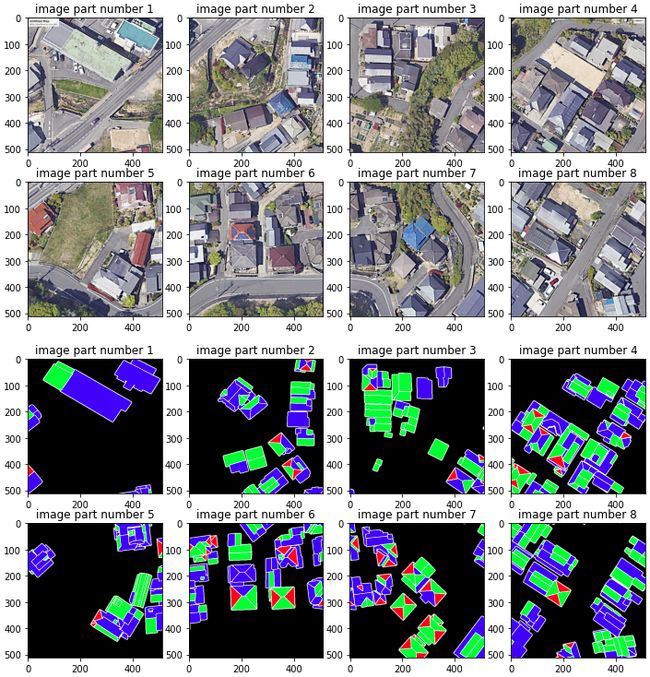
ax2.set_title(‘Mask ‘ + str(i+1))Using the following function, you can show all parts of the splitted image (divided into 8 parts):
使用以下功能,可以显示分割图像的所有部分(分为8个部分):
def image_part_plotter(images_list, offset):
    fig = plt.figure(figsize=(12, 6))
    columns = 4
    rows = 2
    # ax enables access to manipulate each of subplots
    ax = []
    for i in range(columns*rows):
        # create subplot and append to ax
        img = mpimg.imread(images_list[i+offset])
        ax.append(fig.add_subplot(rows, columns, i+1))
        ax[-1].set_title(“image part number “ + str(i+1))
        plt.imshow(img)
    plt.show() # Render the plot
Let’s see what we got as result of images and masks splitting. For the first image:
让我们看看由于图像和蒙版拆分而得到的结果。 对于第一张图片:
image_part_plotter(output_images_list, 0)
image_part_plotter(output_masks_list, 0)image_part_plotter(output_images_list, 8)
image_part_plotter(output_masks_list, 8)Conclusion
结论
The images and masks splitted using the proposed approach are saved with the same file names in different directories, that is, if the file ‘./output_dir/images/1_00001.png’ is in the folder with images, then the file ‘./output_dir/masks/1_00001.png’ will correspond to it in the directory with masks. After splitting the image and mask, you can apply augmentation to each part of it (for example, change brightness, contrast, rotate or flip). To do this, just add the augmentation function.
使用建议的方法分割的图像和遮罩以相同的文件名保存在不同的目录中,也就是说,如果文件“ ./output_dir/images/1_00001.png”位于包含图像的文件夹中,则文件“ ./ output_dir / masks / 1_00001.png'将在带有掩码的目录中与之对应。 分割图像和遮罩后,可以对图像的每个部分应用增强(例如,更改亮度,对比度,旋转或翻转)。 为此,只需添加增强功能。
Pillow (PIL Fork)
枕头(PIL前叉)
Computer Vision Annotation Tool (CVAT)
计算机视觉注释工具(CVAT)
This notebook provides recipes for loading and saving data from external sources
本笔记本提供了从外部源加载和保存数据的方法
翻译自: https://towardsdatascience.com/images-and-masks-splitting-into-multiple-pieces-in-python-with-google-colab-2f6b2ddcb322
谷歌 colab


