SpringBoot整合Mybatis-Plus
文章目录
- SpringBoot整合Mybatis-Plus
-
- 一、环境配置
-
-
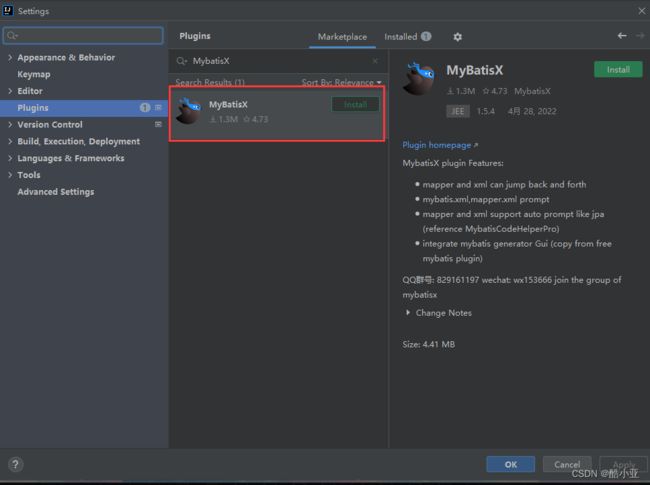
- 1、IDEA导入插件
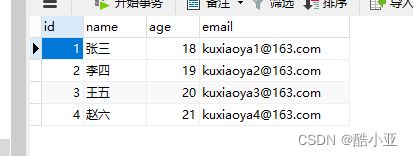
- 2、数据库导入数据
- 3、导入依赖
-
- 二、测试数据源和数据库连接情况
-
-
- 1、application.yaml
- 2、在测试类test一下
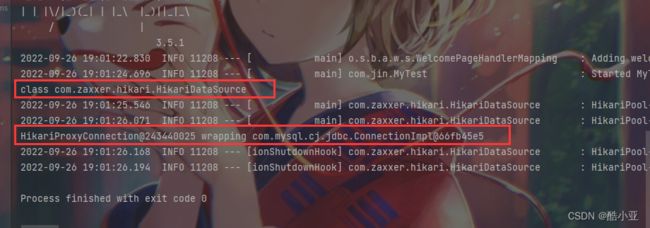
- 3、显示效果
-
- 三、编写代码
-
-
- 1、pojo实体类
- 2、mapper接口类
- 3、service业务逻辑层
- 4、controller控制层
- 5、index前端页面
-
- 四、最终效果
SpringBoot整合Mybatis-Plus
一、环境配置
1、IDEA导入插件
2、数据库导入数据
DROP  DATABASE IF EXISTS mp;

CREATE DATABASE mp;

USE mp;

CREATE TABLE user(
	id int(20) AUTO_INCREMENT PRIMARY KEY COMMENT '主键ID',
	name varchar(55) NOT NULL,
	age int(10)  NOT NULL COMMENT '年龄',
	email varchar(50) NOT NULL COMMENT '邮箱'
)ENGINE=InnoDB DEFAULT CHARSET=utf8;

INSERT INTO user(id,name,age,email) VALUES
(1,'张三',18,'[email protected]'),
(2,'李四',19,'[email protected]'),
(3,'王五',20,'[email protected]'),
(4,'赵六',21,'[email protected]');
3、导入依赖
<dependency>
    <groupId>org.springframework.bootgroupId>
    <artifactId>spring-boot-starter-webartifactId>
dependency>

<dependency>
    <groupId>com.baomidougroupId>
    <artifactId>mybatis-plus-boot-starterartifactId>
    <version>3.5.1version>
dependency>

<dependency>
    <groupId>com.alibabagroupId>
    <artifactId>druidartifactId>
    <version>1.2.8version>
dependency>

<dependency>
    <groupId>mysqlgroupId>
    <artifactId>mysql-connector-javaartifactId>
dependency>

<dependency>
    <groupId>org.springframework.bootgroupId>
    <artifactId>spring-boot-starter-testartifactId>
    <scope>testscope>
dependency>

<dependency>
    <groupId>org.springframework.bootgroupId>
    <artifactId>spring-boot-starter-thymeleafartifactId>
    <version>2.7.3version>
dependency>

<dependency>
    <groupId>org.projectlombokgroupId>
    <artifactId>lombokartifactId>
    <version>1.18.22version>
dependency>
注意一点:
Mybatis-plus把我们的SqlSessionFactory、mapperLocations都已自动配置好。
- 默认值:classpath*:/mapper/**/.xml
建议以后sql映射文件,放在resources资源包下mapper里面
- @Mapper标注的接口也会被自动扫描
二、测试数据源和数据库连接情况
1、application.yaml
# 数据库数据源
spring:
  datasource:
    username: root
    password: 123456
    # 假如时区报错了,就增加一个时区的配置就行了, serverTimezone=UTC
    url: jdbc:mysql://localhost:3306/mp?useSSL=false&useUnicode=true&characterEncoding=utf-8
    driver-class-name: com.mysql.cj.jdbc.Driver
2、在测试类test一下
@SpringBootTest
public class MyTest {

    @Autowired
    DataSource dataSource;

    @Test
    void contextLoads() throws SQLException {
        //查看一下默认数据源
        System.out.println(dataSource.getClass());
        //获得数据库连接
        Connection connection = dataSource.getConnection();
        System.out.println(connection);
        //关闭
        connection.close();
    }
}
3、显示效果
显示效果如下,表示目前为止:数据源和数据库连接情况一切正常!
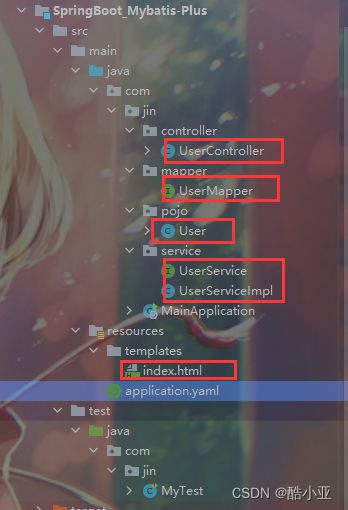
三、编写代码
项目结构体系:
1、pojo实体类
@Data
@AllArgsConstructor
@NoArgsConstructor
public class User {
        private Integer id;
        private String name;
        private String age;
        private String email;
}
2、mapper接口类
@Repository
@Mapper
public interface UserMapper extends BaseMapper<User> {
}
3、service业务逻辑层
UserService接口
public interface UserService extends IService<User> {
}
UserServiceImpl接口实现类
@Service
public class UserServiceImpl extends ServiceImpl<UserMapper,User> implements UserService{
}
4、controller控制层
@Controller
public class UserController {
    @Autowired
    UserService userService;

    @RequestMapping({"/", "/index"})
    public String test1(Model model) {
        List<User> list = userService.list();
        model.addAttribute("users", list);
        return "index";
    }
}
5、index前端页面
DOCTYPE html>
<html lang="en" xmlns:th="http://www.thymeleaf.org">
<head>
    <meta charset="UTF-8">
    <title>首页title>
    <link rel="stylesheet" href="https://cdn.jsdelivr.net/npm/[email protected]/dist/semantic.min.css">
head>
<body>
<div class="ui container" style="margin-top: 40px !important;">

    <form class="ui attached form segment" th:action="@{/}" method="post"  style="display: inline-block !important;" >
        <input name="name"  type="text" style="width: 200px;height: 35px;" placeholder="输入用户名查找">
        <button class="ui blue button"  type="submit">搜索button>
        <a href="#" class="ui button teal" style="margin-left: 30px !important;">新增a>
    form>

    <table class="ui celled attached table">
        <thead>
        <tr>
            <th>编号th>
            <th>姓名th>
            <th>年龄th>
            <th>邮箱th>
            <th>操作th>
        tr>
        thead>
        <tbody>

        <tr th:each="user:${users}">
            <td th:text="${user.id}">Jamestd>
            <td th:text="${user.name}">24td>
            <td th:text="${user.age}">Engineertd>
            <td th:text="${user.email}">[email protected]td>
            <td>
                <a href="#"> <button class="ui primary button">修改button>a>
                <a href="#"> <button class="ui pink button">删除button>a>
            td>
        tr>
        tbody>
    table>
div>
body>
html>
四、最终效果
SpringBoot整合Mybatis—Plus基本上就完成了,想必大家在此页面上扩展增删改查已不是什么难题了!
如果觉得这篇文章还可以的话,大家不妨点个赞!支持一下。


