angular基础学习
angular基础学习
- 核心
- 一. angular环境搭建
-
- 1. 安装前准备:
-
- 1.1 安装nodejs
- 1.2 安装 cnpm, 尽量不要使用
- 1.3 使用npm/cnpm命令安装angular/cli脚手架
- 二.angular项目创建
-
- 2.1 创建项目
- 2.2 Angular环境搭建以及创建项目的时候可能遇到的错误
- 2.3 Angular开发工具介绍
- 2.4 使用vscode所需要的插件
- 2.5 chrome 的插件
- 三. Angular目录结构和核心文件分析
-
- 3.1 Angular目录结构分析
- 3.2 核心文件app.module.ts根模块,组件分析
-
- 3.2.1 app.module.ts根模块分析
- 3.2.2 app.component.ts 组件
- 四. 创建组件,声明属性的几种方式
-
- 4.1 创建组件
- 4.2 使用组件
- 4.3 数据绑定
- 4.4 属性绑定
- 4.5 数据循环*ngFor,用于数组
-
- 4.5.1 *ngFor 普通循环
- 4.5.2 循环的时候设置key
- 4.5.3 template 循环数据
- 4.6 条件判断*ngIf
- 4.7 *ngSwitch
- 4.8 事件绑定
-
- 4.8.1 触发事件(执行事件)
- 4.8.2 表单事件
- 4.9 双向数据绑定[(ngModel)]
- 4.10 样式绑定
-
- 4.10.1 [ngClass] 属性
- 4.10.2 [ngStyle] 属性
- 4.11管道
- 5. 表单(二种表单)
-
- 5.1 响应式表单(重点)
-
- 5.1.1 响应式表单的使用
- 5.1.2 表单验证
-
- 5.1.2.1 内置表单验证器: Validators
- 5.1.2.2 表单验证常用属性
- 5.1.2.3 表单验证规则
- 5.1.2.4 自定义验证器
-
- 5.1.2.4.1 案例
- 5.1.3 对整个表单进行验证
-
- 5.1.3.1 通过FormGroup管理
- 5.1.3.2 通过FormBuilder管理(简洁,推荐)
- 5.2 模板驱动表单(基于模板语法,[(ngModel)]
-
- 表单input
- checkbox
- radio
- select
- textarea
- 6. 案例
-
- 6.1 实现搜索历史功能
- 6.2 toDoList(代办任务)
- 6.3 todos(另外一个案例)
- 7 服务service实现数据持久化完整
-
- 7.1 创建服务
-
- 7.1.1一个普通的服务文件内容
- 7.1.2 注册提供商的三种方式
- 7.2 使用服务
-
- 7.2.1 app.module.ts 中引入服务
- 7.2.1 在组件中使用服务
-
- 7.2.1.2 通过普通的创建类的方式使用服务,不推荐
- 7.2.1.3 以注入的方式使用服务,推荐方式
- 7.3 使用服务重新实现todoList案例
- 8. Dom操作以及@ViewChild,执行css3动画
-
- 8.1 原生js操作dom
- 8.2 Angular中的dom操作(ViewChild)
- 8.3 父组件通过ViewChild调用子组件的方法
- 9. 父子组件以及组件之间通讯
-
- 9.1 父组件给子组件传值和方法
- 9.2 子组件给父组件传值和方法
-
- 9.2.1 第一种方法:前面8.3 ViewChild 已经说过
- 9.2.2 第二种方法:子组件通过@Output触发父组件的方法
- 9.3 父子组件或非父子组件的数据传递
-
- 9.3.1 最好用服务或者localStorage做
- 9.4 父子组件数据传递案例(todos)
-
- 把todos的功能分成三个组件
- 10. 生命周期函数
- 11. Rxjs快速入门教程
- 12. 网络数据请求(HttpClientModule 模块)
-
- 12.1 HttpClientModule 模块的使用
- 12.2 HttpClient 请求方法
-
- 12.2.1 get请求方法
-
- 12.2.1.1 获取所有的响应信息
- 12.2.1.2 类型检查,及请求出现错误的处理
- 12.2.2 post方法
- 12.2.3 patch(局部更新)/put(全部更新) 方法
- 12.2.4 delete方法
- 12.2.5 jsonp解决跨越问题,用得比较少
- 12.3 请求参数和请求头
-
- 12.3.1 请求参数
-
- 使用set()方法
- 使用fromString
- 使用 fromObject
- 12.3.2 请求头
- 12.3.3 完整案例
- 12.4 todos服务的完整案例
-
- 12.4.1 使用json-server做后端数据
- 13. 路由
-
- 13. 创建app-routing.module.ts默认根路由
-
- 13.1 手动创建的cli命令
- 13.2 使路由生效
- 13.3 配置router-outlet 显示动态加载的路由
- 13.4 动态路由
-
- 13.4.1 配置动态路由
- 13.4.2 通配符路由
- 13.4.3 模板中路由跳转
- 13.4.4 获取路由参数
- 13.4.5 编程式路由导航
- 13.5 Get的参数获取
- 13. 2 路由激活高亮
- 13.3 父子路由(嵌套路由)
- 14 模块
-
- 14.1 内置模块
- 14.2 自定义模块
-
- 14.2.1 创建自定义模块
- 15 自定义模块以及配置路由实现模块懒加载
-
- 15.1 创建模块的时候同时创建路由
- 15.2 配置懒加载(异步路由)
- Angular中的TypeScript说明
-
- TypeScript语法
-
- 类型注解:为函数或变量添加约束
- 接口:对值所具有的结果进行类型约束
- 泛型:<>泛型类EventEmitter约定参数类型
- 类成员修饰符:public(默认), private 私有
- 一套完整的员工管理系统案例
-
- 项目搭建
- 创建路由模块
- 配置路由
- 登录功能 - 1 登录表单结构
- 登录功能 - 2 登录样式
- 登录功能 - 3 抽离类型和配置
- 登录访问控制 - 1 路由守卫和实现
-
- 路由守卫实现访问控制思路
- 登录访问控制 - 2 路由导航守卫功能实现
- 异步路由和模块
- 异步路由的使用
- http拦截器
-
- 创建拦截器
- 使用Http拦截器实现统一添加(Authorization)
- 使用Http拦截器处理错误
核心
- angular 以模块的形式管理组件,指令,服务;
- 通过
ng new my-app创建的项目,会自动创建一个根模块app.module.ts, 一个根组件{ app.component.ts, app.component.html, app.component.css} - 根模块
app.module.ts需要引入组件,并且声明组件,组件才能够使用,组件才能在模块中使用
import { NgModule } from '@angular/core';
import { BrowserModule } from '@angular/platform-browser';
// 引入组件
import { AppComponent } from './app.component';

@NgModule({
  declarations: [
  	// 声明组件
    AppComponent,
  ],
  imports: [
    BrowserModule,
  ],
  providers: [],
  bootstrap: [AppComponent]
})
export class AppModule { }
- 根模块和其他模块配合工作:
- 根模块引入其他模块,并且在@ngModule 的对象imports 下也要配置
- 如果根模板还需要其他模块中的组件选择器,还需要在其他模块中导出该组件,才能正常使用
一. angular环境搭建
1. 安装前准备:
1.1 安装nodejs
- 安装
angular的计算机上面必须安装最新的nodejs,安装了node,就自动安装了npm。官网地址:https://nodejs.org/zh-cn/
1.2 安装 cnpm, 尽量不要使用
npm可能安装失败建议先用npm 安装cnpm的淘宝镜像安装https://npmmirror.com/
npm install -g cnpm --registry=https://registry.npmmirror.com
1.3 使用npm/cnpm命令安装angular/cli脚手架
- 只需要安装一次
cnpm install -g @angular/cli 或者 npm install -g @angular/cli
- 安装成功,可以查看cli的版本号
ng v
二.angular项目创建
2.1 创建项目
- 打开命令行工具找到你要创建项目的目录
- 创建项目:
ng new 项目名称
ng new angulardemo
- 如果要跳过
npm i安装:
nag new angulardemo --skip-install - 进入工程文件
cd angulardemo
npm install
- 运行项目
ng serve --open
2.2 Angular环境搭建以及创建项目的时候可能遇到的错误
2.3 Angular开发工具介绍
WebstormVisual Studio Code
2.4 使用vscode所需要的插件
Debugger for ChromeAngular Language Serviceangular filesAngular Snippets (Version 9)angular 语法支持
2.5 chrome 的插件
Talend Api类似Postman,该有的东西都有,测试API用augury能够查看angular组件的层次结构
三. Angular目录结构和核心文件分析
3.1 Angular目录结构分析
3.2 核心文件app.module.ts根模块,组件分析
3.2.1 app.module.ts根模块分析
- angular的根模块,告诉angular如何组装应用
// Angular核心模块
import { NgModule } from '@angular/core';
// 浏览器解析模块
import { BrowserModule } from '@angular/platform-browser';
// 根组件
import { AppComponent } from './app.component';
// 装饰器,@NgModule接收一个元数据对象,告诉Angular如何编译和启动应用
@NgModule({
// 声明当前项目运行的组件
  declarations: [
    AppComponent
  ],
 // 配置当前模块运行依赖的其他模块
  imports: [
    BrowserModule
  ],
  // 配置项目所需要的服务
  providers: [],
  // 指定应用的主视图(称为根组件)通过引导根AppModule来启动应用,这里一般写根组件
  bootstrap: [AppComponent]
})
// 根模块不需要导出任何东西,因为其他组件不需要导入根模块
export class AppModule { }
3.2.2 app.component.ts 组件
/*引入angular 核心*/
import { Component } from '@angular/core';

@Component({
  selector: 'app-root', /*使用这个组件的名称*/
  templateUrl: './app.component.html',/*html 模板*/
  styleUrls: ['./app.component.css']/*css 样式*/
})
/*实现接口*/
export class AppComponent {
  title = 'angulardemo';
}
四. 创建组件,声明属性的几种方式
4.1 创建组件
ng g component components/header
简写
ng g c 组件名称
4.2 使用组件
<app-header></app-header>
4.3 数据绑定
- 数据文本绑定
{{}}
// 规范的写法,有作用范围,数据类型
public id:number = 123
private msg:string = "message"
// 如果变量没有显示初始化,在变量后面加上一个!
public title!:string
// 对象设置为object 有问题
// 设置为any 正常
public userinfo:object = {
	"username" : "张三"
	"age": 18
}

public pic:string = "http://www.xxx.com/images/xxx.png"
<h1>{{title}}h1>
<div>1+1 = {{1+1}}div>
<div>username: {{userinfo.username}}div>
<div>age:{{userinfo.age}}div>

<h1>pich1>
<img src="asset/images/xxx.png" />
<img [src]="pic" />
4.4 属性绑定
- 是属性,不是变量,不能在前面加上
var或let
title = "demo"
- 属性绑定的二种方法,比较流行的是第二种
<div title="{{title}}">{{title}}div>
<div [title]="title">{{title}}div>
- 绑定
html
public content="这是一个h2 用[innerHTML]来解析
"
// 会把html标签也显示出来
<div>{{content}}<div>
// 以html的方式显示
<div [innerHTML]="content">div>
4.5 数据循环*ngFor,用于数组
4.5.1 *ngFor 普通循环
// list: any = ["a","b","c"];
// 可以指定数组里面数据类型
list: any[] = ["a","b","c"];

// 或者这样指定数组
items: Array<number> = [1,2,3,5];

userLists: any[] = [
    {"username": "name1", "age": 18},
    {"username": "name2", "age": 28},
    {"username": "name3", "age": 38},
  ];

  carLists: any[] = [
    {
      cat: "奔驰",
      list:
      [
        {
          "title": "gls350",
          "price": 100
        },
        {
          "title": "gls450",
          "price": 120
        },
        {
          "title": "gls550",
          "price": 150
        }
      ]
    },
    {
      cat: "宝马",
      list:
      [
        {
          "title": "730Li",
          "price": 100
        },
        {
          "title": "740Li",
          "price": 120
        },
        {
          "title": "750Li",
          "price": 150
        }
      ]
    },
  ];
<ul>
	<li *ngFor="let item of list">
 		{{item}}
	li>
ul>

<ul>
	<li *ngFor="let item of items">
 		{{item}}
	li>
ul>

<ul>
    <li *ngFor="let item of userLists">
        {{item.username}} --- {{item.age}}
    li>
ul>

<ul>
    <li *ngFor="let item of carLists">
        品牌:{{item.cat}}
        <ol>
            <li *ngFor="let car of item.list">
                {{car.title}} -- {{car.price}}
            li>
        ol>
    li>
ul>
4.5.2 循环的时候设置key
<ul>
	<li *ngFor="let item of list;let i = index;">
		{{item}} --{{i}}
	li>
ul>
4.5.3 template 循环数据
<ul>
	<li template="ngFor let item of list">
		{{item}}
	li>
ul>
4.6 条件判断*ngIf
<p *ngIf="list.length > 3">这是ngIF 判断是否显示p>
4.7 *ngSwitch
public orderStatus:number = 1;
<ul [ngSwitch]="score">
	<li *ngSwitchCase="1">已支付li>
	<li *ngSwitchCase="2">订单已经确认li>
	<li *ngSwitchCase="3">已发货li>
	<li *ngSwitchDefault>无效li>
ul>
4.8 事件绑定
4.8.1 触发事件(执行事件)
getData(){ /*自定义方法获取数据*/
	//获取
	alert(this.msg);
}
setData(){
//设置值
	this.msg='这是设置的值';
}
<button class="button" (click)="getData()">
	点击按钮触发事件
button>
<button class="button" (click)="setData()">
	点击按钮设置数据
button>
4.8.2 表单事件
keyUpFn(e){
	console.log(e)
	if (e.KeyCode == 13)
	{
		console.log("按了回车");
	}else {
		// 获取键盘值
		console.log(e.target.value)
	}
}
<input type="text" (keyup)="keyUpFn($event)"/>
4.9 双向数据绑定[(ngModel)]
- 注意引入:FormsModule
import { FormsModule } from '@angular/forms';

....
@NgModule({
declarations: [
	AppComponent,
	HeaderComponent,
	FooterComponent,
	NewsComponent
],
imports: [
	BrowserModule,
	FormsModule
],
providers: [],
bootstrap: [AppComponent]
})
export class AppModule { }
- 组件中
export class AppComponent {
  inputValue = ""
}
- 模板中
    <input type="text" [(ngModel)]="inputValue">
    <br>
    表单的值:{{inputValue}}
4.10 样式绑定
4.10.1 [ngClass] 属性
<div [ngClass]="{'red': true, 'blue': false}">
	这是一个div
div>
public flag=false;
<div [ngClass]="{'red': flag, 'blue': !flag}">
	这是一个div
div>
public arr = [1, 3, 4, 5, 6];
<ul>
	<li *ngFor="let item of arr, let i = index">
		<span [ngClass]="{'red': i==0}">{{item}}span>
	li>
ul>
4.10.2 [ngStyle] 属性
<div [ngStyle]="{'background-color':'green'}">你好ngStyle</div>
public attr='red';
<div [ngStyle]="{'background-color':attr}">你好ngStyle</div>
4.11管道
- 处理数据格式的手段
public today=new Date();
<p>{{today | date:'yyyy-MM-dd HH:mm:ss' }}p>
5. 表单(二种表单)
5.1 响应式表单(重点)
优势:让开发人员完全掌控表单
5.1.1 响应式表单的使用
- 导入响应式表单模块并配置当前模块依赖项
import { ReactiveFormsModule } from '@angular/forms';
...
  imports: [
    BrowserModule,
    AppRoutingModule,
    ReactiveFormsModule,
  ],
- 导入表单控件, 新建表单模型
import { Component } from '@angular/core';
import { FormControl } from '@angular/forms';

@Component({
  selector: 'app-root',
  templateUrl: './app.component.html',
  styleUrls: ['./app.component.scss']
})
export class AppComponent {
  constructor() {}
  // 新建username的模型,默认值username
  username = new FormControl('username');
  password = new FormControl('');
}
- 和视图的绑定
<div>
    <label for="username">用户名:
        <input id="username" type="text" [formControl]="username">
    label>
    <p>{{username.value}}p>

    <label for="password">密码:
        <input type="password" name="" id="password" [formControl]="password">
    label>
    <p>{{password.value}}p>
div>
- 在代码中获取username和password 的值
export class AppComponent {
  constructor() {}

  username = new FormControl('username');
  password = new FormControl('password');

  getUsername() {
    console.log(this.username.value);
  }

  setUsername() {
    this.username.setValue("newuser")
  }
}
<div>
    <label for="username">用户名:
        <input id="username" type="text" [formControl]="username">
    label>
    <p>{{username.value}}p>

    <label for="password">密码:
        <input type="password" name="" id="password" [formControl]="password">
    label>
    <p>{{password.value}}p>
div>

<button (click)="getUsername()">获取用户名button>
<button (click)="setUsername()">更新用户名button>
5.1.2 表单验证
5.1.2.1 内置表单验证器: Validators
- 导入表单验证器,
FormControl的第二个参数为验证器内容
export class AppComponent implements OnInit{
  constructor() {}

  username = new FormControl('', [Validators.required]);

  ngOnInit(): void {
    console.log(this.username);
  }
}
<div>
    <label for="username">用户名:
        <input id="username" type="text" [formControl]="username">
    label>

    <p *ngIf="username.dirty && username.errors?.['required']">用户名为必填项p>
    或者
        <p *ngIf="username.dirty && username.hasError('required')">用户名为必填项p>
div>
5.1.2.2 表单验证常用属性
| 属性 | 说明 |
|---|---|
| value | 表示该表单控件的值 |
| errors | 描述错误的对象 |
| dirty | 表示是否编辑过表单 |
| 方法hasError() | 用来获取错误信息 |
5.1.2.3 表单验证规则
| Validators的属性 | 说明 |
|---|---|
| required | 必填项 |
| minLength() | 最小多少个字符 |
| maxLength() | 最大多少个字符 |
| pattern | 使用正则表达式 |
5.1.2.4 自定义验证器
- 自定义验证器是一个函数
- 参数类型:AbstractControl
- 验证成功:返回 null
- 验证失败:返回一个描述错误的对象(自己定义)
5.1.2.4.1 案例
import { Component, OnInit } from '@angular/core';
import { AbstractControl, Form, FormControl, Validators } from '@angular/forms';

@Component({
  selector: 'app-root',
  templateUrl: './app.component.html',
  styleUrls: ['./app.component.scss']
})
export class AppComponent implements OnInit {
  constructor() { }

  username = new FormControl('', [this.customValidate]);

  ngOnInit(): void {
    console.log(this.username);
  }

  // 只要数据改变,就会指向自定义验证器
  customValidate(control: AbstractControl) {
    console.log(control.value);
    // 用户名为小写,长度为3到6位
    if (/^[a-z]{3,6}$/.test(control.value)) {
      // success 返回 null
      return null;
    }
    // failed 返回 错误对象,自己随便写
    return { customError: true}
  }
}
<div>
    <label for="username">用户名:
        <input id="username" type="text" [formControl]="username">
    label>
    <p *ngIf="username.dirty && username.hasError('customError')">用户名为小写,长度为3到6位p>
div>
5.1.3 对整个表单进行验证
5.1.3.1 通过FormGroup管理
import { Component, OnInit } from '@angular/core';
import { AbstractControl, Form, FormControl, FormGroup, Validators } from '@angular/forms';

@Component({
  selector: 'app-root',
  templateUrl: './app.component.html',
  styleUrls: ['./app.component.scss']
})
export class AppComponent implements OnInit {
  constructor() { }

  loginForm = new FormGroup(
    {
      username: new FormControl('', [Validators.required]),
      password: new FormControl('', [Validators.required])
    }
  );


  handleSubmit() {
    if (this.loginForm.valid) {
      console.log('表单验证成功,发送请求');

    } else {
      console.log('表单验证失败');

    }
  }

  ngOnInit(): void {
  }
}
<div>
    <form [formGroup]="loginForm" (ngSubmit)="handleSubmit()">
        <label for="username">用户名:
            <input id="username" type="text" formControlName="username">
        label>
        <label for="password">密码:
            <input id="password" type="password" formControlName="password">
        label>

        <p>
            <button type="submit">提交表单button>
        p>
    form>

div>
5.1.3.2 通过FormBuilder管理(简洁,推荐)
- FormBuilder 是一个服务
import { Component, OnInit } from '@angular/core';
import { Validators,FormBuilder } from '@angular/forms';

@Component({
  selector: 'app-root',
  templateUrl: './app.component.html',
  styleUrls: ['./app.component.scss']
})
export class AppComponent implements OnInit {
  constructor(
    private fb: FormBuilder
  ) { }

  loginForm = this.fb.group(
    {
      username: [''],
      password: ['', Validators.required]
    }
  );

  handleSubmit() {
    if (this.loginForm.valid) {
      console.log('表单验证成功,发送请求');

    } else {
      console.log('表单验证失败');

    }
  }

  ngOnInit(): void {
  }

}
5.2 模板驱动表单(基于模板语法,[(ngModel)]
表单input
checkbox
radio
select
textarea
 public userInfo:any = {
    username: "",
    sex: "1",
    cities: ["北京","上海","深圳"],
    city: "北京",
    hobby: [
      {
        title: "吃饭",
        checked: false
      },
      {
        title: "睡觉",
        checked: false
      },
      {
        title: "听音乐",
        checked: false
      }
    ],
    mark:""
  }

  doSubmit() {
    // jquery dom 操作 不推荐
    // let nameDom:any = document.getElementById('username');
    // console.log(nameDom.value);

    // 双向数据绑定方式
    console.log(this.userInfo);
  }
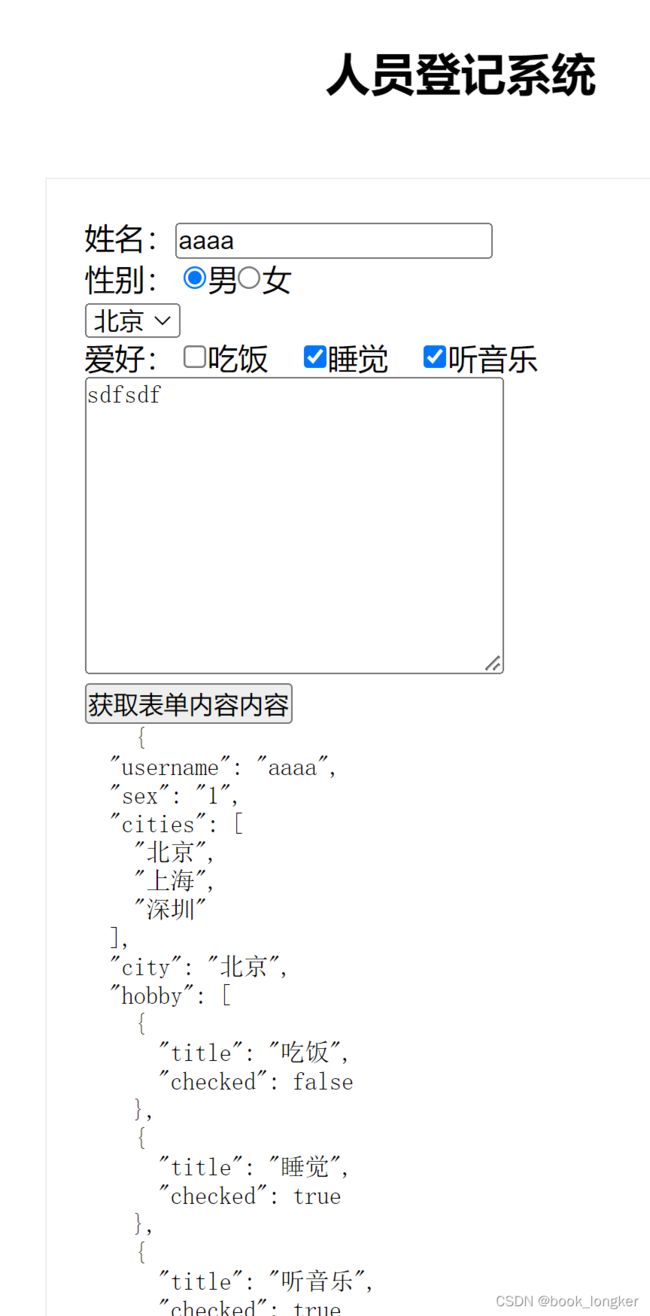
<h2>人员登记系统h2>
<div class="people">
    <ul>
        <li>姓名:<input type="text" name="username" [(ngModel)]="userInfo.username">li>

        <li>
            性别:
            <input type="radio" value="1" name="sex1" [(ngModel)]="userInfo.sex"> <label for="sex1">男label>
            <input type="radio" value="2" name="sex2" [(ngModel)]="userInfo.sex"> <label for="sex2">女label>
        li>

        <li>
            <select name="city" [(ngModel)]="userInfo.city">
                <option [value]="item" *ngFor="let item of userInfo.cities">{{item}}option>
            select>
        li>

        <li>
            爱好:
            <span *ngFor="let item of userInfo.hobby; let key = index;">
                <input type="checkbox" [id]="'check'+key" [(ngModel)]="item.checked"><label
                    [for]="'check'+key">{{item.title}}label>

            span>
        li>
        <li>
            <textarea name="mark" id="" cols="30" rows="10" [(ngModel)]="userInfo.mark">{{userInfo.mark}}textarea>
        li>
    ul>

    <button (click)="doSubmit()">获取表单内容内容button>

    <pre>
    {{userInfo | json}}
    pre>
div>
6. 案例
6.1 实现搜索历史功能
// 搜索关键词
  public keyword: string = '';
  // 搜索记录
  historyList: any[] = [];


  doSearch() {
    // 是否为空
    if (this.keyword == "") return;
    // 判断值是否有重复
    if (this.historyList.indexOf(this.keyword) == -1) {
      this.historyList.push(this.keyword);
    }
    this.keyword = "";
  }

  deleteHistory(index:number) {
    // 删除数据
    this.historyList.splice(index, 1);
  }
<div>
    <input type="text" [(ngModel)]="keyword"> <button (click)="doSearch()">搜索button>
    <ul>
        <li *ngFor="let item of historyList;let key=index;">
            {{item}}---<button (click)="deleteHistory(key)">xbutton>li>
    ul>
div>
6.2 toDoList(代办任务)
 // 搜索关键词
  public keyword: string = '';
  // 搜索记录
  toDoList: any[] = [];


  doAdd(e: KeyboardEvent) {
    // 判断是否是回车
    if (e.key == 'Enter') {
      // 是否为空, 包括空格也不行
      if (this.keyword.trim() === "")
        return
      // 判断值是否有重复
      if (!this.todoListHasKeyword(this.toDoList, this.keyword)) {
        // 注意数据的格式
        this.toDoList.push( {
          "title":this.keyword,
          "status": 0
        });
      } else {
        alert("数据已经存在")
      }
      this.keyword = "";
    }

  }

  deleteHistory(index: number) {
    // 删除数据
    this.toDoList.splice(index, 1);
  }

  todoListHasKeyword(toDoList:any, keyword:any) {
    // 异步,会存在问题
    // toDoList.array.forEach(value => {
    //   if (value.title == keyword){
    //     return true;
    //   }
    // });

    for (let i = 0; i < toDoList.length; i++) {
      if (toDoList[i].title == keyword) {
        return true;
      }
    }
    return false;
  }
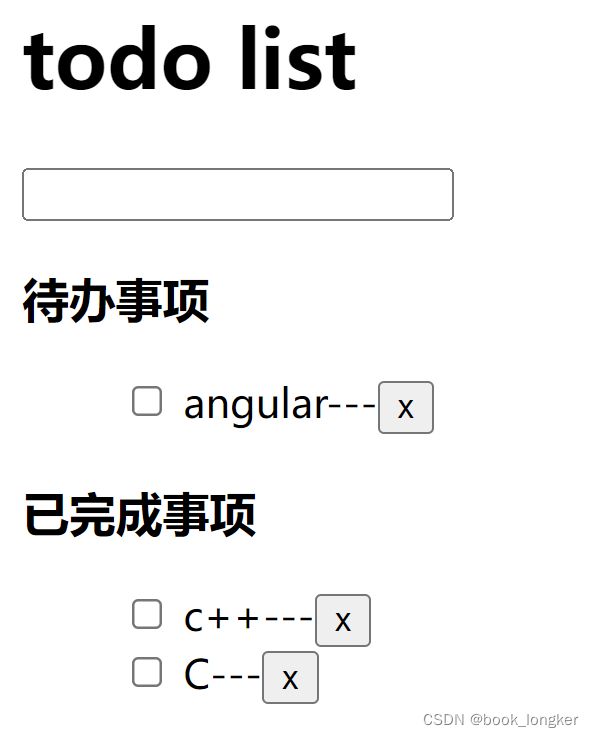
<h1>todo listh1>
<div>
    <input type="text" [(ngModel)]="keyword" (keyup)="doAdd($event)">
    <h3>待办事项h3>
    <ul>
        <li *ngFor="let item of toDoList;let key=index;"  [hidden]="item.status == 1" >
            <input type="checkbox"  [(ngModel)]="item.status"/>
            {{item.title}}---<button (click)="deleteHistory(key)">xbutton>
        li>
    ul>

    <h3>已完成事项h3>
    <ul>
        <li *ngFor="let item of toDoList;let key = index;"  [hidden]="item.status == 0" >
            <input type="checkbox" [(ngModel)]="!item.status"/>
            {{item.title}}---<button (click)="deleteHistory(key)">xbutton>
        li>
    ul>
div>
6.3 todos(另外一个案例)
import { Component } from '@angular/core';

@Component({
  selector: 'app-root',
  templateUrl: './app.component.html',
  styleUrls: ['./app.component.scss']
})
export class AppComponent {
  keyword:string = '';
  todos: any[] = [
    {id: 1, title: "吃饭", done:true},
    {id: 2, title: "睡觉", done:false},
    {id: 3, title: "休息", done:false},
  ];

  addTodo() {
    // 判断内容是否为空
    if (this.keyword.trim() === '') {
      return;
    }

    // 判断重复值
    if (this.todoHasKeyword(this.todos, this.keyword)) {
      return;
    }

    // 判断id值
    var id = 0;
    if (this.todos.length === 0) {
      id = 1;
    } else {
      id = this.todos[this.todos.length-1].id + 1;
    }

    // 添加
    this.todos.push({
      id,
      title: this.keyword,
      done:false
    })

    this.keyword = '';

  }

  changeTodo(id: number) {
    // 数组是引用传递,可以这样修改
    let todo = this.todos.find(todo => todo.id == id);
    todo.done = !todo.done;
    console.log(todo);
  }

  delTodo(id: number) {
    // 删除
    //this.todos = this.todos.filter(todos => todos.id != id);

	const curIndex = this.todos.findIndex(todo => todo.id === id);
	this.todos.splice(curIndex,1);
  }

  // 判断是否有重复值
  todoHasKeyword(todos:any, name:any) {
    for (let i = 0; i < todos.length; i++) {
      if (todos[i].title == name)
        return true;
    }
    return false;
  }
}
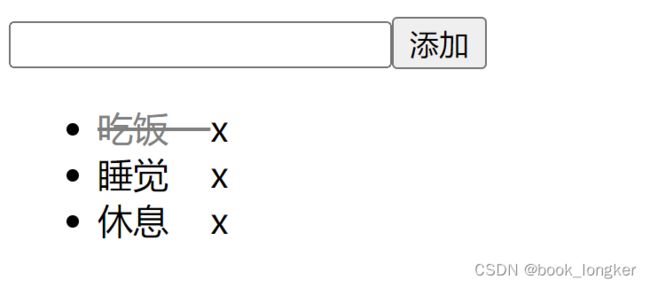
<div class="todos">
  <header>
    <input type="text" [(ngModel)]="keyword">
    <button (click)="addTodo()">添加button>
  header>
  <ul>
    <li *ngFor="let item of todos">
      <span (click)="changeTodo(item.id)" [class.done]="item.done">{{item.title}}    span><a (click)="delTodo(item.id)">xa>
    li>
  ul>
div>
.done {
    text-decoration: line-through;
    color: gray;
}
7 服务service实现数据持久化完整
组件应该只提供用于数据绑定的属性和方法
组件不应该定义任何诸如从服务器获取数据,验证用户输入等操作
应该吧各种处理任务定义到可注入的服务中
服务的作用:处理业务逻辑,供组件使用
服务和组件的关系:组件是服务的消费者
7.1 创建服务
ng g service services/serviceName
简写
ng g s services/serviceName
7.1.1一个普通的服务文件内容
import { Injectable } from '@angular/core';
// 服务提供商,必须要有,当前注册为根级提供商
@Injectable({
  providedIn: 'root'
})
export class StorageService {

  constructor() { }

  get() {
    return "this is service"
  }
}
7.1.2 注册提供商的三种方式
- 通过
Injectable的 providedLn: ‘root’ 注册为根级提供商 - 通过
NgModule的 providers:[] 注册为模块内可用的提供商, 不需要在service文件下注册服务器提供商
import { NgModule } from '@angular/core';
import { CommonModule } from '@angular/common';
import { UserService } from 'services/userservice'
@NgModule({
  declarations: [
  ],

  imports: [
    CommonModule,
  ],
  providers: [UserService]
})
export class UserModule { }
- 通过
Component的provide:[]注册为组件的提供商
7.2 使用服务
组件和组件的方法不能相互访问,需要通过一种技术,来实现公共的方法,给组件之间相互访问,这种公共的方法,我们称为服务
7.2.1 app.module.ts 中引入服务
- 这一步不需要在其他组件中也是可以使用服务的
import { StorageService } from 'src/app/service/storage.service';
@NgModule({
	...
  providers: [StorageService],
	...
})
7.2.1 在组件中使用服务
7.2.1.2 通过普通的创建类的方式使用服务,不推荐
import { StorageService } from 'src/app/service/storage.service';

var storage = new StorageService;

export class HeaderComponent implements OnInit {
  constructor(
  ) { }

  ngOnInit(): void {
    console.log(storage.get());
  }
7.2.1.3 以注入的方式使用服务,推荐方式
import { StorageService } from 'src/app/service/storage.service';

...
// 在类的构造函数中注入服务
  constructor(
    private storage: StorageService
  ) { }

  ngOnInit(): void {
    console.log(this.storage.get());
  }
7.3 使用服务重新实现todoList案例
-
存储数据在本地
storage -
服务文件
storage.service.ts
import { Injectable } from '@angular/core';

@Injectable({
  providedIn: 'root'
})
export class StorageService {

  constructor() { }

  // 存储数据
  set(key:string, value: any) {
    // value 转为对象
    localStorage.setItem(key, JSON.stringify(value))
  }

  // 获取数据
  get(key:string) {
    // string 转对象
    let s:any = localStorage.getItem(key);
    if (s != "")
      return JSON.parse(s)
    return '';
  }
}
- 组件文件
todolist.component.ts
import { Component, OnInit } from '@angular/core';
import { StorageService } from 'src/app/service/storage.service';

@Component({
  selector: 'app-todolist',
  templateUrl: './todolist.component.html',
  styleUrls: ['./todolist.component.css']
})
export class TodolistComponent implements OnInit {
  todoList: any[] = [];
  keyword: string = '';

  constructor(
    private storage: StorageService
  ) { }

  ngOnInit(): void {
    let todoList = this.storage.get("todoList");
    if (todoList) {
      this.todoList = todoList;
    }
  }

  doAdd(e: KeyboardEvent) {
    // 判断是否是回车
    if (e.key == 'Enter') {
      // 是否为空
      if (this.keyword == "")
        return
      // 判断值是否有重复
      if (!this.todoListHasKeyword(this.todoList, this.keyword)) {
        // 注意数据的格式
        this.todoList.push( {
          "title":this.keyword,
          "status": false
        });

        this.storage.set("todoList", this.todoList)
      } else {
        alert("数据已经存在")
      }
      this.keyword = "";
    }
  }

  deleteHistory(key: number) {
    this.todoList.splice(key, 1);
    this.storage.set("todoList", this.todoList);
  }

  changeStatus(key: number) {
    console.log("changeStatus");
    this.todoList[key].status = !this.todoList[key].status
    this.storage.set("todoList", this.todoList);
  }
  todoListHasKeyword(todoList:any, keyword:any) {
    // 异步,会存在问题
    // toDoList.array.forEach(value => {
    //   if (value.title == keyword){
    //     return true;
    //   }
    // });

    for (let i = 0; i < todoList.length; i++) {
      if (todoList[i].title == keyword) {
        return true;
      }
    }

    return false;
  }

}
- 模板文件
todolist.component.html
<h1>todo listh1>
<div>
    <input type="text" [(ngModel)]="keyword" (keyup)="doAdd($event)">
    <h3>待办事项h3>
    <ul>
        <li *ngFor="let item of todoList;let key = index;"  [hidden]="item.status == true" >
            <input type="checkbox" [(ngModel)]="item.status" checked (click)="changeStatus(key)"/>
            {{item.title}}---<button (click)="deleteHistory(key)">xbutton>
        li>
    ul>

    <h3>已完成事项h3>
    <ul>
        <li *ngFor="let item of todoList;let key = index;"  [hidden]="item.status == false" >
            <input type="checkbox" [(ngModel)]="item.status" (click)="changeStatus(key)"/>
            {{item.title}}---<button (click)="deleteHistory(key)">xbutton>
        li>
    ul>
div>
8. Dom操作以及@ViewChild,执行css3动画
8.1 原生js操作dom
// 这个生命周期里可以获取dom节点
 ngAfterViewInit(){
    var boxDom:any = document.getElementById('box');
    boxDom.style.color = "red";
  }
<div id="box">dom操作div>
8.2 Angular中的dom操作(ViewChild)
- 模板中给dom起一个名字
<div #myBox>@ViewChilddiv>
- 组件中引入
ViewChild
import { Component, OnInit, ViewChild } from '@angular/core';
- 在组件类里面
@ViewChild('myBox') myBox: any;
ngAfterViewInit生命周期里获取dom`
this.myBox.nativeElement
8.3 父组件通过ViewChild调用子组件的方法
- 父组件
 // 获取子组件的实例
  @ViewChild('header') header:any;
  ...
  ngAfterViewInit(){
  // 调用子组件的方法
    this.header.run();
  }
- 父模板
<app-header #header>app-header>
- 子组件里的方法
  run() {
    console.log("header method run is call");
  }
9. 父子组件以及组件之间通讯
9.1 父组件给子组件传值和方法
- 子组件中引入Input模块
import { Component, OnInit, Input } from '@angular/core';
- 子组件@Input 公开一个属性,用来接收父组件传过来的数据
export class HeaderComponent implements OnInit {

  @Input() title!:string;
  @Input() run!:any;

  constructor() { }

  ngOnInit(): void {
    console.log(this.title);
    this.run();
  }
	getParentRun() {
	// 指向父组件的run方法
    	this.run();
	}
}
<h1>headerh1>
<button (click)="getParentRun()">执行父组件的方法button>
<hr>
- 父组件不仅可以给子组件传递简单的数据,还可以把自己的方法以及整个父组件传给子组件
- 步骤
- 父组件模板中调用子组件的时候传入数据或者方法,传递方式一样。
如果是传递整个父组件,这需要使用this,父组件内容:
title:string = "首页"
// 传入 run方法
  run() {
    alert("parent run ")
  }
<app-header [title]="title" [run]="run" [home]="this">app-header>
9.2 子组件给父组件传值和方法
9.2.1 第一种方法:前面8.3 ViewChild 已经说过
9.2.2 第二种方法:子组件通过@Output触发父组件的方法
- 子组件引入
Output和EventEmitter
import { Component, OnInit, Input, Output, EventEmitter } from '@angular/core';
- 子组件实例化
EventEmitter事件
// 创建事件,提供出去
 @Output() private outer = new EventEmitter();
- 子组件发送信号
this.outer.emit("我是子组件发的内容");
- 父组件模板, outer 为子组件发送的信号,也称为事件,
$event在这里为子组件传递的内容
<app-header (outer)="runParent($event)">app-header>
- 父组件接收
  runParent(e:any) {
    alert(e); //我是子组件发的内容
  }
9.3 父子组件或非父子组件的数据传递
9.3.1 最好用服务或者localStorage做
9.4 父子组件数据传递案例(todos)
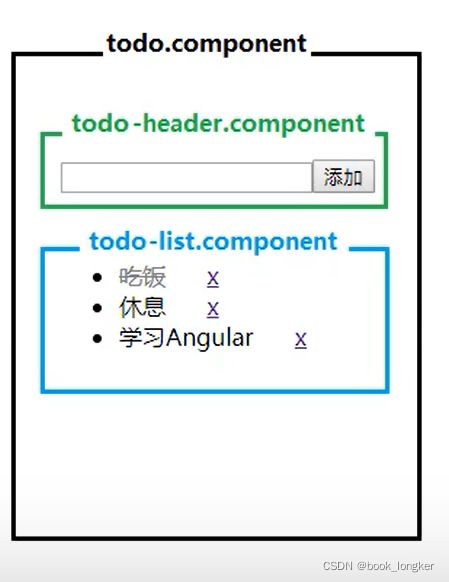
把todos的功能分成三个组件
- 创建todos模块, 并在该模块中创建三个组件
ng g m todos

ng g c todos
ng g c todos/todo-header
ng g c todos/todo-list
- 修改
app.module.ts使todos.module.ts模块可以被根模块使用;
import { TodosModule } from './todos/todos.module';
...
imports: [
    BrowserModule,
    TodosModule,
  ],
- 修改
todos.module.ts,导出TodosComponent组件,以便能在根模板文件中能调用
@NgModule({
  declarations: [
    TodoHeaderComponent,
    TodoListComponent,
    TodosComponent
  ],
  exports:[
   // 导出给其他模块使用
    TodosComponent
  ],
  imports: [
    CommonModule,
    FormsModule,
  ]
})
app.component.html内容
<app-todos>app-todos>
todos.component.ts和todos.component.html
import { Component, OnInit } from '@angular/core';

@Component({
  selector: 'app-todos',
  templateUrl: './todos.component.html',
  styleUrls: ['./todos.component.scss']
})
export class TodosComponent implements OnInit {

  constructor() { }

  ngOnInit(): void {
  }
  todos: any[] = [
    { id: 1, title: "吃饭", done: true },
    { id: 2, title: "睡觉", done: false },
    { id: 3, title: "休息", done: false },
  ];

  addTodo(todoName: string) {
    // 判断重复值
    if (this.todoHasKeyword(this.todos, todoName)) {
      return;
    }

    // 判断id值
    var id = 0;
    if (this.todos.length === 0) {
      id = 1;
    } else {
      id = this.todos[this.todos.length - 1].id + 1;
    }

    // 添加
    this.todos.push({
      id,
      title: todoName,
      done: false
    })
  }
    // 判断是否有重复值
    todoHasKeyword(todos: any, name: any) {
      for (let i = 0; i < todos.length; i++) {
        if (todos[i].title == name)
          return true;
      }
      return false;
    }

    changeTodo(id: number) {
      // 数组是引用传递,可以这样修改
      let todo = this.todos.find(todo => todo.id == id);
      todo.done = !todo.done;
    }

    delTodo(id: number) {
      // 删除
      this.todos = this.todos.filter(todos => todos.id != id);
    }

  }
<div class="todos">
    <app-todo-header (add)="addTodo($event)">app-todo-header>
    <app-todo-list [todos]="todos" (change)="changeTodo($event)" (del)="delTodo($event)">app-todo-list>
div>
todo-header.component.ts和todo-header.component.html
import { Component, OnInit,Output, EventEmitter } from '@angular/core';

@Component({
  selector: 'app-todo-header',
  templateUrl: './todo-header.component.html',
  styleUrls: ['./todo-header.component.scss']
})
export class TodoHeaderComponent implements OnInit {
  keyword!:string;

  @Output()
  add = new EventEmitter();

  constructor() { }

  ngOnInit(): void {
  }

  addTodo() {
    // 判断内容是否为空
    if (this.keyword.trim() === '') {
      return;
    }
    this.add.emit(this.keyword);
    this.keyword = '';
  }

}
<header>
    <input type="text" [(ngModel)]="keyword">
    <button (click)="addTodo()">添加button>
 header>
todo-list.component.ts和todo-list.component.html,css
import { Component, OnInit,Input, Output,EventEmitter } from '@angular/core';

@Component({
  selector: 'app-todo-list',
  templateUrl: './todo-list.component.html',
  styleUrls: ['./todo-list.component.scss']
})
export class TodoListComponent implements OnInit {
  @Input()
  todos!:any[]
  constructor() { }

  @Output()
  del = new EventEmitter();

  @Output()
  change = new EventEmitter();

  ngOnInit(): void {
  }

  changeTodo(id:number) {
    this.change.emit(id);
  }
  delTodo(id:number) {
    this.del.emit(id);
  }

}
   <ul>
    <li *ngFor="let item of todos">
      <span (click)="changeTodo(item.id)" [class.done]="item.done">{{item.title}}span>
      <a (click)="delTodo(item.id)">xa>
    li>
  ul>
.done {
    text-decoration: line-through;
    color: gray;
}
10. 生命周期函数
生命周期函数通俗的讲就是组件的创建,更新,销毁的时候回触发的一系列的方法,当使用构造函数新建一个组件或指令后,就会按下面的顺序在特定时刻调用这些生命周期钩子方法.
| 生命周期函数 | 说明 |
|---|---|
| constructor | 构造函数除了使用简单的值对局部变量进行初始化之外,什么都不应该做。非生命周期函数 |
| ngOnChanges() | 当Angular(重新)设置数据绑定输入属性时响应。该方法接受当前和一属性值的SimpleChanges 对象当被绑定的输入属性的值发生变化时调用,首次调用一定会发生在ngOnInit() 之前 |
| ngOnInit() | 在Angular 第一次显示数据绑定和设置指令/组件的输入属性之后,初始化指令/组件。在第一轮ngOnChanges() 完成之后调用,只调用一次。使用ngOnInit() 有两个原因:1、在构造函数之后马上执行复杂的初始化逻辑2、在Angular 设置完输入属性之后,对该组件进行准备。有经验的开发者会认同组件的构建应该很便宜和安全 |
| ngDoCheck() | 检测,并在发生Angular 无法或不愿意自己检测的变化时作出反应。在每个Angular 变更检测周期中调用,ngOnChanges() 和ngOnInit() 之后 |
| ngAfterContentInit() | 当把内容投影进组件之后调用。第一次ngDoCheck() 之后调用,只调用一次。 |
| ngAfterContentChecked() | 每次完成被投影组件内容的变更检测之后调用。ngAfterContentInit() 和每次ngDoCheck() 之后调用 |
| ngAfterViewInit() | 初始化完组件视图及其子视图之后调用。第一次ngAfterContentChecked() 之后调用,只调用一次 |
| ngAfterViewChecked() | 每次做完组件视图和子视图的变更检测之后调用。ngAfterViewInit() 和每次ngAfterContentChecked() 之后调用 |
| ngOnDestroy() | 当Angular 每次销毁指令/组件之前调用并清扫。在这儿反订阅可观察对象和分离事件处理器,以防内存泄漏。在Angular 销毁指令/组件之前调用 |
export class LifecycleComponent{


    @Input('title') title:string;


    public msg:string='我是一个生命周期演示';

    public userinfo:string='';

    public oldUserinfo:string='';

    constructor() {

      console.log('00构造函数执行了---除了使用简单的值对局部变量进行初始化之外,什么都不应该做')
    }

    ngOnChanges() {

      console.log('01ngOnChages执行了---当被绑定的输入属性的值发生变化时调用(父子组件传值的时候会触发)');
    }

    ngOnInit() {
        console.log('02ngOnInit执行了--- 请求数据一般放在这个里面');
    }

    ngDoCheck() {
        //写一些自定义的操作

        console.log('03ngDoCheck执行了---检测,并在发生 Angular 无法或不愿意自己检测的变化时作出反应');
        if(this.userinfo!==this.oldUserinfo){
            console.log(`你从${this.oldUserinfo}改成${this.userinfo}`);
            this.oldUserinfo = this.userinfo;
        }else{

            console.log("数据没有变化");
        }

    }

    ngAfterContentInit() {
        console.log('04ngAfterContentInit执行了---当把内容投影进组件之后调用');
    }
    ngAfterContentChecked() {
        console.log('05ngAfterContentChecked执行了---每次完成被投影组件内容的变更检测之后调用');
    }
    ngAfterViewInit(): void {
        console.log('06 ngAfterViewInit执行了----初始化完组件视图及其子视图之后调用(dom操作放在这个里面)');
    }
    ngAfterViewChecked() {
        console.log('07ngAfterViewChecked执行了----每次做完组件视图和子视图的变更检测之后调用');
    }


    ngOnDestroy() {
        console.log('08ngOnDestroy执行了····');
    }


    //自定义方法

    changeMsg(){


      this.msg="数据改变了";
    }

}
11. Rxjs快速入门教程
RxJS 是ReactiveX 编程理念的JavaScript 版本。ReactiveX 来自微软,它是一种针对异步数据
流的编程。简单来说,它将一切数据,包括HTTP 请求,DOM 事件或者普通数据等包装成流
的形式,然后用强大丰富的操作符对流进行处理,使你能以同步编程的方式处理异步数据,
并组合不同的操作符来轻松优雅的实现你所需要的功能。
RxJS 是一种针对异步数据流编程工具,或者叫响应式扩展编程;可不管如何解释RxJS 其目
标就是异步编程,Angular 引入RxJS 为了就是让异步可控、更简单
- RxJS 里面提供了很多模块。这里我们主要给大家讲RxJS 里面最常用Observable 和fromEvent
- 目前常见的异步编程的几种方法:
- 回调函数
- 事件监听/发布订阅
- Promise
- Rxjs(Observable可以取消订阅,多次执行)
- 服务的内容
import { Injectable } from '@angular/core';
import { Observable } from 'rxjs';

@Injectable({
  providedIn: 'root'
})
export class RequestService {

  constructor() { }

  getData() {
    console.log("同步方法");
    return "get Data";
  }

  getCallbackData(cb:any) {
    setTimeout(() => {
      var username = "张三";
      cb(username);
    }, 1000);
  }

  getPromiseData() {
    return new Promise((resolve, reject) => {
      setTimeout(() => {
        var username = '张三--promise';
        resolve(username);
      }, 2000);
    });
  }

  getRxjsData() {
    return new Observable((observer) => {
      setTimeout(() => {
        var username = "张三 -- observable";
        observer.next(username);
        // observer.error();
      }, 3000);
    })
  }

  getRxjsIntervalData() {
    let count = 0;
    return new Observable<any>((observer) => {
      setInterval(() => {
        count++;
        var username = "张三--Rxjs-Interval" + count;
        observer.next(username);
      }, 3500);
    })
  }

}
- 组件的内容,调用服务
 ngOnInit() {
    // 1. 同步方法
    this.request.getData();

    // 2. callback 异步方法,1秒后得到数据
    this.request.getCallbackData((username:any) => {
      console.log(username);
    });

    // 3. primise 获取异步数据
    var promiseData = this.request.getPromiseData();
    promiseData.then((data) => {
      console.log(data);
    })

    // 4. Observable 获取异步数据
    // 需要引入 Observable 对象

    var rxjsData = this.request.getRxjsData();
    rxjsData.subscribe((data)=>{
      console.log(data);

    });

    // 取消订阅
    var stream = this.request.getRxjsData();
    let d = stream.subscribe((data)=>{
      console.log(data);
    });

    setTimeout(() => {
      // 取消订阅
      d.unsubscribe();
    }, 1000);


       // 订阅后多次执行

    var streamInterval = this.request.getRxjsIntervalData();
    streamInterval.subscribe((data) => {
      console.log(data);
    })
  }
12. 网络数据请求(HttpClientModule 模块)
作用:发送Http请求
封装了浏览器提供的XMLHttpRequest接口
使用基于可观察(Observable)对象的API
提供了请求和响应拦截器
流式错误处理机制
12.1 HttpClientModule 模块的使用
- 在
app.module.ts引入HttpClientModule并注入
import { HttpClientModule } from '@angular/common/http';
  imports: [
    BrowserModule,
    HttpClientModule,
  ],
- 在用到的地方引入
HttpClient并在构造函数中声明,本身他也是一个服务,一般用于组件和服务中
import { HttpClient } from '@angular/common/http';
constructor(public http: HttpClient) { }
12.2 HttpClient 请求方法
12.2.1 get请求方法
    this.http.get('https://jsonplaceholder.typicode.com/todos').subscribe(res => {
      console.log(res.body);
    })
12.2.1.1 获取所有的响应信息
// 第二个参数加上 {observe: 'response'}
    this.http.get('https://jsonplaceholder.typicode.com/todos', {observe: 'response'}).subscribe(res => {
      console.log(res);
      console.log(res.body);
      console.log(res.headers.get('content-type'));
    })
加上泛型的情况
    this.http.get<Todo>('https://jsonplaceholder.typicode.com/todos', {observe: 'response'}).subscribe((res:HttpResponse<Todo>) => {
      console.log(res);
      console.log(res.body);
      console.log(res.headers.get('content-type'));
    })
12.2.1.2 类型检查,及请求出现错误的处理
- 在订阅后的第二个回调函数为出现错误的回调函数
    this.http.get<Todo>('https://jsonplaceholder.typicode.com/todos', { observe: 'response' }).subscribe((res: HttpResponse<Todo>) => {
      console.log(res);
      console.log(res.body);
      console.log(res.headers.get('content-type'));
    },
      err => {
        console.log(err);
      }
    )
12.2.2 post方法
import { HttpClient, HttpHeaders} from '@angular/common/http';
import { Injectable } from '@angular/core';
import { HttpClient, HttpHeaders } from '@angular/common/http';

@Injectable({
  providedIn: 'root'
})
export class RequestService {

  constructor(public http: HttpClient) { }

  getData() {
    let api = "https://jsonplaceholder.typicode.com/users";
    return this.http.get(api);
  }

  doLogin() {
    let api = "https://jsonplaceholder.typicode.com/posts";

    const httpOptions = {
      headers: new HttpHeaders({ 'Content-Type': 'application/json' })
    };

    return this.http.post(api, {"title":"aa", "body": "body"}, httpOptions);

  }

}
12.2.3 patch(局部更新)/put(全部更新) 方法
    const url = 'https://jsonplaceholder.typicode.com/todos';

    this.http.put(`${url}/3`, {title:"angular", done: true}).subscribe(res => {
      console.log(res);
    })
  }
12.2.4 delete方法
    const url = 'https://jsonplaceholder.typicode.com/todos';

    this.http.delete(`${url}/3`).subscribe(res => {
      console.log(res);
    })
  }
12.2.5 jsonp解决跨越问题,用得比较少
- 在app.module.ts 中引入HttpClientModule、HttpClientJsonpModule 并注入
import {HttpClientModule,HttpClientJsonpModule} from
'@angular/common/http';

  imports: [
    BrowserModule,
    HttpClientModule,
    HttpClientJsonpModule,
  ],
12.3 请求参数和请求头
12.3.1 请求参数
- https://jsonplaceholder.typicode.com/todos?_page=1&_limit=2
使用set()方法
const params = new HttpParams().set("_page", 1).set("_limit", 2);
使用fromString
const params = new HttpParams({fromString: "_page=1&_limit=10"});
使用 fromObject
const params = new HttpParams({ fromObject: { _page: "1", _limit: "10" } });
12.3.2 请求头
const headers = new HttpHeaders().set("token", "iloveangular");
12.3.3 完整案例
ngOnInit() {
    // 请求参数设置
    const params = new HttpParams().set("_page", 1).set("_limit", 2);
    // 请求头设置
    const headers = new HttpHeaders().set("token", "iloveangular");

    this.http.get<Todo>(this.url, {
      params,
      headers
    }).subscribe(res => {
      console.log(res);
    },
      err => {
        console.log(err);
      }
    )
  }
12.4 todos服务的完整案例
12.4.1 使用json-server做后端数据
- db.json 内容
{
  "todos": [
    {
      "id": 1,
      "title": "吃饭",
      "done": true
    },
    {
      "id": 2,
      "title": "睡觉",
      "done": false
    },
    {
      "title": "休息",
      "done": true,
      "id": 3
    }
  ]
}
todos.service.ts
import { Injectable } from '@angular/core';
import { HttpClient, HttpHeaders, HttpParams, HttpResponse } from '@angular/common/http'
import { Todo } from '../todos/todo.interface';

@Injectable({
  providedIn: 'root'
})
export class TodosService {

  constructor(
    private http: HttpClient
  ) { }

  //接口地址
  url = 'http://localhost:3000/todos';
  // url = 'https://jsonplaceholder.typicode.com/todos';

  // GET
  getData() {
    return this.http.get<Todo[]>(this.url);
  }

  // POST
  addData(todoName:string) {
    return this.http.post<Todo>(this.url, { "title": todoName, "done": false })
  }

  // patch
  updateData(id:number, done:boolean) {

    return this.http.patch<Todo>(`${this.url}/${id}`, {done: done } );
  }

  // del
  delData(id:number) {
    return this.http.delete(`${this.url}/${id}`);
  }
}
- todos.component.ts
import { Component, OnInit } from '@angular/core';
import { Todo } from './todo.interface';
import { TodosService } from '../service/todos.service';

@Component({
  selector: 'app-todos',
  templateUrl: './todos.component.html',
  styleUrls: ['./todos.component.scss']
})
export class TodosComponent implements OnInit {
  todos: Todo[] = [];

  constructor(private todosService: TodosService) { }

  ngOnInit(): void {
    this.todosService.getData().subscribe((todo: Todo[]) => {
      console.log(todo);
      this.todos = todo;
    })
  }


  addTodo(todoName: string) {
    // 判断重复值
    if (this.todoHasKeyword(this.todos, todoName)) {
      return;
    }

    this.todosService.addData(todoName).subscribe((res: Todo) => {
      this.todos.push(res);
    })

  }

  // 判断是否有重复值
  todoHasKeyword(todos: any, name: any) {
    for (let i = 0; i < todos.length; i++) {
      if (todos[i].title == name)
        return true;
    }
    return false;
  }

  changeTodo(id: number) {
    // 数组是引用传递,可以这样修改
    const curTodo = this.todos.find(todo => todo.id == id);
    if (curTodo) {
      // todo.done = !todo.done;
        this.todosService.updateData(id, !curTodo?.done).subscribe((todo:Todo) => {
          console.log(todo);
          curTodo.done = todo.done
      })
    }

  }

  // 删除
  delTodo(id: number) {
    this.todosService.delData(id).subscribe((res) => {
      console.log(res);
      const curIndex = this.todos.findIndex(todo => todo.id === id);
      this.todos.splice(curIndex, 1);
    })
  }

}
13. 路由
13. 创建app-routing.module.ts默认根路由
ng g m app-routing --flat --module=app
- –flat : 在src/app 中创建路由文件,而不是单独的目录中
- –module=app: 将该模块注册到
AppModule中
路由的使用步骤:
- index.html中设置
- 在模块中导入
RouterModule模块- 配置路由规则 appRoutes
- 将
RouterModule.forRoot(appRoutes)模块配置在根模块中- 使用 指定路由出口
6 使用 routerLink = “/home” 指定导航链接
13.1 手动创建的cli命令
ng g module --routing routerName
- 路由的内容如下:
import { NgModule } from '@angular/core';
import { Routes, RouterModule } from '@angular/router';
import { SearchComponent } from './components/search/search.component';
import { TodolistComponent } from './components/todolist/todolist.component';
import { WebosocketComponent } from './components/webosocket/webosocket.component';
// 配置项必须至少要有2个参数
// path 路径参数前面不需要加/,因为在首页index.html已经有 13.2 使路由生效
- 必须在当前的
app.module.ts下面引入
import { AppRoutingModule } from './app-routing.module';
  imports: [
    BrowserModule,
    AppRoutingModule,
  ],
13.3 配置router-outlet 显示动态加载的路由
- 路由出口依赖于路由模块
RouteModule
<div class="header">
    <a [routerLink]="['/search']" routerLinkActive="active">搜索a>
    <a [routerLink]="['/todolist']" routerLinkActive="active">todolista>
    <a [routerLink]="['/websocket']" routerLinkActive="active">websocketa>
div>
<router-outlet>router-outlet>
13.4 动态路由
13.4.1 配置动态路由
const routes: Routes = [
	{
	path: '',
		redirectTo: '/home',
		pathMatch: 'full'
	}
	{path: 'home', component: HomeComponent},
	{path: 'news', component: NewsComponent},
	{path: 'newscontent/:id', component: NewscontentComponent},
	{path: '**', component: NotfoundComponent}
];
13.4.2 通配符路由
{path: '**', component: NotfoundComponent} 需要放在路由规则的最后面
13.4.3 模板中路由跳转
<a [routerLink]="[ '/newscontent/',aid]">跳转到详情a>
<a routerLink="/newscontent/{{aid}}">跳转到详情a>
13.4.4 获取路由参数
- 路由配置:
{
	// :id 表示路由参数
	// 能匹配: /car/1, /car/2, ...
	// 不能匹配:/car, /car/2/info
	path: 'car/:id'
}
- 获取路由参数
import { Component, OnInit } from '@angular/core';
import { ActivatedRoute } from '@angular/router';

@Component({
  selector: 'app-car',
  templateUrl: './car.component.html',
  styleUrls: ['./car.component.scss']
})
export class CarComponent implements OnInit {

  constructor(private route: ActivatedRoute) { }

  ngOnInit(): void {
    this.route.paramMap.subscribe(param => {
      console.log(param.get('id'));
    })
  }

}
13.4.5 编程式路由导航
- 引入
import { Router } from '@angular/router';
- 倒计时5秒跳转到首页
import { Component, OnInit } from '@angular/core';
import { Router } from '@angular/router'
@Component({
  selector: 'app-notfound',
  templateUrl: './notfound.component.html',
  styleUrls: ['./notfound.component.scss']
})
export class NotfoundComponent implements OnInit {
  time:number = 5;
  constructor(private router: Router) { }

  ngOnInit(): void {
    const timeId = setInterval(()=> {
      this.time--;
      console.log(this.time);

      if (this.time  === 0) {
        clearInterval(timeId);
        this.router.navigate(["/"]);
      }
    }, 1000);
  }

}
- 路由跳转
this.router.navigate(['/news', hero.id]);
13.5 Get的参数获取
- 导航传值
<a [routerLink]="['/detail']" [queryParams]="{id:10}">detaila>
- 组件中导入
import { ActivatedRoute } from '@angular/router';
 constructor(private route: ActivateRoute) {}

  ngOnInit(): void {
    let todoList = this.storage.get("todoList");
    if (todoList) {
      this.todoList = todoList;
    }
    this.route.queryParams.subscribe((data) => {
      console.log(data);
    })
  }
13. 2 路由激活高亮
- 需要设置css样式
<a routerLink="/home" routerLinkActive="actived" [routerLinkActiveOptions]="{exact: true}"> 首页 a>
<a routerlink="/about" routerLinkActive="actived">关于a>
13.3 父子路由(嵌套路由)
- app.component.html
<header>
    <ul>
        <li><a [routerLink]="['/user']">usera>li>
    ul>
header>

<router-outlet>router-outlet>
- user.component.html
<p><a [routerLink]="['/user/profile']">用户信息a>p>
<router-outlet>router-outlet>
- 路由配置
const routes: Routes = [
  {
    path: "user",
    component: UserComponent,
    children: [
      {
        path: "profile", component: ProfileComponent
      }
    ]
  },
];
14 模块
14.1 内置模块
| 内置模块 | 说明 |
|---|---|
| @angular/core | 核心模块 |
| @angular/common | 通用模块 |
| @angular/forms | 表单模块 |
| @angular/http | 网络模块 |
14.2 自定义模块
当我们项目非常庞大的时候把所有的组件都挂载到根模块里面不是特别合适。所以这个时候我们就可以自定义模块来组织我们的项目。并且通过Angular 自定义模块可以实现路由的懒加载
14.2.1 创建自定义模块
ng g m todos
ng g m todos --routing
其中:会自动创建一个todos文件夹,文件夹下面有一个todos.module.ts
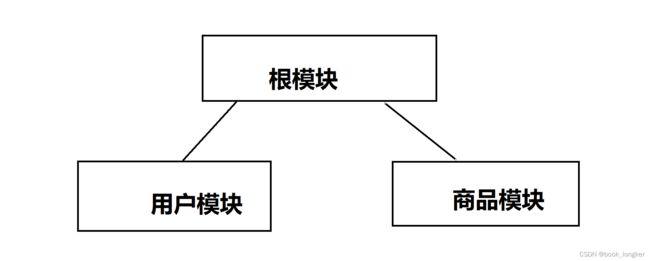
根模块app.module.ts和根组件组合成一个整体,自定义模块也可以和组件组合为一个模块,如下图的关系
15 自定义模块以及配置路由实现模块懒加载
15.1 创建模块的时候同时创建路由
ng g module myModule/user --routing
上面代表了:创建一个user模块,路径为: mymodule/user.module.ts, 同时创建了一个路由 user-routing.module.ts
- 全部实现一次
创建模块:
ng g module module/user --routing
ng g module module/article --routing

创建组件:
ng g component module/user
ng g component module/user/components/profile
ng g component module/user/components/address

ng g component module/article
ng g component module/article/components/detail
ng g component module/article/components/list
15.2 配置懒加载(异步路由)
- 根路由配置懒加载(
app-routing.module.ts)
import { NgModule } from '@angular/core';
import { RouterModule, Routes } from '@angular/router';

const routes: Routes = [
  {
    path: "user",
    // 最新的赖加载写法,以前的老写法淘汰
    loadChildren: () => import('./module/user/user.module').then(mod => mod.UserModule)
  },
  {
    path: "article",
    loadChildren: () => import('./module/article/article.module').then(mod => mod.ArticleModule)
  },
  {
    path: "**", redirectTo: "user"
  }
];

@NgModule({
  imports: [RouterModule.forRoot(routes)],
  exports: [RouterModule]
})
export class AppRoutingModule { }
- 配置user模块中的路由
user-routing.module.ts
import { NgModule } from '@angular/core';
import { RouterModule, Routes } from '@angular/router';
import { AddressComponent } from './components/address/address.component';
import { ProfileComponent } from './components/profile/profile.component';
import { UserComponent } from './user.component';
const routes: Routes = [
{
path: "",
component: UserComponent,
// 这个子路由,需要在user根组件中有Angular中的TypeScript说明
TypeScript语法
类型注解:为函数或变量添加约束
	id:number;
	username: string
接口:对值所具有的结果进行类型约束
interface Todo {
    id: number,
    title: string,
    done: boolean
}

todo:Todo;
泛型:<>泛型类EventEmitter约定参数类型
@Output()
outer = new EventEmitter<string>();
类成员修饰符:public(默认), private 私有
一套完整的员工管理系统案例
项目搭建
创建路由模块
配置路由
登录功能 - 1 登录表单结构
登录功能 - 2 登录样式
登录功能 - 3 抽离类型和配置
登录访问控制 - 1 路由守卫和实现
路由守卫实现访问控制思路
- 登录成功后,将
token存储在localStorage中 - 在路由守卫
CanActivate中判断是否有token,并判断是否合法 - 如果有直接放行
- 如果没有,跳转到login页
登录访问控制 - 2 路由导航守卫功能实现
- 创建守卫, 守卫也是服务
ng g gurd authName - 在路由中使用守卫
import {AuthGuard} './auth.guard'
  {
    path: 'home',
    component: HomeComponent,
    canActivate: [AuthGuard],
  },
- 路由守卫
auth.guard.ts内容
import { Injectable } from '@angular/core';
import { CanActivate } from '@angular/router';
import { Router } from '@angular/router';

@Injectable({
  providedIn: 'root'
})
export class AuthGuard implements CanActivate {
  constructor(private router: Router){}
  canActivate():boolean
  {
    return true; // 测试用

    // 1. 获取token
    const token = localStorage.getItem('token');
    if (!!token)
      return true;

    this.router.navigate(['/login']);
    return false;
  }

}
异步路由和模块
- 异步路由和模块的优势
- 用户请求某个模块的时候,在加载这个模块
- 首页速度有提升,不需要加载太多内容
异步路由的使用
- 创建带有路由的模块:
ng g m employees --routing, 自动创建employees.module.ts和employess-routing.module.ts文件 - 上面2个文件内容如下:
employees.module.ts
import { NgModule } from '@angular/core';
import { CommonModule } from '@angular/common';
import { EmployeesRoutingModule } from './employees-routing.module';

@NgModule({
  declarations: [
  ],
  imports: [
    CommonModule,
    EmployeesRoutingModule, // 自动加的
  ]
})
export class EmployeesModule { }
employess-routing.module.ts
import { NgModule } from '@angular/core';
import { RouterModule, Routes } from '@angular/router';

const routes: Routes = [
];

@NgModule({
  imports: [RouterModule.forChild(routes)],
  exports: [RouterModule]
})
export class EmployeesRoutingModule { }
- 创建员工列表组件:
ng g c employees/employee-list - 创建员工添加组件:
ng g c employees/employee-add - 在
app-routing通过loadChildren异步加载employees模块
import { NgModule } from '@angular/core';
import { RouterModule, Routes } from '@angular/router';
import { PathLocationStrategy, LocationStrategy, APP_BASE_HREF,HashLocationStrategy } from '@angular/common';
import { AuthGuard } from './auth.guard';
import { HomeComponent } from './home/home.component';
import { LoginComponent } from './login/login.component';
import { NotfoundComponent } from './notfound/notfound.component';

// import { EmployeesRoutingModule } from './employees/employees-routing.module';

const routes: Routes = [
  {
    path: '',
    pathMatch: 'full',
    redirectTo: 'home'
  },
  {
    path: 'home',
    component: HomeComponent,
    canActivate: [AuthGuard],
    children:[
      {
        // 这级的path不能省略,否则就达不到异步路由的效果
        path: 'employee',
        loadChildren: () => import('./employees/employees.module').then (m =>m.EmployeesModule)
      },
    ]
  },
  {
    path: 'login',
    component: LoginComponent
  },
  // // 异步加载路由,实际是加载模块
  // {
  //   path: 'employee',
  //   loadChildren: () => import('./employees/employees.module').then (m =>m.EmployeesModule)
  // },

  {
    path: '**',
    component: NotfoundComponent
  }
];

@NgModule({
  imports: [RouterModule.forRoot(routes)],
  exports: [RouterModule],
  providers:[
    // {provide: LocationStrategy, useClass: HashLocationStrategy},
    // {provide: APP_BASE_HREF, useValue: '/'},
  ]
})
export class AppRoutingModule { }
注意:千万不要在根模块中加载employees模块
http拦截器
当我们从网络中获取数据时,每个请求都要在请求头中添加token,太繁琐
解决方式:使用HttpClient拦截器
作用:用它们监视和转换从应用发送到服务器的HTTP请求
创建拦截器
ng g interceptor auth
- 创建的
interceptor会继承HttpInterceptor的接口,创建的拦截器如下:
import { Injectable } from '@angular/core';
import {
  HttpRequest,
  HttpHandler,
  HttpEvent,
  HttpInterceptor
} from '@angular/common/http';
import { Observable } from 'rxjs';

@Injectable()
export class AuthInterceptor implements HttpInterceptor {

  constructor() {}

  intercept(request: HttpRequest<unknown>, next: HttpHandler): Observable<HttpEvent<unknown>> {
    return next.handle(request);
  }
}
- 在app.module.ts 下导入模块,在提供商加入入下内容
import {AuthInterceptor } from './interceptors/auth.interceptor'
...
 providers: [
    {
    provide: HTTP_INTERCEPTORS,
    // 把AuthInterceptor 拦截器放到HTTP_INERCEPTORS数组中
    useClass: AuthInterceptor,
    multi: true},
    // DatePipe
  ],
- 案例
import { Injectable } from "@angular/core";
import { HttpEvent, HttpHandler, HttpInterceptor, HttpRequest } from "@angular/common/http";
import { Observable, tap } from "rxjs";
import  { Router } from '@angular/router';

@Injectable()
export class AuthInterceptor implements HttpInterceptor {
    constructor (private router: Router) {}
    // 拦截使用 HttpClient 请求
    intercept(req: HttpRequest<any>, next: HttpHandler): Observable<HttpEvent<any>> {
        console.log('http interceptor');
        console.log('No-Auth', req.headers.get('No-Auth'));
        // 请求头中有no-auth=‘TRUE’的时候,跳过添加请求头
        // 如果是登录,不需要加Authorization, 这样性能还变差了
        if (req.headers.get('No-Auth') === 'TRUE')
            return next.handle(req);

        const token = localStorage.getItem('token');
        // 先要克隆一份请求头,在添加需要加的头信息
        const authReq = req.clone({
            headers: req.headers.set('Authorization', `bearer ${token}`)
        })
        return next.handle(authReq).pipe(
            tap(
                ok => {
                },
                // 错误处理
                error => {
                    // 很多状态
                    if (error.stutas === 401){
                        // 失效的token
                        localStorage.removeItem('token');
                        this.router.navigate(['/login']);
                    }

                }
            )
        );
    }
}
