语义实例分割1-02:snake(实时实例分割))-官方数据训练测试,环境搭建等
以下链接是个人关于 voxelpose(多视角3D人体姿态估算) 所有见解,如有错误欢迎大家指出,我会第一时间纠正。有兴趣的朋友可以加微信:17575010159 相互讨论技术。若是帮助到了你什么,一定要记得点赞!因为这是对我最大的鼓励。 文末附带 \color{blue}{文末附带} 文末附带 公众号 − \color{blue}{公众号 -} 公众号− 海量资源。 \color{blue}{ 海量资源}。 海量资源。
语义实例分割1-00:snake(实时实例分割)-目录-史上最新无死角讲解
注意,本人编写该博客的时间为 2021 / 01 / 06 ,也就是说,你现在下载的作者代码或许和 \color{red}{注意,本人编写该博客的时间为2021/01/06,也就是说,你现在下载的作者代码或许和} 注意,本人编写该博客的时间为2021/01/06,也就是说,你现在下载的作者代码或许和
本人的代码不一样(如果作者有更新过)还有就是,本人调试该代码为 u b u n t u 18.04 系统 \color{red}{本人的代码不一样(如果作者有更新过)还有就是,本人调试该代码为ubuntu18.04系统} 本人的代码不一样(如果作者有更新过)还有就是,本人调试该代码为ubuntu18.04系统
即下面的报错使用 u b u n t u 18.04 报错的过程,以及解决办法 \color{red}{即下面的报错使用ubuntu18.04报错的过程,以及解决办法} 即下面的报错使用ubuntu18.04报错的过程,以及解决办法
anconda环境搭建
请严格搭建 c u d a 10.0 , p y t o r c h 1.1.0 的环境 , 或者配置作者的环境 − c u d a 9.0 \color{red}{请严格搭建cuda10.0,pytorch1.1.0的环境,或者配置作者的环境-cuda9.0} 请严格搭建cuda10.0,pytorch1.1.0的环境,或者配置作者的环境−cuda9.0,在搭建环境之前,请按上一篇博客下载好,并且摆放好数据。
# snake-root表示从github下载项目的根目录
cd ${snake-root}
conda create -n 11.snake-pytorch1.1-py3.6  -y python=3.6
conda activate 11.snake-pytorch1.1-py3.6
conda install pytorch==1.1.0 torchvision==0.3.0 cudatoolkit=10.0 -c pytorch
cd snake-root
pip install Cython==0.28.2 termcolor pillow==6.0.0
pip install -r requirements.txt
git clone https://github.com/NVIDIA/apex.git
cd apex
git checkout 39e153a3159724432257a8fc118807b359f4d1c8
export CUDA_HOME="/usr/local/cuda-10.0"
python setup.py install --cuda_ext --cpp_ext

cd snake-root/lib/csrc
cd dcn_v2
python setup.py build_ext --inplace
cd ../extreme_utils
python setup.py build_ext --inplace
cd ../roi_align_layer
python setup.py build_ext --inplace
然后按照上一篇博客的介绍摆放好数据之后,创建软链接如下:
# snake-root表示从github下载项目的根目录
cd ${snake-root}
ln -s /my_tmp/zwh/3.snake/Datasets/cityscapes cityscapes
模型测试
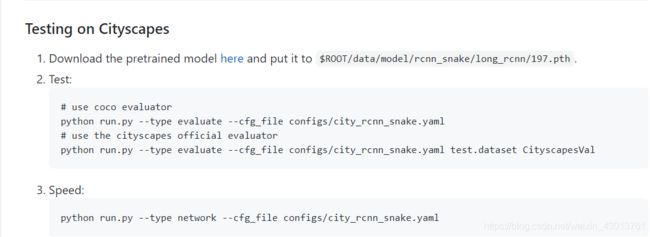
根据README.md,可以看到如下:

所以我们执行如下指令:
# snake-root表示从github下载项目的根目录
cd ${snake-root}
# use coco evaluator
python run.py --type evaluate --cfg_file configs/city_rcnn_snake.yaml
报错一
  File "/my_tmp/zwh/3.snake/1.snake-master/lib/networks/dcn_v2.py", line 31, in forward
    ctx.deformable_groups)
RuntimeError: cublas runtime error : the GPU program failed to execute at /pytorch/aten/src/THC/THCBlas.cu:425
这里主要是GPU的显存不够,本人修改 configs/city_rcnn_snake.yaml 文件如下(被注释的部分为源码):
#gpus: (0, 1, 2, 3)
gpus: (0,)
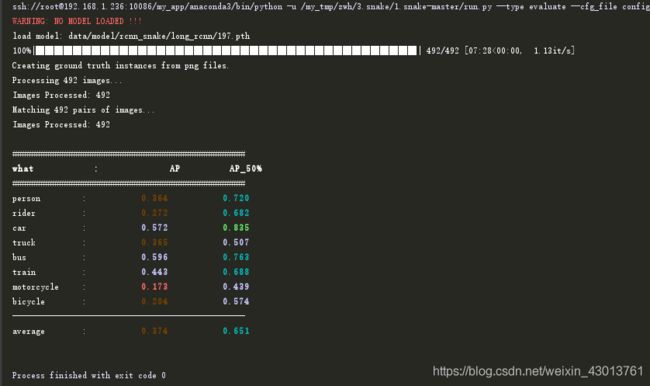
把多GPU改成单GPU运行。再重新运行指令,本人打印显示如下:

或者执行指令:
python run.py --type evaluate --cfg_file configs/city_rcnn_snake.yaml test.dataset CityscapesVal
本人打印如下:

不要问我这个为什么就长得好看一点,暂时我也不是很清楚,后续等分析了代码,再为大家讲解。
结果可视化(Visualization)
执行指令:
# snake-root表示从github下载项目的根目录
cd ${snake-root}
# Visualize Cityscapes test set
python run.py --type visualize --cfg_file configs/city_rcnn_snake.yaml test.dataset CityscapesTest ct_score 0.3
# Visualize Cityscapes val set
python run.py --type visualize --cfg_file configs/city_rcnn_snake.yaml test.dataset CityscapesVal ct_score 0.3
本人结果分别显示如下:
demo测试(单张或者多张图像)
执行指令:
# 当张图片测试
python run.py --type demo --cfg_file configs/sbd_snake.yaml demo_path demo_images ct_score 0.3
# 多张图片测试
python run.py --type demo --cfg_file configs/sbd_snake.yaml demo_path demo_images/2009_000871.jpg ct_score 0.3
模型训练(基于Cityscapes数据集)
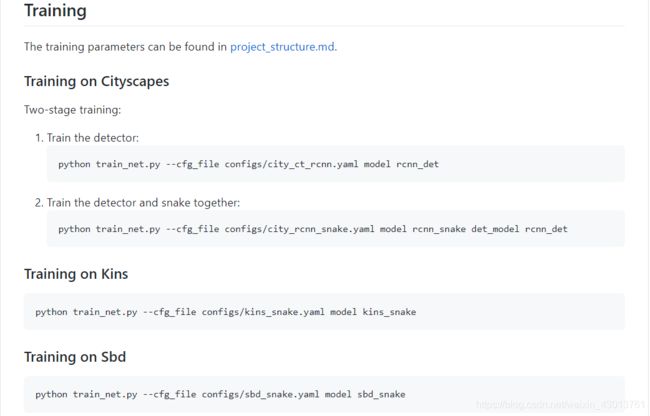
本人运行指令如下:
# 1.Train the detector, 训练检测器
python train_net.py --cfg_file configs/city_ct_rcnn.yaml model rcnn_det
# 2.Train the detector and snake together,检测器以及snake共同训练
python train_net.py --cfg_file configs/city_rcnn_snake.yaml model rcnn_snake det_model rcnn_det
报错一
RuntimeError: CUDA out of memory. Tried to allocate 704.00 MiB (GPU 0; 10.76 GiB total capacity; 9.48 GiB already
 allocated; 203.50 MiB free; 314.85 MiB cached) (malloc at /opt/conda/conda-bld/pytorch_1556653114079/work/c10/cuda/CUDACachingAllocator.cpp:267)
这个依旧是显存不足得问题,这里主要是GPU的显存不够,本人修改 configs/city_ct_rcnn.yaml 以及 city_rcnn_snake.yaml 文件如下(被注释的部分为源码):
#gpus: (0, 1, 2, 3)
gpus: (0,)

#   batch_size: 32
    batch_size: 4
Tensorboard(查看训练曲线图)
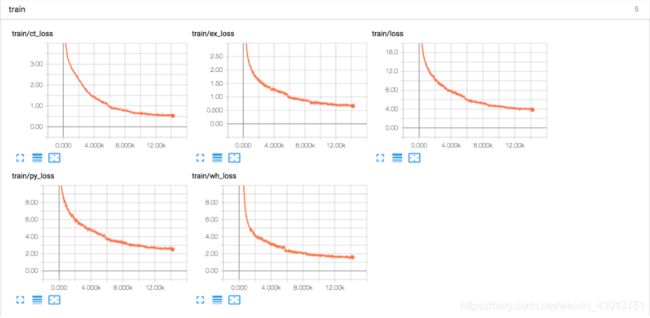
根据README.md,可以看到如下:

所以我们运行如下指令:
# for the rcnn_snake task
tensorboard    --logdir data/record/rcnn_snake
# for the snake task
tensorboard  --logdir data/record/snake
结语
这样,我们就完成模型的训练以及测试,接下来我会为大家对论文进行翻译-使用大白话,请各位大佬给我一个赞。
![]()


