手把手教你使用YOLOv5实现化妆品目标检测
YOLOv5目标检测框架搭建
源码下载
# 在github下载源码
$ git clone https://github.com/ultralytics/yolov5
环境搭建(GPU)
# 创建一个虚拟环境
python 3.8
pip install -r requirements
Ubuntu清理磁盘空间(磁盘空间不够)
# 查找100M以上的文件
sudo find / -size +100M |xargs ls -lh
# 然后删除缓存中不需要的文件
环境搭建(CPU)
# 先安装torch,再安装tb-nightly,剩下按照requirement.txt所需包自适应安装
pip3 install torch==1.9.0+cpu torchvision==0.10.0+cpu torchaudio==0.9.0 -f https://download.pytorch.org/whl/torch_stable.html
pip install tb-nightly
数据准备(略)与yolov3图片标注一样
搭建流程(训练自己的数据集)
-
下载YOLOv5权重文件 放置到项目的根目录,或者新建自定义文件夹。(后面我直接将权重文件放到data文件夹下)
-
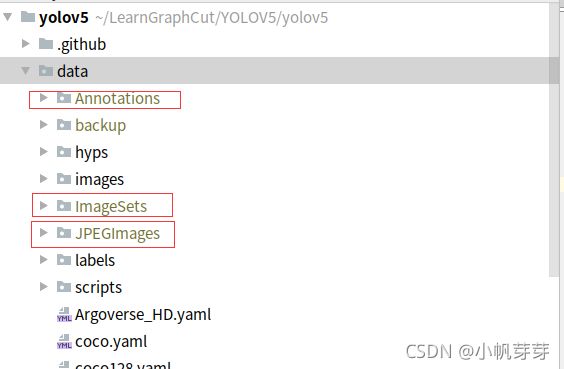
在data目录下新建一下几个文件夹,把自己的数据集中图片放到JPEGImages文件夹中,图片对应的标签文件(xml文件)放到Annotations夹中,再把JPEGImages中的图片复制到images中。
-
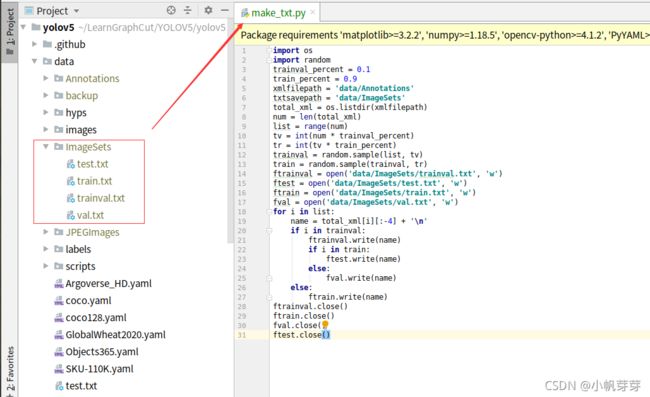
根目录创建make_txt.py
import os import random trainval_percent = 0.1 train_percent = 0.9 xmlfilepath = 'data/Annotations' txtsavepath = 'data/ImageSets' total_xml = os.listdir(xmlfilepath) num = len(total_xml) list = range(num) tv = int(num * trainval_percent) tr = int(tv * train_percent) trainval = random.sample(list, tv) train = random.sample(trainval, tr) ftrainval = open('data/ImageSets/trainval.txt', 'w') ftest = open('data/ImageSets/test.txt', 'w') ftrain = open('data/ImageSets/train.txt', 'w') fval = open('data/ImageSets/val.txt', 'w') for i in list: name = total_xml[i][:-4] + '\n' if i in trainval: ftrainval.write(name) if i in train: ftest.write(name) else: fval.write(name) else: ftrain.write(name) ftrainval.close() ftrain.close() fval.close() ftest.close() -
根目录创建voc2_label.py
import xml.etree.ElementTree as ET import pickle import os from os import listdir, getcwd from os.path import join sets = ['train', 'test','val'] classes = ['bar','yt','dabao','kouhong','hf','fx','myl'] # 此处修改为你的分类 def convert(size, box): dw = 1. / size[0] dh = 1. / size[1] x = (box[0] + box[1]) / 2.0 y = (box[2] + box[3]) / 2.0 w = box[1] - box[0] h = box[3] - box[2] x = x * dw w = w * dw y = y * dh h = h * dh return (x, y, w, h) def convert_annotation(image_id): in_file = open('data/Annotations/%s.xml' % (image_id)) out_file = open('data/labels/%s.txt' % (image_id), 'w') tree = ET.parse(in_file) root = tree.getroot() size = root.find('size') w = int(size.find('width').text) h = int(size.find('height').text) for obj in root.iter('object'): difficult = obj.find('difficult').text cls = obj.find('name').text if cls not in classes or int(difficult) == 1: continue cls_id = classes.index(cls) xmlbox = obj.find('bndbox') b = (float(xmlbox.find('xmin').text), float(xmlbox.find('xmax').text), float(xmlbox.find('ymin').text), float(xmlbox.find('ymax').text)) bb = convert((w, h), b) out_file.write(str(cls_id) + " " + " ".join([str(a) for a in bb]) + '\n') wd = getcwd() print(wd) for image_set in sets: if not os.path.exists('data/labels/'): os.makedirs('data/labels/') image_ids = open('data/ImageSets/%s.txt' % (image_set)).read().strip().split() list_file = open('data/%s.txt' % (image_set), 'w') for image_id in image_ids: list_file.write('data/images/%s.jpg\n' % (image_id)) convert_annotation(image_id) list_file.close() -
依次执行上述文件,将生成以下文件
-
修改coco.yaml为自己数据集需要的形式,你可以复制一份重新命名,这里我复制一份命名为hzp.yaml
# COCO 2017 dataset http://cocodataset.org # Train command: python train.py --data coco.yaml # Default dataset location is next to YOLOv5: # /parent # /datasets/coco # /yolov5 ## Train/val/test sets as 1) dir: path/to/imgs, 2) file: path/to/imgs.txt, or 3) list: [path/to/imgs1, path/to/imgs2, ..] #path: ../datasets/coco # dataset root dir #train: train2017.txt # train images (relative to 'path') 118287 images #val: val2017.txt # train images (relative to 'path') 5000 images #test: test-dev2017.txt # 20288 of 40670 images, submit to https://competitions.codalab.org/competitions/20794 # 此处修改 改成你的数据 # Train/val/test sets as 1) dir: path/to/imgs, 2) file: path/to/imgs.txt, or 3) list: [path/to/imgs1, path/to/imgs2, ..] #path: ../datasets/coco # dataset root dir train: data/train.txt # train images (relative to 'path') 118287 images val: data/val.txt # train images (relative to 'path') 5000 images test: data/test.txt # 20288 of 40670 images, submit to https://competitions.codalab.org/competitions/20794 # Classes #nc: 80 # number of classes #names: [ 'person', 'bicycle', 'car', 'motorcycle', 'airplane', 'bus', 'train', 'truck', 'boat', 'traffic light', # 'fire hydrant', 'stop sign', 'parking meter', 'bench', 'bird', 'cat', 'dog', 'horse', 'sheep', 'cow', # 'elephant', 'bear', 'zebra', 'giraffe', 'backpack', 'umbrella', 'handbag', 'tie', 'suitcase', 'frisbee', # 'skis', 'snowboard', 'sports ball', 'kite', 'baseball bat', 'baseball glove', 'skateboard', 'surfboard', # 'tennis racket', 'bottle', 'wine glass', 'cup', 'fork', 'knife', 'spoon', 'bowl', 'banana', 'apple', # 'sandwich', 'orange', 'broccoli', 'carrot', 'hot dog', 'pizza', 'donut', 'cake', 'chair', 'couch', # 'potted plant', 'bed', 'dining table', 'toilet', 'tv', 'laptop', 'mouse', 'remote', 'keyboard', 'cell phone', # 'microwave', 'oven', 'toaster', 'sink', 'refrigerator', 'book', 'clock', 'vase', 'scissors', 'teddy bear', # 'hair drier', 'toothbrush' ] # class names # 此处修改 你的类别数 nc: 7 # 此处修改 你的类别名称 names: ['bar','yt','dabao','kouhong','hf','fx','myl'] # Download script/URL (optional) download: | from utils.general import download, Path # Download labels segments = False # segment or box labels dir = Path(yaml['path']) # dataset root dir url = 'https://github.com/ultralytics/yolov5/releases/download/v1.0/' urls = [url + ('coco2017labels-segments.zip' if segments else 'coco2017labels.zip')] # labels download(urls, dir=dir.parent) # Download data urls = ['http://images.cocodataset.org/zips/train2017.zip', # 19G, 118k images 'http://images.cocodataset.org/zips/val2017.zip', # 1G, 5k images 'http://images.cocodataset.org/zips/test2017.zip'] # 7G, 41k images (optional) download(urls, dir=dir / 'images', threads=3) -
修改models 下的yaml 文件,yolov5总共有四个模型,用哪个就修改那个,以yolov5s.yaml为例,只需修改 nc 为自己数据集的类别数即可
# Parameters #nc: 80 # number of classes nc: 7 # number of classes # 此处修改成你的类别数 depth_multiple: 0.33 # model depth multiple width_multiple: 0.50 # layer channel multiple anchors: - [10,13, 16,30, 33,23] # P3/8 - [30,61, 62,45, 59,119] # P4/16 - [116,90, 156,198, 373,326] # P5/32 # YOLOv5 backbone backbone: # [from, number, module, args] [[-1, 1, Focus, [64, 3]], # 0-P1/2 [-1, 1, Conv, [128, 3, 2]], # 1-P2/4 [-1, 3, C3, [128]], [-1, 1, Conv, [256, 3, 2]], # 3-P3/8 [-1, 9, C3, [256]], [-1, 1, Conv, [512, 3, 2]], # 5-P4/16 [-1, 9, C3, [512]], [-1, 1, Conv, [1024, 3, 2]], # 7-P5/32 [-1, 1, SPP, [1024, [5, 9, 13]]], [-1, 3, C3, [1024, False]], # 9 ] # YOLOv5 head head: [[-1, 1, Conv, [512, 1, 1]], [-1, 1, nn.Upsample, [None, 2, 'nearest']], [[-1, 6], 1, Concat, [1]], # cat backbone P4 [-1, 3, C3, [512, False]], # 13 [-1, 1, Conv, [256, 1, 1]], [-1, 1, nn.Upsample, [None, 2, 'nearest']], [[-1, 4], 1, Concat, [1]], # cat backbone P3 [-1, 3, C3, [256, False]], # 17 (P3/8-small) [-1, 1, Conv, [256, 3, 2]], [[-1, 14], 1, Concat, [1]], # cat head P4 [-1, 3, C3, [512, False]], # 20 (P4/16-medium) [-1, 1, Conv, [512, 3, 2]], [[-1, 10], 1, Concat, [1]], # cat head P5 [-1, 3, C3, [1024, False]], # 23 (P5/32-large) [[17, 20, 23], 1, Detect, [nc, anchors]], # Detect(P3, P4, P5) ] -
训练模型
# 参数可根据实际情况进行调整,这里注意各个文件的位置,如果是cpu,建议将batch调小,我设置的是1 python train.py --img 640 --batch 4 --epoch 300 --data ./data/hzp.yaml --cfg ./models/yolov5s.yaml --weights data/yolov5s.pt --workers 0 -
复制一份detect.py ,修改test_photo.py,后直接python test_photo.py 即可
def parse_opt(): parser = argparse.ArgumentParser() # 此处修改成你训练的模型 parser.add_argument('--weights', nargs='+', type=str, default='runs/train/exp2/weights/best.pt', help='model.pt path(s)') # 此处修改成你要检测的照片 parser.add_argument('--source', type=str, default='test_img/images', help='file/dir/URL/glob, 0 for webcam') parser.add_argument('--imgsz', '--img', '--img-size', type=int, default=640, help='inference size (pixels)') parser.add_argument('--conf-thres', type=float, default=0.25, help='confidence threshold') parser.add_argument('--iou-thres', type=float, default=0.45, help='NMS IoU threshold') parser.add_argument('--max-det', type=int, default=1000, help='maximum detections per image') parser.add_argument('--device', default='', help='cuda device, i.e. 0 or 0,1,2,3 or cpu') parser.add_argument('--view-img', action='store_true', help='show results') parser.add_argument('--save-txt', action='store_true', help='save results to *.txt') parser.add_argument('--save-conf', action='store_true', help='save confidences in --save-txt labels') parser.add_argument('--save-crop', action='store_true', help='save cropped prediction boxes') parser.add_argument('--nosave', action='store_true', help='do not save images/videos') parser.add_argument('--classes', nargs='+', type=int, help='filter by class: --class 0, or --class 0 2 3') parser.add_argument('--agnostic-nms', action='store_true', help='class-agnostic NMS') parser.add_argument('--augment', action='store_true', help='augmented inference') parser.add_argument('--update', action='store_true', help='update all models') # 存放的文件夹 parser.add_argument('--project', default='runs/detect', help='save results to project/name') # 存放默认名字exp parser.add_argument('--name', default='exp', help='save results to project/name') parser.add_argument('--exist-ok', action='store_true', help='existing project/name ok, do not increment') parser.add_argument('--line-thickness', default=3, type=int, help='bounding box thickness (pixels)') parser.add_argument('--hide-labels', default=False, action='store_true', help='hide labels') parser.add_argument('--hide-conf', default=False, action='store_true', help='hide confidences') parser.add_argument('--half', action='store_true', help='use FP16 half-precision inference') opt = parser.parse_args() return opt -
命令窗口中 测试命令可以对图片和视频进行检测
# 使用训练好的模型测试test_img文件夹里面的照片 python test_photo.py --source test_img/images/cup.jpg --weights runs/train/exp2/weights/best.pt --img 640 # 视频测试,和图片一致 python detect.py --source inference/2.mp4 --weights runs/exp27/weights/best.pt --output inference/detectoutput/ --device 0 # 图片目录检测(暂时未使用) python detect.py --source inference/test --weights runs/exp27/weights/best.pt --output inference/detectoutput --conf-thres 0.5 -
测试效果(测试口红检测效果)
-
参考文章链接
https://blog.csdn.net/qq_45359151/article/details/107591434
https://www.icode9.com/content-3-774443.html
https://www.cnblogs.com/monologuesmw/p/14465254.html


