数据压缩——JPEG原理分析及JPEG解码器的调试
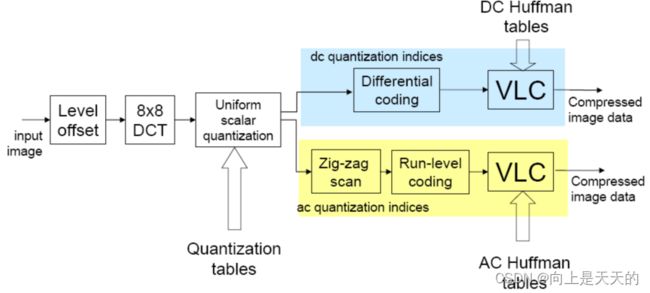
JPEG编解码原理
level off(零偏置)
· 对于灰度级是2n的像素,通过减去2n-1,将无符号的整数值变成有符号数;
· 对于n=8,即将0~ 255的值域,通过减去128,转换为值域在-128~ 127之间的值。
· 目的:使像素的绝对值出现3位10进制的概率大大减少。
8×8 DCT
· 把整个分量图像分成8×8的图像块,再以8×8的图像块为一个单位进行量化和编码处理。
· 目的:去相关,能量集中
图像使用二维DCT变换,其核矩阵为:
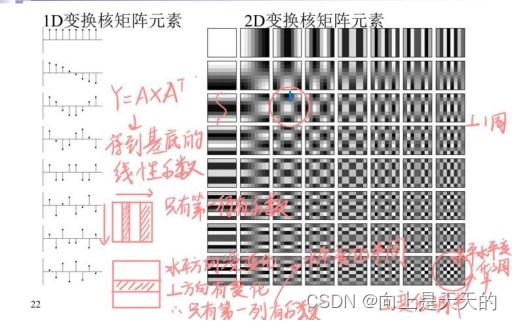
输入图像通过与2D变换核矩阵做矩阵相乘得到DCT系数,系数矩阵反应了输入图像的变化性质
量化
· 采用中平均匀量化器;
· 按照【系数所在位置和颜色分量】来确定量化步距;
· 由人眼对亮度信号比对色度信号更敏感,选择两种量化表:亮度量化表,色度量化表;
· 根据人眼视觉特性:对低频变化敏感于高频变化,采用低频细量化,高频粗量化;
· 真正的量化表=缩放因子×基本量化表
质量因子越大,缩放因子越小,量化表量化步长小,压缩程度小
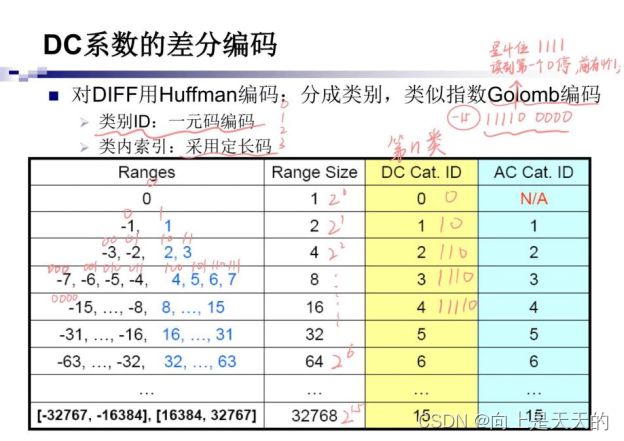
DC系数的差分编码
· 8×8图像块经过DCT变换后得到的DC系数有两个特点:
系数数值比较大;
相邻 8×8 图像块的DC系数值变化不大——冗余
· 根据这个特点,JPEG算法使用了DPCM技术,对相邻图像块之间量化DC系数的差值DIFF进行Huffman编码:
AC系数的zizag(之字扫描)
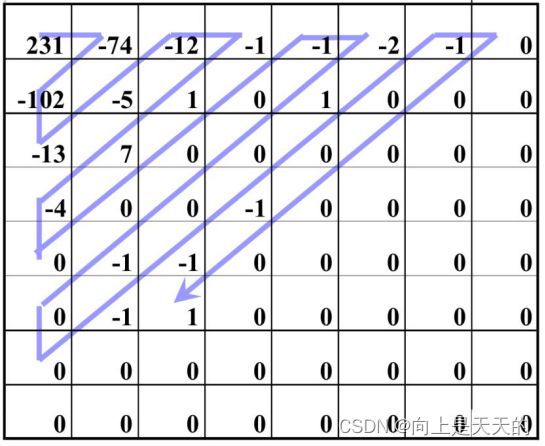
由于经过DCT变换后,系数大多数集中在左上角,即低频分量区,因此采用z字形按频率由低到高的顺序读出,可以出现很多连零的机会。最后,如果都是0,则给出EOB即可。
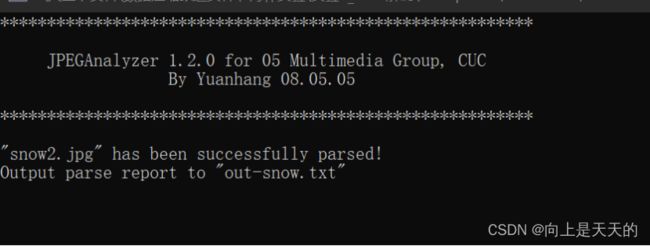
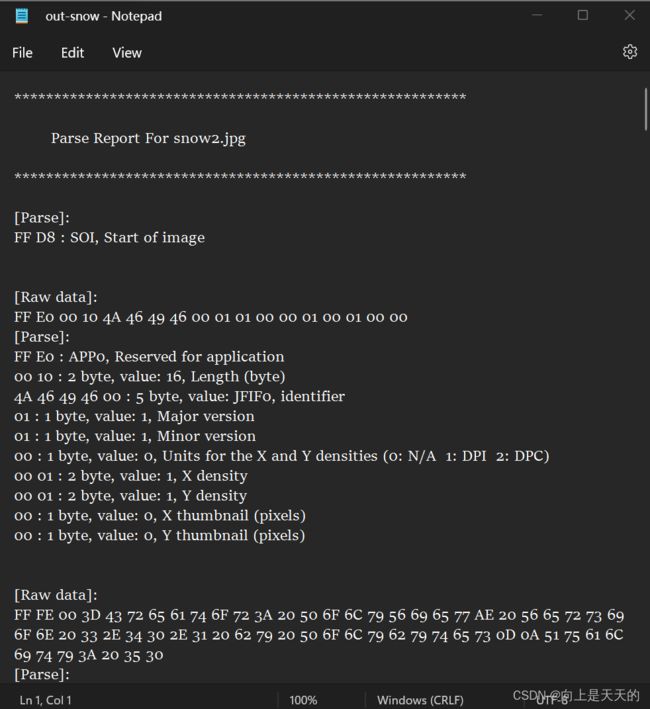
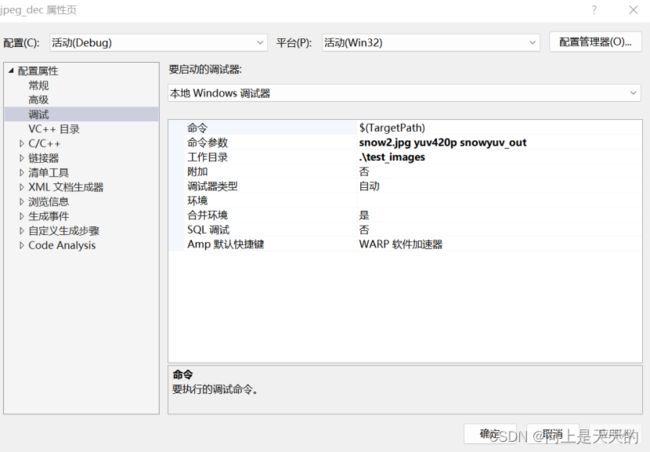
调试 JPEGParser程序
解码JPEG
三个结构体设计目的
- struct huffman_table
快查找和慢查找两种方式,提高编码效率
struct huffman_table
{
  /* Fast look up table, using HUFFMAN_HASH_NBITS bits we can have directly the symbol,
  * 快查找表,根据HUFFMAN_HASH_NBITS可以快速找到符号
   * if the symbol is <0, then we need to look into the tree table
   符号<0,使用慢查找表*/
  short int lookup[HUFFMAN_HASH_SIZE];//得到权值对应的码字
  /* code size: give the number of bits of a symbol is encoded */
  unsigned char code_size[HUFFMAN_HASH_SIZE];//得到权值对应的码长
  /* some place to store value that is not encoded in the lookup table
   * FIXME: Calculate if 256 value is enough to store all values
   计算256个值是否足够存储需要存储的所有值*/
  uint16_t slowtable[16-HUFFMAN_HASH_NBITS][256];
};
- struct component
保存一个MCU的信息,处理完一个MCU,值更新一次。
struct component
{
  unsigned int Hfactor;//水平采样
  unsigned int Vfactor;//垂直采样
  float *Q_table;		/* Pointer to the quantisation table to use指向使用的量化表 */
  struct huffman_table *AC_table; //Huffman AC系数表
  struct huffman_table *DC_table;//Huffman DC系数表
  short int previous_DC;	/* Previous DC coefficient 上一个DC系数 */
  short int DCT[64];		/* DCT coef *///该块的DCT系数,DCT[0]为该块直流,其他为交流
#if SANITY_CHECK
  unsigned int cid;
#endif
};
- struct jdec_private
文件解码信息结构体
struct jdec_private
{
  /* Public variables */
  uint8_t *components[COMPONENTS];//分别指向YUV分量结构体的指针数组
  unsigned int width, height;	/* Size of the image 图像宽高*/
  unsigned int flags;

  /* Private variables */
  const unsigned char *stream_begin, *stream_end; //码流开始,结束指针
  unsigned int stream_length; //码流长度

  const unsigned char *stream;	/* Pointer to the current stream 指向当前码流位置*/
  unsigned int reservoir, nbits_in_reservoir;

  struct component component_infos[COMPONENTS];
  float Q_tables[COMPONENTS][64];		/* quantization tables */
  struct huffman_table HTDC[HUFFMAN_TABLES];	/* DC huffman tables   */
  struct huffman_table HTAC[HUFFMAN_TABLES];	/* AC huffman tables   */
  int default_huffman_table_initialized; //预初始化值
  int restart_interval;
  int restarts_to_go;				/* MCUs left in this restart interval */
  int last_rst_marker_seen;			/* Rst marker is incremented each time 重新开始的位置每次递增 */

  /* Temp space used after the IDCT to store each components */
  uint8_t Y[64*4], Cr[64], Cb[64];//反DCT后三个分量的数组

  jmp_buf jump_state;
  /* Internal Pointer use for colorspace conversion, do not modify it !!! */
  uint8_t *plane[COMPONENTS];

};
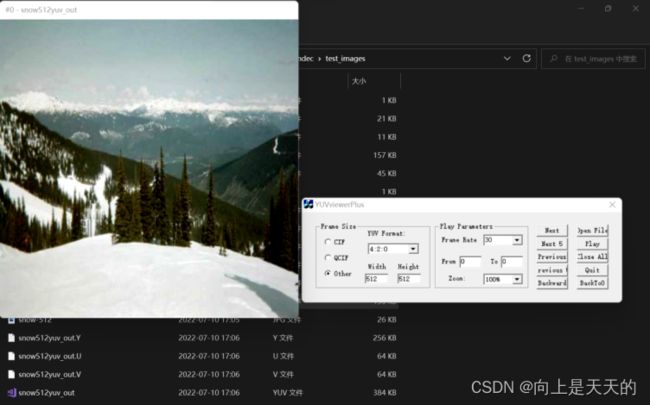
调试程序输出YUV格式
TRACE的作用
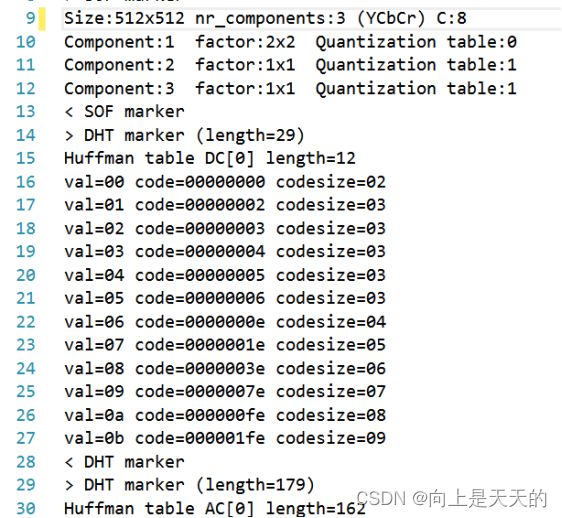
打开trace_jpeg.txt
其包含了图像的宽高信息,文件大小,及Huffman码表等信息
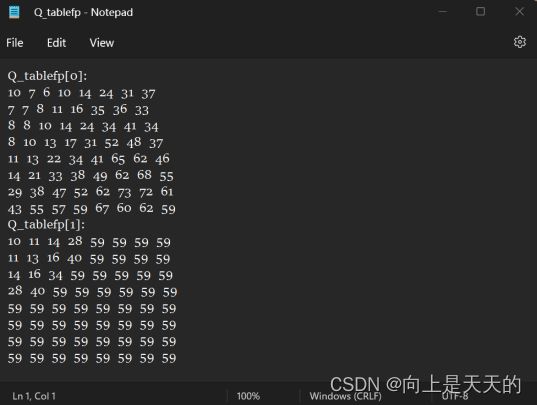
输出量化矩阵
- 类比tracejpeg.txt的代码,在 tinyjpeg.h 中增加文件指针Q_tablefp

- 在结尾加QFILE定义,输出的文件命名为“Q_tablefp.txt”

- 在loadjpeg.c的主函数仿照p_trace,将量化表信息写入txt文件
#if TRACE
  p_trace=fopen(TRACEFILE,"w");
  //添加一个Q_tablefp量化表的写入
  Q_tablefp= fopen(QFILE, "w");
  if (p_trace==NULL)
  {
	  printf("trace file open error!");
  }
  if (Q_tablefp == NULL)
  {
      printf("Quantization file open error!");
  }
#endif
- 在tinyjpeg.c中添加代码:
static void build_quantization_table(float *qtable, const unsigned char *ref_table)
{
  int i, j;
  static const double aanscalefactor[8] = {
     1.0, 1.387039845, 1.306562965, 1.175875602,
     1.0, 0.785694958, 0.541196100, 0.275899379
  };
  const unsigned char *zz = zigzag;

  for (i=0; i<8; i++) {
     for (j=0; j<8; j++) {
       *qtable++ = ref_table[*zz++] * aanscalefactor[i] * aanscalefactor[j];
     }
   }
//添加部分:
#if TRACE
      for (i = 0; i < 8; i++)
      {
          for (j = 0; j < 8; j++)
          {
              if (j == 7)
              {
                  fprintf(Q_tablefp, "%d\n", (int)ref_table[zigzag[i * 8 + j]]);
                  //到第八个数时换行,其余空格即可
              }
              else
              {
                  fprintf(Q_tablefp, "%d  ", (int)ref_table[zigzag[i * 8 + j]]);
              }
          }
      }
#endif
}
- 函数 parse_DQT 中添加:
#if SANITY_CHECK
     if (qi>>4)
       snprintf(error_string, sizeof(error_string),"16 bits quantization table is not supported\n");
     if (qi>4)
       snprintf(error_string, sizeof(error_string),"No more 4 quantization table is supported (got %d)\n", qi);
#endif
//添加部分:
#if TRACE
     fprintf(Q_tablefp, "Q_tablefp[%d]:\n", qi); //码表显示格式
#endif
DC,AC图像及概率分布
图像
#include "tinyjpeg.h"
#include "tinyjpeg-internal.h"
#define  snprintf _snprintf
//添加部分:
unsigned char* DC_;
unsigned char* AC_;
unsigned char* UV_;
int i;
int count = 0;
//
	DC_ = (unsigned char*)malloc(1);
  AC_ = (unsigned char*)malloc(1);
  UV_ = (unsigned char*)malloc(1);
  *UV_ = 128;
  count++;
  *DC_ = (unsigned char)((priv->component_infos->DCT[0] + 512.0) / 4 + 0.5);
  fwrite(DC_, 1, 1, DC);
  *AC_ = (unsigned char)(priv->component_infos->DCT[1] + 128);
  fwrite(AC_, 1, 1, AC);
#if TRACE
  fprintf(p_trace,"Input file size: %d\n", priv->stream_length+2);
  fprintf(p_trace,"Input bytes actually read: %d\n", priv->stream - priv->stream_begin + 2);
  fflush(p_trace);
#endif
  for (i = 0; i < count / 4 * 2; i++)
  {
      fwrite(UV_, sizeof(unsigned char), 1, DC);
      fwrite(UV_, sizeof(unsigned char), 1, AC);
  }
  return 0;
- 在loadjpeg.c中写入文件:
 DC = fopen(DCFILE, "wb");
 AC = fopen(ACFILE, "wb");
- 关闭文件
#if TRACE
  fclose(p_trace);
  fclose(AC);
  fclose(DC);
#endif
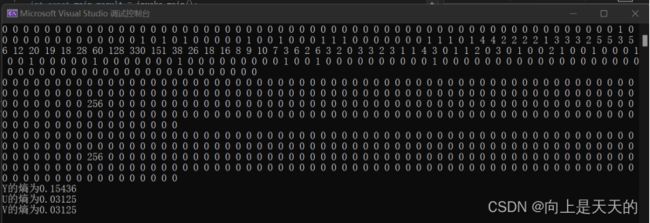
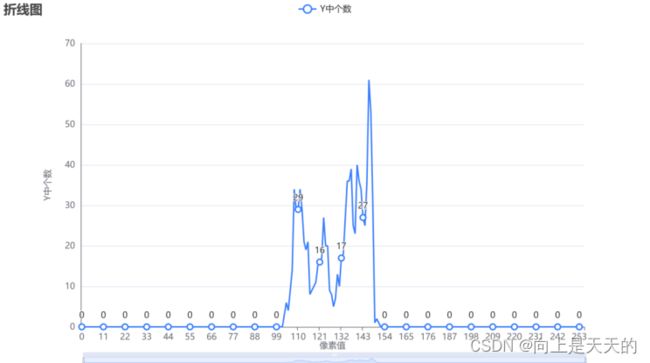
统计DC图像,AC图像的概率分布
修改实验一中求熵的代码:
#includeDC系数统计结果
| Y | U | V |
|---|---|---|
 |
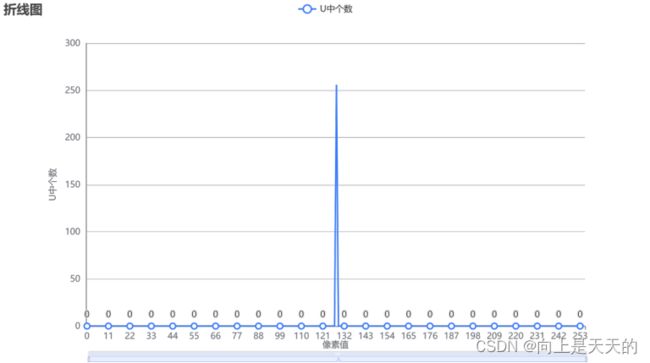 |
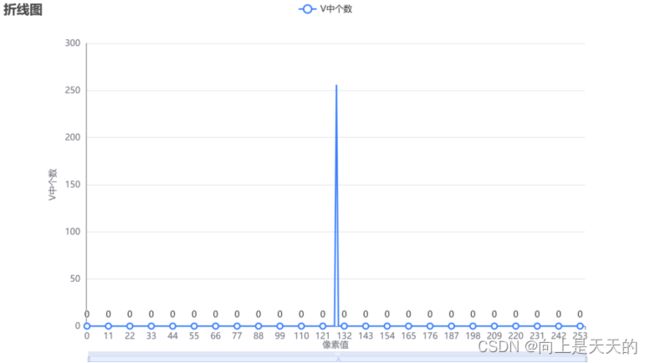 |
AC系数统计结果
| Y | U | V |
|---|---|---|
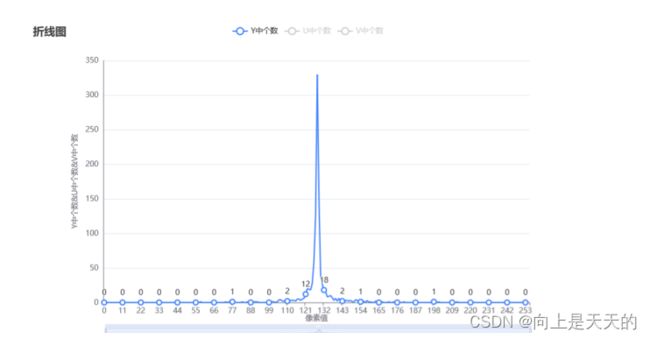 |
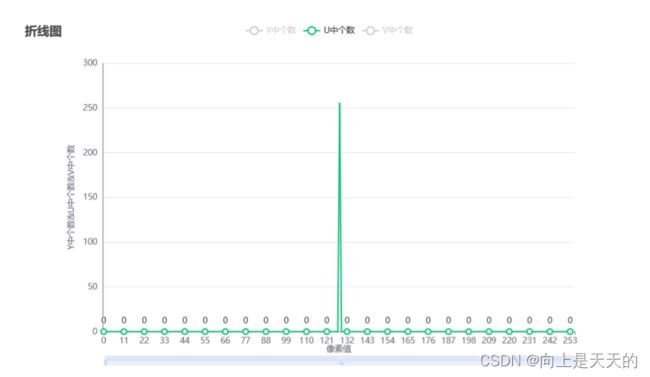 |
 |
参考
- https://blog.csdn.net/weixin_48930495/article/details/117791055
- https://blog.csdn.net/yee_0217/article/details/72846107
- https://blog.csdn.net/weixin_53323848/article/details/117635923
