(pytorch进阶之路六)Swin Transformer实现
写在前面:刚好吃了宵夜,写bug写到凌晨3点,那就顺便一口气搞完它吧
工程项目代码,单元测试太重要,不然bug无从下手改,只能一点一点拆分出检测单元了…
文章目录
- 大致思想
- 论文地址
- Patch embedding
- MHSA-多头自注意力机制
- W-MHSA Window MHSA
- SW-MHSA Shift Window MHSA
- Patch Merging
- 构建SwinTransformerBlock
- 构建SwinTransformerModel
- 完整代码
大致思想
如果想详细的看还是得看论文《Swin Transformer: Hierarchical Vision Transformer using Shifted Windows》
Swin是shift和window两个单词的结合
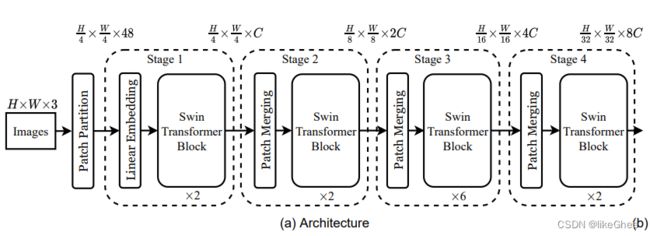
Swin-T主要有4个点,patch embedding,Swin Transformer Block,patch merging, classification
Swin-T对复杂度和效果都做了优化,CV和NLP领域效果都很好,对未来多模态方向提供方便
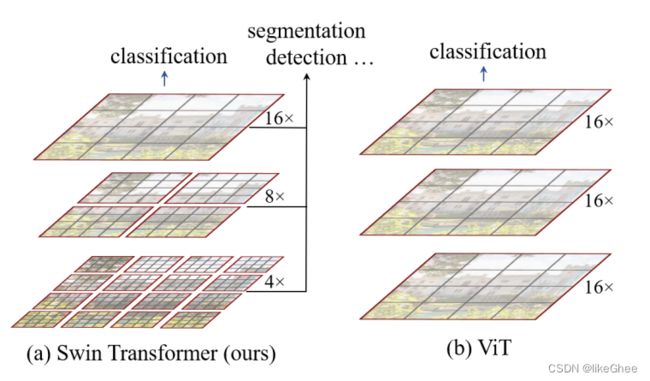
提出了层级式(Hierarchical )transformer,表征通过shifted windows计算得到,shifted windows一方面将自注意力的计算限制在没有交叠的窗口内(把几个patch构成一个window,一个图像划分成几个window,在window内部单独计算自注意力),每个window内的self attention的复杂度和window内的patch数目成平方关系,window数目和图片大小呈线性关系,总体上来说将复杂度从平方关系降低到了线性关系,另一方面通过shifted window计算到了window和window之间的融合

模型结构
第一步,将RBG图下行分割成互不交叠的块(patch),和VIT中做法一样,patch是由多个像素点的通道值所构成的连续性的向量,举个例子,一个patch中有9个像素点的话,通道数(RGB)是3,那么就有3 * 9个值
为了得到patch embedding还要经过一个线性层(MLP)映射到长度维C的新的向量上,C就当作patch的embedding dim,新的向量作为patch的表征
第二步,运用多个不同的Transformer block到patch embedding之上,维持了token数目不变,就是说有几个像素,这个阶段还是只有几个像素,只有到了patch merging阶段token数才进行改变
第三步,进入patch merging层,2×2patch变成1个patch,为了达到类似金字塔状的表征,经过patch merging层时patch数目减少1/4,也就是说随着网络越来越深,patch的数目是越来越少的,同时4个patch拼接成emb dim,也就是emb dim增大了4倍,但是又通过MLP将4倍的dim减少了一半,变成2倍的dim

Swin transformer block 细节部分
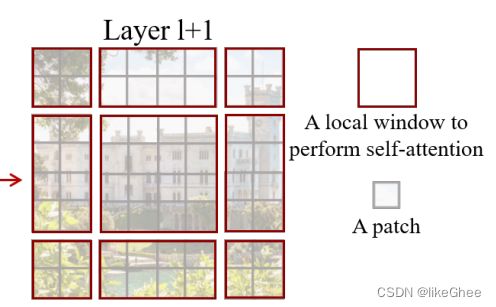
每个Swin transformer block包含两个小层,第一个小层是一个带窗的self attention,窗和窗之间不重叠

第二层是shifted window,为的是窗和窗之间也能建立连接,将window稍微平移了一下,就是将窗格子往左往下移动1/2个窗程,那么我们就重新组织了9个新的window,在窗内计算自注意力
(其实最完美的连接性就是不带窗嘛,退化成VIT,但好处是降低了复杂度)

论文地址
https://openaccess.thecvf.com/content/ICCV2021/papers/Liu_Swin_Transformer_Hierarchical_Vision_Transformer_Using_Shifted_Windows_ICCV_2021_paper.pdf
里面有源码github地址
Patch embedding
如何基于图片生成patch embedding?
方法一
· 基于pytorch unfold的API来将图片进行分块,也就是模仿卷积矩阵乘法的思路,设置kernel_size=stride=patch_size,得到分块后的图片就是没有交叠的,得到格式为[bs, num_patch, patch_depth]的张量
patch_depth = channel × patch_size × patch_size
· 得到张量以后将张量与形状为[patch_depth, model_dim_C)的权重矩阵进行乘法操作,即可得到形状为[bs, num_patch, model_dim_C)的patch embedding
def image2emb_naive(image, patch_size, weight):
    # image shape [bs, c, h, w]
    # patch [bs, num_patch, patch_depth]
    patch = F.unfold(image, kernel_size=(patch_size, patch_size),
                     stride=(patch_size, patch_size)).transpose(-1, -2)
    patch_emb = patch @ weight # [bs, num_patch, model_dim]
    return patch_emb
方法二
patch_depth = channel × patch_size × patch_size
· model_dim_C看作输出通道数,设置kernel为[model_dim_C, input_channel, patch_size, patch_size]
· 调用PyTorch的conv2d API得到卷积的输出张量,形状为[bs, output_channel, patch_size, patch_size]
· 转换为[bs, num_patch, model_dim_C]的格式,即为patch embedding
def image2emb_conv(image, kernel):
    # image shape [bs, ic, h, w]
    # kernel shape [model_dim_C, input_channel, patch_size, patch_size]
    stride = kernel.shape[0]
    output = F.conv2d(image, kernel, stride=stride) # [bs, oc, oh, ow]
    bs, oc, oh, ow =  output.shape
    patch_emb = output.reshape([bs, oc, oh*ow]).transpose(-1, -2)
    return patch_emb
MHSA-多头自注意力机制
对输入的x进行3次MLP,映射分别得到q,k,v
仍然是model_dim到model_dim的映射
不考虑bs,这一步的复杂度为3LCC, L为序列长度,C为特征大小,L = patch总数,C = emb_size
因为[L, C] @ [C, C] 复杂度为L·C·C
将qkv拆分成多头的形式,n=多头数目,将C拆分成C/n
头与头之间不进行self attention计算,多头其实可以看作是batch是一个维度的,因此多头不影响复杂度
计算qk^T,q = [L, C], k^T=[C, L], [L, C] @ [C, L] 复杂度为L·C·L
算qk^T 要考虑掩码,mask让无效位置的能量变为负无穷,mask将在shift window时需要,window MHSA时暂不需要
计算softmax概率后与v相乘,softmax概率 = [L, L],v=[L, C],复杂度为L·L·C
最后再进行一步MLP层,[L, C] @ [C, C],复杂度为LCC
总体复杂度为4LCC + 2LLC
定义两线性层,进行3次MLP完全可以用一个线性层代替,输出的维度写成3×model_dim即可,再拆解成qkv,第二个就是最终输出的映射层
class MultiHeadSelfAttention(nn.Module):
    """
    输入input [bs, num_seq, model_dim]
    input 映射 -> q k v [bs, num_seq, model_dim]
    计算 probability
    输出 v * prob, 输出shape:[bs, num_seq, model_dim]
    """
    def __init__(self, model_dim, num_head):
        super(MultiHeadSelfAttention, self).__init__()
        self.model_dim = model_dim
        self.num_head = num_head
        # qkv映射MLP
        self.proj_linear_layer = nn.Linear(model_dim, 3*model_dim)
        self.final_linear_layer = nn.Linear(model_dim, model_dim)

    def forward(self, inp, additive_mask=None):
        bs, seq_len, model_dim = inp.shape
        num_head = self.num_head
        head_dim = model_dim // num_head

        # qkv映射
        proj_output = self.proj_linear_layer(inp)
        # chunk 对最后一维度进行拆分成3份,qkv
        q, k, v = proj_output.chunk(3, dim=-1)  # [bs, T, model_dim]
        # print(q.shape, k.shape, v.shape)

        # 将qkv转为多头形式
        q = q.reshape([bs, seq_len, num_head, head_dim]).transpose(1, 2)
        q = q.reshape([bs*num_head, seq_len, head_dim])

        k = k.reshape([bs, seq_len, num_head, head_dim]).transpose(1, 2)
        k = k.reshape([bs*num_head, seq_len, head_dim])

        v = v.reshape([bs, seq_len, num_head, head_dim]).transpose(1, 2)
        v = v.reshape([bs*num_head, seq_len, head_dim])

        if additive_mask is None:
            prob = torch.bmm(q, k.transpose(-1, -2))
            prob = prob / math.sqrt(head_dim)
            prob = F.softmax(prob, dim=-1)
        else:
            # 对mask扩充num_head倍,因为计算mask没有考虑头数
            additive_mask = additive_mask.tile([num_head, 1, 1])
            prob = torch.bmm(q, k.transpose(-1, -2))
            prob = (prob / math.sqrt(head_dim)) + additive_mask
            prob = F.softmax(prob, dim=-1)

        output = torch.bmm(prob, v)  # [bs*num_head, seq_len, head_dim]
        # 拆开多头
        output = output.reshape([bs, num_head, seq_len, head_dim])
        output = output.transpose(1, 2)
        output = output.reshape([bs, seq_len, model_dim])

        output = self.final_linear_layer(output)

        return prob, output
W-MHSA Window MHSA
如何构建Window MHSA并计算其复杂度?
之前我们构建好了patch_emb,将patch_emb传入W-MHSA层
MHSA层执行步骤:
1. 将patch组成的图片进一步划分成一个个更大的window
需要将三维的patch embedding转换成图片格式[bs, num_patch, model_dim_C] -> [bs, c, h, w]
h × w = num_patch
model_dim_C看作是通道数c
2. 使用unfold来将patch划分成window
kernel_size = window_size
stride_size = window_size
3. 调用MSHA层在每个window内部计算MHSA
window与window之间没有交互计算,
因此window数目维度可以跟batch size维度进行统一对待。
· 关于计算复杂度
我们知道多头自注意力机制复杂度是4LCC + 2LLC,L是patch总数。假设窗的边长为W,那么WW就是面积,将WW看作L,则每个窗的总体复杂度是per_w_cplx = 4WWCC+2W^4C
patch的总数目为L,WW是窗面积,那么窗的数目为num_win = L / WW
因此,Window-HMSA的总体复杂度为total_cplx = cplx × num_win
每个窗内的所有patch和每个patch之间都有关联性的,因此不需要mask
将计算结果转换成带window的四维张量格式。
复杂度对比
· MHSA:4LCC+2LLC
· Window-MHSA: 4LCC+ 2LWWC
现在发现W-MHSA是和L呈线性关系,W和C都可以看作常量,MHSA是和L呈平方关系,因此W-MHSA在复杂度上做了优化
def window_multi_head_self_attention(
        patch_emb,
        mhsa,
        window_size,
):
    """
    patch_emb: 输入: [bs, num_patch, patch_depth]
    mhsa: 实例化好的多头自注意力机制
    window_size: window边长
    输出:[bs, num_window, num_patch_in_window, patch_dim]
        其中 num_window, num_patch_in_window = num_patch
    """
    num_patch_in_window = window_size * window_size
    bs, num_patch, patch_depth = patch_emb.shape
    image_h = image_w = int(math.sqrt(num_patch))

    # 将patch emb转化为image形式
    patch_emb = patch_emb.transpose(-1, -2)
    # 图片形式,patch_depth视为channel
    patch = patch_emb.reshape([bs, patch_depth, image_h, image_w])
    # window: [bs, num_window = (image_h/4)^2, window_depth = window_size^2 * patch_depth]
    window = F.unfold(patch, kernel_size=window_size, stride=window_size)\
        .transpose(-1, -2)

    bs, num_window, patch_depth_times_num_patch_in_window = window.shape
    # 因为窗和窗之间是独立的,bs可以和窗数量维度合并
    # window [bs*num_window, num_patch_in_window, patch_depth]
    window = window.reshape([bs*num_window, patch_depth,
                             num_patch_in_window]).transpose(-1, -2)

    # 计算window内的多头自注意力机制
    attention_prob, output = mhsa(window)
    # 拆成4维的window格式
    output = output.reshape([bs, num_window, num_patch_in_window, patch_depth])

    return attention_prob, output
SW-MHSA Shift Window MHSA
如何构建Shift Window MHSA及其Mask?
W-MHSA结果:[bs, num_window, num_patch_in_window, patch_depth]
1. 将上一步的W-MHSA的结果转换成图片格式 -> [bs, c, h, w]
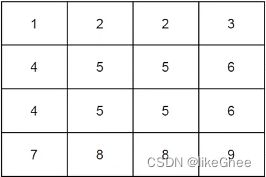
2. 假设我们进行了shift-window做了新的window划分,划分新的window有9个区域

3. 为了保持window数目不变从而有高效的计算,需要将shift-window后的图片的patch往左和往上各自滑动(cycle shift)半个面口大小的步长,这样做的好处是仍然保持4个2×2的window,但是有些window中的patch是属于不同类的,比如6和4之间不需要计算MHSA的,6只和6发生作用,4只和4发生作用,那么这个时候我们就需要引入一个4×4的mask,有4行,每行分别表示每个patch与其他patch的关联性

如何生成mask?
1. 首先构建—个shift-window的patch所属的window类别矩阵
2. 对该矩阵进行同样的往左和往上各自滑动半个窗口大小的步长的操作
3. 通过unfold操作得到[bs, num_window, num_patch_in_window]形状的类别矩阵
4. 对该矩阵进行扩维成[bs, num_window, num_patch_in_window,1]的4维张量
5. 将该矩阵与其转置矩阵进行作差,a - a^T,得到同类关系矩阵(元素为0的位置上的patch属于同类,否则属于不同类)
对同类关系矩阵中非零的位置用负无穷数进行填充,对于零的位置用0去填充,这样就构建好了MHSA所需要的masK
此mask的形状为[bs, num_window, num_patch_in_window, num_patch_in_window]
6. 将window转换成三维的格式的特征,[bs*num_window, num_patch_in_window, patch_depth]
7. 将三维格式的特征连同mask一起送入MHSA中计算得到注意力输出
8. 将注意力输出转换成图片patch格式。[bs, num_window, num_patch_in_window, patch_depth]
9. 为了恢复位置,需要将图片的patch往右和往下各自滑动半个窗口大小的步长,至此,SW-MHSA计算完毕
def window2image(msa_output):
    """
    输入:[bs, num_window, num_patch_in_window, patch_depth]
    输出:[bs, c, image_h, image_w]
    其中:
            c = patch_depth
            image_h = int(math.sqrt(num_window)) * int(math.sqrt(num_patch_in_window))
            image_w = image_h
    """
    bs, num_window, num_patch_in_window, patch_depth = msa_output.shape
    window_size = int(math.sqrt(num_patch_in_window))
    image_h = image_w = int(math.sqrt(num_window)) * window_size

    msa_output = msa_output.reshape([
        bs,
        int(math.sqrt(num_window)),
        int(math.sqrt(num_window)),
        window_size,  # window_size * window_size = num_patch_in_window
        window_size,
        patch_depth
    ])
    msa_output = msa_output.transpose(2, 3)

    # 转化为三维格式
    image = msa_output.reshape([bs, image_h * image_w, patch_depth])
    image = image.transpose(-1, -2)
    image = image.reshape([bs, patch_depth, image_h, image_w])

    return image


def build_mask_for_shifted_window_mhsa(
            bs,
            image_h,
            image_w,
            window_size
        ):
    """
    1.  首先构建—个shift-window的patch所属的window类别矩阵
        类别矩阵 index_matrix:
            1 2 2 3
            4 5 5 6
            4 5 5 6
            7 8 8 9
        类别矩阵含有9个window区域

    2.  对类别矩阵进行往左和往上各自滑动半个窗口大小的步长的操作

    3. 通过unfold操作得到[bs, num_window, num_patch_in_window]形状的类别矩阵

    4.  对该矩阵进行扩维成[bs, num_window, num_patch_in_window,1]的4维张量

    5. 将该矩阵与其转置矩阵进行作差,a - a^T,得到同类关系矩阵(元素为0的位置上的patch属于同类,
    否则属于不同类)

    对同类关系矩阵中非零的位置用负无穷数进行填充,对于零的位置用0去填充,
    这样就构建好了MHSA所需要的masK

    output:[bs*num_window,
            num_patch_in_window,
            num_patch_in_window]
    """
    index_matrix = torch.zeros(image_h, image_w)

    for i in range(image_h):
        for j in range(image_w):
            # 按window_size区块划分行的序号
            row_times = (i + window_size//2) // window_size
            # 按window_size区块划分列的序号
            col_times = (j + window_size//2) // window_size
            # row_times*(image_h // window_size) 上面若干行总共经过了多少区块
            index_matrix[i, j] = row_times*(image_h // window_size) + col_times + row_times + 1

    # print(index_matrix, "# index_matrix")  # 调试代码

    # 让类别矩阵向左向上滑动半个窗程
    rolled_index_matrix = torch.roll(index_matrix,
                                     shifts=(-window_size//2, -window_size//2),
                                     dims=(0, 1))
    # print(rolled_index_matrix, "# rolled_index_matrix")  # 调试代码

    # 引入bs和channel维度 [bs, ch, h, w]
    rolled_index_matrix = rolled_index_matrix.unsqueeze(0).unsqueeze(0)

    # 按照标准形式去划分窗口 c: [bs, num_window, num_patch_in_window]
    unfold_rolled_index_matrix = \
        F.unfold(rolled_index_matrix, kernel_size=window_size,
                 stride=window_size).transpose(-1, -2).tile(bs, 1, 1)

    # print("unfold_rolled_index_matrix: \n", unfold_rolled_index_matrix)  # 调试代码

    bs, num_window, num_patch_in_window = unfold_rolled_index_matrix.shape
    # 扩一维 c:[bs, num_window, num_patch_in_window,1]
    c1 = unfold_rolled_index_matrix.unsqueeze(-1)

    valid_matrix = ((c1 - c1.transpose(-1, -2)) == 0).to(torch.float32)
    # 不属于同一个窗口的转化成负无穷
    additive_mask = (1 - valid_matrix) * (-1e9)

    # print(additive_mask, "# additive_mask")  # 调试代码

    additive_mask = additive_mask.reshape(bs*num_window,
                                          num_patch_in_window,
                                          num_patch_in_window)

    return additive_mask


def shift_window(
        w_msa_output,
        window_size,
        shift_size,
        generate_mask=True):
    """辅助shift window函数,高效计算sw msa
    输入:w_mhsa_output: [bs, num_window, num_patch_in_window, patch_depth]
    输出:shift_window_output:[ bs, num_window,
                               num_patch_in_window, patch_depth]

         mask: [ bs*num_window,
                 num_patch_in_window,
                 num_patch_in_window] if generate_mask==True
    """
    bs, num_window, num_patch_in_window, patch_depth = w_msa_output.shape
    # 转换为image形式
    w_msa_output = window2image(w_msa_output)
    bs, patch_depth, image_h, image_w = w_msa_output.shape

    # 把图片的h,w维度往左和往上滑动半个窗程
    rolled_w_msa_output = torch.roll(
        w_msa_output,
        shifts=(shift_size, shift_size),
        dims=(2, 3)
    )
    # 再把shift后图片还原成patch格式
    shifted_w_msa_input = rolled_w_msa_output.reshape([
        bs,
        patch_depth,
        int(math.sqrt(num_window)),
        window_size,
        int(math.sqrt(num_window)),
        window_size,
    ])

    shifted_w_msa_input = shifted_w_msa_input.transpose(3, 4)

    shifted_w_msa_input = shifted_w_msa_input.reshape([
        bs,
        patch_depth,
        num_window * num_patch_in_window
    ])

    shifted_w_msa_input = shifted_w_msa_input.transpose(-1, -2)

    shifted_window = shifted_w_msa_input.reshape([
        bs,
        num_window,
        num_patch_in_window,
        patch_depth
    ])

    if generate_mask:
        additive_mask = build_mask_for_shifted_window_mhsa(
            bs,
            image_h,
            image_w,
            window_size
        )
    else:
        additive_mask = None

    return shifted_window, additive_mask


def shift_window_multi_head_self_attention(
        w_msa_output,
        mhsa,
        window_size,
):
    bs, num_window, num_patch_in_window, patch_depth = w_msa_output.shape
    # 对patch进行shift,向左上角滑动
    shifted_w_msa_input, additive_mask = shift_window(
        w_msa_output,
        window_size,
        shift_size=-window_size//2,
        generate_mask=True
    )
    # 转换成mhsa所需要的格式 [bs, seq_len, dim]
    shifted_w_msa_input = shifted_w_msa_input.reshape([bs*num_window,
                                                       num_patch_in_window,
                                                       patch_depth])
    # 计算shift mhsa, output: [bs, seq_len, dim]
    prob, output = mhsa(shifted_w_msa_input,
                        additive_mask=additive_mask)

    output = output.reshape([bs, num_window, num_patch_in_window, patch_depth])

    # 最后反shift一下,向右下角滑动
    output, _ = shift_window(output, window_size, shift_size=window_size//2,
                             generate_mask=False)
    return output
Patch Merging
如何构建Patch Merging?
将window格式的特征转换或图片格式
merge_size表示将多少乘多少的patch浓缩乘一个patch
利用unfold操作,按照merge_size * merge_size的大小得到新的patch, 形状为[bs, num_patch_new, merge_ size * merge size * patch_depth_old]
使用一个全连接层对depth进行降维成0.5倍,也就是从merge_ size * merge size * patch_depth_old映射到0.5 * merge_ size * merge size * patch_depth_old
输出的是patch embedding的形状格式,[bs,num_patch, patch_depth]
举例说明: 以merge_size=2为例,经过PatchMerging后,patch数目减少为之前的1/4,但是depth增大为原来的2倍,而不是4倍
class PatchMerging(nn.Module):
    """
    merge_size: 表示将merge_size乘merge_size的patch浓缩乘一个patch,
                假设merge_size=2,则patch数目减少为原来的1/4
    model_dim: 用来构建线性层,线性层参数
    output_depth_scale: 用来构建线性层,线性层参数
        用于构建线性层:
            nn.Linear(
                model_dim * merge_size * merge_size,
                int(model_dim * merge_size * merge_size * output_depth_scale)
            )
    输入: sw_block_out: [bs, num_window, num_patch_in_window, patch_depth]
    输出: output: [bs, T, dim]
        其中:T = num_window * num_patch_in_window / merge_size^2
             dim = patch_depth * merge_size^2 * output_depth_scale

    如何构建Patch Merging?
        1.将window格式的特征转换或图片image格式
            window格式的特征: [bs, num_patch_old, num_patch_in_window_old, patch_depth_old]
            patch格式: [bs, patch_depth_old, height, width]

        2.利用unfold操作,按照merge_size * merge_size的大小得到新的patch,
          形状为[bs, num_patch_new, merge_ size * merge size * patch_depth_old]

        3.使用一个全连接层对depth进行降维成0.5倍,
          也就是从merge_size * merge_size * patch_depth_old映射到
          0.5 * merge_size * merge_size * patch_depth_old

        输出的是patch embedding的形状格式:[bs,num_patch, patch_depth]

        举例说明: 以merge_size=2为例,经过PatchMerging后,
                 patch数目减少为之前的1/4,但是depth增大为原来的2倍
    """
    def __init__(self, model_dim, merge_size, output_depth_scale=0.5):
        super(PatchMerging, self).__init__()
        self.merge_size = merge_size
        self.proj_layer = nn.Linear(
            model_dim * merge_size * merge_size,
            int(model_dim * merge_size * merge_size * output_depth_scale)
        )

    def forward(self, inp):
        """
        input shape: [bs, num_window, num_patch_in_window, patch_depth]
        output shape: [bs, seq_len, dim]
        """
        # window格式转化成image格式
        inp = shift_window_mhsa.window2image(inp)  # [bs, patch_depth, image_h, image_w]

        # 利用卷积的思路将它划分成块
        # merged_window:[bs, num_patch, patch_depth]
        # 如果merge_size=2,则比原来patch缩小4倍,dim扩大4倍
        merged_window = F.unfold(inp, kernel_size=self.merge_size,
                                 stride=self.merge_size).transpose(-1, -2)

        # dim降维 dim=dim*0.5
        # [bs, num_patch, patch_depth*0.5]
        merged_window = self.proj_layer(merged_window)

        return merged_window
构建SwinTransformerBlock
如何构建SwinTransformerBlock?
每个block包含LayerNorm、W-MHSA、MLP、SW-MHSA、残差连接等模块
·输入是patch embedding格式
.每个MLP包含两层,分别是4 * model_dim和model_dim的大小,先映射到大的维度上,再还原到原来的维度
·输出的是window的数据格式,[bs, num_window, num_patch_in_window, patch_depth]
·需要注意残差连接对数据形默的要求,被残差的地方维度需要是一致的
class SwinTransformerBlock(nn.Module):
    """
    每个MLP包含两层,分别是4 * model_dim和model_dim的大小,
    先映射到大的维度上,再还原到原来的维度

    输入:patch embedding格式
        [bs, num_patch, patch_depth]

    输出:window的数据格式
        [bs, num_window, num_patch_in_window, patch_depth]
        其中:
            num_window * num_patch_in_window = num_patch
    """
    def __init__(self, model_dim, window_size, num_head):
        super(SwinTransformerBlock, self).__init__()
        self.window_size = window_size
        self.layer_norm1 = nn.LayerNorm(model_dim)
        self.layer_norm2 = nn.LayerNorm(model_dim)
        self.layer_norm3 = nn.LayerNorm(model_dim)
        self.layer_norm4 = nn.LayerNorm(model_dim)

        self.wsma_mlp1 = nn.Linear(model_dim, 4*model_dim)
        self.wsma_mlp2 = nn.Linear(4*model_dim, model_dim)
        self.swsma_mlp1 = nn.Linear(model_dim, 4*model_dim)
        self.swsma_mlp2 = nn.Linear(4*model_dim, model_dim)
        # 一个window的mhsa,一个shifted window的mhsa
        self.mhsa1 = py.origin_mhsa.MultiHeadSelfAttention(model_dim, num_head)
        self.mhsa2 = py.origin_mhsa.MultiHeadSelfAttention(model_dim, num_head)

    def forward(self, inp):
        bs, num_patch, patch_depth = inp.shape

        '''block第一层'''
        # 首先层归一化
        inp1 = self.layer_norm1(inp)
        # 送进mhsa
        prob, w_msa_output = py.window_mhsa.window_multi_head_self_attention\
            (inp1, self.mhsa1, window_size=self.window_size)
        # 获取num_window和num_patch_in_window
        bs, num_window, num_patch_in_window, patch_depth =\
            w_msa_output.shape
        # 做一个残差连接
        w_msa_output = inp1 + w_msa_output.reshape([bs, num_patch, patch_depth])
        # w层归一化和两层MLP
        output1 = self.wsma_mlp2(self.wsma_mlp1(self.layer_norm2(w_msa_output)))
        # 再经过残差连接
        output1 += w_msa_output

        '''block第二层'''
        # 经过层归一化
        input2 = self.layer_norm3(output1)
        input2 = input2.reshape([bs, num_window, num_patch_in_window, patch_depth])
        # 送入shift window mhsa
        sw_msa_output = shift_window_multi_head_self_attention(input2,
                                                               self.mhsa2,
                                                               window_size=self.window_size,
                                                               )
        # 经过残差连接
        sw_msa_output = output1 + sw_msa_output.reshape([bs,
                                                         num_patch,
                                                         patch_depth])
        # 层归一化和两层MLP
        output2 = self.swsma_mlp2(self.swsma_mlp1(self.layer_norm4(sw_msa_output)))
        # 残差连接
        output2 += sw_msa_output

        output2 = output2.reshape([bs, num_window, num_patch_in_window,
                                   patch_depth])

        return output2
构建SwinTransformerModel
如何构建SwinTransfogmerModel?
输入是图片 [bs, c, h, w]
首先对图片进行分块并得到Patch embedding
经过第一个stage
进行patch merging,再进行第二个stage,以此类推…
对最后一个block的输出转换成patch embedding的格式,[bs, num_patch, patch_depth]
对patch embedding在num_patch维度(时间维度)进行平均池化(而VIT是用cls token),并映射到分类层得到分类的logits
这里假设stage只有一个block
class SwinTransformerModel(nn.Module):
    """
    输入:image格式 [bs, c, h, w]
    输出:[bs, num_class]

        1.首先对图片进行分块并得到Patch embedding

        2.经过第一个stage(这里只有一个block)

        3.进行patch merging,再进行第二个stage,以此循环往下...

        4.对最后一个block的输出转换成patch embedding的格式,[bs, num_patch, patch_depth]

        5.对patch embedding在num_patch维度(时间维度)进行平均池化,
          并映射到分类层得到分类的logits
    """
    def __init__(self, input_image_channel=3, patch_size=4, model_dim_c=8, num_class=10, window_size=4, num_head=2,
                 merge_size=2):
        super(SwinTransformerModel, self).__init__()
        self.merge_size = merge_size
        self.num_head = num_head
        self.window_size = window_size
        self.num_class = num_class
        self.patch_size = patch_size
        self.input_image_channel = input_image_channel
        self.model_dim_C = model_dim_c

        patch_depth = patch_size * patch_size * input_image_channel
        # weight定义成nn.Parameter格式参与到梯度更新
        self.patch_embedding_weight = nn.Parameter(torch.randn(patch_depth, model_dim_c))
        self.block1 = sw_block.SwinTransformerBlock(model_dim_c, window_size, num_head)
        self.block2 = sw_block.SwinTransformerBlock(model_dim_c*2, window_size, num_head)
        self.block3 = sw_block.SwinTransformerBlock(model_dim_c*4, window_size, num_head)
        self.block4 = sw_block.SwinTransformerBlock(model_dim_c*8, window_size, num_head)

        self.patch_merging1 = patch_merge.PatchMerging(model_dim_c, merge_size)
        self.patch_merging2 = patch_merge.PatchMerging(model_dim_c*2, merge_size)
        self.patch_merging3 = patch_merge.PatchMerging(model_dim_c*4, merge_size)

        # MLP映射到分类
        self.final_layer = nn.Linear(model_dim_c*8, num_class)

    def forward(self, image):
        patch_embedding = image2emb.image2emb_naive(image,
                                                    self.patch_size,
                                                    self.patch_embedding_weight)
        print(patch_embedding.shape, "# patch_emb.shape")

        # block1 + merge1(patch缩小1/4, dim扩大2倍,下merge同)
        sw_mhsa_output1 = self.block1(patch_embedding)
        merged_patch1 = self.patch_merging1(sw_mhsa_output1)
        print(sw_mhsa_output1.shape, "# sw_mhsa_output1.shape")
        print(merged_patch1.shape, "# merged_patch1.shape")

        # block2 + merge2
        sw_mhsa_output2 = self.block2(merged_patch1)
        merged_patch2 = self.patch_merging2(sw_mhsa_output2)
        print(sw_mhsa_output2.shape, "# sw_mhsa_output2.shape")
        print(merged_patch2.shape, "# merged_patch2.shape")

        # block3 + merge3
        sw_mhsa_output3 = self.block3(merged_patch2)
        merged_patch3 = self.patch_merging3(sw_mhsa_output3)
        print(sw_mhsa_output3.shape, "# sw_mhsa_output3.shape")
        print(merged_patch3.shape, "# merged_patch3.shape")

        # block4
        sw_mhsa_output4 = self.block4(merged_patch3)
        print(sw_mhsa_output4.shape, "# sw_mhsa_output4.shape")

        # sw_mhsa_output4:window格式
        bs, num_window, num_patch_in_window, patch_depth = sw_mhsa_output4.shape
        # 转化为3维的
        sw_mhsa_output3 = sw_mhsa_output3.reshape([bs, -1, patch_depth])
        # 平均池化时间维度
        pool_output = torch.mean(sw_mhsa_output3, dim=1)  # [bs, patch_depth]

        logits = self.final_layer(pool_output)
        print(logits.shape, "# logits.shape")

        return logits
完整代码
https://github.com/yyz159756/pytorch_learn/tree/main/Swin_Transformer/py
