引言
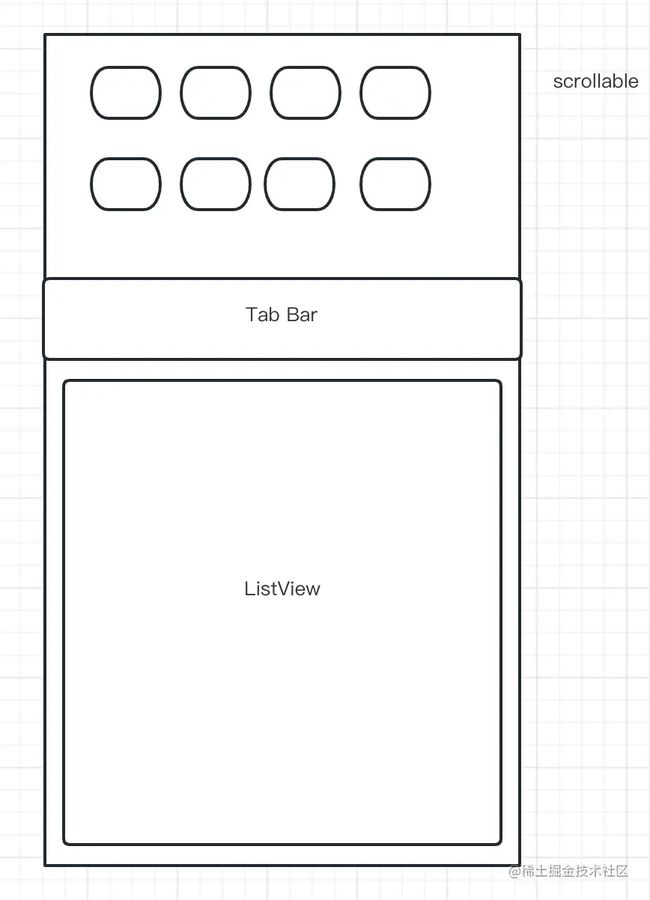
在上一篇文章Android进阶宝典 -- 事件冲突怎么解决?先从Android事件分发机制开始说起中,我们详细地介绍了Android事件分发机制,其实只要页面结构复杂,联动众多就会产生事件冲突,处理不得当就是bug,e.g. 我画了一张很丑的图
其实这种交互形式在很多电商、支付平台都非常常见,页面整体是可滑动的(scrollable),当页面整体往上滑时,是外部滑动组件,e.g. NestedScrollView,当TabBar滑动到顶部的时候吸顶,紧接着ListView自身特性继续往上滑。
其实这种效果,系统已经帮我们实现好了,尤其是像NestScrollView;如果我们在自定义View的时候,没有系统能力的加持,会有问题吗?如果熟悉Android事件分发机制,因为整体上滑的时候,外部组件消费了DOWM事件和MOVE事件,等到Tabbar吸顶之后,再次滑动ListView的时候,因为事件都在外部拦截,此时 mFirstTouchTarget还是父容器,没有机会让父容器取消事件再转换到ListView,导致ListView不可滑动。
那么我们只有松开手,再次滑动ListView,让DOWN事件传递到ListView当中,这样列表会继续滑动,显得没有那么顺滑,从用户体验上来说是不可接受的。
1 自定义滑动布局,实现吸顶效果
首先我们如果想要实现这个效果,其实办法有很多,CoordinateLayout就是其中之一,但是如果我们想要自定义一个可滑动的布局,而且还需要实现Tabbar的吸顶效果,我们需要注意两点:
(1)在头部没有被移出屏幕的时候,事件需要被外部拦截,只能滑动外部布局,ListView不可滑动;
(2)当头部被移出到屏幕之外时,事件需要被ListView消费(继续上滑时),如果下滑时则是同样会先把头部拉出来然后才可以滑动ListView
1.1 滑动容器实现
因为我们知道,要控制view移动,可以调用scrollBy或者scrollTo两个方法,其中两个方法的区别在于,前者是滑动的相对上一次的距离,而后者是滑动到具体位置。
class MyNestScrollView @JvmOverloads constructor(
    val mContext: Context,
    val attributeSet: AttributeSet? = null,
    val flag: Int = 0
) : LinearLayout(mContext, attributeSet, flag) {
    private var mTouchSlop = 0
    private var startY = 0f
    init {
        mTouchSlop = ViewConfiguration.get(context).scaledPagingTouchSlop
    }
    override fun onInterceptTouchEvent(ev: MotionEvent?): Boolean {
        /**什么时候拦截事件呢,当头部还没有消失的时候*/
        return super.onInterceptTouchEvent(ev)
    }
    override fun onTouchEvent(event: MotionEvent?): Boolean {
        when (event?.action) {
            MotionEvent.ACTION_DOWN -> {
                Log.e("TAG", "MyNestScrollView ACTION_DOWN")
                startY = event.y
            }
            MotionEvent.ACTION_MOVE -> {
                Log.e("TAG", "MyNestScrollView ACTION_MOVE")
                val endY = event.y
                if (abs(endY - startY) > mTouchSlop) {
                    //滑动了
                    scrollBy(0, (startY - endY).toInt())
                }
                startY = endY
            }
        }
        return super.onTouchEvent(event)
    }
    override fun scrollTo(x: Int, y: Int) {
        var finalY = 0
        if (y < 0) {
        } else {
            finalY = y
        }
        super.scrollTo(x, finalY)
    }
}
所以在事件消费的时候,会调用scrollBy,来进行页面的滑动,如果我们看scrollBy的源码,会明白最终调用就是通过scrollTo实现的,只不过是在上次pos的基础上进行累计。
public void scrollBy(int x, int y) {
    scrollTo(mScrollX + x, mScrollY + y);
}
所以这里重写了scrollTo方法,来判断y(纵向)滑动的位置,因为当y小于0的时候,按照Android的坐标系,我们知道如果一直往下滑,那么△Y(竖直方向滑动距离) < 0,如果一直向下滑,最终totalY也会小于0,所以这里也是做一次边界的处理。
接下来我们需要处理下吸顶效果,所以我们需要知道,顶部View的高度,以便控制滑动的距离,也是一次边界处理。
override fun scrollTo(x: Int, y: Int) {
    var finalY = 0
    if (y < 0) {
    } else {
        finalY = y
    }
    if (y > mTopViewHeight) {
        finalY = mTopViewHeight
    }
    super.scrollTo(x, finalY)
}
override fun onSizeChanged(w: Int, h: Int, oldw: Int, oldh: Int) {
    super.onSizeChanged(w, h, oldw, oldh)
    //顶部view是第一个View
    mTopViewHeight = getChildAt(0).measuredHeight
}
所以这里需要和我们写的布局相对应,顶部view是容器中第一个子View,通过在onSizeChanged或者onMeasure中获取第一个子View的高度,在滑动时,如果滑动的距离超过 mTopViewHeight(顶部View的高度),那么滑动时也就不会再继续滑动了,这样就实现了TabBar的吸顶效果。
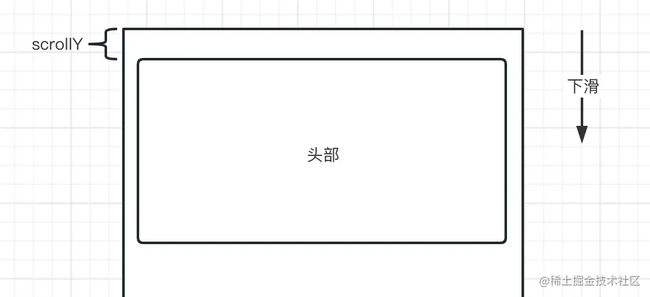
基础工作完成了,接下来我们完成需要注意的第一点,先看下面的图:
当我们上滑的时候,头部是准备逐渐隐藏的,所以这里会有几个条件,首先 mStartX - nowX > 0 而且 scrollY < mTopViewHeight,而且此时scrollY是大于0的
/**
 * 头部View逐渐消失
 * @param dy 手指滑动的相对距离 dy >0 上滑 dy < 0 下滑
 */
private fun isViewHidden(dy: Int): Boolean {
    return dy > 0 && scrollY < mTopViewHeight
}
当我们向下滑动的时候,此时 mStartX - nowX < 0,因为此时头部隐藏了,所以ScrollY > 0,而且此时是能够滑动的,如果到了下面这个边界条件(不会有这种情况发生,因此在滑动时做了边界处理),此时scrollY < 0
private fun isViewShow(dy: Int):Boolean{
    return dy < 0 && scrollY > 0 && !canScrollVertically(-1)
}
此时还有一个条件,就是canScrollVertically,这个相信伙伴们也很熟悉,意味着当前View是能够往下滑动的,如果返回了false,那么就是不能继续往下滑动了。
override fun onInterceptTouchEvent(ev: MotionEvent?): Boolean {
    var intercepted = false
    /**什么时候拦截事件呢,当头部还没有消失的时候*/
    when (ev?.action) {
        MotionEvent.ACTION_DOWN -> {
            startY = ev.rawY
        }
        MotionEvent.ACTION_MOVE -> {
            val endY = ev.rawY
            if (abs(startY - endY) > mTouchSlop) {
                if (isViewHidden((startY - endY).toInt())
                    || isViewShow((startY - endY).toInt())
                ) {
                    Log.e("TAG","此时就需要拦截,外部进行消费事件")
                    //此时就需要拦截,外部进行消费事件
                    intercepted = true
                }
            }
            startY = endY
        }
    }
    return intercepted
}
所以在外部拦截的时候,通过判断这两种状态,如果满足其中一个条件就会拦截事件完全由外部容器处理,这样就完成了吸顶效果的处理。
1.2 嵌套滑动机制完成交互优化
通过上面的gif,我们看效果貌似还可以,但是有一个问题就是,当完成吸顶之后,ListView并不能跟随手指继续向上滑动,而是需要松开手指之后,再次滑动即可,其实我们从Android事件分发机制中就能够知道,此时mFirstTouchTarget == 父容器,此时再次上滑并没有给父容器Cancel的机会,所以才导致事件没有被ListView接收。
因为传统的事件冲突解决方案,会导致滑动不流畅,此时就需要嵌套滑动机制解决这个问题。在前面我们提到过,NestedScrollView其实就是已经处理过嵌套滑动了,所以我们前面去看一下NestedScrollView到底干了什么事?
public class NestedScrollView extends FrameLayout implements NestedScrollingParent3,
        NestedScrollingChild3, ScrollingView
我们看到,NestedScrollView是实现了NestedScrollingParent3、NestedScrollingChild3等接口,挺有意思的,这几个接口貌似都是根据数字做了升级,既然有3,那么必然有1和2,所以我们看下这几个接口的作用。
1.2.1 NestedScrollingParent接口和NestedScrollingChild接口
对于NestedScrollingParent接口,如果可滑动的ViewGroup,e.g. 我们在1.1中定义的容器作为父View,那么就需要实现这个接口;如果是作为可滑动的子View,那么就需要实现NestedScrollingChild接口,因为我们在自定义控件的时候,它既可能作为子View也可能作为父View,因此这俩接口都需要实现。
public interface NestedScrollingChild {
    /**
     * Enable or disable nested scrolling for this view.
     *
     * 启动或者禁用嵌套滑动,如果返回ture,那么说明当前布局存在嵌套滑动的场景,反之没有
     * 使用场景:NestedScrollingParent嵌套NestedScrollingChild
     * 在此接口中的方法,都是交给NestedScrollingChildHelper代理类实现
     */
    void setNestedScrollingEnabled(boolean enabled);
    /**
     * Returns true if nested scrolling is enabled for this view.
     * 其实就是返回setNestedScrollingEnabled中设置的值
     */
    boolean isNestedScrollingEnabled();
    /**
     * Begin a nestable scroll operation along the given axes.
     * 表示view开始滚动了,一般是在ACTION_DOWN中调用,如果返回true则表示父布局支持嵌套滚动。
     * 一般也是直接代理给NestedScrollingChildHelper的同名方法即可。这个时候正常情况会触发Parent的onStartNestedScroll()方法
     */
    boolean startNestedScroll(@ScrollAxis int axes);
    /**
     * Stop a nested scroll in progress.
     * 停止嵌套滚动,一般在UP或者CANCEL事件中执行,告诉父容器已经停止了嵌套滑动
     */
    void stopNestedScroll();
    /**
     * Returns true if this view has a nested scrolling parent.
     * 判断当前View是否存在嵌套滑动的Parent
     */
    boolean hasNestedScrollingParent();
    /**
    * 当前View消费滑动事件之后,滚动一段距离之后,把剩余的距离回调给父容器,父容器知道当前剩余距离
    * dxConsumed:x轴滚动的距离
    * dyConsumed:y轴滚动的距离
    * dxUnconsumed:x轴未消费的距离
    * dyUnconsumed:y轴未消费的距离
    * 这个方法是嵌套滑动的时候调用才有用,返回值 true分发成功;false 分发失败
    */
    boolean dispatchNestedScroll(int dxConsumed, int dyConsumed,
            int dxUnconsumed, int dyUnconsumed, @Nullable int[] offsetInWindow);
    /**
     * Dispatch one step of a nested scroll in progress before this view consumes any portion of it.
     * 在子View消费滑动距离之前,将滑动距离传递给父容器,相当于把消费权交给parent
     * dx:当前水平方向滑动的距离
     * dy:当前垂直方向滑动的距离
     * consumed:输出参数,会将Parent消费掉的距离封装进该参数consumed[0]代表水平方向,consumed[1]代表垂直方向
    * @return true:代表Parent消费了滚动距离
     */
    boolean dispatchNestedPreScroll(int dx, int dy, @Nullable int[] consumed,
            @Nullable int[] offsetInWindow);
    /**
     * Dispatch one step of a nested scroll in progress.
     * 处理惯性事件,与dispatchNestedScroll类似,也是在消费事件之后,将消费和未消费的距离都传递给父容器
     */
    boolean dispatchNestedFling(float velocityX, float velocityY, boolean consumed);
    /**
     * Dispatch a fling to a nested scrolling parent before it is processed by this view.
     * 与dispatchNestedPreScroll类似,在消费之前首先会传递给父容器,把优先处理权交给父容器
     */
    boolean dispatchNestedPreFling(float velocityX, float velocityY);
}
public interface NestedScrollingParent {
    /**
     * React to a descendant view initiating a nestable scroll operation, claiming the
     * nested scroll operation if appropriate.
     * 当子View调用startNestedScroll方法的时候,父容器会在这个方法中获取回调
     */
    boolean onStartNestedScroll(@NonNull View child, @NonNull View target, @ScrollAxis int axes);
    /**
     * React to the successful claiming of a nested scroll operation.
     * 在onStartNestedScroll调用之后,就紧接着调用这个方法
     */
    void onNestedScrollAccepted(@NonNull View child, @NonNull View target, @ScrollAxis int axes);
    /**
     * React to a nested scroll operation ending.
     * 当子View调用 stopNestedScroll方法的时候回调
     */
    void onStopNestedScroll(@NonNull View target);
    /**
     * React to a nested scroll in progress.
     *
     */
    void onNestedScroll(@NonNull View target, int dxConsumed, int dyConsumed,
            int dxUnconsumed, int dyUnconsumed);
    /**
     * React to a nested scroll in progress before the target view consumes a portion of the scroll.
     * 在子View调用dispatchNestedPreScroll之后,这个方法拿到了回调
     *
     */
    void onNestedPreScroll(@NonNull View target, int dx, int dy, @NonNull int[] consumed);
    /**
     * Request a fling from a nested scroll.
     *
     */
    boolean onNestedFling(@NonNull View target, float velocityX, float velocityY, boolean consumed);
    /**
     * React to a nested fling before the target view consumes it.
     *
     */
    boolean onNestedPreFling(@NonNull View target, float velocityX, float velocityY);
    /**
     * Return the current axes of nested scrolling for this NestedScrollingParent.
     * 返回当前滑动的方向
     */
    @ScrollAxis
    int getNestedScrollAxes();
}
通过这两个接口,我们大概就能够明白,其实嵌套滑动机制完全是子View在做主导,通过子View能够决定Parent是否能够优先消费事件(dispatchNestedPreScroll),所以我们先从子View开始,开启嵌套滑动之旅。
1.2.2 预滚动阶段实现
在这个示例中,需要与parent嵌套滑动的就是RecyclerView,所以RecyclerView就需要实现child接口。前面我们看到child接口好多方法,该怎么调用呢?其实这个接口中大部分的方法都可以交给一个helper代理类实现,e.g. NestedScrollingChildHelper.
因为所有的嵌套滑动都是由子View主导,所以我们先看子View消费事件,也就是onTouchEvent中,如果当手指按下的时候,首先获取滑动的是x轴还是y轴,这里我们就认为是竖向滑动,然后调用NestedScrollingChild的startNestedScroll方法,这个方法就代表开始滑动了。
override fun onTouchEvent(e: MotionEvent?): Boolean {
    when(e?.action){
        MotionEvent.ACTION_DOWN->{
            mStartX = e.y.toInt()
            //子View开始嵌套滑动
            var axis = ViewCompat.SCROLL_AXIS_NONE
            axis = axis or ViewCompat.SCROLL_AXIS_VERTICAL
            nestedScrollingChildHelper.startNestedScroll(axis)
        }
        MotionEvent.ACTION_MOVE->{
        }
    }
    return super.onTouchEvent(e)
}
我们看下startNestedScroll内部的源码:
public boolean startNestedScroll(@ScrollAxis int axes, @NestedScrollType int type) {
    if (hasNestedScrollingParent(type)) {
        // Already in progress
        return true;
    }
    if (isNestedScrollingEnabled()) {
        ViewParent p = mView.getParent();
        View child = mView;
        while (p != null) {
            if (ViewParentCompat.onStartNestedScroll(p, child, mView, axes, type)) {
                setNestedScrollingParentForType(type, p);
                ViewParentCompat.onNestedScrollAccepted(p, child, mView, axes, type);
                return true;
            }
            if (p instanceof View) {
                child = (View) p;
            }
            p = p.getParent();
        }
    }
    return false;
}
从源码中 我们可以看到,首先如果有嵌套滑动的父容器,直接返回true,此时代表嵌套滑动成功;
public boolean hasNestedScrollingParent(@NestedScrollType int type) {
    return getNestedScrollingParentForType(type) != null;
private ViewParent getNestedScrollingParentForType(@NestedScrollType int type) {
    switch (type) {
        case TYPE_TOUCH:
            return mNestedScrollingParentTouch;
        case TYPE_NON_TOUCH:
            return mNestedScrollingParentNonTouch;
    }
    return null;
}
在判断的时候,会判断mNestedScrollingParentTouch是否为空,因为第一次进来的时候肯定是空的,所以会继续往下走;如果支持嵌套滑动,那么就会进入到while循环中。
核心代码1:
while (p != null) {
    //---------- 判断条件1 -------------//
    if (ViewParentCompat.onStartNestedScroll(p, child, mView, axes, type)) {
        setNestedScrollingParentForType(type, p);
        ViewParentCompat.onNestedScrollAccepted(p, child, mView, axes, type);
        return true;
    }
    if (p instanceof View) {
        child = (View) p;
    }
    p = p.getParent();
}
首先调用ViewParentCompat的onStartNestedScroll方法如下:
public static boolean onStartNestedScroll(@NonNull ViewParent parent, @NonNull View child,
        @NonNull View target, int nestedScrollAxes, int type) {
    if (parent instanceof NestedScrollingParent2) {
        // First try the NestedScrollingParent2 API
        return ((NestedScrollingParent2) parent).onStartNestedScroll(child, target,
                nestedScrollAxes, type);
    } else if (type == ViewCompat.TYPE_TOUCH) {
        // Else if the type is the default (touch), try the NestedScrollingParent API
        if (Build.VERSION.SDK_INT >= 21) {
            try {
                return Api21Impl.onStartNestedScroll(parent, child, target, nestedScrollAxes);
            } catch (AbstractMethodError e) {
                Log.e(TAG, "ViewParent " + parent + " does not implement interface "
                        + "method onStartNestedScroll", e);
            }
        } else if (parent instanceof NestedScrollingParent) {
            return ((NestedScrollingParent) parent).onStartNestedScroll(child, target,
                    nestedScrollAxes);
        }
    }
    return false;
}
其实在这个方法中,就是判断parent是否实现了NestedScrollingParent(2 3)接口,如果实现了此接口,那么返回值就是parent中onStartNestedScroll的返回值。
这里需要注意的是,如果parent中onStartNestedScroll的返回值为false,那么就不会进入代码块的条件判断,所以在实现parent接口的时候,onStartNestedScroll需要返回true。进入代码块中调用setNestedScrollingParentForType方法,将父容器给mNestedScrollingParentTouch赋值,那么此时hasNestedScrollingParent方法就返回true,不需要遍历View层级了。
private void setNestedScrollingParentForType(@NestedScrollType int type, ViewParent p) {
    switch (type) {
        case TYPE_TOUCH:
            mNestedScrollingParentTouch = p;
            break;
        case TYPE_NON_TOUCH:
            mNestedScrollingParentNonTouch = p;
            break;
    }
}
然后又紧接着调用了parent的onNestedScrollAccepted方法,这两者一前一后,这样预滚动阶段就算是完成了。
在父容器中,预滚动节点就需要处理这两个回调即可,关键在于onStartNestedScroll的返回值。
override fun onStartNestedScroll(child: View, target: View, axes: Int): Boolean {
    Log.e("TAG","onStartNestedScroll")
    //这里需要return true,否则在子View中分发事件就不会成功
    return true
}
override fun onNestedScrollAccepted(child: View, target: View, axes: Int) {
    Log.e("TAG","onNestedScrollAccepted")
}
1.2.3 滚动阶段实现
然后MOVE事件来了,这个时候我们需要记住,即便是滑动了子View,但是子View依然是需要将事件扔给父类,这里就需要调用dispatchNestedPreScroll方法,这里在1.2.1中介绍过,需要跟dispatchNestedScroll区分,dispatchNestedPreScroll是在子View消费事件之前就交给父类优先处理。
public boolean dispatchNestedPreScroll(int dx, int dy, @Nullable int[] consumed,
        @Nullable int[] offsetInWindow, @NestedScrollType int type) {
    if (isNestedScrollingEnabled()) {
        //这里不为空了
        final ViewParent parent = getNestedScrollingParentForType(type);
        if (parent == null) {
            return false;
        }
        if (dx != 0 || dy != 0) {
            int startX = 0;
            int startY = 0;
            if (offsetInWindow != null) {
                mView.getLocationInWindow(offsetInWindow);
                startX = offsetInWindow[0];
                startY = offsetInWindow[1];
            }
            if (consumed == null) {
                consumed = getTempNestedScrollConsumed();
            }
            consumed[0] = 0;
            consumed[1] = 0;
            ViewParentCompat.onNestedPreScroll(parent, mView, dx, dy, consumed, type);
            if (offsetInWindow != null) {
                mView.getLocationInWindow(offsetInWindow);
                offsetInWindow[0] -= startX;
                offsetInWindow[1] -= startY;
            }
            //-------- 由父容器是否消费决定返回值 -------//
            return consumed[0] != 0 || consumed[1] != 0;
        } else if (offsetInWindow != null) {
            offsetInWindow[0] = 0;
            offsetInWindow[1] = 0;
        }
    }
    return false;
}
在子View调用dispatchNestedPreScroll方法时,需要传入四个参数,这里我们再次详细介绍一下:
dx、dy指的是x轴和y轴滑动的距离;
consumed在子View调用时,其实只需要传入一个空数组即可,具体的赋值是需要在父容器中进行,父view消费了多少距离,就传入多少,consumed[0]代表x轴,consumed[1]代表y轴;
看上面的源码,当dx或者dy不为0的时候,说明有滑动了,那么此时就会做一些初始化的配置,把consumed数组清空,然后会调用父容器的onNestedPreScroll方法,父容器决定是否消费这个事件,因为在父容器中会对consumed数组进行复制,所以这个方法的返回值代表着父容器是否消费过事件;如果消费过,那么就返回true,没有消费过,那么就返回false.
所以我们先看父容器的处理:
override fun onNestedPreScroll(target: View, dx: Int, dy: Int, consumed: IntArray) {
    Log.e("TAG", "onNestedPreScroll")
    //父容器什么时候 消费呢?
    if (isViewShow(dy) || isViewHidden(dy)) {
        //假设这个时候把事件全消费了
        consumed[1] = dy
        scrollBy(0, dy)
    }
}
其实我们这里就是直接将之前在onTouchEvent中的处理逻辑放在了onNestedPreScroll中,如果在上拉或者下滑时,首先头部优先,假设父容器把距离全部消费,这个时候给consumed[1]赋值为dy。
MotionEvent.ACTION_MOVE -> {
    val endY = e.y.toInt()
    val endX = e.x.toInt()
    var dx = mStartX - endX
    var dy = mStartY - endY
    //进行事件分发,优先给parent
    if (dispatchNestedPreScroll(dx, dy, cosumed, null)) {
        //如果父容器消费过事件,这个时候,cosumed有值了,我们只关心dy
        dy -= cosumed[1]
        if (dy == 0) {
            //代表父容器全给消费了
            return true
        }
    } else {
        //如果没有消费事件,那么就子view消费吧
        smoothScrollBy(dx, dy)
    }
}
再来看子View,这里是在MOVE事件中进行事件分发,调用dispatchNestedPreScroll方法,判断如果父容器有事件消费,看消费了多少,剩下的就是子View消费;如果父容器没有消费,dispatchNestedPreScroll返回了false,那么子View自行处理事件。
所以如果子View使用的是RecyclerView,那么在父容器做完处理之后,其实就能够实现嵌套滑动吸顶的完美效果,为什么呢?是因为RecyclerView本来就实现了parent接口,所以如果在自定义子View(可滑动)时,子View处理的这部分代码就需要特别关心。
1.2.4 滚动结束
在手指抬起之后,调用stopNestedScroll方法。
MotionEvent.ACTION_UP->{
    nestedScrollingChildHelper.stopNestedScroll()
}
从源码中看,其实就是回到父容器的onStopNestedScroll方法,然后将滑动的标志位(mNestedScrollingParentTouch)置为空,在下次按下的时候,重新初始化。
public void stopNestedScroll(@NestedScrollType int type) {
    ViewParent parent = getNestedScrollingParentForType(type);
    if (parent != null) {
        ViewParentCompat.onStopNestedScroll(parent, mView, type);
        setNestedScrollingParentForType(type, null);
    }
}
以上就是Android进阶NestedScroll嵌套滑动机制实现吸顶效果详解的详细内容,更多关于Android NestedScroll吸顶的资料请关注脚本之家其它相关文章!


