实战 | OpenCV+OCR实现环形文字识别实例(详细步骤 + 代码)
点击上方“小白学视觉”,选择加"星标"或“置顶”
重磅干货,第一时间送达导读
本文将介绍使用OpenCV+OCR实现环形文字识别的详细步骤和代码演示。(来源公众号:OpenCV与AI深度学习)
背景介绍
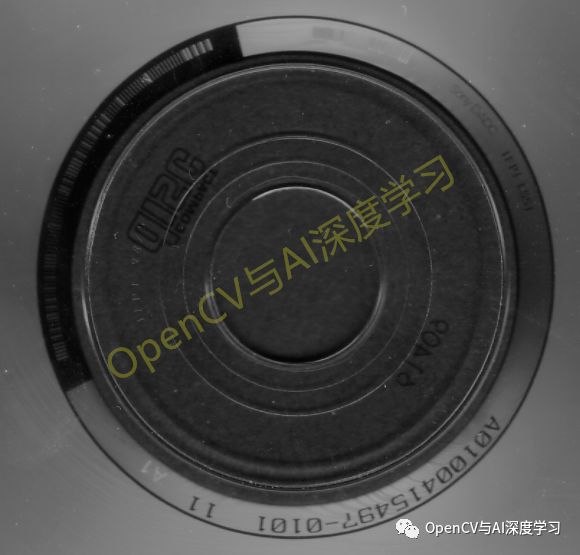
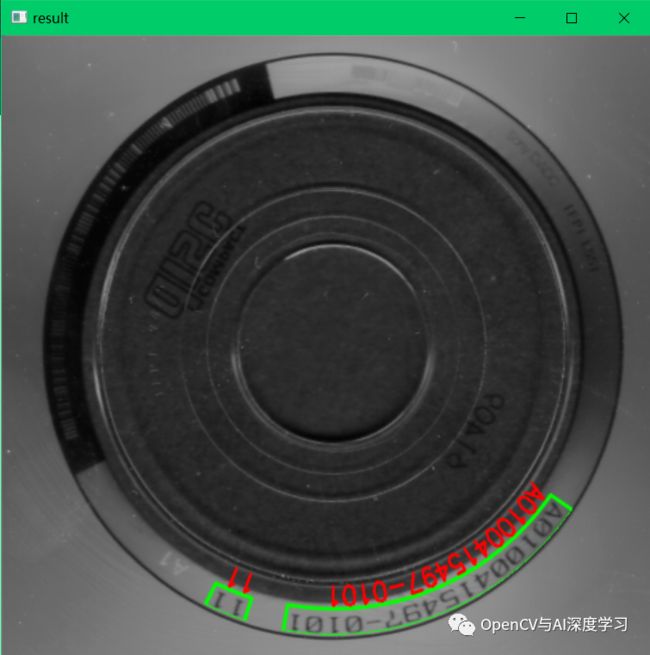
光学字符识别(OCR)场景中有很多特殊情况,比如噪声、脏污、倾斜、变形等,都会对识别造成影响。环形文字也是其中一种,我们通常不能直接识别它们,而是先将文字转换到水平方向,再做识别。如下图所示:
如果我们直接识别,很容易识别失败,那怎么办呢?下面来详细介绍上图文字的识别步骤,也可看做环形文字识别的一般步骤。
详细实现步骤
【1】查找定位图中的圆形轮廓。定位圆形可以使用一般的Blob分析,也可使用霍夫圆变换实现,这里因为圆形比较规则且分明,直接使用霍夫圆变换即可,代码和检测效果如下:
gray = cv2.cvtColor(img,cv2.COLOR_BGR2GRAY)
gray = cv2.medianBlur(gray,3)
circles = cv2.HoughCircles(gray,cv2.HOUGH_GRADIENT,1,100,\
         param1=200,param2=30,minRadius=200,maxRadius=300)


isNG = False
if circles is None:
  print("找圆失败!")

else:
  circles = np.uint16(np.around(circles))
  a, b, c = circles.shape
  print (circles.shape)
  for i in range(b):
    cv2.circle(img_copy, (circles[0][i][0], circles[0][i][1]), circles[0][i][2], (0, 0, 255), 3, cv2.LINE_AA)
    cv2.circle(img_copy, (circles[0][i][0], circles[0][i][1]), 2, (0, 255, 0), 3, cv2.LINE_AA) # draw center of circle
  cv2.imshow("findCircle", img_copy)
【2】基于找到的圆做极坐标变换,将文字转换到水平方向。
x = circles[0][i][0] - circles[0][i][2]
y = circles[0][i][1] - circles[0][i][2]
w = h = 2 * circles[0][i][2]
center = (circles[0][i][0], circles[0][i][1])
radius = circles[0][i][2]
C = 2 * math.pi * radius
print(C,radius)


ROI = img[y:y+h,x:x+w].copy()
cv2.imshow('ROI',ROI)
trans_center = (center[0]-x, center[1]-y)
polarImg = cv2.warpPolar(ROI,(int(radius),int(C)),trans_center,radius,cv2.INTER_LINEAR + cv2.WARP_POLAR_LINEAR)
polarImg = cv2.flip(polarImg,1) #镜像
polarImg = cv2.transpose(polarImg)#转置
cv2.imshow('polarImg',polarImg)
cv2.imwrite('polarImg.png',polarImg)
【3】文字识别。使用EasyOCR或PaddleOCR均可,这里使用EasyOCR。
result = reader.readtext(polarImg)
print(result)
if len(result) > 0:
  for i in range(0,len(result)):
    print(result[i][1])
    if(result[i][2] < 0.4):
      continue
    for j in range(4):
      if j > 0:
        cv2.line(polarImg,(tuple(result[i][0][j-1])),(tuple(result[i][0][j])),(0,255,0),2,cv2.LINE_AA)
    cv2.line(polarImg,(tuple(result[i][0][0])),(tuple(result[i][0][3])),(0,255,0),2,cv2.LINE_AA)
    strText = result[i][1].replace(' ','')
    cv2.putText(polarImg,strText,(result[i][0][3][0],result[i][0][3][1]+20),0,0.8,(0,0,255),2)


  cv2.imshow('polarImg-OCR',polarImg)
【4】极坐标反变换,将包含识别结果的图像还原成圆形。
polarImg = cv2.flip(polarImg,0) #镜像
polarImg = cv2.transpose(polarImg)#转置
polarImg_Inv = cv2.warpPolar(polarImg,(w,h),trans_center,radius,cv2.INTER_LINEAR + \
                       cv2.WARP_POLAR_LINEAR + cv2.WARP_INVERSE_MAP)
cv2.imshow('polarImg_Inv',polarImg_Inv)
【5】创建圆形mask图像做copyTo操作,使圆形外部图像与原图保持一致。
mask = np.zeros((h,w,1),np.uint8)
  cv2.circle(mask,trans_center,radius-3,(255,255,255),-1, cv2.LINE_AA)
  cv2.imshow('mask', mask)
  ROI = img[y:y+h,x:x+w]
  for i in range(0,ROI.shape[0]):
    for j in range(0, ROI.shape[1]):
      if mask[i,j] > 0:
        ROI[i,j] = polarImg_Inv[i,j]
  cv2.imshow('result', img)
  cv2.waitKey(0)
好消息!
小白学视觉知识星球
开始面向外开放啦
下载1:OpenCV-Contrib扩展模块中文版教程

在「小白学视觉」公众号后台回复:扩展模块中文教程,即可下载全网第一份OpenCV扩展模块教程中文版,涵盖扩展模块安装、SFM算法、立体视觉、目标跟踪、生物视觉、超分辨率处理等二十多章内容。


下载2:Python视觉实战项目52讲
在「小白学视觉」公众号后台回复:Python视觉实战项目,即可下载包括图像分割、口罩检测、车道线检测、车辆计数、添加眼线、车牌识别、字符识别、情绪检测、文本内容提取、面部识别等31个视觉实战项目,助力快速学校计算机视觉。


下载3:OpenCV实战项目20讲
在「小白学视觉」公众号后台回复:OpenCV实战项目20讲,即可下载含有20个基于OpenCV实现20个实战项目,实现OpenCV学习进阶。


交流群

欢迎加入公众号读者群一起和同行交流,目前有SLAM、三维视觉、传感器、自动驾驶、计算摄影、检测、分割、识别、医学影像、GAN、算法竞赛等微信群(以后会逐渐细分),请扫描下面微信号加群,备注:”昵称+学校/公司+研究方向“,例如:”张三 + 上海交大 + 视觉SLAM“。请按照格式备注,否则不予通过。添加成功后会根据研究方向邀请进入相关微信群。请勿在群内发送广告,否则会请出群,谢谢理解~


